Wednesday 30 September 2020

Mercia 798AD - The battle of Wudiandum continued

At the end of the last post things the West Saxon centre was finally in action, their right was potentially in trouble as the Mercian command facing them was getting it's act together and the left was starting over the river to come to grips with the Mercian right wing.  As far as I can tell (I haven't started to play the rest of the game as I write this introduction) the key to this battle is the fight in front of Wudiandum village.  If this goes against the men of Wessex the flank of their main command will be open.  Although they have a few troops in reserve in a second line in the centre the time needed to get them into a new line to cover this risk may not be granted them.  The fight over on their left is almost a separate battle as even if they should win over there it would be a big ask for those troops to re-enforce the centre because of terrain restrictions.  No pressure then!

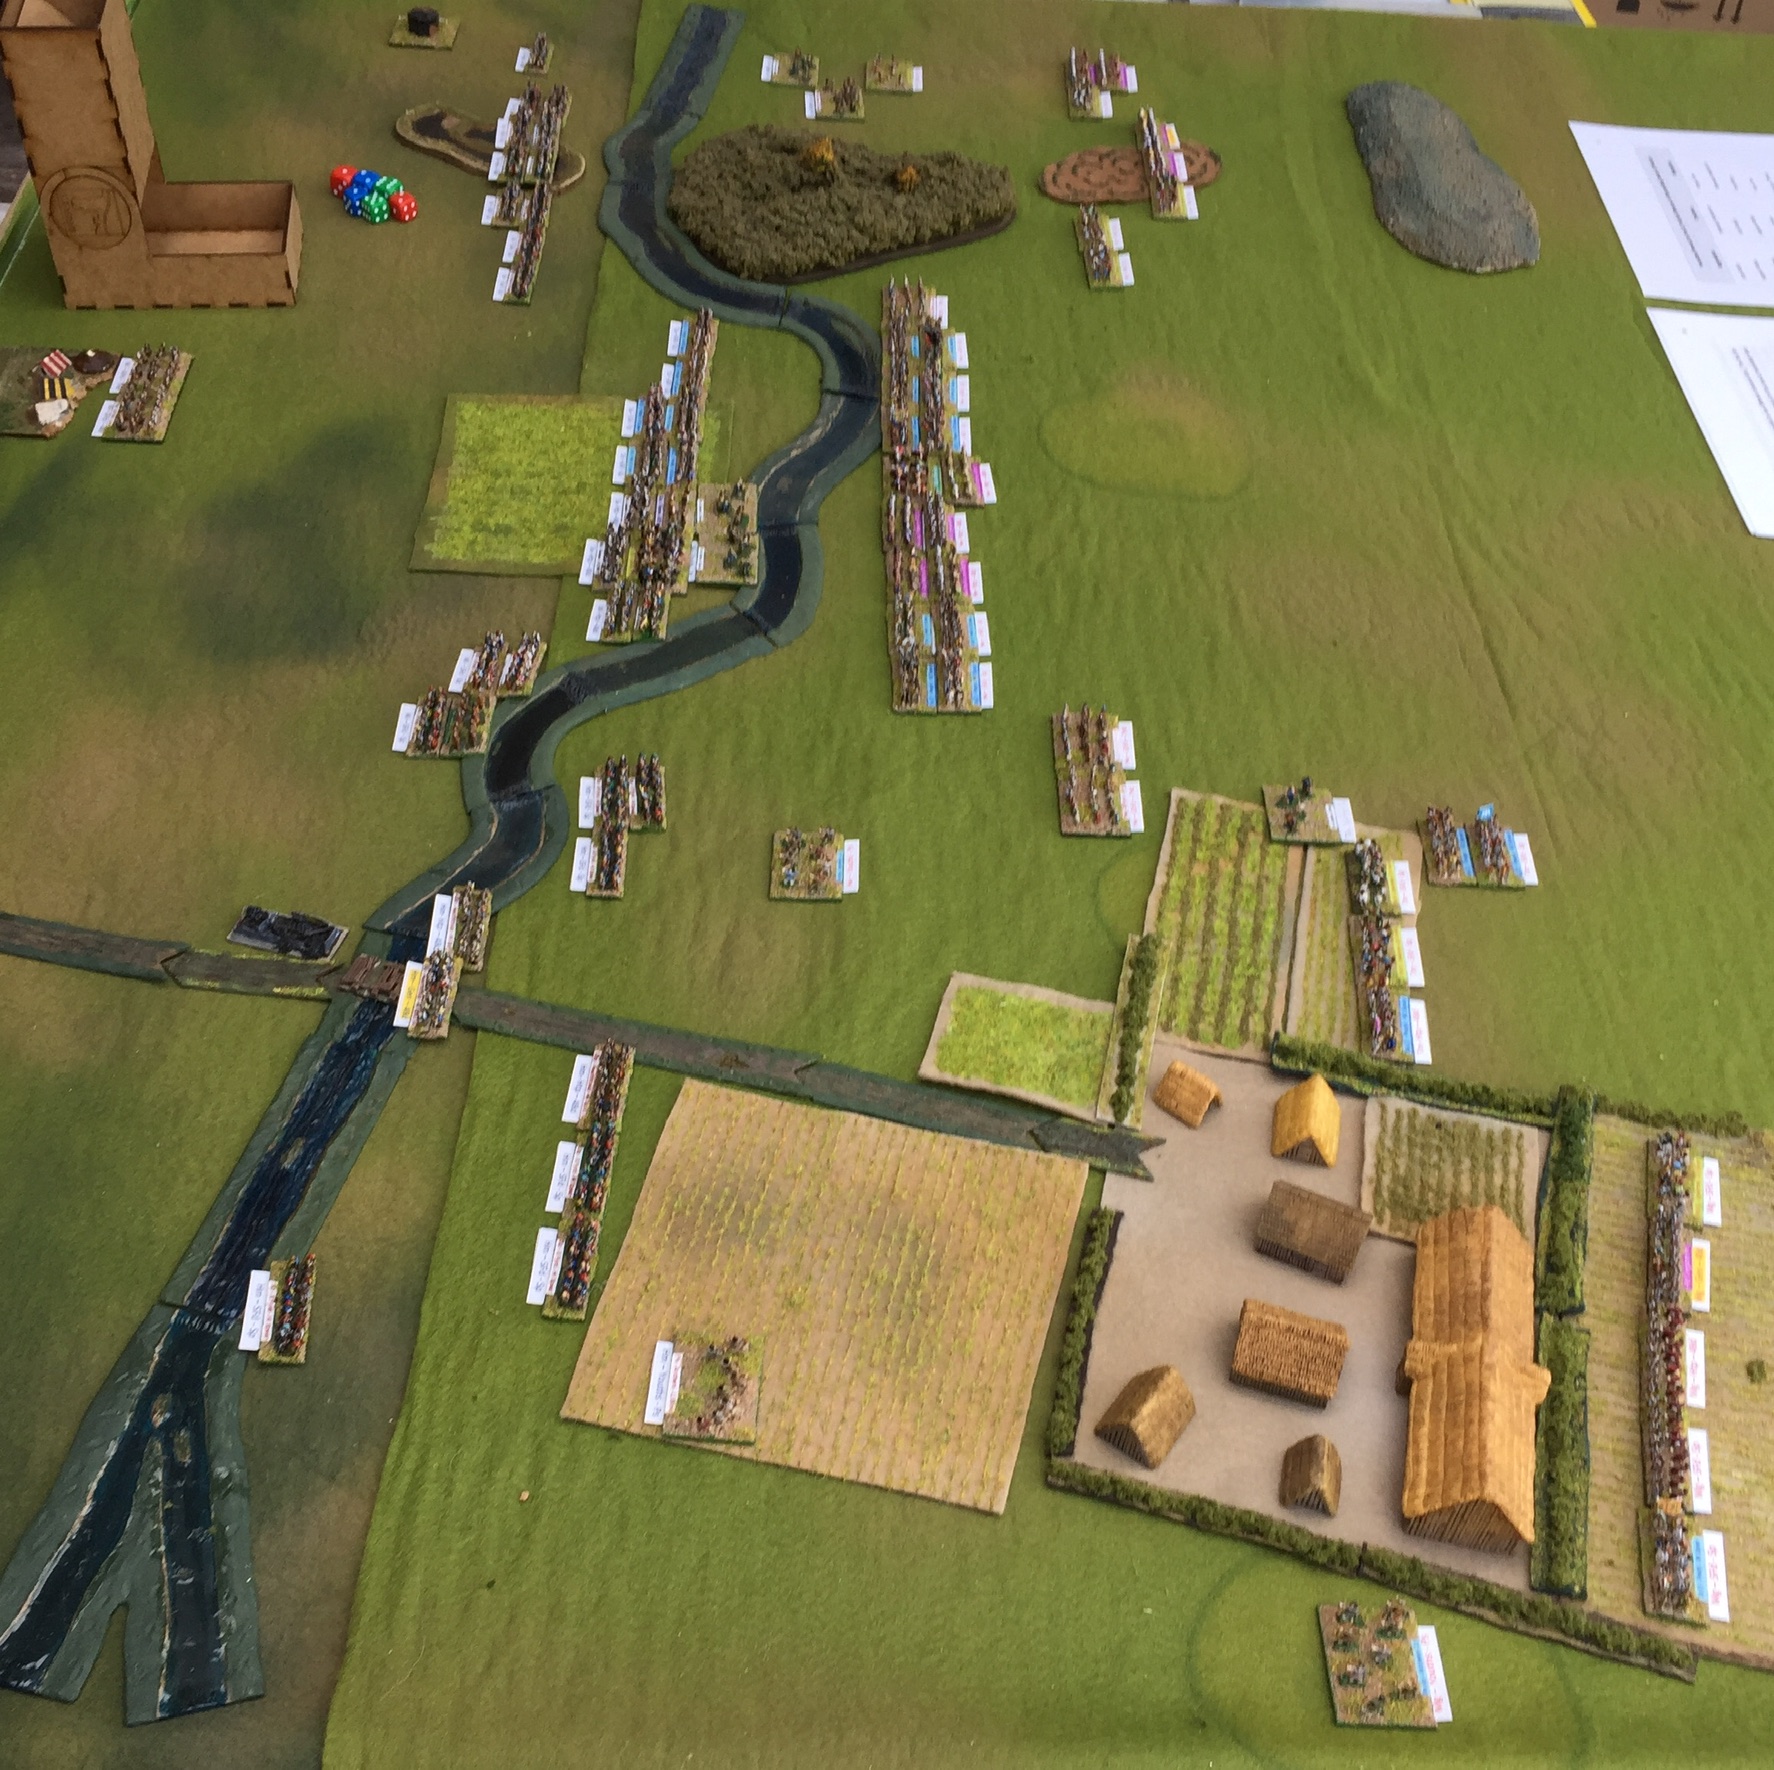
Its the start of the third hour of this battle (in game time).  The Mercian shield wall pushes back in the centre but make little headway.  They are slowly and methodically setting up a shield wall on their left and have rushed what troops they can towards the river bank on their right.  It would help if they could roll well just once.  The West Saxon reply is to keep the meat grinder going in the centre and to push more troops across the river on their left.  On their right where they really need to disengage they roll 1 pip!  It's not just the Mercians the dice have it in for.  The only good news for the hard pressed West Saxon right is that the Mercians just can't get a decisive attack in to push the command over the edge, all they achieve is a series of recoil results which helps the West Saxons by opening up some space between the lines. 

1. Fighting on the river bank as the Wessex Left command attempts to cross

The next few turns see the West Saxon left slowly chip away at the Mercian command facing them.   The Mercians are hampered by inconsistent dice rolls, whenever they have the chance to be aggressive the pip dice is against them.  As a result they are forced to give up the defence of the river bank allowing the West Saxons to gain a toe hold.

2.  It's soon more than a toe hold, but the Mercian defenders look to be ready for the onslaught

Once the West Saxons are over both sides face off against each other but the Mercians are soon on the back foot.  How are things over on the other flank?

 
3. On the Mercian left things look better, for the Mercians!

With a couple of good dice rolls in succession the Mercian left wing recovers from it's earlier confusion and continues to advance.  The West Saxons seem to have the same problem the Mercians have on the other flank.  They are slowly pushed back but the Mercians just can't seem to get their act together and fight as well as they manoeuvre.

4. The king glances towards his threatened right flank

The centre is getting messy with recoils on both sides fragmenting the shield wall.  The Mercian's manage another kill here but its anything but decided as yet.

5. The central commands pushing and heaving

The West Saxon right proves remarkably resilient and despite being one element loss away from demoralisation hangs on in the face of repeated Mercian attacks.  All the Mercians can do is create recoils.  This goes on for another four turns until they manage to hard flank an isolated Wessex spear element.  This tips the West Saxon command over the edge.  Now they are demoralised and all the Saxon Sub General can use his pips for is to hold elements in place. Where he doesn't have the pips to hold elements in place they flee towards the rear base edge each turn.  Even then he gets decent pips and manages to fight a reasonable withdrawal action.

6.  See that gap between the two units facing each other?  There were West Saxons there a moment ago!

The fight in the centre continues to be a mess.  The threat zones prevent any serious reorganisation of the front lines and overall the West Saxons are getting the better of things.  This continues until the Mercian centre is one element away from demoralisation with the West Saxons nowhere near that state.  Both sides are throwing their reserves forward but the Mercians are trying to fill holes in the line while the West Saxon's are hunting for overlaps.  The two Kings are both in the thick of things now and in danger of getting isolated.  They tend to have the better of combats because of the plus one for a general in combat and as they are blades they pursue while any spear elements around them don't.

As the Mercian left continues to push the demoralised West Saxon command facing it slowly backwards options for detaching elements to go to the aid of the beleaguered centre start to present themselves.  However on the other wing a disaster is unfolding.

7. The Mercian right: a lone element of spears is in deep trouble attacked frontally and in flank

Over the last few turns the Mercian right has taken steady casualties until it is only one element away from collapse.  The West Saxons exploit the gaps created by defensive tactics and low pips and pounce on an isolated element of spears. Unbelievably the dice off is a draw on the first round and it is in the following Mercian combat round that it is killed.  The command is now the second to become demoralised.  The next two turns are inconclusive the centre has no decisive fights but gaps are opening up and the Mercian left is slowly hooking around onto the exposed flank of the West Saxon's centre. 

8. The Mercians teeing up the flank attack against the centre

It takes a while for the Mercian left to move into position against the open flank of right flank of the West Saxon Centre.  Part of the command is shadowing the fleeing West Saxons (aka not enough pips to bring them over to join the preparations for the attack).  In the centre of his command I imagine that King Beohtric is having a Wellington at Waterloo moment "Give me Bearruc Scir or give me dark" kind of thing. and the day is dragging to a close after close to 4 hours fighting but dark is still a ways off.  However over on the West Saxon left the men of Bearruc Scir and Dorseate have finally broken the Mercian command facing them and a racing through the woodland to the aid of the central command.

The Mercian assault goes in, but trouble is brewing at the other side of the field

Things are now very close the Mercian left made up of the Fyrds of the Wrocensaetan and Hendrica slam into the open flank of King Beohtric's centre In the first moments of the attack aa west saxonlight infantry element is destroyed and the end of the line is forced to recoil.  It is only the fragmented nature of the line that prevents major casualties as there are no units to the rear of the recoiling troops for them to break against.  In the West Saxon turn the dice are kind to their left wing but less so to the centre command where a paltry one is rolled.  I use this to pull the King's element back thinking he may be needed to help bolster up the right flank.  Both central commands are at breaking point one element away from becoming demoralised and ending the game.

The next turn starts with the Mercians continuing the assault on the West Saxon centre but the central command is handed a defensive tactical stance and the best they can do repair their line the left is aggressive but has only one pip and can't make any significant contact with the enemy.  King Beohtric breathes a sigh of relief.  There is one final roll of the dice now for the West Saxons, literally so in fact!  Another high roll for the left allows the men of Bearruc Scir to crash into the Mercian centre.  They lose an element but the second attack kills a Mercian spear and then to add insult to injury the central command kills the Heathtroop of Ealderman Aethelmund of the Hwicce.  Dicing for the command casualty shows that the Ealderman died with his men.  This ends the West Saxon turn and the game.  It was a close run thing the Mercians could have, should have won it the turn before if the dice had been kinder.  The final casualty count was 10-11 in favour of the West Saxons.  A pyrrhic victory that badly weakens both kingdoms for the rest of the campaign turn. 

The end of the affair but both sides have suffered heavy casualties
 

This was the biggest game I have yet fought using DBA and I found that the BBDBA rules have a few wrinkles which need to be ironed out.  The demoralisation rule is one of them.  I like the concept, in fact I like it a lot, but is assumes that the commands will always be 12 elements, or more accurately, that they will be exactly divisible by three.  At least I assume that to be the case as the rule is that a command becomes demoralised once a third of it's units have been lost.  The rules have no mechanism for coping with commands not divisible by three, nothing to say round up or down for example.

So I have introduced a house rule.  Divide the number of elements by three and if it is not a whole number round down to reach the trigger loss number.  However the demoralisation trigger point is 'once that number is exceeded' not once it is reached.  So a command of 14 elements divided by three gives a demoralisation trigger of 4.66.  Round that down to a value of 4.  So that has to be exceeded so hitting a loss of 4 elements equals it but doesn't exceed.  Hitting 5 does exceed the trigger point (and for completeness sake also exceeds 4.66) so that's sorted then.  I also think that the standard DBA rule of Hordes not counting as a loss and perhaps extending that to light infantry as well.

I also decided after the battle that demoralised troops should take a minus one to combat dice if they ever end up having to fight in close combat.  I don't think I will extend that the troops who can shoot though, although that won't be a problem in this campaign as there are no archers or artillery to worry about.

The other issues is that the maximum size an army is set as three times the size of a standard DBA army.  For BBDBA historical refights the rule is use the actual number of troops converted to elements.  This means some really large commands can be created.  In the current game the two opposing central commands are both 19 elements in size.  I ignored my previous rule of capping command sizes but I think this was a mistake and will reintroduce it in any future large scale actions.

All that said I do rather like the BBDBA version of DBA3.0  it feels more like a historical battle, not that I have ever been in one to know for sure!

Oh and I almost forgot: the mandatory chronicle entry.

798AD Mercian chronicle

And in this year did Beohtric of Wessex basely break from his allegiance with his sworn lord Coenwulf and come in arms to Mercia.  There he did ravage the land of the Hwicce until at length he was met by the King and all his host in battle.  There was slain Ealderman Aethelmund of the Hwicce and a multitude of others with him as well and the West Saxons had possession of the field.


Thursday 24 September 2020

Dark Ages Campaign - 798AD Battle of Wudiandum

So to battle.  As previously posted I have the men of Wessex with the Mercians being run by the solo play rules.  I have decided that each command will have its own pip dice to reflect the poor command and control of the period so co-ordination between commands will be more difficult.  I’m also going to move the centre commands first for each side as they are the ones commanded by the two respective kings.


1. The initial deployments, Mercians furthest away

Both sides deployed with a strong centre and weaker flank commands.  The AI placed its troops to the front and centre of the deployment box, but it wasn't possible to fit them all in so I over ruled it and mirrored the West Saxons while staying as far forwards as possible.  It looks  neat, but trust me that's not going to last.  The Mercian pre-battle dice rolls gave their right command a defensive stance and the other two commands received neutral stances.  This impacts on the tactical choices of each command by pulling the dice result towards that overall stance each game turn.  It is still possible for a defensive command to take aggressive action but it is less likely.  The Mercians will move first each turn which may or not be of benefit.

The first couple of turns see both sides pushing forwards.  The west Saxons are the first to have their formation come apart as the rush to get across the river before it turns into a contested crossing.  The river turns out to difficult to cross.  This means that only single elements or columns of elements can cross for each pip expended, movement is slowed and defenders gain an advantage against troops crossing.

2. West Saxon start crossing the Coln

The first to start crossing are the troops on the right of Wessex's line.  The light infantry are not slowed but the shield wall's tight formation breaks up and the close order infantry are slowed.  In the centre the line is moving up towards the river in a race to get there before the Mercian's can line the far bank and contest the crossing.  Middle Anglo-Saxon's may not be the most tactically clever armies but even they know a disputed river crossing is not a good thing!

3.  The crossing continues on the West Saxon right.

The crossing on the West Saxon right is unopposed as the Mercian command facing them is in disarray!  They rolled aggressive but couldn't easily follow the instruction and became tangled up in the approaches to the village.  Their line fragmented into a number of small groups.  In the centre the Mercians are also rushing forward towards the river having rolled an aggressive stance and decent pips.  On the far side of the table West Saxon light troops are over the river and fronting up to their Mercian opposite numbers. On that flank the Mercian command is slowed while they are traversing woodland.  


4. The view from the Mercian right wing.

By the next turn the Mercians have reached the river with their central command but are unsure about what to do (a low pip score limited their options).  Light Infantry are exchanging arrows and insults on the right and the Mercian left is in a real mess.  The nice neat line has broken up around the village and with instructions to take aggressive action they are throwing small groups of men forward to attempt to come to spear thrust and sword stroke with the enemy before they can reorganise their shield wall after the river crossing.  As a result they close as fast as possible but as the line attempts to move around the left of the village the formation ends in total confusion.  This is one of the points with the solo rules, orders from the AI can result in odd decisions and if the dice swing back and forth between aggression and defence it can result in this kind of chaos.  Players have the right to ignore results three times under the rules but I'm not using these yet in case I need them later.  Probably a mistake to be honest, after all how much worse could a situation get than this?


5. A closer view of the Mercian left wing, it's chaos over there

Its one of the interesting things about solo games the AI mechanics create situations and as a player I like to create a narrative to make sense of it, it also gives me a story for the AAR here on the blog.  

In the next turn the Mercian centre is following a second aggressive stance but on limited pips the entire command simply surges forwards and starts to cross the river, only for them to get a defensive stance and limited pips the next turn.  So they retreat to form a defensive line on the river bank.  I rationalise this as a rush of blood and a desire to come to grips with the invaders followed by the nasty shock when the water is cold and realising that there's a solid looking shield wall over on the other bank, so maybe we should stay this side and defend the river bank instead!  Something similar happens on the Mercian left a defensive stance roll and maximum pips allows form defensive line to be an option and the fragmented line starts to reform.  Possibly older more experienced heads have prevailed over there.

There has also been the first few clashes light infantry facing off over on the Mercian right saw a psiloi doubled by their West Saxon opponents and killed with the same thing happening on the other wing but with a West Saxon psiloi destroyed to even the score at one element lost each.  Else where West Saxon Light Infantry are recoiling and fleeing from the Mercian shield walls.

The two armies have been facing each other for over an hour in game time now with no significant fighting yet.  As you can see below the Mercian left wing is regaining some kind of cohesion and their West Saxon opponents are over the river but disorganised.

6. The Mercian left starts to reorganise while their opponents are still struggling to reform their line

This would be a good turn to get good aggression scores and high pips.  Which is probably a good point to show how I'm handling the AI dice.  I roll red for the left (port in nautical terms), green for the right (so that would be starboard) and blue is the central command.  The relevance of the nautical terms is that boats and planes show red lights to port and green to starboard so the colour s help me remember which dice goes to which command.  The larger dice give me the aggression (before adjustments) and the small ones the pips.  These need to be thrown together as the pip score adjusts the aggression score low pip reduces aggression high pips increase it.

8. The Mercian dice, red for port, green for starboard,  blue you can guess.

So having said this would be a good time to roll lots of sixes what we get is the above!  Its about typical for the Mercian dice so far.  The left and centre are feeling like attacking but don't have many options other than go straight in while the right has decent pips but is feeling a touch nervous.  Hey ho (or what ever the Mercian equivalent is) you do what you can with what the dice provide.  Its enough to start a moving into the village on the left and consolidating in the centre.


9. The Mercian left more organised but still tangled up in the village

Now the West Saxons take the bull by the horns and with a decent pip score their central command storms over the river and slams into the Mercian shield wall.  The Mercians are pushed back with recoils but only one casualty.  The flank commands continue to slowly advance and the first troops from the left hand command cross over the Coln to the Mercian held bank.  This is getting to look like a fight now.

10. Wudiandum still in Mercian hands

The Mercians still hold the village, mainly because the West Saxons have been slow to move against it, but there is a fight coming.  The fighting in the centre is hanging in the balance both Kings have been fighting alongside their household warriors.  So far with no risk to either of them.  The shield walls a pushing and shoving but there have been few casualties as yet.

11. The aftermath of the attack in the centre both Kings in the thick of it.

Which is where I am leaving it for this post.  I will finish the game and post the last part of the AAR in a day or two.

Monday 21 September 2020

The Dark Ages Campaign - Mercia 798AD pre-battle set up

The real situation between Wessex and Mercia in 798AD was that in the post Offa period it was not a foregone conclusion that the Mercian hegemony was going to fall apart.  The Danes were not yet a major risk and the new Mercian King Coenwulf saw his job as re-asserting Mercian rights and privileges over their sub kingdoms to the South and east.  It seems that Mercian policy was to control all the English kingdoms South of the Humber and Mersey and to keep Northumbria weak.  Seen in that light their actions in the first few years after Offa's death make perfect sense.  In the real late 8th/early 9th century it was Mercia which acted as the aggressor against Wessex, East Anglia, Essex and Kent.  This was generally successful in that Kent, East Anglia and Essex seem to have fallen back into client state relationships , certainly they stopped issuing their own currencies and a Mercian was placed onto the Kentish throne.  In our real timeline the Ealdorman of the Hwicce fought and lost a battle against the Fyrd of the Wiltsaetan not a million miles away from our fictional clash.  Other than that there seems to have been a political settlement between Mercia and Wessex partially cemented by dynastic intermarriages, Beorhtric may even have been a Mercian appointed and supported king.

Which brings us nicely back to the campaign action in our alternative timeline. The clash is at a ford on the River Coln close by the small village of Wudiandum which is centred around a small monastery.  The Mercians are being run by the DBA solo rules with a few amendments made on the fly to cover the larger nature of this action.  The dice have determined that the Mercians shall deploy as far forwards as possible and with their three divisions as near to the centre of their deployment area as possible while still holding to a single battle line.  Their tactical choice is a neutral one for the centre and their right with the left being more defensive.  This will impact on the turn by turn options as the game is played out.  

The Mercian line up has their left held by Wrocensaetan and Hendrica with 9 elements.  The Centre is held by the Hwicce with 19 Elements and the right by the Maegonsaetan and Tomsaetan with 12 elements.  King Coenwulf is in the centre of the Hwiccan line with his Hearth Troop.

The Mercian Host

Facing them across the Coln are, in the centre, King Beorhtric and his Hearth Troop along with the men of Wilsaetan and Sumersaetan adding a further 19 elements to his command.  To his left are the men of Bearruc Scir and Dorsaete with 13 elements and to his left the men of Hamptonscir with 10 elements.

The West Saxon line of battle

The West Saxon line of battle above shows the labels I had to add so I can track losses by province.  The sharp eyed will note that I am having to use proxies as I just don't have enough Anglo-Saxon spears.  Even if Baccus had been able to stay open throughout the coronavirus epidemic I doubt I would have had the required numbers to hand as I wasn't expecting such a large action so early in the campaign!

This has the makings of a slugfest as there is little scope for tactical subtlety with these armies and neither side has a significant advantage in either troop numbers or types.  The numbers mean neither side will be easy to crack and there is little scope for turning flanks

The day dawned clear and it was midmorning when the two sides sighted each other.  There was a short exchange that almost counted as negotiation, almost but not quite.  Mercia demanded Wessex returned to its previous fealty claiming it had agreed to acknowledge Mercian over lordship.  Wessex countered by stating that agreement was personal to Offa and died with him and as the new ruler of Mercia had no link to the house of Offa they felt no need to submit. The Mercians called the West Saxons rogues and plunderers come to loot what they thought to be defenceless lands, the West Saxons looked disdainful and pointed out that the Mercians were only a little better than the Welsh they lived so close to and should know all about theft and plunder and that was the end of any attempt at a peaceful settlement.  God shall have to decide the right now!.

Sunday 20 September 2020

Random Thoughts #9 - Tee totally and totally tea

 It has been a funny old year and it doesn't show any intention of changing.  Who knew that a health crisis would develop so rapidly and have such wide ranging impacts.  My main outdoor hobby historical re-enacting simply hasn't happened this season and because I have an underlying health problem I haven't been into the office since late February either.  As a result my social interactions have been limited, to put it mildly.  No wargaming shows, no Monday Night Gaming (on a Tuesday), no friends around to the house, no going away for re-enactment weekends and worst of all (or possibly best of all) no booze.  I'm not a big drinker (for a given value of big) it's not like I'm down the pub every night, or even most nights, but I do like a social pint when there is an event to go to, like a gig or a folk night and I do like to go to the beer tent on Sealed Knot weekends to catch up with old friends.  However part of the underlying health problem means I was prescribed new medication and I positively, definitely cannot consume alcohol while on this stuff!

Here's the really weird thing though I haven't missed the demon drink.  I tried some of the alcohol free alternatives and although some are actually very good indeed (I'm looking at you Heineken 0% Lager), but it turns out that I'd rather have a cup of tea.  It seems that I don't miss the booze so much as the company that goes with having a few drinks.  

At the start of lockdown I started to put weight on, like many others, but with the lack of alcohol and going on a low carb diet (which is made easier without the sugar content of Rum n Coke) I have in the last two weeks regained my pre lockdown weight.  All I have to do next is get rid of the rest of what I had put on over the last decade, which turns out to be rather more than I like to admit (cough...two stones...cough).  It would be easier if I was allowed to go to the gym (really, I'm not lying) or do vigorous exercise (I'm really not meant to) so I just have to rely on will power to get the pounds off.  But at least I don't have to worry about post pub munchies anymore.  It turns out that sugar is more addictive than booze!

Hello My Name is Elenderil and I'm a chocoholic!

Meanwhile back in the Dark Ages - Mercia 798AD

Its been a while since I last returned to the Dark Ages campaign. It's the downside of a solo campaign, my opponent tends not to pester me if I side-line things for a while!  In case you had forgotten the last post was >here<.  Wessex was feeling feisty and the Witan approved a plan to to test Mercian resolve by attacking Hwicce, a Mercian province across the Thames from Wilsaetan.  King Beorhtric considered that Mercia would be in flux following the death of Offa and that they would struggle to gather a large force to defend against his incursion.  He was wrong.  A few miles beyond the Thames he finds himself facing a significant Mercian army commanded by this years Mercian King Coenwulf (they tend to change quite rapidly post Offa, I blame the Danes).  This is a significant moment  as its the first time two Kings have faced each other across the battlefield in this campaign.  Both have brought a significant amount pf their manpower to bear and a serious defeat here will have a significant effect on troop numbers along the Thames Valley and for the Mercians the Welsh Borders for the next few years.

The forces are will be drawn up on the new "Acme Table Topper of Tactical Ineptitude" (TM pending) aka my new wargames table in 4 x 4 configuration.  The game is being played on a larger than normal area as the armies are BBDBA sized and "I have a table and I'm gonna use it" mode has been engaged.  The layout was experimental and didn't use the DBA terrain rules as I wanted the table’s first run out to look pretty!  The fields are just cosmetic and have no terrain effect the only 'true' terrain consists of a village, two hills (one gentle and one steep), the river, two woods and an area of boggy ground.  The village buildings are all from 2D6 miniatures and everything else is scratch built.

The Battlefield

Wessex has brought the men of Wilsaetan, Bearruc Scir, Hamptun Scir, Dorsaete and Sumersaetan almost their entire strength is here.  Facing them are men from Hwicce, Maegonsaetan, Tomsaetan, Wrocensaetan and Hendrica.  Which may make more sense if you check out the campaign master map at  https://elenderilsblog.blogspot.com/2020/05/the-dark-ages-campaign-some-background.html 

I will be using the Solo DBA amendments to run the Mercians, so tonight's job is to determine their deployment and tactical stance.  The West Saxons are already deployed in three bodies which is done before seeing the AI controlled force so as not to gain any unfair advantage.  I'm calling the other side the  AI but it is all done on dice and charts although it's not impossible that the dice may well be tactically smarter than I am.

More in a short while.

Monday 7 September 2020

Making a wargames board part 3 Snagging and finishing.

I got side tracked from finishing the board off last week and only got back to it this weekend just gone.  I drilled the frames through on the long edges and bolted them together to ensure everything lined up and fitted snugly together.  This is one of those jobs where measure twice cut (or in this case drill) once is very much the thing.  It would have been easier if I had remembered to place all of the screws which hold the frame to the MDF table top the same distances apart.  What saved me was that I used 50mm deep battens and 20 mm long screws so that even allowing for 5mm as the depth of the counter sinks into the table top the screws only reach 25mm down into the batten.  That meant that I still had 25mm of the frame to drill into.  Live and learn as they say.

Framing all done.  Centre line battens are to help stabilise the end sections if they hang over the end of the banquet table a bit. 


Bolts help the sections butt up tight but mainly are there to stop sections moving apart in use.

I have bought 6mm diameter bolts with 50mm length.  So I drilled 8mm holes to give a bit of leeway. but I didn't really have any problems as the holes all lined up and the sections bolted together fine.  I do have some snags to deal with.  One section doesn't butt up as closely as I want.  This is either the batten not set square to the top so the bottom of the batten is leant outwards a little or the drill hole having to be tidied up a bit, but either way the application of a wood plane will sort the issue.

Some of the filler I used to hide the screw heads has shrunk and I need to add a second layer but that is a simple job to do before I apply the second coat of the green paint to the table top and paint the edging strip.  One more weekend's work should be sufficient to see it all done.  The only outstanding question is should I leave the table top the single shade of green or try to break it up a little?  I'm open to ideas here.

I haven't got it to the point of  gaming on it yet but while I was trying out the 6' x 4' combination I did deploy some 2mm ACW figures.  This was to give me a visual on the Altar of Freedom First Manassas scenario comment on this being a very large table for the small number of troops deployed, but it recreates the issues of command and control on the day.  I set up all the forces in the game's order of battle for First Manassas and it is clear that there is a lot of ground for them to cover.  Next step on that particular project will be to make the specific terrain called for to replicate the main features on the battlefield.  Some of my existing terrain can be used but there are some items I don't have or don't have enough of for the scenario.

You can see how lost the troops for 1st Manassas are on a 6 x 4 table

At the moment I have some Brigade models ACW small scale scenery buildings on the painting table.  These are slightly smaller than the figures and still wildly larger than ground scale but they work well enough in use.  I'm making some additional river sections especially for the scenario, first up are the numerous fords that allow crossings of Bull Run, then some additional hills.  More on those in coming posts.

Tuesday 1 September 2020

Random Thoughts #8 - Anticipation isn't what I hoped it would be


These are the best hot cross buns for Easter - according to experts -  CoventryLive
The offending article, or should that be tempting?
Mrs E has been the sole shopper during the coronavirus lockdown period as I have tried to avoid contact with the general populace.  She is of the opinion that this is due not so much caused by social distancing as by anti-social tendencies!  So, not having been within the mystic portals of our local Tesco supermarket for some month's you can imagine my surprise when she brought home hot cross buns, in August!

Now I'm not complaining about being the recipient of nice toasted hot cross bun at all, I like a hot cross bun in it's season. Having them available all year round did make me wonder about the nature of anticipation though.  Once upon a time a hot cross bun was a seasonal delicacy available and enjoyed in the month or so before Easter and then gone for the rest of the year.  There was a delicious anticipation in knowing that the season of cinnamony and fruited goodness was about to dawn.  That is now denied to us but were they the better for being a limited availability treat or is a year around taste of springtime a welcome bonus and anticipation can go hang?

Anticipation or no, I will be eating these all year around, just don't get me started on adding chocolate chips in place of the fruit.  Biting into one those abominations when expecting fruit and spice and getting what is a sort of second rate chocolate brioche really does ruin the anticipation!