Showing posts with label 2D6. Show all posts

Tuesday, 17 May 2022

Ammunition supply - further thoughts

 My post covering a possible rule to cover the risk of a unit running low and subsequently then running out of ammunition sparked a healthy debate on the TMP boards.  Much more than I expected.  The responses split into two groups.  Those who felt that unit commanders should know what the ammo supply state was and control the engagement accordingly and those who felt that at some point going up the chain of command that ability to read the minutiae of a battle was lost.  It was partly split on time periods too with those who game in mechanised periods less keen on the suggested rule as they considered that commanders should never be surprised by running out of ammo.


The debate focussed on the view that where an army has a firm understanding of it's supply position pre battle then the risk of going ammunition depleted should or could be managed and reflected in the way the battle is fought.  There was also a feeling that resupply was so well organised that using up ammunition should be an extreme case.  One responder seemed to think that a very detailed rule would be required and that the overhead wasn't worth while.  He even wondered about the available statistical evidence and how well my rule reflected those details.  My problem is that while I can give statistics on the rate of use of ammunition for the British Civil Wars based on re-enacting experience and that I do know that resupply of filled bandoliers was carried out in some cases, the rest of the data isn't (or at least isn't easily) available.  So I can't point to a battle where ammunition ran out or had to be resupplied but can find evidence where the move to close combat happened because powder and shot was in short supply.  

The one thing I can be sure about is that a musketeer's initial load of powder and shot was commonly between 14 - 18 premeasured shots and that  an initial rate of fire of two shots a minute was easily attainable although as muskets fouled this would slow down due to the difficulty of ramming home the musket ball.  Even with slower firing  either from firing by single ranks or files or due to fouled muskets one shot a minute should be achievable.  At those rates it is entirely possible for a block of musketeers to use all of the powder and shot they carried on their persons in around 30 minutes (or three turns in my rules).  For an army to keep a steady rate of fire up either units had to be rotated to the front or powder and shot resupplied.  Even with the typically short time in action during BCW fights I think it is it is a constraint worth modelling.  

Under the proposed rule the chance of a unit becoming low on ammo is 15/216 or just over 2% .  Subsequently the chance of running out is also 15/216 so pretty long odds of going out of ammunition before resupply is arranged.  For steady fire (introduction, extraduction and the like) I upped the requirement to rolling 3 sixes on the 3D6 firing roll to drop to low and then out of ammo status, which is 1/216 or under 0.5%.  So if a unit is low on ammo they can change firing tactics to conserve powder.  That works for me.

While I do like to stay close to statistical norms for my rules where the data isn't available the best I can do is create a rule to require decisions to be made about things where the real commanders had to make those decisions.  In this case about resource allocation and rate of use.  The key point being that we are dealing with human issues such as how fast is a unit burning through it's powder as well as some abstract ones such as quality of gun powder.  For example, what if going out of ammo replicates successful resupply from local resources but the resupply powder is damp or adulterated or unavailable so a unit which expected to be able to continue a fire fight cannot do so? (Isandlwana anyone?)


I reread the original post and came to the conclusion that my suggested rule works best for pre mechanised armies where the player is sitting at army commander level rather than at battalia or brigade level.   Once we get to periods where logistics are being well managed and rates of depletion of ammunition are known, then I'm happy to accept that those armies can be assumed to be dealing with the problem without player input.  For lower level combats at platoon level or lower then maybe some rule is needed as I recall that one of the main tasks of an infantryman was to manage their ammunition and it was rare to use rapid fire for a sustained period.  I'd want to cover that in a different way.

Your thoughts may, of course, vary!

Wednesday, 30 September 2020

Mercia 798AD - The battle of Wudiandum continued

At the end of the last post things the West Saxon centre was finally in action, their right was potentially in trouble as the Mercian command facing them was getting it's act together and the left was starting over the river to come to grips with the Mercian right wing.  As far as I can tell (I haven't started to play the rest of the game as I write this introduction) the key to this battle is the fight in front of Wudiandum village.  If this goes against the men of Wessex the flank of their main command will be open.  Although they have a few troops in reserve in a second line in the centre the time needed to get them into a new line to cover this risk may not be granted them.  The fight over on their left is almost a separate battle as even if they should win over there it would be a big ask for those troops to re-enforce the centre because of terrain restrictions.  No pressure then!

Its the start of the third hour of this battle (in game time).  The Mercian shield wall pushes back in the centre but make little headway.  They are slowly and methodically setting up a shield wall on their left and have rushed what troops they can towards the river bank on their right.  It would help if they could roll well just once.  The West Saxon reply is to keep the meat grinder going in the centre and to push more troops across the river on their left.  On their right where they really need to disengage they roll 1 pip!  It's not just the Mercians the dice have it in for.  The only good news for the hard pressed West Saxon right is that the Mercians just can't get a decisive attack in to push the command over the edge, all they achieve is a series of recoil results which helps the West Saxons by opening up some space between the lines. 

1. Fighting on the river bank as the Wessex Left command attempts to cross

The next few turns see the West Saxon left slowly chip away at the Mercian command facing them.   The Mercians are hampered by inconsistent dice rolls, whenever they have the chance to be aggressive the pip dice is against them.  As a result they are forced to give up the defence of the river bank allowing the West Saxons to gain a toe hold.
2.  It's soon more than a toe hold, but the Mercian defenders look to be ready for the onslaught

Once the West Saxons are over both sides face off against each other but the Mercians are soon on the back foot.  How are things over on the other flank?

 
3. On the Mercian left things look better, for the Mercians!

With a couple of good dice rolls in succession the Mercian left wing recovers from it's earlier confusion and continues to advance.  The West Saxons seem to have the same problem the Mercians have on the other flank.  They are slowly pushed back but the Mercians just can't seem to get their act together and fight as well as they manoeuvre.

4. The king glances towards his threatened right flank

The centre is getting messy with recoils on both sides fragmenting the shield wall.  The Mercian's manage another kill here but its anything but decided as yet.

5. The central commands pushing and heaving

The West Saxon right proves remarkably resilient and despite being one element loss away from demoralisation hangs on in the face of repeated Mercian attacks.  All the Mercians can do is create recoils.  This goes on for another four turns until they manage to hard flank an isolated Wessex spear element.  This tips the West Saxon command over the edge.  Now they are demoralised and all the Saxon Sub General can use his pips for is to hold elements in place. Where he doesn't have the pips to hold elements in place they flee towards the rear base edge each turn.  Even then he gets decent pips and manages to fight a reasonable withdrawal action.

6.  See that gap between the two units facing each other?  There were West Saxons there a moment ago!

The fight in the centre continues to be a mess.  The threat zones prevent any serious reorganisation of the front lines and overall the West Saxons are getting the better of things.  This continues until the Mercian centre is one element away from demoralisation with the West Saxons nowhere near that state.  Both sides are throwing their reserves forward but the Mercians are trying to fill holes in the line while the West Saxon's are hunting for overlaps.  The two Kings are both in the thick of things now and in danger of getting isolated.  They tend to have the better of combats because of the plus one for a general in combat and as they are blades they pursue while any spear elements around them don't.

As the Mercian left continues to push the demoralised West Saxon command facing it slowly backwards options for detaching elements to go to the aid of the beleaguered centre start to present themselves.  However on the other wing a disaster is unfolding.

7. The Mercian right: a lone element of spears is in deep trouble attacked frontally and in flank

Over the last few turns the Mercian right has taken steady casualties until it is only one element away from collapse.  The West Saxons exploit the gaps created by defensive tactics and low pips and pounce on an isolated element of spears. Unbelievably the dice off is a draw on the first round and it is in the following Mercian combat round that it is killed.  The command is now the second to become demoralised.  The next two turns are inconclusive the centre has no decisive fights but gaps are opening up and the Mercian left is slowly hooking around onto the exposed flank of the West Saxon's centre. 

8. The Mercians teeing up the flank attack against the centre

It takes a while for the Mercian left to move into position against the open flank of right flank of the West Saxon Centre.  Part of the command is shadowing the fleeing West Saxons (aka not enough pips to bring them over to join the preparations for the attack).  In the centre of his command I imagine that King Beohtric is having a Wellington at Waterloo moment "Give me Bearruc Scir or give me dark" kind of thing. and the day is dragging to a close after close to 4 hours fighting but dark is still a ways off.  However over on the West Saxon left the men of Bearruc Scir and Dorseate have finally broken the Mercian command facing them and a racing through the woodland to the aid of the central command.

The Mercian assault goes in, but trouble is brewing at the other side of the field

Things are now very close the Mercian left made up of the Fyrds of the Wrocensaetan and Hendrica slam into the open flank of King Beohtric's centre In the first moments of the attack aa west saxonlight infantry element is destroyed and the end of the line is forced to recoil.  It is only the fragmented nature of the line that prevents major casualties as there are no units to the rear of the recoiling troops for them to break against.  In the West Saxon turn the dice are kind to their left wing but less so to the centre command where a paltry one is rolled.  I use this to pull the King's element back thinking he may be needed to help bolster up the right flank.  Both central commands are at breaking point one element away from becoming demoralised and ending the game.

The next turn starts with the Mercians continuing the assault on the West Saxon centre but the central command is handed a defensive tactical stance and the best they can do repair their line the left is aggressive but has only one pip and can't make any significant contact with the enemy.  King Beohtric breathes a sigh of relief.  There is one final roll of the dice now for the West Saxons, literally so in fact!  Another high roll for the left allows the men of Bearruc Scir to crash into the Mercian centre.  They lose an element but the second attack kills a Mercian spear and then to add insult to injury the central command kills the Heathtroop of Ealderman Aethelmund of the Hwicce.  Dicing for the command casualty shows that the Ealderman died with his men.  This ends the West Saxon turn and the game.  It was a close run thing the Mercians could have, should have won it the turn before if the dice had been kinder.  The final casualty count was 10-11 in favour of the West Saxons.  A pyrrhic victory that badly weakens both kingdoms for the rest of the campaign turn. 

The end of the affair but both sides have suffered heavy casualties
 

This was the biggest game I have yet fought using DBA and I found that the BBDBA rules have a few wrinkles which need to be ironed out.  The demoralisation rule is one of them.  I like the concept, in fact I like it a lot, but is assumes that the commands will always be 12 elements, or more accurately, that they will be exactly divisible by three.  At least I assume that to be the case as the rule is that a command becomes demoralised once a third of it's units have been lost.  The rules have no mechanism for coping with commands not divisible by three, nothing to say round up or down for example.

So I have introduced a house rule.  Divide the number of elements by three and if it is not a whole number round down to reach the trigger loss number.  However the demoralisation trigger point is 'once that number is exceeded' not once it is reached.  So a command of 14 elements divided by three gives a demoralisation trigger of 4.66.  Round that down to a value of 4.  So that has to be exceeded so hitting a loss of 4 elements equals it but doesn't exceed.  Hitting 5 does exceed the trigger point (and for completeness sake also exceeds 4.66) so that's sorted then.  I also think that the standard DBA rule of Hordes not counting as a loss and perhaps extending that to light infantry as well.

I also decided after the battle that demoralised troops should take a minus one to combat dice if they ever end up having to fight in close combat.  I don't think I will extend that the troops who can shoot though, although that won't be a problem in this campaign as there are no archers or artillery to worry about.

The other issues is that the maximum size an army is set as three times the size of a standard DBA army.  For BBDBA historical refights the rule is use the actual number of troops converted to elements.  This means some really large commands can be created.  In the current game the two opposing central commands are both 19 elements in size.  I ignored my previous rule of capping command sizes but I think this was a mistake and will reintroduce it in any future large scale actions.

All that said I do rather like the BBDBA version of DBA3.0  it feels more like a historical battle, not that I have ever been in one to know for sure!

Oh and I almost forgot: the mandatory chronicle entry.

798AD Mercian chronicle

And in this year did Beohtric of Wessex basely break from his allegiance with his sworn lord Coenwulf and come in arms to Mercia.  There he did ravage the land of the Hwicce until at length he was met by the King and all his host in battle.  There was slain Ealderman Aethelmund of the Hwicce and a multitude of others with him as well and the West Saxons had possession of the field.


Thursday, 24 September 2020

Dark Ages Campaign - 798AD Battle of Wudiandum

So to battle.  As previously posted I have the men of Wessex with the Mercians being run by the solo play rules.  I have decided that each command will have its own pip dice to reflect the poor command and control of the period so co-ordination between commands will be more difficult.  I’m also going to move the centre commands first for each side as they are the ones commanded by the two respective kings.


1. The initial deployments, Mercians furthest away

Both sides deployed with a strong centre and weaker flank commands.  The AI placed its troops to the front and centre of the deployment box, but it wasn't possible to fit them all in so I over ruled it and mirrored the West Saxons while staying as far forwards as possible.  It looks  neat, but trust me that's not going to last.  The Mercian pre-battle dice rolls gave their right command a defensive stance and the other two commands received neutral stances.  This impacts on the tactical choices of each command by pulling the dice result towards that overall stance each game turn.  It is still possible for a defensive command to take aggressive action but it is less likely.  The Mercians will move first each turn which may or not be of benefit.

The first couple of turns see both sides pushing forwards.  The west Saxons are the first to have their formation come apart as the rush to get across the river before it turns into a contested crossing.  The river turns out to difficult to cross.  This means that only single elements or columns of elements can cross for each pip expended, movement is slowed and defenders gain an advantage against troops crossing.

2. West Saxon start crossing the Coln

The first to start crossing are the troops on the right of Wessex's line.  The light infantry are not slowed but the shield wall's tight formation breaks up and the close order infantry are slowed.  In the centre the line is moving up towards the river in a race to get there before the Mercian's can line the far bank and contest the crossing.  Middle Anglo-Saxon's may not be the most tactically clever armies but even they know a disputed river crossing is not a good thing!

3.  The crossing continues on the West Saxon right.

The crossing on the West Saxon right is unopposed as the Mercian command facing them is in disarray!  They rolled aggressive but couldn't easily follow the instruction and became tangled up in the approaches to the village.  Their line fragmented into a number of small groups.  In the centre the Mercians are also rushing forward towards the river having rolled an aggressive stance and decent pips.  On the far side of the table West Saxon light troops are over the river and fronting up to their Mercian opposite numbers. On that flank the Mercian command is slowed while they are traversing woodland.  


4. The view from the Mercian right wing.

By the next turn the Mercians have reached the river with their central command but are unsure about what to do (a low pip score limited their options).  Light Infantry are exchanging arrows and insults on the right and the Mercian left is in a real mess.  The nice neat line has broken up around the village and with instructions to take aggressive action they are throwing small groups of men forward to attempt to come to spear thrust and sword stroke with the enemy before they can reorganise their shield wall after the river crossing.  As a result they close as fast as possible but as the line attempts to move around the left of the village the formation ends in total confusion.  This is one of the points with the solo rules, orders from the AI can result in odd decisions and if the dice swing back and forth between aggression and defence it can result in this kind of chaos.  Players have the right to ignore results three times under the rules but I'm not using these yet in case I need them later.  Probably a mistake to be honest, after all how much worse could a situation get than this?


5. A closer view of the Mercian left wing, it's chaos over there

Its one of the interesting things about solo games the AI mechanics create situations and as a player I like to create a narrative to make sense of it, it also gives me a story for the AAR here on the blog.  

In the next turn the Mercian centre is following a second aggressive stance but on limited pips the entire command simply surges forwards and starts to cross the river, only for them to get a defensive stance and limited pips the next turn.  So they retreat to form a defensive line on the river bank.  I rationalise this as a rush of blood and a desire to come to grips with the invaders followed by the nasty shock when the water is cold and realising that there's a solid looking shield wall over on the other bank, so maybe we should stay this side and defend the river bank instead!  Something similar happens on the Mercian left a defensive stance roll and maximum pips allows form defensive line to be an option and the fragmented line starts to reform.  Possibly older more experienced heads have prevailed over there.

There has also been the first few clashes light infantry facing off over on the Mercian right saw a psiloi doubled by their West Saxon opponents and killed with the same thing happening on the other wing but with a West Saxon psiloi destroyed to even the score at one element lost each.  Else where West Saxon Light Infantry are recoiling and fleeing from the Mercian shield walls.

The two armies have been facing each other for over an hour in game time now with no significant fighting yet.  As you can see below the Mercian left wing is regaining some kind of cohesion and their West Saxon opponents are over the river but disorganised.

6. The Mercian left starts to reorganise while their opponents are still struggling to reform their line

This would be a good turn to get good aggression scores and high pips.  Which is probably a good point to show how I'm handling the AI dice.  I roll red for the left (port in nautical terms), green for the right (so that would be starboard) and blue is the central command.  The relevance of the nautical terms is that boats and planes show red lights to port and green to starboard so the colour s help me remember which dice goes to which command.  The larger dice give me the aggression (before adjustments) and the small ones the pips.  These need to be thrown together as the pip score adjusts the aggression score low pip reduces aggression high pips increase it.

8. The Mercian dice, red for port, green for starboard,  blue you can guess.

So having said this would be a good time to roll lots of sixes what we get is the above!  Its about typical for the Mercian dice so far.  The left and centre are feeling like attacking but don't have many options other than go straight in while the right has decent pips but is feeling a touch nervous.  Hey ho (or what ever the Mercian equivalent is) you do what you can with what the dice provide.  Its enough to start a moving into the village on the left and consolidating in the centre.


9. The Mercian left more organised but still tangled up in the village

Now the West Saxons take the bull by the horns and with a decent pip score their central command storms over the river and slams into the Mercian shield wall.  The Mercians are pushed back with recoils but only one casualty.  The flank commands continue to slowly advance and the first troops from the left hand command cross over the Coln to the Mercian held bank.  This is getting to look like a fight now.

10. Wudiandum still in Mercian hands

The Mercians still hold the village, mainly because the West Saxons have been slow to move against it, but there is a fight coming.  The fighting in the centre is hanging in the balance both Kings have been fighting alongside their household warriors.  So far with no risk to either of them.  The shield walls a pushing and shoving but there have been few casualties as yet.

11. The aftermath of the attack in the centre both Kings in the thick of it.

Which is where I am leaving it for this post.  I will finish the game and post the last part of the AAR in a day or two.

Sunday, 20 September 2020

Meanwhile back in the Dark Ages - Mercia 798AD

Its been a while since I last returned to the Dark Ages campaign. It's the downside of a solo campaign, my opponent tends not to pester me if I side-line things for a while!  In case you had forgotten the last post was >here<.  Wessex was feeling feisty and the Witan approved a plan to to test Mercian resolve by attacking Hwicce, a Mercian province across the Thames from Wilsaetan.  King Beorhtric considered that Mercia would be in flux following the death of Offa and that they would struggle to gather a large force to defend against his incursion.  He was wrong.  A few miles beyond the Thames he finds himself facing a significant Mercian army commanded by this years Mercian King Coenwulf (they tend to change quite rapidly post Offa, I blame the Danes).  This is a significant moment  as its the first time two Kings have faced each other across the battlefield in this campaign.  Both have brought a significant amount pf their manpower to bear and a serious defeat here will have a significant effect on troop numbers along the Thames Valley and for the Mercians the Welsh Borders for the next few years.

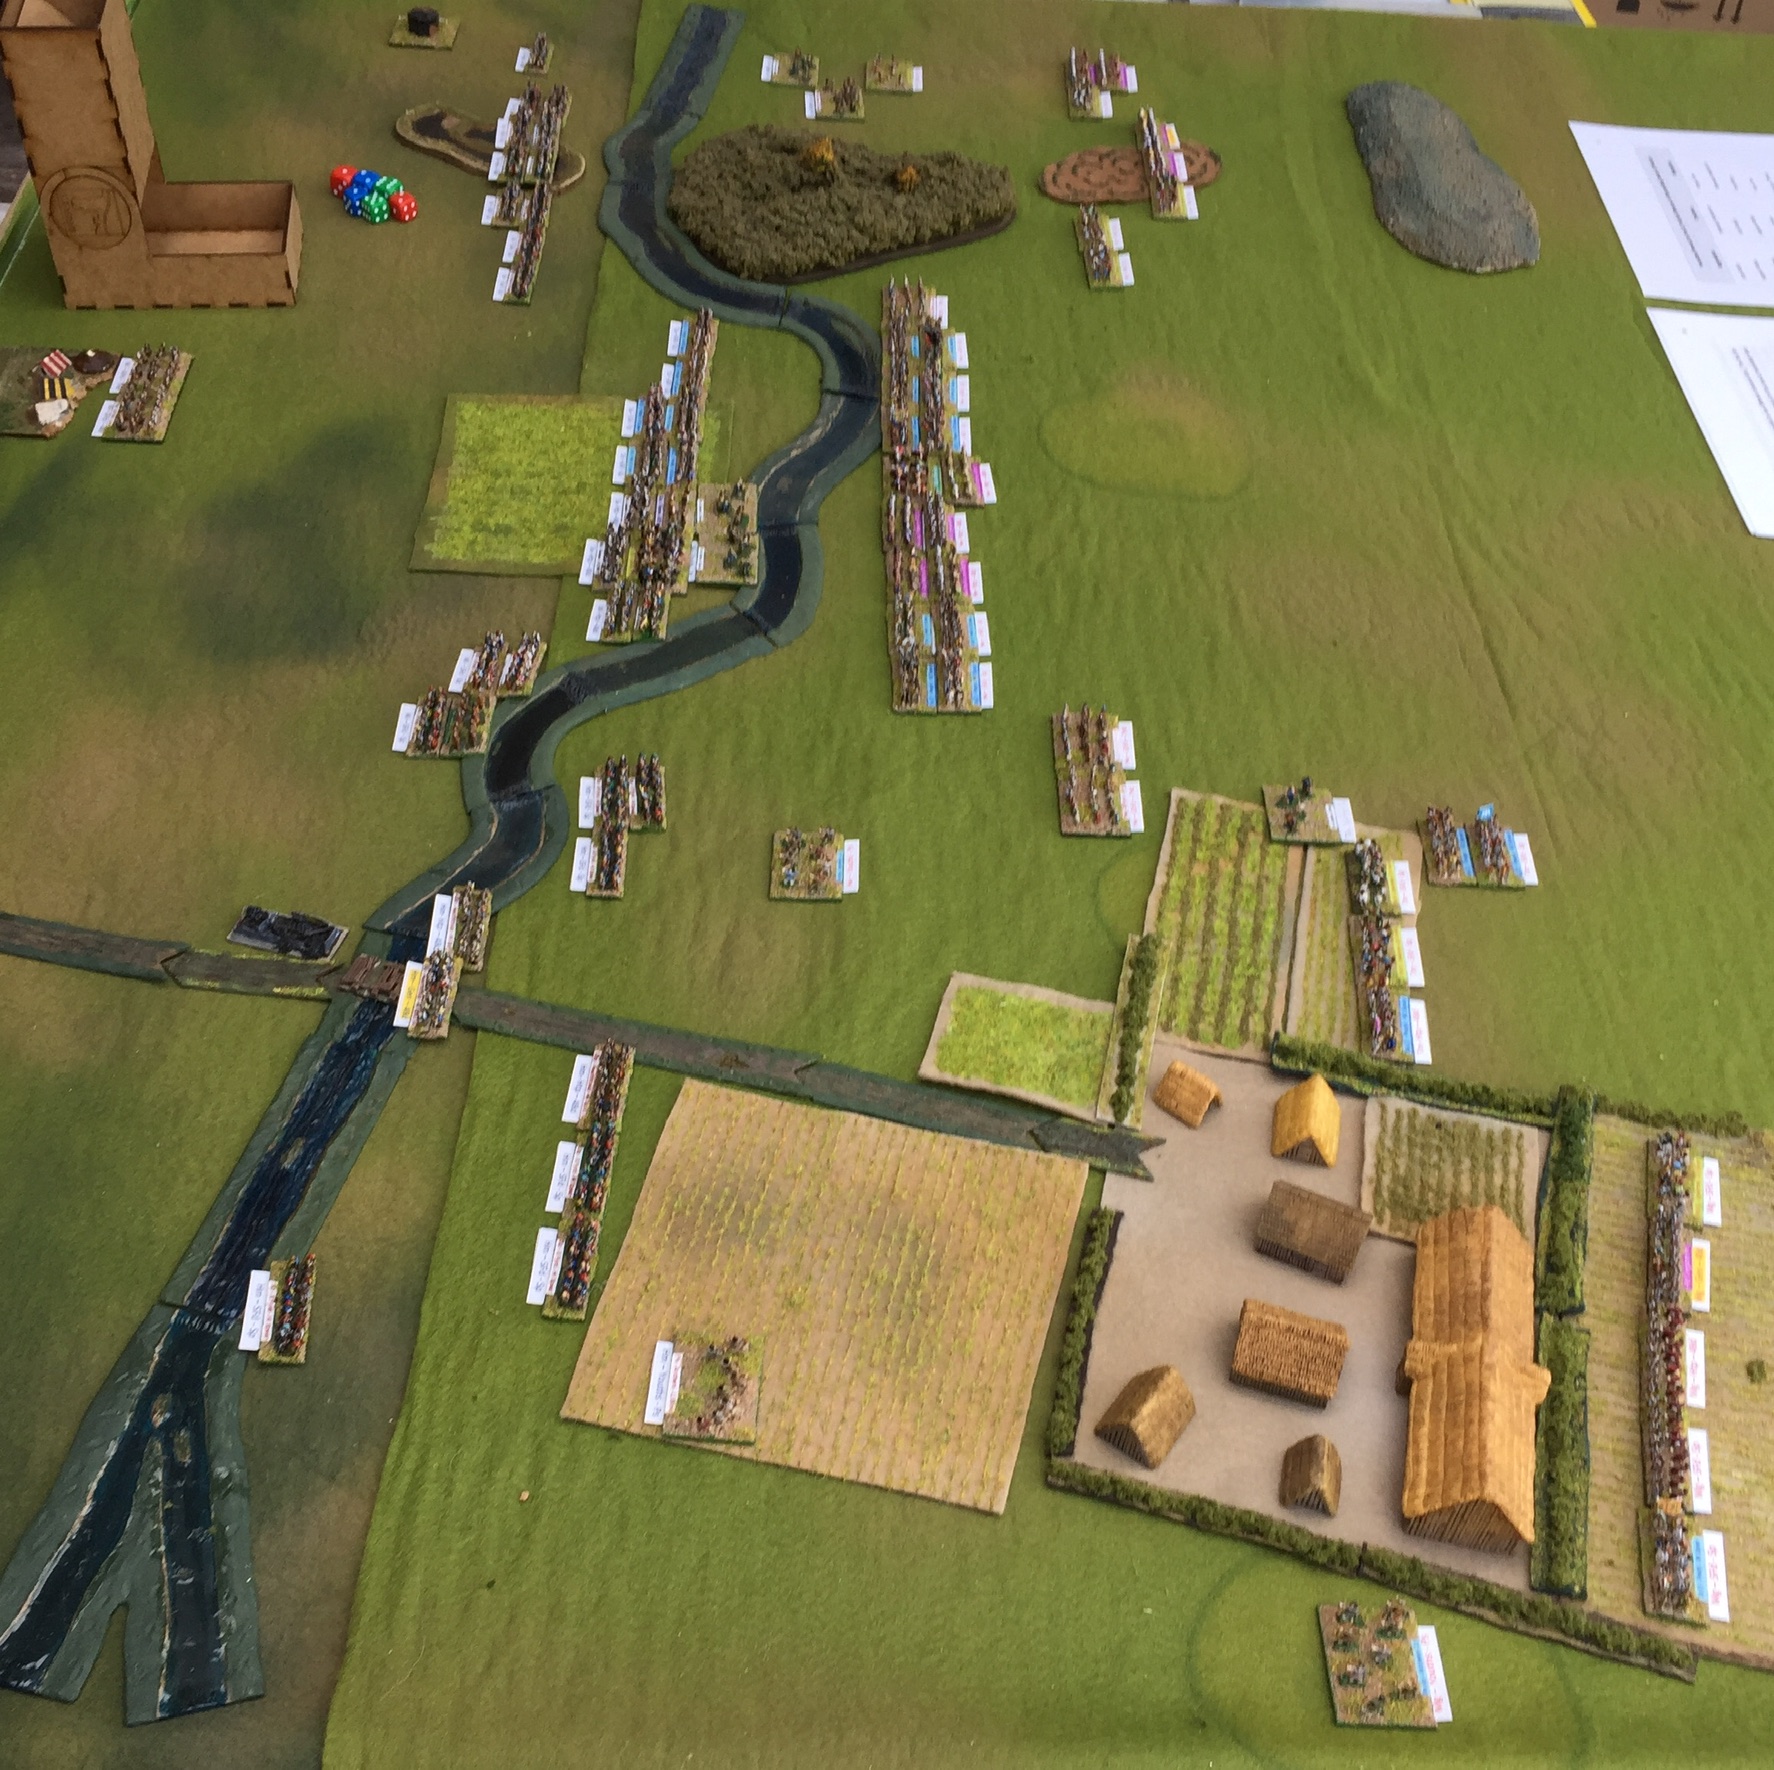
The forces are will be drawn up on the new "Acme Table Topper of Tactical Ineptitude" (TM pending) aka my new wargames table in 4 x 4 configuration.  The game is being played on a larger than normal area as the armies are BBDBA sized and "I have a table and I'm gonna use it" mode has been engaged.  The layout was experimental and didn't use the DBA terrain rules as I wanted the table’s first run out to look pretty!  The fields are just cosmetic and have no terrain effect the only 'true' terrain consists of a village, two hills (one gentle and one steep), the river, two woods and an area of boggy ground.  The village buildings are all from 2D6 miniatures and everything else is scratch built.

The Battlefield

Wessex has brought the men of Wilsaetan, Bearruc Scir, Hamptun Scir, Dorsaete and Sumersaetan almost their entire strength is here.  Facing them are men from Hwicce, Maegonsaetan, Tomsaetan, Wrocensaetan and Hendrica.  Which may make more sense if you check out the campaign master map at  https://elenderilsblog.blogspot.com/2020/05/the-dark-ages-campaign-some-background.html 

I will be using the Solo DBA amendments to run the Mercians, so tonight's job is to determine their deployment and tactical stance.  The West Saxons are already deployed in three bodies which is done before seeing the AI controlled force so as not to gain any unfair advantage.  I'm calling the other side the  AI but it is all done on dice and charts although it's not impossible that the dice may well be tactically smarter than I am.

More in a short while.

Thursday, 5 December 2019

First sight - 2D6 Anglo Saxon buildings

Robert Fellows of 2D6 Wargames has very recently released a new range of 6mm Anglo-Saxon resin buildings.  So of course I ordered a set.  Using his online shopping cart was extremely easy (far too easy according to Mrs E) and as with most internet shopping sites I could pay with a bank or credit card via paypal without having a paypal account.  The order came through within a couple of days and I received email updates to show how the shipping process was going throughout.  Packaging was good and I'd be surprised if normal handling in the postal system would be able to damage anything.  Excellent customer service throughout.

The castings themselves are in a fairly dense resin similar to that used by Leven Miniatures for their buildings, so they should be robust enough to withstand tabletop wear and tear.  The resin in my order was a pure white and my first thought was that they probably wouldn't need an undercoat, especially as there little or no trace of any mold release agent.  There were no bubbles in the castings and only one tiny bit of tissue thin flash where resin had over topped the mold and that came straight off without damaging the casting.

The detail is crisp and the buildings are well modelled with good proportions.  Over all they are ever so slightly larger than Leven but not as big as Timecast in size. The doors are the right height for 6mm so these are simply models of larger buildings.  The range currently consists of one large and small pit house, two cottages one thatched and one with a wooden shingled roof and a huge great hall model.  The latter is probably twice the length of the Leven offering. I'd say a Royal Hall as much as a great hall.  The differences in size are fine though as it will simply add some variety to my tabletop settlements.


2D6 (unpainted) and Leven Great Halls

from left to right; Timecasr, 2D6 and Leven cottages
Of course me being me I couldn't wait to slap some paint on at least one of the 2D6 models.  I chose the small pithouse, after all its small so wouldn't take too long to do.  I didn't undercoat it although I did wash it in hot soapy water first.  It seems to have worked OK although time will tell if the paint is going to rub off.  I used a very basic technique a straw yellow base on the thatch and a light green-brown for the timber.  I slapped (er I mean lovingly and carefully brushed) a coat of GW Agrax Earthshade over the whole model.  Lastly I applied a heavily thinned pale grey over the highpoints of the woodwork to simulate weathering.  I think that worked quite well and will do it again.  The entire paint job took under 30 minutes including letting coats dry.  The detail in the castings really helped there.  Its going to be no time at all before I have  good sized Anglo-Saxon town ready for the tabletop.


Front elevation of the painted pit house plenty of details to be seen


And the rear is just as well sculpted

The completed pit house, the grid is centimetre squares
I will be painting the rest of the order over the next couple of days and will post more images once I have done so.

To sum up; I'm very impressed, especially as these are 2D6's first foray into 6mm model buildings.  I'd say we have a significant new player in the resin scenics market which can only be a good thing.  I'm looking forward to seeing what comes next from Robert.


Monday, 2 December 2019

A change of pace

After a couple of weeks where I have been painting Viking Age figues I wanted a bit of a change.  I had some Leven 6mm buildings I had bought last year which for various reasons had either not made it to the painting table or hadn't been finished so I turned to these for a bit of light relief.  Or so I thought, I quickly realised that I had forgotten what techniques I had decided on using to paint buildings and my system for 6mm figures doesn't translate to buildings.  The problem is that they have large areas of flat, often textureless, space and making sure to get a good even cover is difficult.  This easier for the buildings cast in the cream resin than it is for those cast in the grey resin but in both cases I am coming to the conclusion that an undercoat is vital.

I have a mixture of Timecast and Leven buildings.  I prefer the Leven stuff myself but the Timecast Anglo Saxon buildings are still top notch castings and I have no hesitation in mixing the two together, I just prefer the proportions of the Leven ones.

Leven Norman Chapel with the large Anglo Saxon Cottage and the Great Hall behind 


Over the last couple of days I have tidied up the Anglo Saxon Great Hall and started on the two Anglo Saxon Cottages.  Those were fairly simple paint jobs as they are wattle and daub with a thatched roof which don't provide that many options for colour schemes, darker thatch for older roofs white wash v natural cow dung and straw coloured walls and you are about there!  However, lurking at the back of the queue was a Norman Chapel with stone walls and a slate tiled roof.  There are a couple of examples of this style of church locally so I have a decent handle on the colours for the materials but getting them right on the model was another thing entirely!  The variance in tone from block to block of the sandstone is really causing me some heartache as I just can't get it to look right.  It probably doesn't help that I studied Geology in my youth and I know that a rock isn't just a rock.  Sandstone colours vary based on the individual grains of sediment which up the rock, those in turn vary based upon the rocks that were eroded to create the sand that is the basis of the sandstone.  Sandy Limestones look different to Gritstones and so it goes.  I'm two far into the red sandstone end of the spectrum which is fine if i'm recreating Buildings that use Old Red Sandstone or New Red Sandstone but isn't right for south and central England where the stone is a more, well, sandy coloured.  I agonised over that paint scheme until I realised that no matter how hard I try my painting will never rival the detail nature puts into real building stone and probably nobody will care anyway.

I have just order some of 2D6's new Anglo Saxon buildings which should arrive in a few days time so once those arrive I will provide a review of this new manufacturer's products.  The photos on the website look good and reviews of their WW2 stuff have been universally positive so I have high hopes.