Showing posts with label materials. Show all posts

Friday, 8 July 2022

Fun with cardboard - a low tech storage boost for 2mm figures

As you will have gathered I'm a fan of the Really Useful Box as a storage solution. My go to boxes are the four and nine litre capacity ones as they take two or four hobby trays respectively. The hobby trays each have fifteen spaces measuring just over 60mm by 60 mm and 30mm deep. For two millimetre figures it's that last dimension which is problematic. Well not really problematic, more overly generous. I simply don't use the entire depth of the tray to maximum benefit. For the 2mm Altar of Freedom project two nine litre boxes don't quite give me enough storage space and a lot of the space available is wasted. This vexed me as I needed more storage while at the same time I had unusable storage capacity staring me in the face!  The question was what to do about it.  As always I turned to a do it yourself solution.  I considered a few options, I dismissed cutting trays down to allow extra trays per box as too costly and probably impossible to do neatly and turned to my old stand by ...cardboard.

The thing about my homemade 2mm figures is that even with a 2mm MDF base and standards mounted on top of the matchsticks the average height of an infantry base is well under 1cm, nearer to 6mm in fact.  So there is space to double up in each compartment in a tray.  What I didn't want to do was damage the flags of the lower layer by standing a second base directly on them so I came up with a cunning plan.

The aforementioned cunning plan in the flesh

A quick bit of basic mathematics told me how many more compartments I would need to free up.  This was assuming that I could only stack infantry, artillery and cavalry bases two deep (Generals and HQ's have oversized flag poles and won't stack).  Then it was out with the scissors and Stanley knife and straight edge.  Trebian at Wargaming for Grown Ups will be proud of me I'm doing proper grown up craft stuff with sharp tools and still have all my own fingers!  The idea was to create a 60 x 60mm surface supported all round on 15mm 'legs'  (these would sit around the MDF bases of the first layer of troops)  a small hole in the centre of the 60 x 60 surface allows the mezzanine floor I'd created to be easily removed to get at the lower tier of troops.  The first one was carefully measured and test fitted before being used as a template for the rest (that's high tech talk for 'you draw around it and then cut more of the same shape out').  Four score lines later and a bit of gentle bending and hey presto.

The master copy for use as a template


The final rough shape

These work exactly as wanted and have given me a low tech, low cost storage extension solution, which pleases me immensely, especially the low cost part.  

The final item in use ...Simples!

In other news I am still testing positive for the 'Rona but the viral load must be dropping off as the line is much thinner on today's test.  Hopefully I will be clear tomorrow and can rejoin polite society (if they will have me).

Friday, 6 May 2022

Rebasing...I hate rebasing!

The Altar of Freedom rebasing is progressing on some sort of schedule.  I'm taking it as a positive as it means that I like the rules enough to upgrade from the cardboard test bases.  The laser cut MDF is so much better than my ham fisted attempts to cut marine ply into 100% accurate bases on a consistent basis (Bases ....basis there must be a tongue twister in there somewhere).  It has quickly become my new go to solution since i started basing my 6mm DBA/ADLG forces that way.  I don't have that many units to do for AoF as I only made up the OOBs for 1st Manassas/Bull Run to start with.  In the next few days I will be expanding that to create the bases needed to be able to play Gettysburg as that is the scenario which needs the most troops in the Eastern Theatre.  If I can cover that battle I'm good for anything in the two scenario books.  Time to start cutting more match sticks.

Dragging the WW2 models out has also shown up the lack lustre basing (cardboard again) I used the first time of asking.  These will need bring up to my new standard in due course although I can live with them as they are for the time being.

In other news when I finished typing this post I went to the post setting screen to add the labels only to find Blogger has forgotten what they were in previous posts.  Which is an embuggerance!

Edit - after much cursing I have managed to get Blogger to relist past labels.  I have no idea what is going on (so no change there then).

Sunday, 30 August 2020

Making a wargaming board part 2

The MDF boards have all been framed which took the warpage out a treat.  Edging has been added to provide a small lip above the table surface to  prevent things like dice getting knocked off the table.  All the edges butt up nice and tight.  So far so good.  Next comes the painting of the surface.

Although I intend to use a cloth much of the time a coat of paint does two things, firstly it seals the MDF, which if I'd thought to do in the first place would probably prevented the warping.  Secondly it provides a base colour in case a cloth doesn't cover everything or I just want to get troops on a table with the minimum of setting up fuss.  So it was off the B&Q for some green paint, but which shade of green?

Green is a tricky colour to get right.  As its the predominant colour in our natural environment our eyes have evolved to distinguish really subtle differences in green's tone and shade. I settled on a shade made by Valspar called 'Absinthe Dreams' which is one of those shades that the store mixes for customers on the spot.  It's a good match for a generic grass green.  Now comes the bad news; its paint so it is all one shade, 'cos paint's like that.  Real world ground cover isn't all one shade, cos the real world is like that and the two don't really match up.  Having a table top all one shade of green simply doesn't look right.  It needs breaking up which I suppose is why many people use flock over terrain boards.

Image result for British landscape images
Look at the variation in shades of green in this photo of Cumbria from the BBC


The problem is made worse by the helicopter general effect.  By that I mean that when we look at our game tables we are looking down as if we were hovering over the battlefield.  We see what pretends to be a large chunk of landscape from a long distance (based on the scale of the terrain) which means we expect to see variation in the vegetation, pretty much as shown above.  Now my board looks like this after one coat of paint.

I have created a board of purest green, but it's not much like the photo above is it? 
I'm going to give it a second coat and then put it up as a three section 6' x 4' board and try out the look with some scatter terrain before I start trying to break up the green.  There are still a couple of things to do.  In no particular order I need to paint the sides which I will probably do in a pale grey and I need to drill holes through the frame to allow the sections to be bolted together.  I will probably do that tomorrow.

By the way Chez Elenderil doesn't normally look as messy as it does in the above photo!  This is the scene at the end of week four of building work to convert what was originally an outside toilet and a store room into a shower room. The rooms now open into the conservatory rather than the garden and for the last month the builders have been cutting and sawing, plastering, digging up concrete floors , drilling through brick walls and other Bob the builder style stuff, all of which makes dust and mess.  And that is my excuse, honest.


Friday, 21 August 2020

Making a wargaming board

In 50 some years of gaming I have played games on the floor, on various domestic tables but only once have I had a bespoke gaming board,   It was awful and I'm not just saying that, look for yourself.!
After the contours came off - ugh that green...just ugh!
I built a set of contoured  boards to create a 3D table for Bussaco (my only serious attempt to get onto Napoleonic's)back in 2007.  I ultimately only used a part of the full four part board and I only used that the once.  As a result four 2' x 4' MDF boards have sat unused in a succession of garages and sheds for over a decade.  I stripped the polystyrene ceiling tile hills off the boards and last weekend I started work on the gaming board.  I have two 6' folding banquet tables that I bought about 5 years ago for gaming use, which will be the supporting structure for the new table.  I intend to lay the boards over these for games so all I need to do is create the table top.  The plan is for everything to pack down into a small space when not in use.  The four boards will slot together and of course folding banquet tables fold up.

Here is how I did it, and trust me If I can do this anyone can do it.  It helps to have the right tools but it doesn't require a huge amount of skill.  On the subject of tools I used an electric drill, an electric screwdriver, some clamps, a mitre saw and block and one of those trigger gun applicators for the tube of glue plus an adjustable try square and a tape measure.  So not beyond the average home toolkit I don't think.

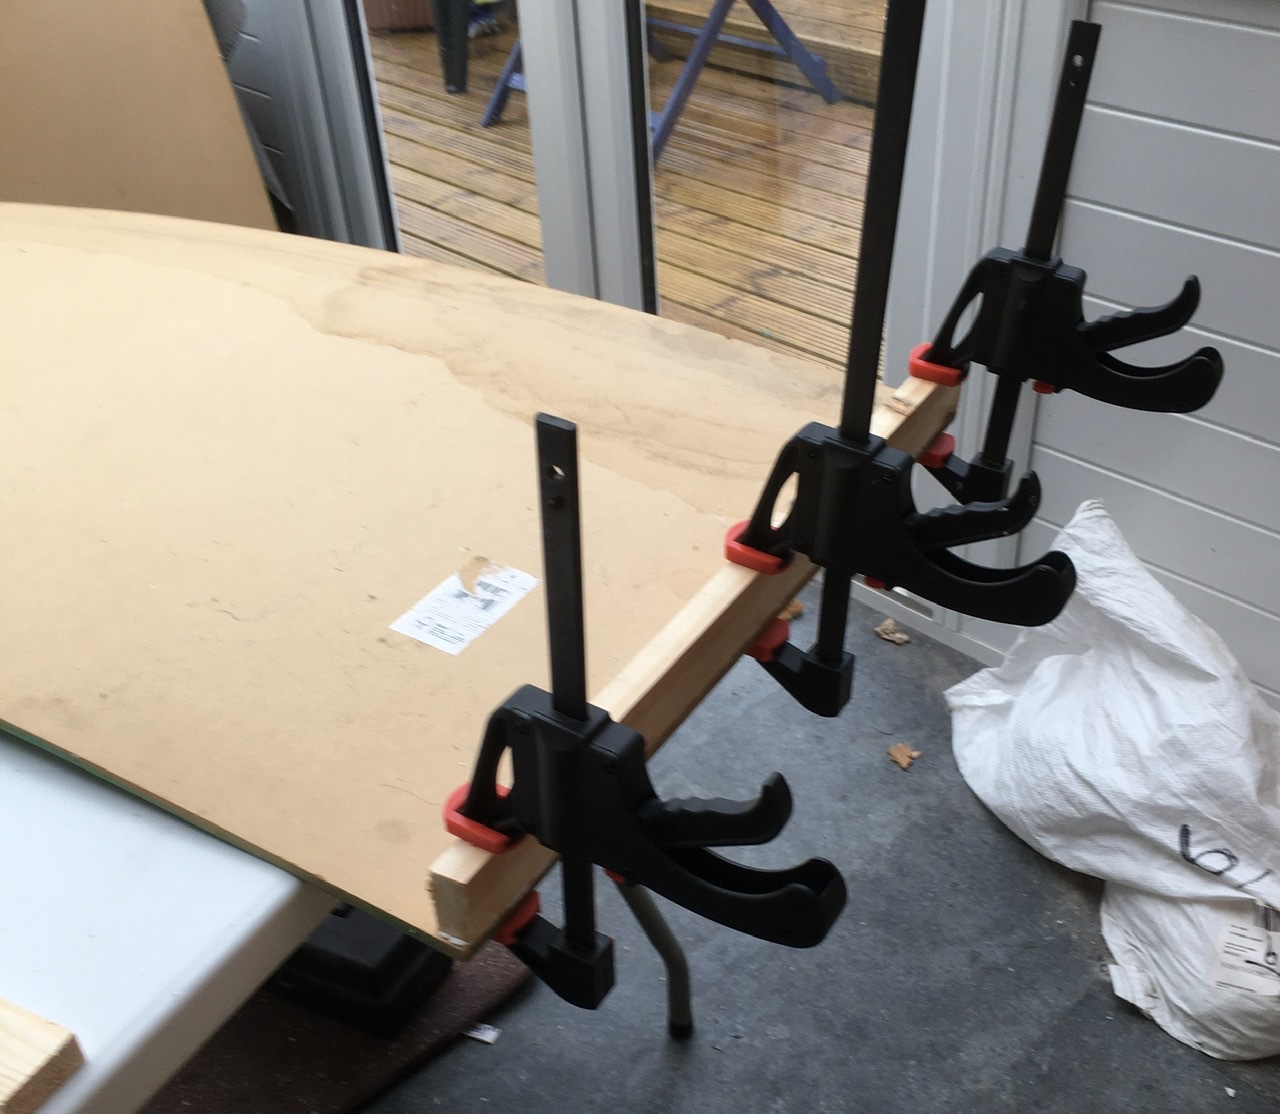
The MDF boards were pretty badly warped so I needed to use timber battens to pull them back into shape.  Fortunately I have a builder doing some work in the house at the moment and he kindly cut the battens to length with his chop saw which saved me a job.  If you want to avoid this most Do It Yourself stores will cut any  timber you are buying from them. I didn't bother mitring the joints at the corners of the boards.  Simple butt joints are fine for the frame.  I used 1" x 2" timber for this and glued the battens in place with 'No More Nails' one batten at a time.  I clamped them in place and them drilled pilot holes and screwed the battens into place (Screw and glue as us experienced woodworkers call it 😜) 

You can see the warping in this shot of a clamped batten
I remembered to countersunk the screwheads to keep them below the finished table top.  Lastly I used timber architrave to create a lip around the side of the table top.  If I use rubber mats under my drop cloth that will stop it sliding off the edge..  I have done that around three sides of the first board, I will be doing the same around the short ends of the next two and again around three sides of the last board.  That way I can alter the length of the board to create a 4' x 4' up to a 8' x 4' playing area as required.  Altar of Freedom only needs a 6' x 4' at most but as I had the extra MDF board why not go for it.

I filled the counter sinks with filler once the battens were screwed down and the glue dry
You can see how the boards butt together in the photo above.  I need to drill holes through the frames where they butt together so I can bolt the individual boards together.

Mrs E was very impressed that I was doing DIY especially as I was using grown up power tools and no trips to A&E were required.  She was less impressed that it wasn't anything she thinks of as being useful like a shelf!

Look I still have all my fingers!
I have a one litre can of a nice leaf green acrylic emulsion I got mixed for me at B&Q which I will paint the table top in.  The previous horrid mint green is safely hidden as the underside of the new boards.  To finish I need to find some of the builder's insulation foam that doesn't have plasterboard glued to it for use as formers for hills and make some more canopy woods (a lot of canopy woods) and I'm all set.


Tuesday, 14 July 2020

First Manassas - The 2mm Armies

I'm a cheapskate when it comes to new periods, I will always look to try rules out without buying figures.  It stops, well limits, overspending on little lead men I may end up never using.  Trust me I have done that a few times and oft, that's how lead piles get started.

So for Altar of Freedom I decided to go cheap, very cheap, 2mm lets me do that, especially in an ACW setting where most of the troops are infantry.  The beauty of 2mm infantry is that a couple of matchsticks provide the basics of an infantry line.  As AoF uses brigade bases four blocks of infantry on a base looks like a brigade.  The base frontage is 60mm so four regiments on 25mm frontages deployed in two lines of two regiments works nicely.

The massed matchsticks of a Federal Infantry Brigade
To make the 'regiments' take two lengths of matchstick cut into 25mm lengths and glue then together along the long sides this represents two ranks of troops.  Four of these get glued to a base. Paint them blue or gray for a kriegspiel style look or if you are feeling ambitious take to MS Paint (other graphics programs are available) and create a paper print to glue to the front, top and rear of each regiment.  I do that as a single piece that wraps around the match sticks using PVA glue. The downside is that I have to draw the individual figures pixel by pixel, the upside is once I have done a couple of figures I can cut and paste to create the rest of the rank.

Artillery and Generals are trickier and I will probably limit myself to top down pictures or maybe a portrait taken from the OOB in the rules for Generals.  Cavalry will be bigger blocks, well horses are bigger then men after all.  I have tried out a couple of modelling styles for cavalry but  haven't decided which I prefer yet.  One thing I do know is that the beauty of 2mm is that it isn't that much extra work to do mounted and dismounted versions.

For First Manassas (or Bull Run if you prefer) I need 23 infantry brigades as against  two cavalry brigades, eight artillery batteries and three command groups.  The total costs costs will be measured in pennies rather than pounds which really pleases that cheapskate streak that I have!

Friday, 13 March 2020

Making transfers (Decals) for 6mm Late Roman shields

I have tried freehand painting shields for 6mm figures in the past but  I decided that I didn't like the results.  What I needed was a different approach that would look OK at tabletop distances or if possible closer.  The obvious solution was to use a water slide transfer but I couldn't find any in 6mm scale.

I have been down this road before when I needed some World War One lozenge camouflage for my 1/300th German aircraft.  No one seemed to make it  for that scale so I made my own.  I found a site that had details of the actual  colours used and examples of the patterned fabric and I was able to import an image into paint, brighten the colours slightly and resize it.  I was really surprised and pleased with how it looked.  So when I needed Late Imperial Roman shield patterns, transfers seemed like a workable option.

A work in progress but look at the detail on the lozenge pattern.
To be honest creating transfers is not difficult. The key things to keep in mind are:
  • Transfer paper comes with either a transparent or a white backing.  For most modelling uses white backing is best.
  • Do a test print of the transfers onto ordinary printer paper to test the size and colours are as expected.  Transfer paper is about £1 a sheet ordinary printer paper is about a tenth of that cost, so make your mistakes on the cheap paper!
  • Home printed transfers are not on individual pieces of transfer film.  Instead the entire A4 sheet is one big piece of transfer film.  You will need a good sharp pair of nail scissors or similar (small pointed blades) as you are going to need to cut the printed transfer to the shape you want.  One benefit of the clear transfer paper is that you don't have to be too accurate with this stage, the down side is that a home printer doesn't print in white so any areas that will be white have to painted in before laying down the transfer.
  • As printed the transfer isn't water fast until it is sprayed with a varnish.  Two or three light coats of acrylic varnish is best.  Make sure it is really dry before using them.
  • Placing the transfers is not any easier that it used to be on those Airfix kits of yesteryear!  In fact it is even more difficult as (in my case) the eyes are not as good as they were back then and the models are a lot smaller.  A couple of fine probes helps get the transfers where you want them.  I use an old paint brush handle with a pin glued and lashed to the end and some probes (like dental probes) I got from Maplins to help place them.
  • Even using the standard MS paint software that comes with a windows PC some quite detailed designs can be created if you design at a much larger size that the final product.  Resizing to the required size and re touching the shrunk version can give remarkably good results.  The resizing doesn't create a perfect copy of the larger item hence the need to edit after shrinking the image, but it does capture 90% of the layout and colours.  This might be easier on a more advanced graphic program such as Paintshop Pro.
  • Using a specialist product like Decalfix softens the transfer and helps it mold around the model which is useful in dealing with shield bosses. I also hand paint more varnish over the applied transfer when it has dried to ensure good adhesion and to protect the transfer.
  • Last but not least experiment with the best way to apply the transfers before going for the final attempt on what will be the finished models.  For very small items I tend to slide it off onto my fingertip to ensure it stays flat then carefully work a probe under the transfer to lift it,  
Insignia of the Magister Peditum praesentalis
Example page from the Notitia
Details of the patterns are easy to find on line from the Notitia Dignitatum.  There are no original copies in existence and what we now have available are medieval copies so we cannot be certain of the accuracy of the designs or colours.  In fact there are some discrepancies between the surviving examples.  Another point to be aware of is that the shields are depicted as round but all other evidence shows them to have been oval.  The use of circles was probably to make copying easier.   The WRG book Armies and Enemies of Imperial Rome illustrates all of the shields for the western empire but only as black and white outlines.  Life is a lot easier now we have internet images in colour to work from.

Because I was working with 6mm figures I could simply hint at the finest details of the patterns as they really don't show up that well.  A small dot of colour in the centre of shield boss will probably be a single pixel on the final transfer, so either exaggerate it it or leave it off.

Armegerii Propugnatores Iuniores - those shields are around 5 x 3.5mm

The results I have got are more than good enough for me and are far better than I could have achieved by hand painting the designs.

The entire unit


Thursday, 22 August 2019

Fields of Fire

Well it's actually flock in this case not fire. A chance conversation with Phil Steele from the Northamptonshire Battlefields Society brought me back to a project which has been on hold for a while.  That project being the making of some Ridge and Furrow fields for the Medieval to 17th Century period.  Phil needs some for the 1469 Edgecote Battlefield model the Society is currently displaying at events.  I had what I thought might be just the thing, courtesy of Hobbycraft.  Its a brown corrugated rubber/plastic sheet, A4 size.  The ridges are about 3 to the centimetre and stand a couple of millimeters high so ready made ridge and furrow for smaller scales.

Sorry about the sideways image.  This is the Hobbycraft sheet.

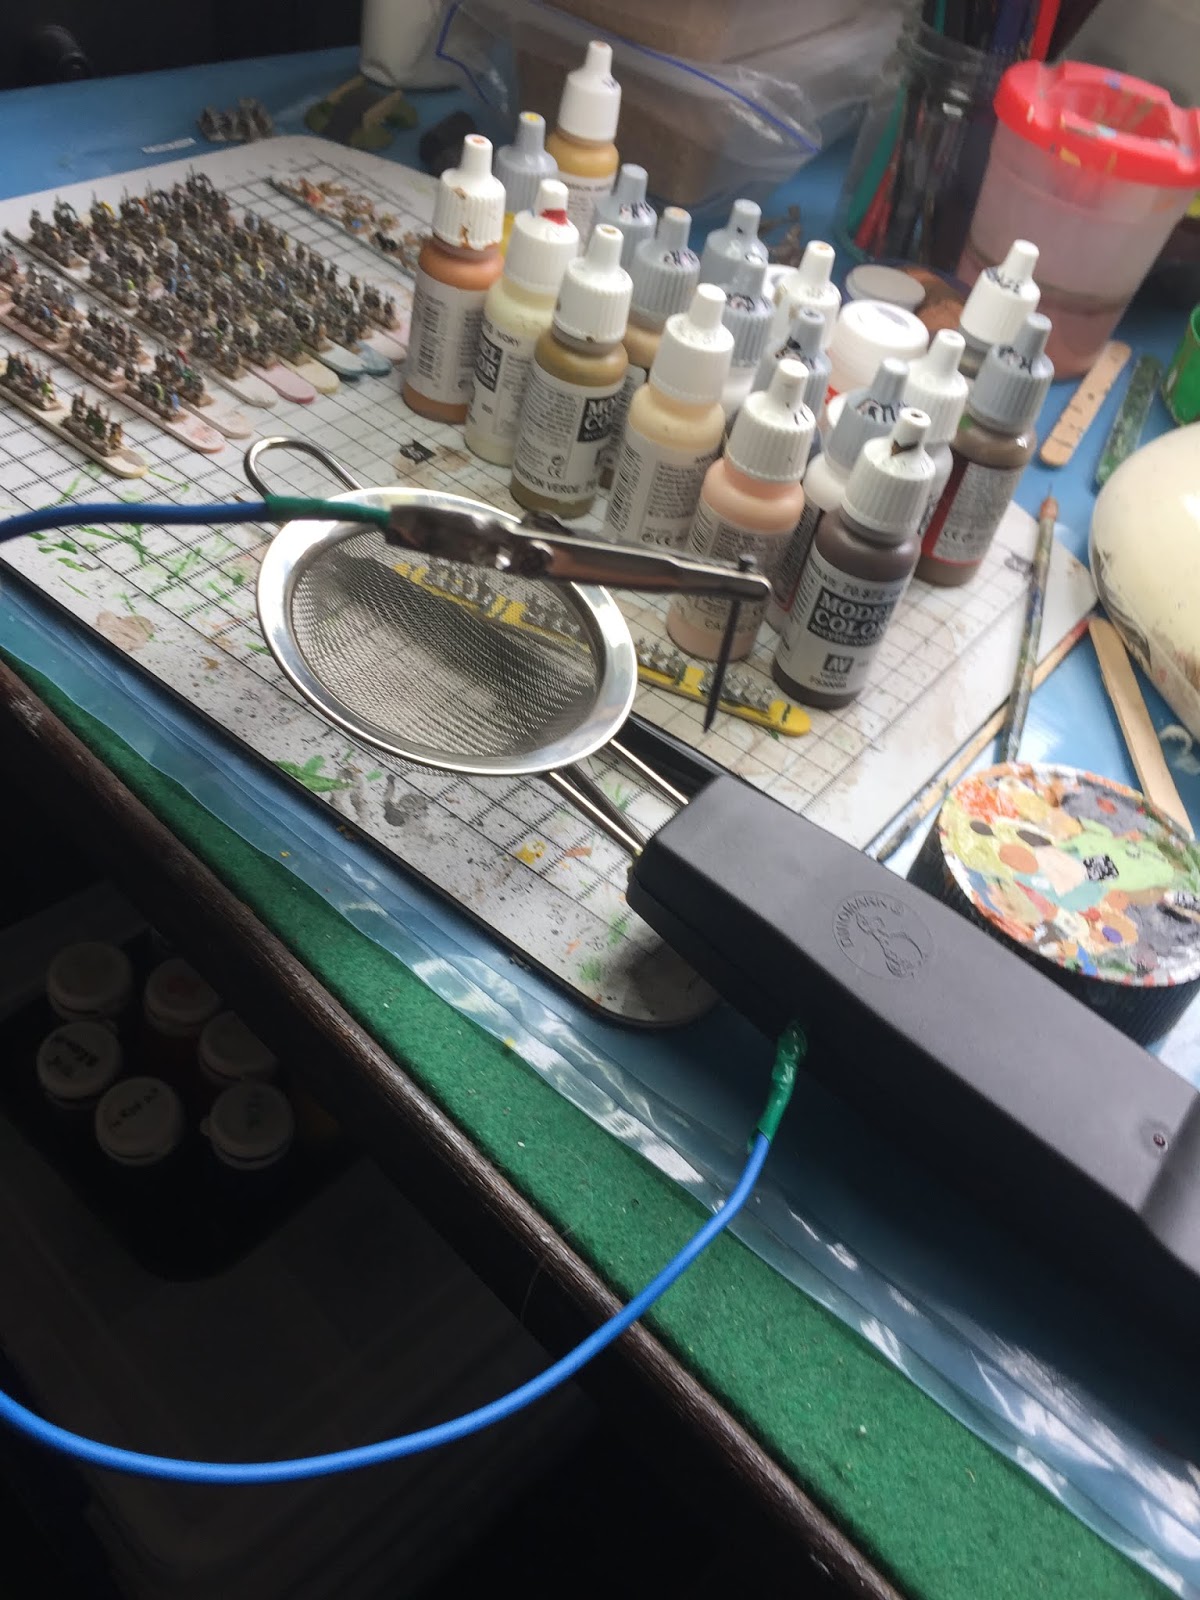
All that is really needed is to cut the sheet to the required size and then glue some flock to the top of the ridges.  Of course as with a lot of my projects I needed to go back an additional step and make my own static grass applicator before I could do the flock application! It was a really easy job using an electric fly swatter and a small seive as the main components.  The trickiest part is the soldering of the wires coming out of the circuit board of the fly swatter to the sieve on one side and a length of additional wire on the other.  Mind you if I can do it anyone can so not exactly rocket science.  I'm not going to provide any detailed instructions as there are any number of good tutorials only a Google search away.

The completed applicator.  Its a bit Heath Robinson but it does the job.
I was a bit concerned about getting the flock to stick to the corrugated sheet.  I needn't have worried it stuck fine. Simply place a thin strip of PVA on the top of the raised ridges and sprinkle the flock and Bob's your mother's brother!  Well not quite, the thin school style PVA does tend to flow down into the grooves rather than stay where it was meant to be, but the strands do stand on end!  Still its part of a learning curve and a second test with woodworking PVA was more successful.  I will take some photos of the finished article when its, well, finished!

Its off to the wars for me this weekend.  The Sealed Knot has its largest event of the year just outside Scarborough this coming bank holiday weekend so I will be shooting at the ever romantic but commonly wrong supporters of that man of blood Charles Stuart for a couple of days. 

Friday, 21 August 2015

Buying spree

This week I have mostly been ....... buying varnishes, and brush cleaner and brushes.  I have had one of my periodic foraging expeditions to Hobbycraft in Northampton.  I wanted some acrylic matt varnish as the Humbrol spray matt varnish had been stripping the ink wash on some of the stuff I have painted.  I think the propellant was the culprit it seems to have dissolved the gloss varnish I had painted over the ink wash.

I bought a pot of Humbrol acrylic matt varnish and as a test a large pot of Decoart Media Ultra-Matte Varnish.  To check how effective this was I daubed a thick layer of artists white acrylic paint on some card.  I let this dry then brushed ink on it and then varnished it with first the Vallejo gloss varnish then the two matt varnishes one to each half of the test piece. You can see the results below DecoArt on the left hand side and Humbrol on the right.  Both provide a good matt finish without lifting the ink.  So I now have a lifetimes supply of brushable matt varnish.
This is the generic stuff


Not the best photo but both products give a similar matt finish on this test

 
I also bought some Hobbycraft brush cleaner.  I'm pretty rough on brushes as I use nothing bigger than a 2 for most of my painting. It doesn't need much paint to get down into the ferrule and the base  of the brush for it to start clogging them.  So I thought it was time to start a proper cleaning routine.  I'm not certain that it will renovate older brushes but it does seem to be keeping the newer ones cleaner than water alone.  Time will tell if it prolongs brush life.


Last but not least I bought a couple of sable brushes.  I could probably get them cheaper on line but I like to see if the brush has a decent point before I buy.  Sorry Hobbycraft but your selection was awful.  Almost nothing on the racks in the sizes I wanted and most of those had splayed heads.  I got a better choice and quality at the war games store in Milton Keynes and those had good handles too, thicker above the grip point which gives good balance.  I don't know what brand they are but they are very good indeed.

So equipped with some new kit painting can continue apace.