Showing posts with label Dark Ages. Show all posts

Tuesday, 27 July 2021

So where were we?

I'm about ready to resume gaming now as I am able to lift and carry playing boards and banqueting tables again.  Which means I can set up a game and restart the Dark Ages and World War Three campaigns.  I might even be able to try out the Altar of Freedom Random bid spreadsheet once I have created enough terrain (my collection needs to be extended to include more roads, rivers and a lot of woods).  As it's been a while since I was able to move any of the campaigns forward I thought that a short catch up post might be in order.

Dark Ages Campaign
It's still 799AD in dark age Great Britain.  The last entry for that campaign was way back in February and can be found here Small but Perfectly Formed: The Dark Ages Campaign (elenderilsblog.blogspot.com) and details the forces about to clash in the South West of modern Scotland where Strathclyde and Northumbria are about to fight.  The Northumbrians have the advantage of numbers and are intending a straightforward line 'em up and let 'em go approach to the battle.  The Strathclyde Welsh are hoping to use the terrain to narrow the battle lines to off set the Northumbrian numbers.

Cold War Gone Hot 1982
The second encounter between BAOR forward elements and the Soviet assault formations is going to be a tad unbalanced.  You may recall that a BAOR recon formation is facing probing Russian Motor Rifle and Tank battalions in sector D8 of my campaign map.  Details of the run up to this game are at Small but Perfectly Formed: Cold War 82 - further information (elenderilsblog.blogspot.com)  The big question is should NATO funnel armoured formations into the table from adjacent map sectors or hold the line until all Soviet lines of attack have been identified.

Altar of Freedom
The most recent thing I was working on was the semi-random bidding spreadsheet.  I think this does what I want but I need to trial run it in a game.  My big issues is that the PC with the spreadsheet software is not in the same room as the gaming table.  So I came up with the idea of generating several turns' bids (actually more than the game will need) before the game and recording them on cards.  Each turn I shuffle the cards and draw one at random so that I have no solid idea what that turn's enemy bid is going to be.  It means that I'm not running from room to room every turn which will let me get on with the game with minimum interruptions.

So that's where we are.  Normal (or at least what passes for normal around here) service will be resumed in the next day of two.


Tuesday, 9 February 2021

The Dark Ages Campaign

 Its been few weeks since I did any updates on the Dark Ages campaign.  My focus has been elsewhere mostly on painting figures and for the last week or so on pushing on with the ECW rules.  I'm hoping to be able to post a rules update in the next couple of days as I have made some substantial progress on that project.

Meanwhile back in Dark Ages.  I have decided not to fight the small unbalanced campaign actions in every case.  So the Devet v Seisyllwch battle will be solved by the simple expedient of Devet accepting it's new status as a client or sub princedom of it's larger neighbour.  I have rather a lot of time to cover within the campaign and if I want to get to the end I'm going to need to speed things up.  Plus it lets me get to the more interesting table top encounters.  So Devet falls without a fight and the game rolls onwards.

Looking back at the list of events for this turn, we now move on to the last event of 799AD.  Northumbria attacking Strathclyde by striking into Rheged.  

By 799AD Northumbria's power was concentrated to the east of the Pennines and that is how the game is set up.  The North West was contested ground under Strathclyde Welsh influence (if not outright control) in Cumbria and loosely Northumbrian in the areas south of that.  The nature of government in Northumbria at this point was such that central authority was often lacking and control ceded to local leaders who made their own way without much thought, or care, for who the king was.  It was only where a strong king arose that this changed and historically that didn't happen very often.  

In modern terms Northumbria was a failed state.  There had been a generation of in fighting between rival branches of the royal line over which line should sit on the throne and this continued right into the mid 9th century, when one claimant allied himself with the sons of Ragnar Lothbrok.  Lets just say that it didn't end well. If you have read the Last Kingdom books or watched the TV series based upon the same you will have come across them as leaders of the first wave of Viking invasions.

Looking at the available forces in the game The Strathclyde Welsh can assemble the men of Galloway, Strath Clut and Rheged itself.  While Northumbria can count on Lothene, Berneich and possibly Cumbre.  I say possibly for Cumbre, as I have designated that region as disputed but occupied by Northumbria so the Cumbrians will act as allies and may be unreliable.

The available forces will be maximised as both kings are present so the line ups look like this:

Strathclyde

Strat Clut: King (Cv), 3 x Sp (reduced by battle losses)

Rheghed: 1 x Gen (Cv), 3 x Sp (reduced by battle losses)

Galloway: 1 x Gen (Cv), 1 x Cv, 3 x Sp

Strathclyde is carrying losses from the clash with the Picts earlier in the turn so are only able to turn out 13 elements.  They cannot deploy in two bodies as they don't meet the minimum element count  I set in the rules to do so.

Northumbria

Lothene: 1 x Gen (4Bd), 3 x Sp, 1 x Ps

Berneich: King (4Bd), 3 x 4Bd, 7 x Sp, 3 x Hd, 1 x Ps

Cumbre: Gen (Sp), 1 x Ps

Northumbria has maximised the available troops so as to be able to have two commands and is fielding 22 elements.  They will field The men of Berneich as a single command and merge Cumbre and Lothene into a second.  As a disputed territory Cumbre will count as allied and may not be reliable on the battle field. 

Wednesday, 18 November 2020

Dal Raitia 799AD - Pictia attacks Comgail (Dal Raitia)

The Pictish Forces are advancing from the North East and near an insignificant settlement called An Cladach they clash with the Dal Raitian royal army.  The Dal Raitian Scots are defending and the invading Picts are being run by the AI rules.  I am again using De Bellis Solitarius which are available as a free download from the Fanaticus and other, websites.  Versions are available for DBA 2.0 and 3.0 and I find that they give an interesting game by virtue of setting constraints on what the AI side is allowed to do while allowing player input within those constraints.  Before the game started I decided on the Scots deployment.  I then rolled up the Picts overall tactical stance for the encounter and then their deployment.  Think of that as the commanders pre-battle briefing from the CinC something like:

"Right settle down and listen up,  here is the plan.  We outnumber them almost two to one so they either have to hit us hard and fast before we have the line properly set up or they will want to defend and use the ground to their advantage.  If they attack their initial charge is a problem but if we stack the spearmen deep we should be able to absorb the impact.    

Moravin, you have the larger command so act aggressively, I'm putting you out on the right flank with Mar.  You have the majority of the mounted lads so if you get a chance to get around their flank, take it. Especially if you see a chance to attack their camp.  Nothing like having your women attacked to take a man's mind off the fighting eh?  

I will be in the centre with the rest of the Army, so that's you three, Strath Erin, Athfotla and Monath.  Your boys will hold the centre and cover our camp.  Nothing too clever required there, I think we can hold back in a defensive posture and see how things develop on the right.  If they attack us then all the more space on the flank for the mounted lads to use.  I'm pretty sure their entire strength is in the field against us but I'm not ignoring the risk of them trying to land behind our flank from boats.  Moravin the beach is on your flank so have a think about about what you might do to cover that eventuality will you. 

Everyone happy?  Excellent well grab what sleep you can and we shall see what the morning brings."

Or as the dice rather more prosaically gave me; place the camp as near the centre line as possible and behind any available bad going.  Command 1 (The King with  8 elements) deploy in the centre with a defensive stance.  Command 2 (11 elements) deploys on the right flank and takes an aggressive stance.  Pike form up two deep if facing warbands.  Fastest troops deploy on the end of the line.  

The Scots have 11 elements to deploy including the King.  There is nothing to loose and a defensive strategy just will not cut it.  The Scots will probably never have more men in the field than they have today, so they have to take the fight to their Pictish cousins.  Accordingly I have decided to go with a littoral landing.  That will be on the Pictish Right which it turns out are under orders to be aggressive and so with any luck it will land behind their flank.

The Scots briefing is an altogether more downbeat affair.

'Alright then sit down and take a drink it may be the last one you get from me.  You all know the Picts outnumber us and have a point to prove having had a beating from the Strathclyders of late.  They have crossed the mountains to get at our heartlands so I doubt they just want to talk.  Tomorrow is going to be bloody, the only question is whose blood will be on the heather?

We don't have the luxury of giving up this ground and there are no reinforcements coming. What we do, win or loose, we do with the men we have, here, at this place.  They will come on fast and that is our one advantage as it will give us the option of turning their flanks.  I will have the main body but  you Comgail,  you will lead a small group to land on the beach behind them.  Hit them in the flank or rear and hit them hard.  Make them rue the day they came to Dal Raitia.  You will be the hammer, we will be the anvil and between us I intend to crush them.  Now go see to your men, tell them of certain victory on the morrow and, remind them that they are fighting for their homes and families.

The Day of Battle

'The day of battle  dawned and looked set fair so the fight commenced almost immediately. Our landing party sprang into action as soon as the Picts were in reach and charged up the beach into the end of their line.  Two units of Pictish light horse turned to meet the threat.  Meanwhile our main line advanced as quickly as they could but it was clear that the landing party would be on their own for a wee while.  We could tell that the attack from the beach had the Picts rattled as their advanced stopped dead on that flank.'  

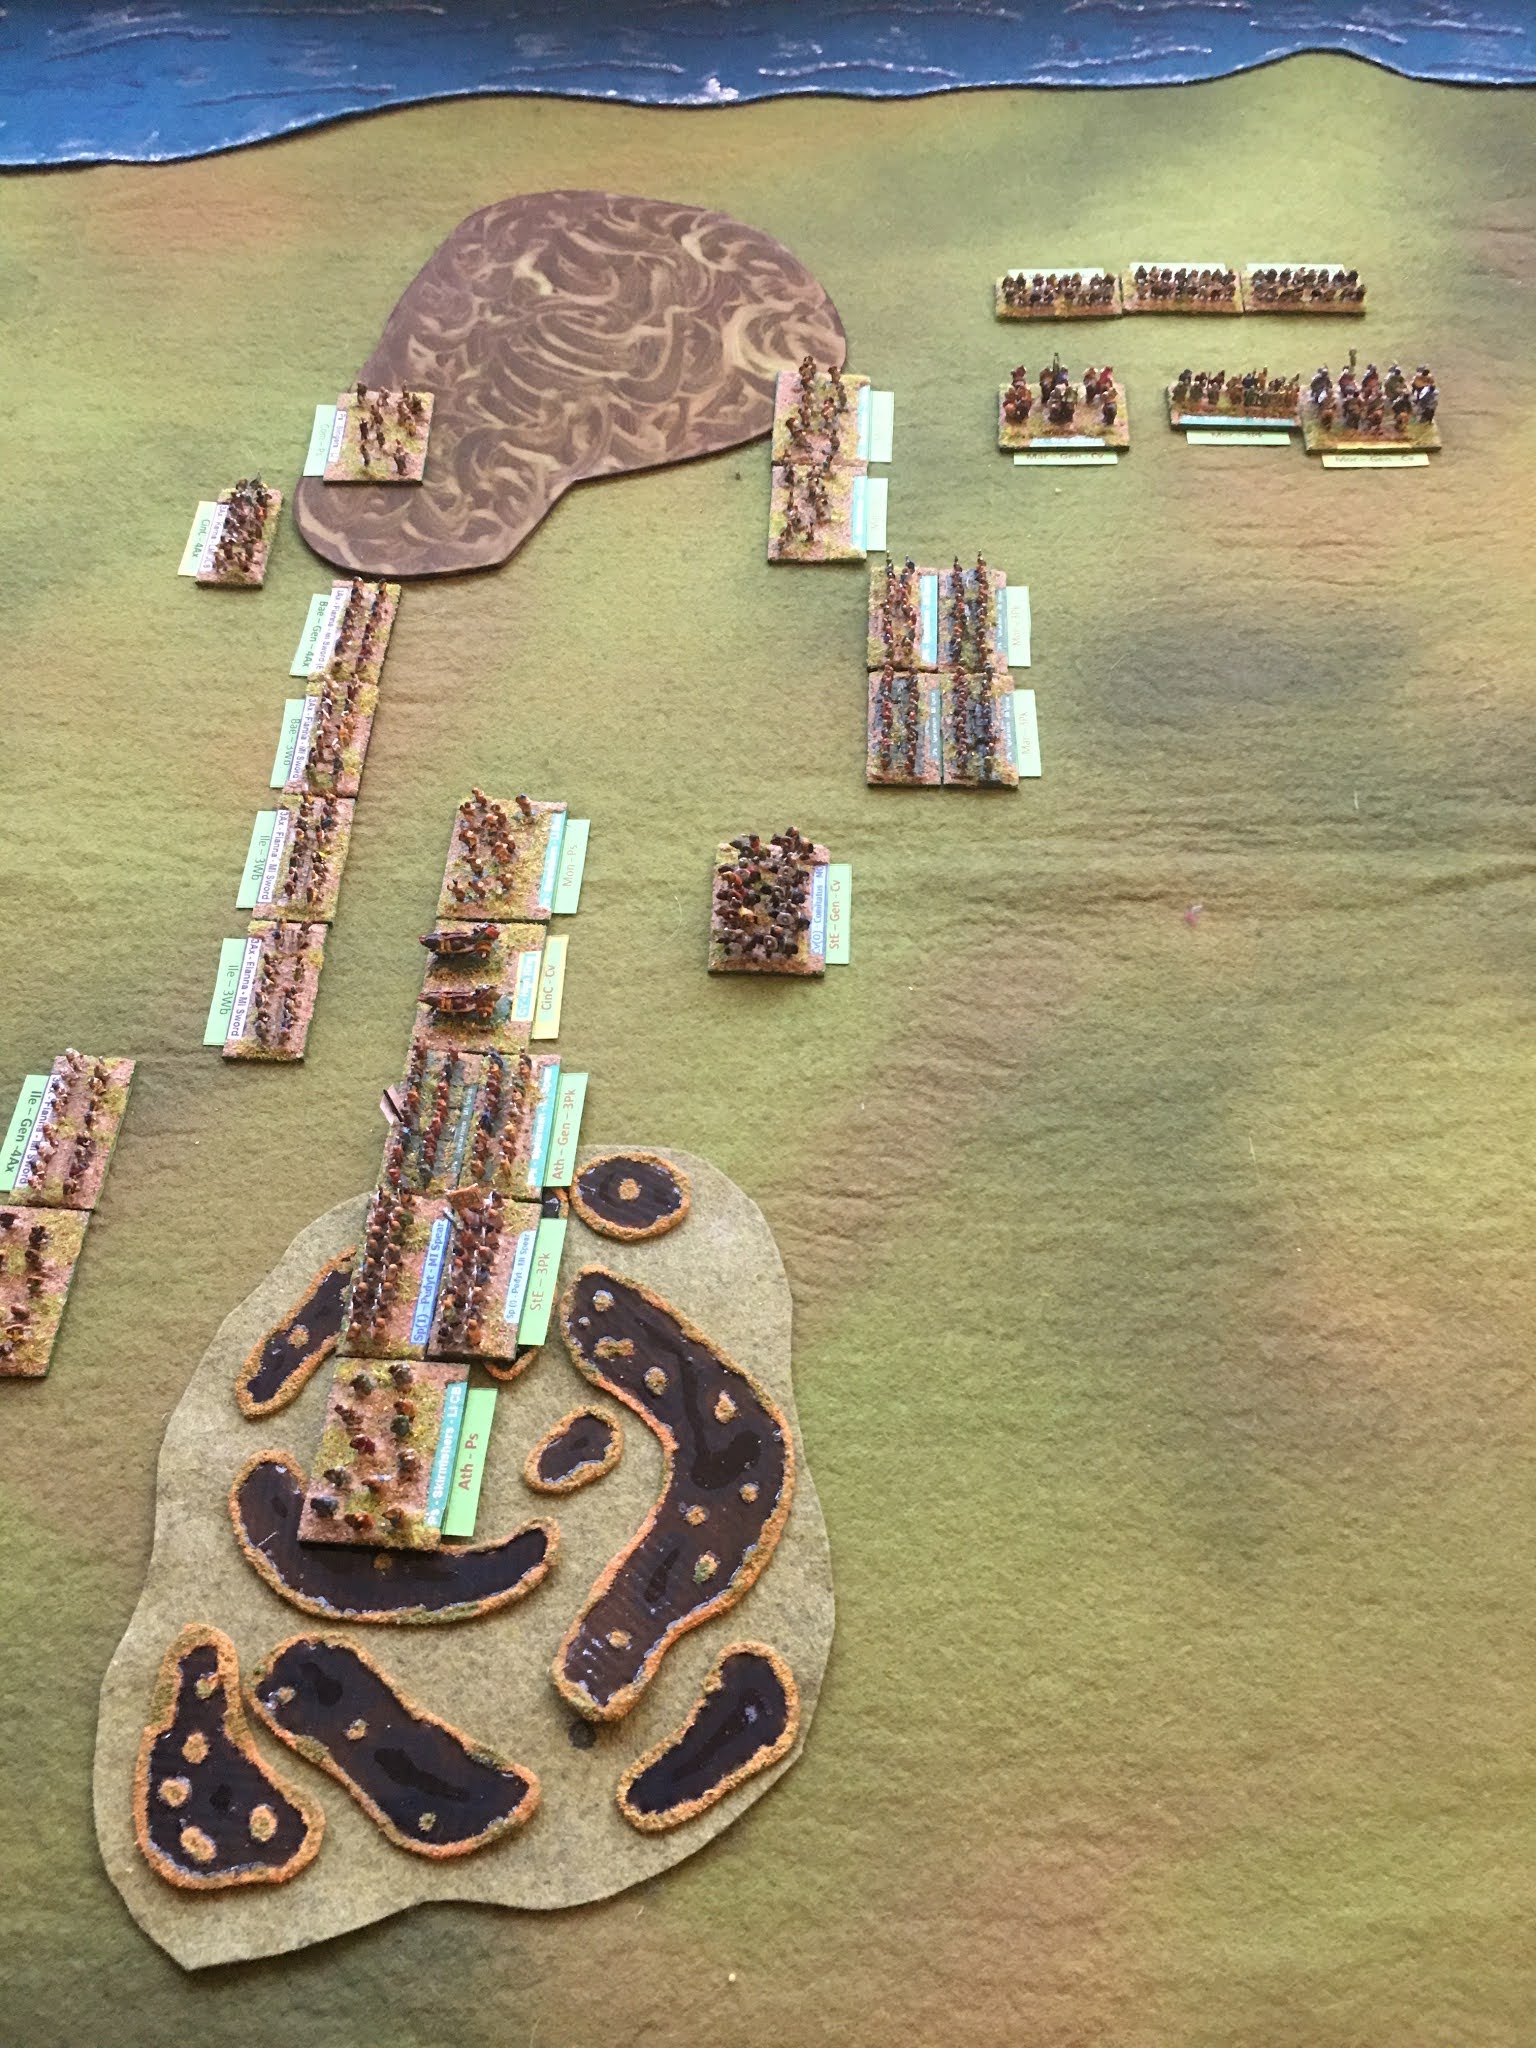
1. The armies deployed -landing party ready to storm up the beach!

A good opening pip score allows the out of command littoral landing to get into contact with the end of the Pictish line.  In their turn both Pictish commands get abysmal pip scores and low aggression scores meaning that the right hand command who are meant to be moving up stall as their flank units have to deal with the Scottish attack. The left hand command does manage to advance to occupy the boggy ground to their front.  This was repeated for the next two turns where the Picts consistently rolled single pips for both commands.

'We couldn't believe that the beach attack had thrown the enemy into such confusion, we could see that the fighting was muckle fierce on that flank and one group of Pictish light horse was soon destroyed.  The rest of that wing seemed incapable of reacting to the attack.  Our main body continued to push forward towards the enemy with our wilder tribesmen leading the advance.'

2. Picts in a pickle - down one LH already

I roll two dice for each Pictish command the large dice is the aggression for this turn the smaller the Pip score.  The aggression roll is adjusted based on the starting aggression and the pip score.  The photo below shows just how bad the Pictish rolls were!

3. On the defensive. Awful dice mean the Picts cannot put attacks together!

As the day rolls on the landing party takes out a second light horse unit it had pinned back against the end of the Pictish line. The poor Pictish command rolls are really hurting them and the right wing is only one unit away from becoming demoralised.

4. It looks better than it really is for the Picts (on the left here)

The terrain is helping the Scots.  The aggressive Pictish right wing has to overcome the flanking attack and get through the woods to to turn the Scot's left.  The other flank, which is wide open, is facing the defensive Pictish wing who are less likely to take advantage.  The boggy ground is doing nothing to slow either side but it is preventing the Pictish spearmen gaining the rear support bonus  Fast Pike would gain in clear terrain.

5. The Scots have a decent defensive line at least

It isn't until turn five that the Picts get a decent pip and aggression roll and with the Scots racing forwards to the attack with their main force it isn't a moment too soon.  They bring more troops up to the fight on the right wing and push forwards in the centre where the two lines come to close combat.  There the fighting leads to a first casualty for the Scots and the usual confusion as the neat lines dissolve.  At this point you would have thought that things are about to improve for the Picts, they are in contact all along the line and should be able to bring the advantage of numbers to bear.  You might have thought that but, the dice gods really have it in for the painted people and in the first combat they loose another unit.  Even worse this is from their right wing command which pushes them over the edge into demoralisation.  There is a single ray of hope now as a second scots unit was destroyed in the combat round, so the Scots are edging closer to their break point. 

6. A turn later and the battle is slipping away from the Picts

The next couple of turns have the Picts attempting to keep their right wing on the table by using pips to force unit's hold their ground.  Because they are demoralised that wing can't do anything but hold or retreat and it takes a pip to have a unit hold in place, they can't initiate combat although they can defend.  Their biggest problem is that if they hold the units closest to the edge of the table in place then those who are pinning the Scot's beach landing in place have to retreat and that opens the way for a camp run.  On the other wing I successfully override the standing orders for a turn and send a Pictish light infantry unit sprinting for the Scot's camp but with my Scot's cap (should that be bonnet?) on I counter that with a Scots light infantry unit in the following turn by bringing close enough to pin the Picts in their threat zone.

7. Although the Picts' left is holding men a streaming to the rear on the right wing

Things are looking bleak for the Picts now as the only command that can act has defensive standing orders so is going to struggle to advance to combat.   Poor dice rolls on the other wing are allowing units to head to the rear there.  Although the Pict's have managed to get into a good position for an attack the defensive stance stops them from capitalising on it and I failed the override dice roll for them.  A poor pip roll for the demoralised command sees four elements leave the table and that is game over.

Although not particularly heavy, the losses will have an impact on both sides the Picts have lost three elements and the Scots two.  At least the King of Picts was able to escape the disaster.

The Pictish chronicles simply recounts 

'The fury of the Scotsmen knew no bounds'

This game taught me a few things about these troops.  Fast pike are capable troops but only if well deployed the +3 rear support bonus would have made a huge difference had I been able to use it.  It was only the poor initial deployment that worked against them and I should have redeployed the line to get them into good going.  The terrain made no difference to movement for the infantry as both sides have fast foot or solid auxilia who are not slowed in bad going.  Still the Picts are not going to let a little thing like two defeats in one turn change their ambition and they will be be back.

Friday, 9 October 2020

The Dark Ages campaign - 799AD Scots v Picts setting the stage

With the dawning of 799AD comes new strife. It's in the North in the lands of the Picts and Scots where a dispute over the little travelled region of Comgail has erupted into armed conflict. Although nominally allied under a single family in reality there are different clan allegiances within the ruling blood lines and it is by no means certain which line of descent will rule North of the Forth- Clyde line.  The Pictish side of the family have decided to strengthen their hand or at least weaken the Dal Raidian side

The Picts have assembled a royal army led by High-King  Caustantin mac Fergus which extends the area they can recruit from.  The Dal Raidian Scots have a much smaller recruitment base but are assembling every fighting man they can muster under their King Taidg mac Donncoirce.  For this clash the forces arrayed are as follows:

Pictia will have two commands.  King Caustantin has the first command of 8 elements and the Mormaer of Moravin commands the second made up of 12 elements.  These consist of:

  • The King (Cv) plus 1 x Cv, 4 x 3Pk and 2 x Ps.
  • Mormaer of Moravin (Cv) plus 1 x Cv, 2 x LH, 5 x 3Pk and 2 x Ps.

While Dal Raidia is fielding a single command of 11 elements commanded by King Taidg

The King (4Ax) plus 3 x 4Ax, 5 x 3Wb and 2 x Ps

This is the second outing for the Picts in this campaign turn and losses from the earlier fighting have reduced their numbers.  Strath Erin is still recovering from casualties suffered against the men of Alt Clut.

The Dal Raidian Scots will be the defenders and will choose the terrain.  The dice gave me the Scots so I can determine the terrain without using the solo rules.  Their home terrain is Littoral so I chose a waterway (compulsory) a difficult hill, a marsh and a woods.  It will look something like the image below.  Picts deploy on the bottom edge Scots on the top.

It will look something like this.

In reality we don't know for certain who was king of Dal Raidia at the turn of the 8th Century.  the Annals of Ulster give names but these may have only been kings of the Irish Dal Raidians.  Still I needed a name for the campaign so King Taidg mac Donncoirce it is.

Wednesday, 30 September 2020

Mercia 798AD - The battle of Wudiandum continued

At the end of the last post things the West Saxon centre was finally in action, their right was potentially in trouble as the Mercian command facing them was getting it's act together and the left was starting over the river to come to grips with the Mercian right wing.  As far as I can tell (I haven't started to play the rest of the game as I write this introduction) the key to this battle is the fight in front of Wudiandum village.  If this goes against the men of Wessex the flank of their main command will be open.  Although they have a few troops in reserve in a second line in the centre the time needed to get them into a new line to cover this risk may not be granted them.  The fight over on their left is almost a separate battle as even if they should win over there it would be a big ask for those troops to re-enforce the centre because of terrain restrictions.  No pressure then!

Its the start of the third hour of this battle (in game time).  The Mercian shield wall pushes back in the centre but make little headway.  They are slowly and methodically setting up a shield wall on their left and have rushed what troops they can towards the river bank on their right.  It would help if they could roll well just once.  The West Saxon reply is to keep the meat grinder going in the centre and to push more troops across the river on their left.  On their right where they really need to disengage they roll 1 pip!  It's not just the Mercians the dice have it in for.  The only good news for the hard pressed West Saxon right is that the Mercians just can't get a decisive attack in to push the command over the edge, all they achieve is a series of recoil results which helps the West Saxons by opening up some space between the lines. 

1. Fighting on the river bank as the Wessex Left command attempts to cross

The next few turns see the West Saxon left slowly chip away at the Mercian command facing them.   The Mercians are hampered by inconsistent dice rolls, whenever they have the chance to be aggressive the pip dice is against them.  As a result they are forced to give up the defence of the river bank allowing the West Saxons to gain a toe hold.

2.  It's soon more than a toe hold, but the Mercian defenders look to be ready for the onslaught

Once the West Saxons are over both sides face off against each other but the Mercians are soon on the back foot.  How are things over on the other flank?

 
3. On the Mercian left things look better, for the Mercians!

With a couple of good dice rolls in succession the Mercian left wing recovers from it's earlier confusion and continues to advance.  The West Saxons seem to have the same problem the Mercians have on the other flank.  They are slowly pushed back but the Mercians just can't seem to get their act together and fight as well as they manoeuvre.

4. The king glances towards his threatened right flank

The centre is getting messy with recoils on both sides fragmenting the shield wall.  The Mercian's manage another kill here but its anything but decided as yet.

5. The central commands pushing and heaving

The West Saxon right proves remarkably resilient and despite being one element loss away from demoralisation hangs on in the face of repeated Mercian attacks.  All the Mercians can do is create recoils.  This goes on for another four turns until they manage to hard flank an isolated Wessex spear element.  This tips the West Saxon command over the edge.  Now they are demoralised and all the Saxon Sub General can use his pips for is to hold elements in place. Where he doesn't have the pips to hold elements in place they flee towards the rear base edge each turn.  Even then he gets decent pips and manages to fight a reasonable withdrawal action.

6.  See that gap between the two units facing each other?  There were West Saxons there a moment ago!

The fight in the centre continues to be a mess.  The threat zones prevent any serious reorganisation of the front lines and overall the West Saxons are getting the better of things.  This continues until the Mercian centre is one element away from demoralisation with the West Saxons nowhere near that state.  Both sides are throwing their reserves forward but the Mercians are trying to fill holes in the line while the West Saxon's are hunting for overlaps.  The two Kings are both in the thick of things now and in danger of getting isolated.  They tend to have the better of combats because of the plus one for a general in combat and as they are blades they pursue while any spear elements around them don't.

As the Mercian left continues to push the demoralised West Saxon command facing it slowly backwards options for detaching elements to go to the aid of the beleaguered centre start to present themselves.  However on the other wing a disaster is unfolding.

7. The Mercian right: a lone element of spears is in deep trouble attacked frontally and in flank

Over the last few turns the Mercian right has taken steady casualties until it is only one element away from collapse.  The West Saxons exploit the gaps created by defensive tactics and low pips and pounce on an isolated element of spears. Unbelievably the dice off is a draw on the first round and it is in the following Mercian combat round that it is killed.  The command is now the second to become demoralised.  The next two turns are inconclusive the centre has no decisive fights but gaps are opening up and the Mercian left is slowly hooking around onto the exposed flank of the West Saxon's centre. 

8. The Mercians teeing up the flank attack against the centre

It takes a while for the Mercian left to move into position against the open flank of right flank of the West Saxon Centre.  Part of the command is shadowing the fleeing West Saxons (aka not enough pips to bring them over to join the preparations for the attack).  In the centre of his command I imagine that King Beohtric is having a Wellington at Waterloo moment "Give me Bearruc Scir or give me dark" kind of thing. and the day is dragging to a close after close to 4 hours fighting but dark is still a ways off.  However over on the West Saxon left the men of Bearruc Scir and Dorseate have finally broken the Mercian command facing them and a racing through the woodland to the aid of the central command.

The Mercian assault goes in, but trouble is brewing at the other side of the field

Things are now very close the Mercian left made up of the Fyrds of the Wrocensaetan and Hendrica slam into the open flank of King Beohtric's centre In the first moments of the attack aa west saxonlight infantry element is destroyed and the end of the line is forced to recoil.  It is only the fragmented nature of the line that prevents major casualties as there are no units to the rear of the recoiling troops for them to break against.  In the West Saxon turn the dice are kind to their left wing but less so to the centre command where a paltry one is rolled.  I use this to pull the King's element back thinking he may be needed to help bolster up the right flank.  Both central commands are at breaking point one element away from becoming demoralised and ending the game.

The next turn starts with the Mercians continuing the assault on the West Saxon centre but the central command is handed a defensive tactical stance and the best they can do repair their line the left is aggressive but has only one pip and can't make any significant contact with the enemy.  King Beohtric breathes a sigh of relief.  There is one final roll of the dice now for the West Saxons, literally so in fact!  Another high roll for the left allows the men of Bearruc Scir to crash into the Mercian centre.  They lose an element but the second attack kills a Mercian spear and then to add insult to injury the central command kills the Heathtroop of Ealderman Aethelmund of the Hwicce.  Dicing for the command casualty shows that the Ealderman died with his men.  This ends the West Saxon turn and the game.  It was a close run thing the Mercians could have, should have won it the turn before if the dice had been kinder.  The final casualty count was 10-11 in favour of the West Saxons.  A pyrrhic victory that badly weakens both kingdoms for the rest of the campaign turn. 

The end of the affair but both sides have suffered heavy casualties
 

This was the biggest game I have yet fought using DBA and I found that the BBDBA rules have a few wrinkles which need to be ironed out.  The demoralisation rule is one of them.  I like the concept, in fact I like it a lot, but is assumes that the commands will always be 12 elements, or more accurately, that they will be exactly divisible by three.  At least I assume that to be the case as the rule is that a command becomes demoralised once a third of it's units have been lost.  The rules have no mechanism for coping with commands not divisible by three, nothing to say round up or down for example.

So I have introduced a house rule.  Divide the number of elements by three and if it is not a whole number round down to reach the trigger loss number.  However the demoralisation trigger point is 'once that number is exceeded' not once it is reached.  So a command of 14 elements divided by three gives a demoralisation trigger of 4.66.  Round that down to a value of 4.  So that has to be exceeded so hitting a loss of 4 elements equals it but doesn't exceed.  Hitting 5 does exceed the trigger point (and for completeness sake also exceeds 4.66) so that's sorted then.  I also think that the standard DBA rule of Hordes not counting as a loss and perhaps extending that to light infantry as well.

I also decided after the battle that demoralised troops should take a minus one to combat dice if they ever end up having to fight in close combat.  I don't think I will extend that the troops who can shoot though, although that won't be a problem in this campaign as there are no archers or artillery to worry about.

The other issues is that the maximum size an army is set as three times the size of a standard DBA army.  For BBDBA historical refights the rule is use the actual number of troops converted to elements.  This means some really large commands can be created.  In the current game the two opposing central commands are both 19 elements in size.  I ignored my previous rule of capping command sizes but I think this was a mistake and will reintroduce it in any future large scale actions.

All that said I do rather like the BBDBA version of DBA3.0  it feels more like a historical battle, not that I have ever been in one to know for sure!

Oh and I almost forgot: the mandatory chronicle entry.

798AD Mercian chronicle

And in this year did Beohtric of Wessex basely break from his allegiance with his sworn lord Coenwulf and come in arms to Mercia.  There he did ravage the land of the Hwicce until at length he was met by the King and all his host in battle.  There was slain Ealderman Aethelmund of the Hwicce and a multitude of others with him as well and the West Saxons had possession of the field.


Thursday, 24 September 2020

Dark Ages Campaign - 798AD Battle of Wudiandum

So to battle.  As previously posted I have the men of Wessex with the Mercians being run by the solo play rules.  I have decided that each command will have its own pip dice to reflect the poor command and control of the period so co-ordination between commands will be more difficult.  I’m also going to move the centre commands first for each side as they are the ones commanded by the two respective kings.


1. The initial deployments, Mercians furthest away

Both sides deployed with a strong centre and weaker flank commands.  The AI placed its troops to the front and centre of the deployment box, but it wasn't possible to fit them all in so I over ruled it and mirrored the West Saxons while staying as far forwards as possible.  It looks  neat, but trust me that's not going to last.  The Mercian pre-battle dice rolls gave their right command a defensive stance and the other two commands received neutral stances.  This impacts on the tactical choices of each command by pulling the dice result towards that overall stance each game turn.  It is still possible for a defensive command to take aggressive action but it is less likely.  The Mercians will move first each turn which may or not be of benefit.

The first couple of turns see both sides pushing forwards.  The west Saxons are the first to have their formation come apart as the rush to get across the river before it turns into a contested crossing.  The river turns out to difficult to cross.  This means that only single elements or columns of elements can cross for each pip expended, movement is slowed and defenders gain an advantage against troops crossing.

2. West Saxon start crossing the Coln

The first to start crossing are the troops on the right of Wessex's line.  The light infantry are not slowed but the shield wall's tight formation breaks up and the close order infantry are slowed.  In the centre the line is moving up towards the river in a race to get there before the Mercian's can line the far bank and contest the crossing.  Middle Anglo-Saxon's may not be the most tactically clever armies but even they know a disputed river crossing is not a good thing!

3.  The crossing continues on the West Saxon right.

The crossing on the West Saxon right is unopposed as the Mercian command facing them is in disarray!  They rolled aggressive but couldn't easily follow the instruction and became tangled up in the approaches to the village.  Their line fragmented into a number of small groups.  In the centre the Mercians are also rushing forward towards the river having rolled an aggressive stance and decent pips.  On the far side of the table West Saxon light troops are over the river and fronting up to their Mercian opposite numbers. On that flank the Mercian command is slowed while they are traversing woodland.  


4. The view from the Mercian right wing.

By the next turn the Mercians have reached the river with their central command but are unsure about what to do (a low pip score limited their options).  Light Infantry are exchanging arrows and insults on the right and the Mercian left is in a real mess.  The nice neat line has broken up around the village and with instructions to take aggressive action they are throwing small groups of men forward to attempt to come to spear thrust and sword stroke with the enemy before they can reorganise their shield wall after the river crossing.  As a result they close as fast as possible but as the line attempts to move around the left of the village the formation ends in total confusion.  This is one of the points with the solo rules, orders from the AI can result in odd decisions and if the dice swing back and forth between aggression and defence it can result in this kind of chaos.  Players have the right to ignore results three times under the rules but I'm not using these yet in case I need them later.  Probably a mistake to be honest, after all how much worse could a situation get than this?


5. A closer view of the Mercian left wing, it's chaos over there

Its one of the interesting things about solo games the AI mechanics create situations and as a player I like to create a narrative to make sense of it, it also gives me a story for the AAR here on the blog.  

In the next turn the Mercian centre is following a second aggressive stance but on limited pips the entire command simply surges forwards and starts to cross the river, only for them to get a defensive stance and limited pips the next turn.  So they retreat to form a defensive line on the river bank.  I rationalise this as a rush of blood and a desire to come to grips with the invaders followed by the nasty shock when the water is cold and realising that there's a solid looking shield wall over on the other bank, so maybe we should stay this side and defend the river bank instead!  Something similar happens on the Mercian left a defensive stance roll and maximum pips allows form defensive line to be an option and the fragmented line starts to reform.  Possibly older more experienced heads have prevailed over there.

There has also been the first few clashes light infantry facing off over on the Mercian right saw a psiloi doubled by their West Saxon opponents and killed with the same thing happening on the other wing but with a West Saxon psiloi destroyed to even the score at one element lost each.  Else where West Saxon Light Infantry are recoiling and fleeing from the Mercian shield walls.

The two armies have been facing each other for over an hour in game time now with no significant fighting yet.  As you can see below the Mercian left wing is regaining some kind of cohesion and their West Saxon opponents are over the river but disorganised.

6. The Mercian left starts to reorganise while their opponents are still struggling to reform their line

This would be a good turn to get good aggression scores and high pips.  Which is probably a good point to show how I'm handling the AI dice.  I roll red for the left (port in nautical terms), green for the right (so that would be starboard) and blue is the central command.  The relevance of the nautical terms is that boats and planes show red lights to port and green to starboard so the colour s help me remember which dice goes to which command.  The larger dice give me the aggression (before adjustments) and the small ones the pips.  These need to be thrown together as the pip score adjusts the aggression score low pip reduces aggression high pips increase it.

8. The Mercian dice, red for port, green for starboard,  blue you can guess.

So having said this would be a good time to roll lots of sixes what we get is the above!  Its about typical for the Mercian dice so far.  The left and centre are feeling like attacking but don't have many options other than go straight in while the right has decent pips but is feeling a touch nervous.  Hey ho (or what ever the Mercian equivalent is) you do what you can with what the dice provide.  Its enough to start a moving into the village on the left and consolidating in the centre.


9. The Mercian left more organised but still tangled up in the village

Now the West Saxons take the bull by the horns and with a decent pip score their central command storms over the river and slams into the Mercian shield wall.  The Mercians are pushed back with recoils but only one casualty.  The flank commands continue to slowly advance and the first troops from the left hand command cross over the Coln to the Mercian held bank.  This is getting to look like a fight now.

10. Wudiandum still in Mercian hands

The Mercians still hold the village, mainly because the West Saxons have been slow to move against it, but there is a fight coming.  The fighting in the centre is hanging in the balance both Kings have been fighting alongside their household warriors.  So far with no risk to either of them.  The shield walls a pushing and shoving but there have been few casualties as yet.

11. The aftermath of the attack in the centre both Kings in the thick of it.

Which is where I am leaving it for this post.  I will finish the game and post the last part of the AAR in a day or two.

Monday, 21 September 2020

The Dark Ages Campaign - Mercia 798AD pre-battle set up

The real situation between Wessex and Mercia in 798AD was that in the post Offa period it was not a foregone conclusion that the Mercian hegemony was going to fall apart.  The Danes were not yet a major risk and the new Mercian King Coenwulf saw his job as re-asserting Mercian rights and privileges over their sub kingdoms to the South and east.  It seems that Mercian policy was to control all the English kingdoms South of the Humber and Mersey and to keep Northumbria weak.  Seen in that light their actions in the first few years after Offa's death make perfect sense.  In the real late 8th/early 9th century it was Mercia which acted as the aggressor against Wessex, East Anglia, Essex and Kent.  This was generally successful in that Kent, East Anglia and Essex seem to have fallen back into client state relationships , certainly they stopped issuing their own currencies and a Mercian was placed onto the Kentish throne.  In our real timeline the Ealdorman of the Hwicce fought and lost a battle against the Fyrd of the Wiltsaetan not a million miles away from our fictional clash.  Other than that there seems to have been a political settlement between Mercia and Wessex partially cemented by dynastic intermarriages, Beorhtric may even have been a Mercian appointed and supported king.

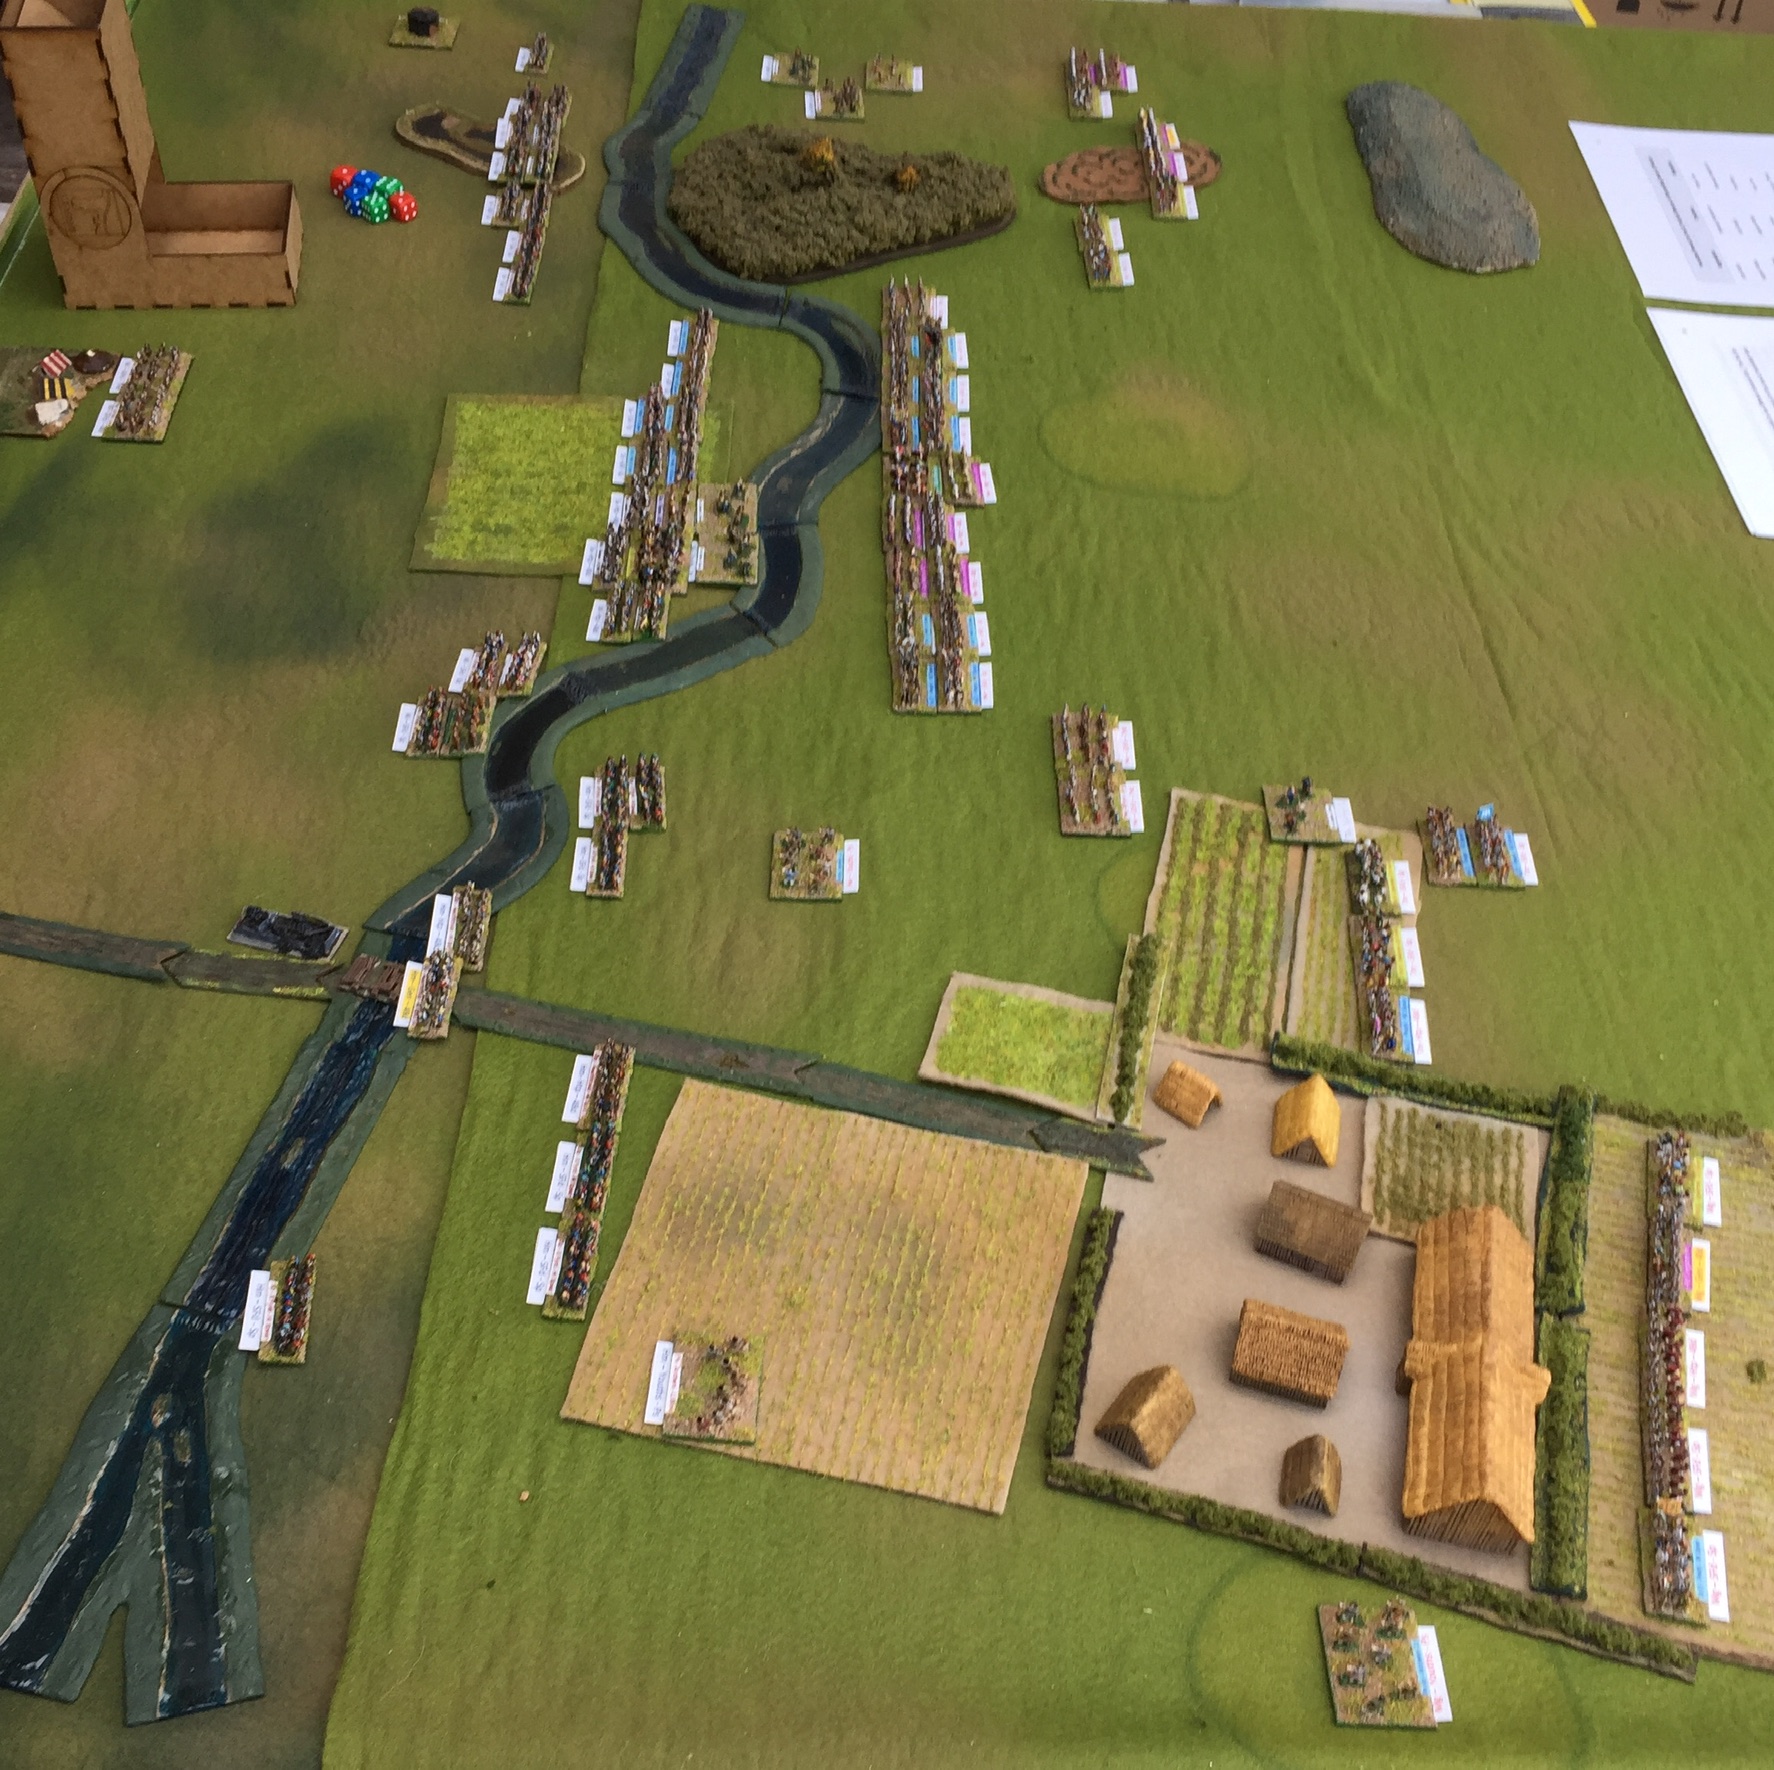
Which brings us nicely back to the campaign action in our alternative timeline. The clash is at a ford on the River Coln close by the small village of Wudiandum which is centred around a small monastery.  The Mercians are being run by the DBA solo rules with a few amendments made on the fly to cover the larger nature of this action.  The dice have determined that the Mercians shall deploy as far forwards as possible and with their three divisions as near to the centre of their deployment area as possible while still holding to a single battle line.  Their tactical choice is a neutral one for the centre and their right with the left being more defensive.  This will impact on the turn by turn options as the game is played out.  

The Mercian line up has their left held by Wrocensaetan and Hendrica with 9 elements.  The Centre is held by the Hwicce with 19 Elements and the right by the Maegonsaetan and Tomsaetan with 12 elements.  King Coenwulf is in the centre of the Hwiccan line with his Hearth Troop.

The Mercian Host

Facing them across the Coln are, in the centre, King Beorhtric and his Hearth Troop along with the men of Wilsaetan and Sumersaetan adding a further 19 elements to his command.  To his left are the men of Bearruc Scir and Dorsaete with 13 elements and to his left the men of Hamptonscir with 10 elements.

The West Saxon line of battle

The West Saxon line of battle above shows the labels I had to add so I can track losses by province.  The sharp eyed will note that I am having to use proxies as I just don't have enough Anglo-Saxon spears.  Even if Baccus had been able to stay open throughout the coronavirus epidemic I doubt I would have had the required numbers to hand as I wasn't expecting such a large action so early in the campaign!

This has the makings of a slugfest as there is little scope for tactical subtlety with these armies and neither side has a significant advantage in either troop numbers or types.  The numbers mean neither side will be easy to crack and there is little scope for turning flanks

The day dawned clear and it was midmorning when the two sides sighted each other.  There was a short exchange that almost counted as negotiation, almost but not quite.  Mercia demanded Wessex returned to its previous fealty claiming it had agreed to acknowledge Mercian over lordship.  Wessex countered by stating that agreement was personal to Offa and died with him and as the new ruler of Mercia had no link to the house of Offa they felt no need to submit. The Mercians called the West Saxons rogues and plunderers come to loot what they thought to be defenceless lands, the West Saxons looked disdainful and pointed out that the Mercians were only a little better than the Welsh they lived so close to and should know all about theft and plunder and that was the end of any attempt at a peaceful settlement.  God shall have to decide the right now!.

Sunday, 20 September 2020

Meanwhile back in the Dark Ages - Mercia 798AD

Its been a while since I last returned to the Dark Ages campaign. It's the downside of a solo campaign, my opponent tends not to pester me if I side-line things for a while!  In case you had forgotten the last post was >here<.  Wessex was feeling feisty and the Witan approved a plan to to test Mercian resolve by attacking Hwicce, a Mercian province across the Thames from Wilsaetan.  King Beorhtric considered that Mercia would be in flux following the death of Offa and that they would struggle to gather a large force to defend against his incursion.  He was wrong.  A few miles beyond the Thames he finds himself facing a significant Mercian army commanded by this years Mercian King Coenwulf (they tend to change quite rapidly post Offa, I blame the Danes).  This is a significant moment  as its the first time two Kings have faced each other across the battlefield in this campaign.  Both have brought a significant amount pf their manpower to bear and a serious defeat here will have a significant effect on troop numbers along the Thames Valley and for the Mercians the Welsh Borders for the next few years.

The forces are will be drawn up on the new "Acme Table Topper of Tactical Ineptitude" (TM pending) aka my new wargames table in 4 x 4 configuration.  The game is being played on a larger than normal area as the armies are BBDBA sized and "I have a table and I'm gonna use it" mode has been engaged.  The layout was experimental and didn't use the DBA terrain rules as I wanted the table’s first run out to look pretty!  The fields are just cosmetic and have no terrain effect the only 'true' terrain consists of a village, two hills (one gentle and one steep), the river, two woods and an area of boggy ground.  The village buildings are all from 2D6 miniatures and everything else is scratch built.

The Battlefield

Wessex has brought the men of Wilsaetan, Bearruc Scir, Hamptun Scir, Dorsaete and Sumersaetan almost their entire strength is here.  Facing them are men from Hwicce, Maegonsaetan, Tomsaetan, Wrocensaetan and Hendrica.  Which may make more sense if you check out the campaign master map at  https://elenderilsblog.blogspot.com/2020/05/the-dark-ages-campaign-some-background.html 

I will be using the Solo DBA amendments to run the Mercians, so tonight's job is to determine their deployment and tactical stance.  The West Saxons are already deployed in three bodies which is done before seeing the AI controlled force so as not to gain any unfair advantage.  I'm calling the other side the  AI but it is all done on dice and charts although it's not impossible that the dice may well be tactically smarter than I am.

More in a short while.

Monday, 22 June 2020

Dark Ages Campaign - campaign rules update

Just a quick update on the rules this time.  I looked at the next field action (Wessex invades Hwicce) and realised that the numbers of troops available was going to get out of hand using the troop selection rules as originally planned (something like 10,000 v 9300 a side in game statistic terms if each element is 240 men).  While I know it's only a game and what really matters is the number of elements on the table, in this case 42 v 30, it still didn't sit right with me. So I wondered how I could restrict the troop numbers without making fights between single provinces become mere skirmishes (which might actually be the proper interpretation).

An evening's reading around on military obligations (and a well spent hour reading a paper on the location and etymology of muster points and what it meant for army logistics in Wessex, not core to the point, but very interesting) suggested that for the Anglo-Saxons and Welsh I was giving too free a hand for troops to leave their own regions.

I already knew that the system of Anglo-Saxon organisation for active duty within the Fyrd changed in the reign of Alfred the Great but in the interests of simplicity I have decided to use a similar logic from the start of the game and for all nations apart from the Danes and Norse viking raids. I already have a different system for them intended to create a series of escalating raids until a 'Great Army' can be recruited.

As before available troops can join an army in their own province or an adjacent province to their own. and if the king commands he can levy troops from additional provinces by raising from provinces adjacent to those normally raised.  So those adjacent to those adjacent to the muster province, if that makes sense.  To offset the impact of the king being present I will require his element to be the command element and increase his chance of death.  Well Kings have to be seen to lead from the front, at least in my world view.

Troops will be broken down into three levels of availability:

  • First Tier - Personal troops of generals.  These go where their Lord goes.  In terms of Anglo-Saxons in the DBA lists these are the 4Bd Hird.  I have also included Psiloi as there are always a few youths ready to go off on an adventure.  All of these troops can be raised in the muster province and adjacent provinces.
  • Second tier - 50% are available when attacking and 100% when defending.  These are the Anglo-Saxon Sp Select Fyrd.  These can be raised in their own and adjacent provinces.
  • Third Tier - Raised to defend their own province only these are the Anglo-Saxon 7Hd Great Fyrd.
All of the above are troops raised without the King being present.  Add the additional adjacent provinces when he is present.  For example (have the game map available to make sense of this!).  Mercia is attacking Cant.  They muster the army in Suth Rige.  This allows them to raise all the first and half the second tier troops in Suth Rige, and all the first tier troops from South Seaxe and Middle Seaxe.  If the Mercian King was present he would be able to raise the men of Ciltern Saetan as this is adjacent to a province which is itself adjacent to the muster province.  The percentages available don't change just the provinces where troops can be raised.  In Cent the King can raise all his troops as he is defending.

As not all of the troops lists easily break down into the equivalents of the Anglo-Saxon categories I have made unilateral divisions of troops into three categories:  I will explain how that works when it next happens.

Ot perhaps I should simply relax and accept that an element is just an element no more, no less just some small toy soldiers glued to a base!


Tuesday, 16 June 2020

This is the way the lead pile grows!

Mea Culpa!  I have sinned, well spent to be accurate.  I mentioned a while ago that I was considering putting in an order to Irregular Miniatures and then I mentioned I was going to need some more Picts, you can probably guess the rest.

As always the service from Ian at Irregular was excellent, order placed on Tuesday, posted on thursday with an email to confirm, and delivered on Saturday.  The castings are all crisp and clean with nothing required except a bit of filing to level the bottom of the bases off.

I ended up with sixteen blocks of Pictish Spearmen giving ninety-six figures which will break down into 6 more DBA/ADLG elements.  Four blocks of five Dacian Light Horse which make two elements of Pictish Light Cavalry, two light Chariots four bases of naked celtic fanatics (possibly going to be Attecotti) and sixteen generic dark age barbarian foot generals and instead of the partridge in a pear tree a couple of sample castings a base each  of Scottish Spearmen and Highlanders from the feudal and medieval range and the new boat scenic castings all in wonderful 6mm of course.

The scottish spearmen are really nice castings but they are cast shoulder to shoulder so i will have to have a think about whether I can get them to fit my basing scheme.  The Highlanders are a really useful looking generic open order javelin armed light Infantry so I'm sure I will find a use for them.

I made a start on the naked fanatics as they looked to be an easy paint job, wall to wall Vallejo Pale flesh plus some shields hair and swords.job done, right?  Well almost, it needed a couple of different skin tones and a wash before they looked right but all done in an hour or so.  Once they are based I will grab a picture and post it.

I just had a thought, does posting pictures of naked Celts make this a porn site I wonder?

Monday, 8 June 2020

The Dark Ages Campaign 798 AD - Border disputes in Pictia

Fearing the growing  power of the Pictish Kingdom Riderch King of Strathclyde has determined on a show of force.  The target is the region of Menteith to the immediate North West of Strat Clut and an important link between Pict and Scot's-Irish lands.  Riderch gathers all his might at Cambuslang and heads North.  He is met close to Mucetauc (Modern Mugdock in Sterlingshire) by a force lead by the Mormaer of Menteith supported by the men of  Fib and Strath Erin.  This is close by the site of an actual real world battle between Strathclyde and the Picts a century earlier.

I diced for sides and the Picts fell to be managed by the solo rules.  These determined that they would be formed up in five groups (the DBA solo rules require groups of no more than four elements and cavalry to be in two groups which means that the first turn for the AI is usually sorting the groups out to a more sensible arrangement I think I want to change this).  The Pictish spearmen (3Pk) were two elements deep in two groups on a crestline in the centre.  Cavalry and Light Horse on their right and Light Infantry on the left.  The plan was for the spearmen to push forwards with the horse and light Infantry protecting the flanks of the spearmen.

The initial deployment.  Picts are furthest away 
On my side after the Pictish defenders had deployed I placed my Spearmen in two lines in the centre with a frontline wide enough to overlap the Pictish spearmen on both ends of their line and as far forwards as possible.  All my cavalry bar one element on my left facing the Pictish horsemen and all the Light Infantry along with the remaining cavalry element on my right.  My plan was to engage the two flank groups and hold them back while dealing with the main Pictish threat in the centre.

You know what they say about plans though!

The overall tactical stance of the Picts was aggressive which to be fair to the solo rules seemed right given the situation.  They started with a general advance and closed up the two groups of infantry in the centre into one body.  Their cavalry pushed ahead of the centre trying to engage the Welsh cavalry and prevent it getting around the back of the main body.  In response the Britons of Strathclyde push their own cavalry forward to clash with the Pictish light cavalry who form the front line opposite them.  In the combat they destroy one LH element and recoil the others, 0-1 to the Welsh.

The Pictish massed spears pour down from the distant ridge 
The Picts continue to plod forwards in the centre and a swirling cavalry melee erupts on their left wing as they feed the second line of cavalry into the fight.  They destroy a Welsh cavalry element 1-1.  In return the Welsh also feed their reserves into the cavalry fight but then seem to loose all of the fights with recoils along the line.  Those Pictish light cavalry are tougher than they look.  On the other wing the light infantry fight is inconclusive although the lone unit of welsh cavalry does get into a flank position.  Next turn the Picts get the dreaded single pip just when they don't want it.  They elect to continue to push the mass of spearmen forward but this means that there is no movement on the two flanks and the centre is starting to push too far ahead of it's flank guards.

So far so good the Pictish infantry have advanced beyond their supports
In response the Britons withdraw their centre and try to reform line with their horse.  Over on the right the light infantry fight is still see sawing.

The Strathclyde Welsh refuse their centre
The Pictish command still favours aggressive action but doesn't have the pip score to do all it would like.  They prioritise stabilising the cavalry wing and attacking with their light infantry while they still have it to attack with.  They manage to destroy one light infantry element making it 2-1 to the Picts.  The Welsh get a good pip score and take the opportunity to deploy their reserve of spearmen.  One unit moves into the front line and the remaining two head out over towards the right wing in case the light infantry fail to hold over there.  The cavalry regroup but loose another cavalry element in the melee. 3-1 to the Picts.  This was not how the plan was meant to unfold!

The Picts continue in their attempt to come to grips with the Welsh shield wall but are still a move away from contact.  To try to offset the overlap on their spearmen they add a light Infantry element to the end of the line.  On the left flank things are falling apart with another Welsh light infantry unit destroyed, 4-1 to the Picts and only two elements off the Strathclyde Welsh's breakpoint!  The Welsh can see the day slipping away from them and having a reasonable pip score they advance in the centre hoping it isn't too little too late.

The Welsh centre commits and starts to turn the left flank of the Picts
The dice Gods now turn their face away from the painted men of Pictia and narrow their options with a low pip score.  In a do or die move the surviving Pictish light infantry attempts to hold the Welsh cavalry in place for a turn to prevent a camp run.  They hold for a turn and then succumb to a flank attack from the Welsh spear reserves. In the centre the main infantry action starts.  Pictish 3Pk stacked up two deep for a cumulative opening factor of six against Welsh spear on a basic factor of four.  Again the dice Gods turn away and the Picts only kill one spear element in the first round of combats 5- 2 to the Picts.  In an equivalent to Wellington shouting 'Now Maitland. now's your time!' the Welsh close onto the flanks of the Pictish Infantry line and attack all along the line.  It will only take one Welsh loss and it is all over.  The first attack goes in with flank support and the Pict Light infantry recoil, except they can't,  5-3 Another kill in the centre of the line 5-4 and the flank attack on the other end of the line kills another element 5-5!  There are some Welsh cavalry on the field ...they think it's all over! and with the destruction of one more element it is, the Welsh have pulled it out of the bag.

There are some Picts left but they are all intent on going home, without further delay
Menteith has passed into Strathclyde Welsh control.  There were no command casualties, but there will be lamentations in Pictia and Strathclyde for the small folk who never came away from this field.

Strathclyde losses
Strat Clut 1 x Cv, 1 x Sp, 1 x Ps.
Rheghed  1 x Cv, 1 x Ps

Pictish losses
Menteith    1 x Ps (now SC Welsh)
Fib             1 x 3Pk, 1 x Ps
Strath Erin 1 x 3Pk, 1 x LH, 1 x Ps

These casualties will have an effect in later games in this five year turn as destroyed elements from this fight will not be available until the next full game turn and Strathclyde are to be attacked by Northumbria and the Picts are attacking the Dal Raitian Scots.

I learned that a solid wall of spears can hold off a pike armed body but only once they start to get overlaps can they do real damage to them.  Pike have to be used aggressively before their flanks can be turned.  Light Cavalry are stronger in these rules against cavalry than I expected and light infantry are a nuisance if allowed to do what they want so they have to be neutralised early. 

Strathclyde Welsh figures are from Baccus’ Goth range.  The Picts are from Irregular.  Buildings are Leven and 2D6 Miniatures.  The sharp eyed will have noticed that I had to proxy some figures as I need more Picts and Strathclyde Welsh.  I really wish someone did some Picts that were a better match for the Baccus figures. Plus I need to do something a bit more creative with the built up area than dumping buildings on a bit of felt!

Last but not least the chronicles have another entry.

798 AD In this year in spring, on the 25th day of May, there was a great battle at Mucetauc in Pictia and there the Peithwyr were put to flight by the Britons of Alt Clut and divers were slain of both peoples.  Such a slaughter has not been in these lands since the time of the Romans.


The Dark Ages Campaign - 798 AD a few additional rules and a battle

Things are moving along nicely and so far the mechanisms seem to be creating a narrative and a set of decision points that are not always those I would have tried for if I had an entirely free hand.  As each turn spans a 5 year period I have divided the activations in the order that they fell across the 5 years.  As the number of states left falls the number of activations will reduce as each state is drawn at random so as states become extinct then the number of activations will reduce, so I may have to find a different mechanism for spreading events over the turn's timeframe.

We now move on to the year of 798 AD with Strathclyde seeking to restrict the expansion and influence of Pictia by attacking Menteith.

The Strathclyde Welsh are led by their King Riderch II so as to be able to maximise the troops available.  He has raised the men of all three regions of Strathclyde for this expedition. The Picts are led by the Mormaer of Menteith backed up the Mormaers of Fib and strath Erin.  Both sides will form as a single command.  Where the king leads an extra element is added to the army to represent the King and his household troops.  The type will be chosen from the troop type available for any other general of that nationality.

By the way, I have decided that multiple combat commands will be used (each with their own Pip dice) as follows:

0-18 elements - one command
19- 30 elements - two commands
31 - 42 elements - three commands
43 or more elements - four commands

I will probably use the DBM or DBMM rules on dice allocation between Commands.  I'll worry about it if it happens.

The two armies are:

Strathclyde (Player Army)
General 1 x Cv (King Riderch)
5 x Cv (Including the 3 regional leaders Comitatenses)
9 x Sp
2 x Ps

17 elements - Break point 6

NB I have no idea what the actual equivalent title to Ealderman or Mormaer in Strathclyde was so I went with something vaguely Romano-British and will be calling them 'Dux'.

Pictia (AI controlled Army)
General 1 x Cv (Mormaer of Menteith)
2 x Cv (the other two Mormaer's household troops)
3 x LH
8 x 3Pk
3 x Ps

17 Elements - Break point 6

Terrain - Arable
The Picts have three gentle hills and a hamlet to place on the table.  I didn't use the random terrain selection rules from solo DBA amendments, instead I looked for the terrain that seemed most likley to assist an army with pike armed infantry.  Gentle hills are good going which Pike like as they can have the supporting rear rank bonus plus a second bonus if uphill.  Of course none of that is of much use if it falls badly!

Battle report in the next post.