Tuesday, 31 December 2024

Solo Gaming - down to the nitty gritty

Well the nitty certainly, perhaps not the gritty just yet.  Due to finding the work I did a decade (or possibly two) ago, I have made more progress on this project than I expected to have done.  What I have so far is a mechanism for deciding if the AI army will fight and in general terms how it will fight, it isn't clever and it's definitely not an elegant solution, but it seems to work.  It uses a set of factors to arrive at a measure of the base aggression of the army.  For the lack of anything else to call it I have termed it a fight or flight test.  It uses ten sets of factors some of which measure the difference between the AI and the player's forces while others look at a single variable.  Each factor generates a score which when added together  give a total which is checked against a table of battlefield grand tactical options.  A high positive result shows a high aggression and willingness to attack and a minus a low aggression and more likelihood of fighting defensively (or withdrawing).


Here is the Fight or Fly decision table.  The scores are from a set of factors

I have given you the results table before the ten tables of factors so you can have some sense of how I have weighted each of the following ten sets of circumstances that build up to the total.  The maximum and minimum that could be theoretically achieved are higher than plus 25 to minus 31 range represented on the table above.   In the tables which follow the green highlighted options are the commonest expected outcomes.


The first two input tables

Table 1 looks at the balance of numbers between the two armies as a ratio, it doesn't consider troop types simply overall numbers.

Table 2 deals with the ability/reputation of the two overall commanders.  It is creating a differential so an outstanding AI commander generates five points but a good player commander then deducts three points for a net comparison of plus two.  You will see this mechanism in a number of the following tables.  If in doubt assume the AI general doesn't consider the player as highly as it should and down grade the player.  Rather like Napoleon dismissing Wellington as merely a 'Sepoy General'.


Table 3 considers the relative morale of the two sides.  Again this is checking for the difference between the two sides.  You could use results from previous battles in a campaign or the morale rating from the rules of your choice or a mixture of both.

Table 4 asks what are the chances of avoiding combat.  Not whether either side wants to do so but could they.  An infantry heavy army facing a highly mobile opponent would be an example of an army where avoiding combat is impossible, although seeking better ground may be an option.


Table 5.  This is considering the effect of the overall strategic position on the AI commanders options.  Rather like Rupert at Marston Moor feeling like he had to attack because of Charles' poorly drafted instructions.  If there are no overarching orders from High Command use the Fight if victory probable option.

Table 6 looks at the relative pugnacity of the two commanders.  An aggressive general facing a defensive opponent is more likely to take the fight to them if all other factors are neutral.


The next two tables look for the effect of different levels of training and combat experience between the two armies.

Table 7 looks at the comparative levels of training of the two armies.  Untrained are civilians pressed into service with no training beyond stand there and try not to die!  Militia are troops with basic training or tribesmen with basic weapon skills as part of their culture.  Trained are Greek city hoplites called out when needed and required to drill at regular intervals during the year.  Regulars are full time professional soldiers.

Table 8 considers the amount of combat experience they have.  Raw troops have never experienced battle.  Experienced have fought at least one engagement while Veterans have fought and survived multiple combats.


Table 9 requires some creative thinking as the AI knows what re-enforcements it expects but has to guess whether the opponent will be getting more troops.  The scouting rules from your tabletop or campaign rules may help with this otherwise use your judgement.

Table 10 takes a look at the lay of the land but only in very general terms.  I'm not fully happy with this and will be playing around with it.  Ignore the player options and only use the top three options for the time being.

There is one remaining factor but it isn't a table like those above.  Its a random factor created by rolling two D6.  One dice is designated plus and one minus add the results together to get a random final figure.

As you can tell from the cut and pasted tables I use a spreadsheet, the factor used boxes are manually calculated and entered but those are picked up and totalled, along with the random factor, by the spreadsheet to give the final score for the fight or flight decision.

What I have here is more like a toolkit and concepts but it allows you guys to tinker with things.  If you don't agree with the weighting of the factors I have created change them.  Alternatively you can change the results table scores for each action.  I tested them against some actual battles treating both sides as if they were the AI side to see how close the result came to the initial plan of the actual commanders.  It gives a reasonable but not 100% match to what I think the original plan was, so it's broadly where I want it to be.  Its a case of tinkering with the balance now.  Have a play and let me know if it seems to work as you would expect.


New Years Eve 2024

Well 2024 has been the usual mixed bag.  The high spot was playing in Jolly Broom Man's English Civil War campaign at the start of the year and winning!  It was a really interesting system that left me feeling like an actual senior commander.  I made the strategic moves on the campaign map and selected the troops and gave the grand tactical orders needed to fight any battles, but after that had no input to the actual tactical level of field actions as JBM fought those solo following the remote player's plans.  What clinched it was King Charles dying early in 1643 following the defeat at Winterton Field.  I played a few solo games using my quick play Pike and Shot rules and in the aftermath of Christmas played a family game of Lord of the Ring's Risk.  If you haven't come across that game it is a different take on Risk and gives a good afternoon's fun.  I'm saying that even though I had my Ass (other equines are available) handed to me by the forces of evil.  It's a game which really deserves a post all of it's own and I will see what I can do in that respect in the New Year.  I also regained my painting Mojo which is a huge relief.

Real Life has been a bit of a bugger in 2024.  In part it's the inevitable legacy of getting older, I have lost a number of friend's from my misspent youth over the last few months.  It's to be expected I suppose, but it is an unwelcome reminder that none of us live forever!

I didn't really set myself any major objectives at the start of the year but I did say something about getting to some wargame shows, playing more games, posting more on the blog and painting more figures.  I got to a show so I'm calling that done, I posted slightly less than 2023 but hey that's close enough for Jazz, I don't have the data on games played over the two years but I was involved in a fair few this year.  Painting was an overall win as I end the year with less unpainted stuff than I started with so that's a result.

The big question of course is what objectives am I setting for 2025?  In no particular order then:

  • Complete the following DBA armies and ideally extend them to ADLG size: Early Byzantine Army (its about half way there), Goths (Ostro and Visi),  Hunnic and some infantry based Germanic types probably Franks.  EDIT - I forgot to put Moors on this list!
  • Finish the year with less unpainted stuff than I started with!
  • Rebase my 6mm British Civil war troops
  • Build a couple of 2mm armies for Strength and Honour and get a game or two in.
  • Play some ADLG
  • Put together some sort of AI system for use in solo games
Last and very much not least.  Thanks for stopping by and reading my ramblings.  I wish all of you a very Happy, Healthy and Prosperous New Year for 2025.


Monday, 30 December 2024

Giving ADLG a proper go

I only have the edition of ADLG prior to the current one and other than a couple of games against Paul Dawson I haven't really played many games with these, or the current version of the rules.  However, I got to thinking (dangerous as always) that building a couple or three 120pt armies from my existing troops wasn't too much of a stretch after building a standard DBA Army.  This is also known as rampant expansionism, mission creep or a simple 'ooh shiny complex'.  The only issue I can see is the almost automatic urge to just add a few more options to cover all the bases to build a standard 200pt ADLG army.  Before you know it I could be up to DBM/DBMM figure counts!

The difference between the figure counts is less pronounced with cavalry heavy armies as these use a single base in both ADLG and DBA.  Infantry heavy armies with two bases for heavy and medium infantry in ADLG are where things really show up.  Lets have a look at the difference using a Late Imperial Roman force as an example (because it is somewhere in the middle as a 'combined arms force).

There isn't a great deal in the way of alternatives in the DBA army list for the Western Late Imperials.  Two legionary elements, three auxilia, two light cavalry and two cavalry (which include the general) are mandatory which covers 75% of the army!  The remaining three elements provide options as follow.  Firstly two of Auxilia Palatina or Velites (can be one of each), then lastly one from Clibanarii (3Kn), Catafractarii/Alans (4Kn), legionaries, bolt shooters, Lanciarii (3Bd) or warband .  So optional choices are limited.  For my last three elements I went with options of 1 x Auxilia Palatina, 1 x Velites and 1 x Catafracts (4Kn).  Oh and for what it's worth the Eastern Empires options are even less flexible!

Late Imperial Romans as a 12 Element DBA 3.0 army plus camp

One thing I have noted is that the Late Imperial Roman army list defines Clibanarii as 4Kn and Catafracts as 3Kn, I think this is the wrong way around as most lists show cataphracts as 4Kn which is why I changed them in the last paragraph! 


Late Imperial Romans as a 200pt ADLG force with two commands
Next lets look at the ADLG version, I excluded Foederati (Huns, Goths etc) to make the comparison closer, My selection still only has 12 units. However, it looks bigger as it has separate bases for it's two generals and of course the heavy and medium infantry are double based. What is less obvious is that this army has two commands so it's more like Big Battle DBA, it also has a fortified camp which prevents Light Cavalry raids on it. On top of which it has paid points for special capabilities for some units.

The Final selections were; First command   a brilliant general, 1 x Elite Heavy cavalry (Impact), 1 x Equites Sagittarii Light cavalry, 1 x Elite Cataphracts, 1 x Equites Heavy Cavalry (Impact)1 x Elite Legionaries (Impact, Armour, Missile Support), 1 x Elite Auxilia Palatina (Impact, Missile Support).  Second command, an ordinary general,  2 x Legionaries (Armour, Impact, Missile Support),  2 x Auxilia Palatina (Impact, Missile support), 2 x  Light Infantry Archers.  Plus a Fortified Camp.


A better view of the ADLG army

ADLG differs from DBA in that it has a points based army creation system so it has those interesting moments of self doubt about making choices, just like the old WRG ancients army list quandaries.   You know, the should I make those Hun horse archers elite or take a unit of light infantry archers instead kind of thing, rather than the straight 12 element choice of DBA.   It also has special capabilities (as shown above) in some lists.  So the Legionaries above can have armour, missile support and elite status as options. Me being, well, me I have gone for armour and missile support for the Legionaries, impact is mandatory  For the auxilia again missile support and mandatory impact.  The mounted command also took the elite option for it's the infantry reserve.

ADLG has other things going for it too that I like, light infantry and cavalry archers actually shoot at stuff, and units degrade rather than die in an all or nothing way.  Why I haven't used the rules more I really don't know, as I do really like 'chrome' within the rules of a game and the extra figures gives the whole army a better appearance.  

Any way as a result of all of this thinking my painting table is now packed again, after I did really well in November in clearing stuff down.  The western gunfight figures are on the back burner (or is that the left side burner as per the picture), as masses of Baccus 6mm horsemen take centre stage. These are mostly Late Roman/Early Byzantine horse archers and Hunnic heavy cavalry who will be proxying as Byzantine Boukellarioi.  It's a good thing I like painting horses.

I haven't imposed the mess which is my painting table on you for a while!

As you can probably tell I'm having a bit of an upsurge with my painting mojo after a fairly slow year.  I cleared 128 infantry and 30 cavalry figures from the lead pile in November and at this rate will be ahead by a couple of hundred figures compared to January 1st.  Retirement eh, what is it good for?  Well painting teeny tiny soldiers apparently!

Sunday, 22 December 2024

Solo Gaming - What should Generals be doing?

I suppose we have all seen players who, as the commanding General,  micro manage every aspect of their wargames army.  It's almost a built in requirement of most rules as there is no one else available to move units, decide who they attack and all the myriad of other decisions needed for combat units.  As a result the player ends up covering every level of the chain of command at the same time.  In the worst cases the micro management is down to moving exact distances to avoid the other side being in shooting range or charge reach.  In my experience, limited I grant you to re-enactment and reading military history, that isn't how things happened in reality.  Real life isn't so cut and dried, generals couldn't be certain how far a unit could advance, or how close they could get to the enemy and still be safe,  In fact they often couldn't even see all of their troops to know what they were doing!  We shouldn't have that level of control either as the player or in the form of an AI opponent.

Against, not with, that's..AGAINST Yourself!

I tried to reduce the control available in my detailed pike and shot rules by using a standard system of orders for each unit.  These set an objective; either a location or an enemy unit, an action when they reach the objective and the speed of movement towards the objective, either fast or slow.  Lastly a delay can be set before starting to move.  As an alternative a support order can be given where a unit simply follows another and assist or takes over that unit's objective if they cannot complete it.  So an order would be something like this:  Advance quickly to  Rabbit Warren Hill and take it by close assault and then hold that position.  After that new orders would be sent or the unit would continue to Hold and other troops would continue the action.  It's assumed in the rules that units will attempt to follow orders until either; they are completed, or they get new orders, or they change orders by using their initiative (via a reaction test).  I think that this goes a long way towards reflecting the reality of command and control for pre 20th century warfare.

A commanding general is only one man, perhaps with a few messengers and aides to assist him, but he can't do everything himself.  Time and space conspire against him if he tries (unless the Army is on the small side).  If he tries to micro manage every unit he can't react to every change in circumstances for every unit, he doesn't have the time.  He cannot get new orders to a unit  from where he is to where they are with any certainty that the situation on receipt won't have changed while they were in transit.  So to balance those problems armies delegate command responsibility.  Hence the chain of command springs into being.  This balances speed of reaction to changes against lack of overall control.  At Battalion level the colonel has to react to the immediate combat situation and may amend the overall plan while still attempting to fulfil his part in it.  At Brigade the Brigadier reacts to the situation the battalions of his brigade are facing and perhaps to the situation of the Brigades alongside his own and so it goes.  Each commander has limited autonomy and is supposed to be following the larger plan (or in some cases not!).

While all of the above may be interesting, it should also have an impact on solo rule mechanisms.  It shows how the AI army should behave; it should have delay built in at higher levels but be capable of reacting to tactical changes at lower levels fairly quickly, unless the officer concerned is of limited capabilities, by some form of reaction test.  These limited capability chaps do exist, consider Byron at Marston Moor charging his cavalry wing over the ground Rupert instructed him to force Cromwell to cross to disrupt their formation!  Or as Brigadier Peter Young once reported on a junior officer "Sir if that man was a horse, I should hesitate to breed from him!"  I'd like an AI system that can throw up this sort of inconsistency.  Much of the reaction at front line level should be included in your rules of choice but that isn't automatically the case.  I'd almost goo as far as saying that rules should cover these issues be they solo or not.

So I'm now at the point of thinking that there should be an opening stage where the Commander in Chief carries out his comparison of forces and considers the strategic overview to determine if he will fight and if so what style of action to fight - attack, spoiling attack, hold and counter attack, defend or withdraw.  The second stage is to look at the ground and craft a plan based on how the terrain constrains tactical options for each side.  This is the stage at which the details of the action are thrashed out.  Hold the left advance the centre and hook around the right level of tactics plus creating a deployment plan.  I like the idea of giving commanders some personality traits which would have an effect at this stage. I'm also thinking that the orders should be to the top tier formations so wings, centre and or reserve in pike and shot fights or brigades.  I'm currently a bit stuck on how to convert these to orders for individual units, but I will get there.  As a bonus I found my spreadsheet from my last attempt to create something so I have a start compared to where I thought I was.


Wednesday, 18 December 2024

Some thoughts on solo wargaming

A recent Facebook review on a new solo wargaming book got me to thinking about what I would want to read on the topic.  The review pretty much listed what I don't want and apparently the book in question had all of these!  I don't need force generators or scenarios I can do that myself.  I don't want a history of or definition of what solo wargaming is either, most of my games are solo I understand what's going on...honest.  What I want is a non player opponent who makes decisions based upon the situation, pre battle objectives, and tactical options available.  Ideally it would look at the balance between it's forces and mine and decide on an overall approach that suits it's forces strengths and weaknesses and takes advantage of my forces weak areas.  It would also be nice if it could surprise me from time to time and wasn't so smart that I am never able to beat it!  It's not too much to ask is it.  I suppose what I am looking for is some kind of Artificial intelligence (AI).

I suppose the same goes for Wargames


Funnily enough I had to undertake a long drive today (Well not that funny the weather was dismal) and , as you do, tuned into Radio 4 as my usual channel had poor reception.  Lo and behold I stumbled onto a discussion of the development of AI systems.  It seems that in the early days there were two schools of thought about how to create a workable system.  One was based on mathematical models and in effect created huge suites of 'IF THEN' steps.  The other was bio- computational and sought to create what we now call neural nets.  The first was something that was seemed achievable with the technology available but had limits hard wired in by the drafting of the IF THEN alternatives.  On the other hand the neural net had huge issues around being able to create the thing but would then have been self sustaining as it would set most of its own decision making parameters and would learn as it grew (Sounds a tad scary to me)

If I'm brutally honest I understand the concept of IF THEN chains but Neural Nets are beyond me.  I actually started to try to create an AI opponent using a simple set of IF THEN steps over a decade ago and ran into some of the problems that proper IT scientists hit.  The first is that you have to understand the entire decision making chain and second it gets very clunky very quickly as the length of the IF THEN steps increases.

So why am I bothering to write all of the above?  Well in the absence of any clever IT boffin creating a computerised AI opponent for me I am going to have another attempt at the 'IF THEN' approach.  Here is where my thought process has brought me to so far:

Firstly the AI General tries to gather information about the player's forces by scouting and interrogating the local population.  Friendly locals are going to give more help than non friendly ones.  The number of mounted troops (cavalry and or Dragoons) influences this step as does the number of player mounted troops screening against scouts.

Next there is a pre battle assessment where the AI General looks at his troops and compares them to what he knows of the enemy.  This considers troop types, quality, numbers compared to the player's force and the broader operational situation (for example is an attack at poor odds necessary to pull enemy troops away from another location).  A basic tactical decision is made at this stage about whether to engage in battle, to withdraw, hold the ground, redeploy to a better site and similar overarching matters.

Now comes a more detailed tactical review on how to deploy and actually fight.  This considers the ground held by the two armies and who it favours.  The balance and composition of forces and the possible deployment.

All I have to do is create excel spreadsheet formulas to value those decision factors and If Then statements or other options to fine tune the AI options.  Sad to say that is where it all came to a grinding halt last time I tried this.  So here is the thing do any of my readers have any suggestions on what to include, how to weight the various decision factors or even suggestions for something that has already done what I'm considering or even an AI chat bot that could create tactical decisions?

Answers gratefully received in the comment section.

Sunday, 8 December 2024

British Civil War 6mm forces

These are my oldest 6mm figures and are all from Irregular Miniatures.  I bought most of them from the wargames shop that used to be near King's Cross station back in the late 1980's or early 1990's.  After the intervening 30 plus years they are a little battered and in need of some TLC and a rebase.  Some are still awaiting the touch of a paint brush and a first base!

So here they all are.  Zoom in too see the details

Most of them are the original Irregular Miniatures designs with musketeers that are cast standing feet together with musket at port across the chest and that made them fragile.  Unsurprisingly a number have snapped off, or are in danger of snapping off, at the ankles.  Some are the later design which are more robust and have more animation to them.  Those have alternating firing and loading figures on each strip which isn't how I want them.  I prefer a rank to be all firing, all loading or all standing waiting rather than a mixture.  Still a bit of careful work with side cutters will solve that.

Old style musketeers on show here.  Painted 30 years ago.

And here are the newer style figures painted much more recently.

I'm struggling to decide how to rebase these figures.  The pikemen are cast in close order, shoulder to shoulder with no way to split them down. so I am stuck with the casting's frontages of 20mm or multiples of that.  The shot are on 30mm frontages and cavalry on 25mm so unlike DBA or ADLG I can't use a standard base frontage.  I may have to go old school and count each strip as being 100 men and just live with the different frontages as showing different order, pike in close order and shot in order.  No matter what I decide to do, there will have to be an order heading off to Warbases in due course as nothing in my pile of DBA style bases will match.  Plus as you can see from the first image there is some painting to be done!  The other issue is that I will have to ask  Irregular if they can supply the figures needed to complete some units as they are not retailing their 6mm range at present.

Wednesday, 4 December 2024

6mm Industry News updates

Probably you are all aware of what follows, or you don't do 6mm figures and so hadn't noticed, but a couple of things popped up this week.  

Firstly, Irregular Miniatures have announced that are taking an enforced break from supplying their 6mm ranges.  This is due to family illness, staff shortages and the need to create new moulds as the old ones are showing wear.  Hopefully this is a temporary measure and will be reversed before too long.  I know a lot of people don't like Irregular's style but they paint up far better than you would expect at first glance at the bare castings and most importantly they have stuff that others don't and at a very competitive price.  The good news is that they have said that for existing customers needing figures to complete projects they will do their best to supply the required figures if you email them.  I'm sure you all join me in wishing them all the best with these issues.

The second issue, and one for The Jolly Broom Man to be aware of, is that Baccus 6mm are stopping shipping their ranges to the EU.  This is due to the imminent implementation (try saying that without your teeth in!) of new product safety rules for goods imported into EU member states from non EU countries.  This is going to require significant paper work and EU representation and Peter Berry can't currently find a way to handle this cost effectively or with certainty that it will meet the new requirements.  He has posted to say that he will be looking to return to selling to EU if possible and that if you want any of his cracking figures selling to you in the EU you need to get orders in PDQ.  Peter is pretty scathing about the circumstances which have led up to this situation and to be frank I agree with him.  I have seen other suppliers taking the same position and I expect to see more.

Wargaming is a business of two extremes at one end you have Games Workshop who are now a FTSE 100 quoted company, and not the smallest one either.  While at the other end most wargame figure, rules and other paraphernalia production is at, or around, the cottage industry level.  The UK is a wargaming commerce power house but mostly fuelled from these small businesses.  Being a third country supplier to the EU hits those small businesses the hardest as they have the least spare resource in time and/or money to deal with this stuff.  I wish I had a solution to offer but I don't.

Tuesday, 3 December 2024

More Moors

The Moors are coming along nicely.  As usual I'm starting by building a DBA3 army but will probably extend to a small L'Arte De La Guerre (ADLG) army later.  In part this is because DBA and ADLG have different ways of depicting the different parts of the army.  

With DBA there is a standard army of 12 elements which depicts the General, and his bodyguard, as one of those 12 elements and defines him as being a standard DBA troop type (with a bonus in combat).  ADLG on the other hand has generals either as a separate base that can be attached and unattached from any unit of the army or as an attached general permanently linked to a single unit (pretty much as in DBA).  On top of which many ADLG infantry units consist of the equivalent of two DBA elements.  That makes it easier (and cheaper) to start with the DBA version of an army, which is why I started where I have.  Come on you all knew I was a cheapskate!  ADLG also uses an army selection points system with standard games having a 200 point budget. There is a version closer to DBA army size using 100 or 120 points.  That said even at the lower point values an ADLG army is likely to have between 30 to 40% more bases than the DBA equivalent because of the infantry basing system.

Anyway back to the moors (cries of Cathy...Heathcliff in a strange North African tongue should now be ringing in your ears, No? OK maybe that's just me then?).  The General's element is now completed along with the additional infantry.  After some thinking and a query to the hive mind on TMP I decided to use Late Roman Heavy Cavalry castings to differentiate the General from his underlings...er... I mean brave fighting men.  I removed the Draco standard from the command figure group and replaced it with one based upon the Infantry standard.  Which may be wrong but at least it's a standard.


All the army to date, but...wait for it...there is moor to come

When it comes to painting horses I rather like liver chestnut and bay horses as the mainstay of my cavalry. To my eye nothing says 'horse' as much as the black tail and manes of a bay. I do throw in some pure brown, black and greys for variety and the very occasional pure chestnut and roan. I rarely do units in 6mm with all the horses in the same coat colours as these are troops on campaign not the parade ground. If you do spot a unit all of one colour watch out, it will be something or someone a bit special and probably has more oomph than other cavalry formations.

The general's element for DBA

As a final thought I realise that I should have created a Moorish army years ago, honestly the scope for puns is huge!  For a start they are almost all bare headed, not a cap to be seen, although I doubt many have been to Ilkley Moor.  I will leave you to work that one out. 😉

Sunday, 17 November 2024

The More the Merrier

Or in this case 'The Moor the Merrier' or Mauri, it's the North West African chaps who are the focus of this post.  I was looking through my lead pile and realised that I had bought a couple or three packs of Moorish Infantry.  These were used for various Dark Age types like the Welsh Princedoms and Dal Radian Scots.  The castings are bare legged and only have a tunic so they can be pressed into service as any number of lower class skirmishing foot types in that period.  I have sufficient of those for the time being so I decided to use them as Mr Berry intended, well I had quite a lot of them more (or should that be moor) than enough to cover the DBA3 infantry requirements for a Later Moorish army.

With very little variation in clothing choices, which meant a restricted palette, painting looked like it was going to be easy.  White(ish) tunic,  some dyed cloaks dark skin tone and then just animal skin shields in a mid brown, hair in a dark colour and weapons.   Well at least it it looked easy!  Moors didn't have the really dark skins of Sub-Saharan Africans  so getting that shade right took a few goes and as for the white tunics....Arghh!  White is one of those colours which is difficult to shade (I really must try a contrast type white paint at some point) and it took me a few attempts before I came up with an system that I was happy with.

I started with a white undercoat courtesy of Halfords ever reliable rattle can automotive primer.  I pre-shading on that but didn't like the contrast it gave.  So I had a cup of tea and a bit of a think ( but didn't take off any handles or things what hold the candles*) and decided on a new approach.  I painted all the tunics in Vallejo Bone white which is more of a pale coffee brown and all the flesh in Vallejo German Camouflage Brown a darker mid brown with a hint of something else in the mix possibly blue.  Only then did I apply a thinned wash of GW Agrax Earth Shade.  After which I dry brushed the tunics in Vallejo Ivory and then picked out some high spots in Vallejo Pure White.  It sounds like a lot of work but it doesn't take as long as you might think.  Adding some variations between black and chocolate brown for hair and some pale brown for javelin shafts pretty much completed the main paining.  A coat of varnish and the final touch of silver for spear points and bronze to officers' helmets and that was job done.

A gratuitous close up so you can see the final effect on those pesky tunics

Basing is my usual block paving sand and fine flock patches.  I used less flock than normal as Moors live in the Semi-Arid lands of North West Africa.  I will have to order some Moorish cavalry next time I'm buying from Baccus, then the Moors can be off to the races (see what I did there?). I have completed 44 of the infantry to date and have a further 36 on the painting table nearing completion.

A few more Moors (sorry I couldn't resist it), there are more to come (sorry, not sorry) 

The Moors are an interesting army in DBA, a general who is either cavalry or light cavalry, five Light Cavalry and six javelin armed foot who can be a mix of  light infantry or fast auxilia. Not a lot of punch but a whole lot of nuisance value.

As an aside, and I may already have posted about this.  I read something on a blog a while ago which has been a game changer in terms of brush care.  The occasional use of alcohol based hand sanitiser gel to clean brushes!  The gel means it sticks to the brush and it removes acrylic paint a treat, being clear also means you can see what is being shifted too.  It doesn't seem to damage the glue holding the hair in place, although I take the precaution of washing them out in warm water with a drop of Mrs E's shampoo in it afterwards.  After a second rinse they get a bit of hair conditioner then a final rinse and dry.

* For the education of younger readers go look for Bernard Cribbins' song "Right Said Fred".  It's a tale of the trials and tribulations of two removal men.  As an aside we had a second hand upright piano when I was very young that had both handles and things what held candles!  Life eh?

Edited 24 November 2024 to remove some typos I spotted

Thursday, 7 November 2024

The Great War in the Air - Part two

 The charts and tables

If you have looked at the original rules for Flying Circus you will have seen that those rules had a bespoke chart for each aeroplane.  That wasn't going to work with the much larger number of 'planes I had in mind so I took inspiration from another game where a generic data sheet was used and the bits that were not required were blanked out and specific data added into the relevant boxes.

The Control Sheet
You will need one of these for each aeroplane on the table with the relevant min and max data added and irrelevant parts blanked out.  You will also need some markers to track current height, speed, overspeed, ammunition  and damage.


Speed (throttle) shows the current movement points in level flight and is the speed generated by the engine.  If an aeroplane has dived it can gain additional Kinetic Energy (KE) this is acceleration due to gravity less deceleration from drag.  The maximum energy an airframe can 'store' from diving either in a Power dive (PD) or a Steep Dive (SD) is limited by a number of factors.  Lets lump all of those together as 'drag'.  That number is recorded in the Max KE box while the KE which is gained by diving is shown in the Kinetic Energy gain and loss section gains by power diving or steep diving on the left side and conversely the amount lost each turn in level flight (LF) or climbing is on the right .  If the airframe is storing kinetic energy it is tracked on the extra speed from diving track  This energy can be useful or may risk damage if the 'plane exceeds the VNE speed (velocity never exceed) as recorded in the VNE box.  Aeroplanes may also accelerate under power (Throttling up) or decelerate by cutting power and letting drag have it's effect.  The maximum number of movement points that can be gained or lost in a turn by these actions is recorded in the movement maximum gain and loss area.

Height is tracked using a counter on the three height tracks one shows 50 feet increments up to 1,000 feet, one 1,000 feet increments up to 10,000 feet and the last is in increments of 10,000 feet.  To track current height you need three counters one on each track.  Of course all aeroplanes have a maximum ceiling which is recorded to the left of the height tracks along with a box to record the maximum climb rate of the aeroplane.  Note that some manoeuvres can have an effect on the altitude of the 'plane.

Turn codes are the number of hex sides that can be moved through in a single hex and the cost per side in movement points and the number of hexes required in forward flight before making the next turn.  Turn codes A- D are as in Flying Circus.  I added extra more sluggish turns for larger aeroplanes These are turn codes E and F.  Code E costs one movement point for the first hex side and can only turn one hex side in a single hex.  Turn code F costs two movement points for the first hex side and can only turn one hex side in a single hex.  In both codes E and F the aeroplane must move forwards one movement point before making another turn.

The Statistics
You may not agree with some, or all of these and I can't be certain that they are anywhere close to actual performance data.  This is because I tried to find formulas which gave me the same stats as Flying Circus provided for it's original list of aeroplanes.  To do that I had to work with what data was actually available.  I could calculate secondary stats like lift area and power to weight ratios, but its all a bit vague really. Actual aircraft designers should probably look away now! What it does do is generate different data for different 'planes and in general scouts perform better than two seaters perform better than multi-engine types.  In general early war craft are more fragile that later war stuff.  V- strut sesquiplanes with smaller lower wings than upper are also a riskier proposition especially in steep dives but gain lift and turn rate as well as improved downwards visibility.

I used some ludicrously complex formulas to generate some kind of differences between the various aeroplanes and added some wild approximations as well.  Feel free to change anything you like, after all its all pseudoscience really!  What I have is a complicated spreadsheet but more on that next time as it really needs a post of its own, which is code for I need to tidy it up so it makes sense to people other than me!

Tuesday, 5 November 2024

Mixed emotions!

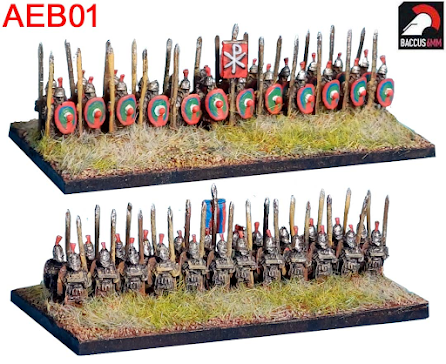
 A number of years ago I added a plea onto the Baccus forums for the esteemed Mr Berry to create a range of early Byzantines so I could replace my venerable Irregular Miniatures army.  At the time the response was that it may happen but not in the immediate future.  However, I wanted a Byzantine army, specifically one for the 5th - 6th centuries, so I decided to proxy other Baccus figures to that very end.    Sassanid regular infantry had a suitably large shield so I started there and though I say so myself they don't look too bad, yet they were not perfect.  In my mind's eye I had an image of the old Hinchcliffe 25mm figures but in glorious 6mm, but needs must and all that.  At 'The other Partisan' last month I bought some of Mr B's Hunnic Noble to serve as, well, Hunnic Nobles, but also to proxy for Boukellariioi for Belisarius or Narses.  This week in a fit of enthusiasm I started to work on a second unit of Skoutatoi.  No sooner had I started then 'bingly bong' goes my mobile phone to alert me to the fact that Baccus 6mm have launched a new range for a new period.  Yes you guessed it the period is 'Late Antiquity' and the range 'Early Byzantines'.

So this is the cause of my mixed emotions the infantry are exactly what I was dreaming of but I already have proxy troops for that role.  I almost wish that they were not what I wanted, but the entire range is perfect!  Damn you Mr Berry, now I think I may be falling prey to some form of compulsive behaviour disorder.  This is caused by knowing that the exact figures I want are out there so my lovingly proxied Sassanids are no longer ticking the right boxes.  I must have proper Byzantines, I need proper Byzantines!!!

Not 'proper Byzantines' but I was happy with them until.....

So in due course I will, of course, weaken and buy said 'proper Byzantines' the only question remaining is what to do with the demobilised Sassanid proxies, other than use them as Sassanid regular infantry (well that would be too easy wouldn't it).

Proper Byzantines!  (image from the Baccus 6mm catalogue)

Other than the above mixed emotions the new range looks really useful.  It will cover Justinian Byzantines and Maurikian Byzantines, it has the Avar influenced half armoured cavalry (drool)) as well as lance and bow armed heavy cavalry.  At a push it would cover Byzantine armies through to the introduction of the kite shield in the late 10th Century.  The castings look excellent, you can see them here Baccus 6mm and the later Byzantines from the early Medieval range are here Baccus 6mm.  I now have a terrible stabbing pain in my wallet!

Monday, 28 October 2024

Doing some admin!

Ooh that does sound exciting doesn't it.  It probably conjures up images of a weaselly looking bloke with a flat cap, a pencil moustache, a clipboard and a slew of coloured pens!  Sorry, it's not that exciting, but it does include a spreadsheet (if that helps) not that you get to see it though.  Instead its my annual calculation of the replacement value of my toys, you know the one I deflate by around 15% when Mrs E asks how much did that little lot cost then? 

It was a bigger task when I first did the count a few years back, but since then it has only been a case of adding new figures to the totals and updating the replacement costs for the figures, bases, painting service (I paint my own but if I lost the lot I wouldn't feel up to redoing them) etc.  Each year I add a new section, this year for example it was painted 6mm ECW.  I still need to add values for  painted World War One aeroplanes and World War Two tanks etc though.  Anal moi? No! Meglomaniac....well maybe a bit!

So what is the actual damage?

6mm Ancients to ECW

Painted and based - 3,647 figures with an estimated like for like replacement cost of £3,600

Unpainted - 900 figures, I haven't done an estimated replacement cost yet

6mm 1915 - 1945

I haven't done a count of the painted stuff yet, or valued these.  A job for 2025 I think. 

Unpainted - 329 castings foot armour and aircraft - again no replacement value calculated, another 2025 job then.

2- 3mm ECW, ACW and Cold War

These are not fully counted but the numbers are a bit scary if I count individual soldiers, not that I would as it's castings or maybe bases which are the way to value them.  For example the ACW infantry alone would number 13,392 figures or 93 bases of 144 each.  But those are matchstick based, home made troops with a negligible value other than the MDF bases.

I'm trying to reduce the lead pile...honest

Summing it all up

All in all I think the full replacement cost would be over £4,500 and probably approaching £6,000 if I  include terrain items, tables and boards (or rules or associated reference books) and the like.

So toodle loo, or in my case it better be too da painting table!

Wednesday, 23 October 2024

Painting the Antonine 2mm blocks

I know lots of other painters have covered this topic, but this is a post aimed at a very small and specific audience....me!   I wanted to document how I arrived at my approach to painting these blocks as my usual system wasn't going cut it, so I can repeat the style later.  The Antonine castings don't have the definition of Irregular Miniatures 2mm stuff.  All the detail has to be painted in, some of it is there just not as much as with the IM blocks.  This has to be painting intended to fool the eye at arms length, so as I often say we are painting for mass effect not individual detail, but this time it's real what do we see at first glance stuff.  So the first thing to decide is what needs to 'pop', what are we going to see the most easily at gaming distances?  To me it's the glint of metal from helmets and the splash of colour from shields and to a lesser degree the faces and lastly the clothing on the backs of rear ranks of warriors.  Helpfully heads and shields are visible on the castings if you look carefully.  Sidney Roundwood's blog (Roundwood's World) gave me a great concept to work with; he suggested taking a look at Snayers' paintings of the battles of the Thirty Years War for inspiration.  These show masses of soldiers as seen at a distance and is the level of detail to go for.

 An extract from Snayers' Battle of Fleurus

In the above portion of a much larger painting I have focussed on troops who are in the middle distance of the painting.  If you look at the furthest infantry it is almost impressionistic simple lines and of lighter and darker shades of a base colour to give the look of a mass of men.  That's what I wanted to go for but with a bit more pop.  The other thing to notice is the contrast between the block of soldiers and the background which makes them stand out, again something to focus upon in our tiny troop formations.

So with all of that in mind I broke with my normal painting system and under coated with Vallejo Earth.  It's a mid brown edging towards the red end of the brown scale which gives it some warmth.  Once that was dry I started with the detailing I dotted a metallic (bronze, silver or gold) on most of the heads of the warband castings then added a few primary colours and a few white spots to give something to draw the eye.  More regular troops all got the same metallic dot as they are dressed in a more uniform style.  Next up was a dry brush all around the sides of the foot castings in a pale sand to hint at linen tunics.  Next up are the shields done in a mix of primary colours so they stand out.  All this needs is a spot or a short brush stroke.  Lastly a dot of pale flesh (applied with a needle's point) for faces in the front rank.  

Barbarian Horde approaching.

I kept the unit photo small to give more of the on table feel to what you can see.  Remember this is painting a 'unit' not individuals.

The cavalry were also undercoated in Earth.  As I was doing these as cataphracts they then got a gunmetal coat to the front of the head and all the top surfaces and riders.  I picked out some faces and helmets in gold and silver for variety.  Lastly I painted in some cloaks in my usual primary colours plus white.

Two rank cavalry blocks as cataphracts.  I'm happier with this basing style.

As usual basing caused me trouble.  I never seem to get a scheme that I like first time of trying.  I used my usual fine sand and PVA base but masked off a 5mm strip along the rear of the base, so far so good.  For the horde I dry brushed a lighter shade over the actual sand.  I know; painting actual sand a sandy colour, who else but a wargamer would do such a thing!  The problem is that I didn't like the resulting shade of sand I got.  I tried some olive green dry brushing to break it up but I'm still not happy.  The cavalry base is better and is probably how I will do them going forwards.

The cavalry castings just don't match the infantry castings, they are too big and too blocky

A final thought after applying paint, the cavalry castings are about 30-40% bigger than they probably should be compared to the foot castings.  Plus I can't help but feel that they look like someone's Dad made them horse armour from old cardboard boxes that flat pack furniture came in!  At some point a re-sculpt is going to be required. 


Sunday, 20 October 2024

Antonine 2mm blocks

As mentioned in my last post Warbases don't carry stock of the 2mm blocks of troops for Strength and Honour.  So on Tuesday I made use of the free postage voucher they gave me and ordered some on online.  I spent just under £15.00 and bought four different types to see what the castings were like.  Given that this included 2mm thick MDF bases it was a decent price to pay for what I received.  This was:

  • A Roman Legion of 10 cohorts,
  • A pike phalanx, well its actually three of them on a single base,
  • A cavalry unit (as heavy or medium cavalry not lights)
  • a Barbarian warband.
My first thought is that these are big units, which is as they should be as they represent several thousand men each.  The castings are a little more 'abstract' than Irregular's 2mm offerings and seem ever so slightly smaller but that isn't noticeable when placed side by side.  The pike phalanx is much bigger than anything IM offer but the pikes are not as high as the IM ones. 

Antonine pike phalanx compared to IM pike block (centre)
The cavalry are rather nice although a bit 'cubist' in design, as they are made up of rectangles and lack the detail of the IM cavalry. They look great from arms length thoughI suspect that I might use Irregular's cavalry in preference to Antonine's
.
Fuzzy photo (sorry) but you see why I find the cavalry a bit 'Cubist'

There are a couple of different warband castings but all have the same style, depicting an unorganised body of men in unorganised mass. each unit consists of several castings which can be combined to give different shaped masses of men.

Barbarian warband base

I spent around half an hour this morning gluing the castings to the bases ready for painting and they do look good.  The castings lend themselves to this approach as there isn't as much need to get to the sides or rear of castings as would be the case with IM equivalents where each block would be several castings. There was little to no flash to worry bout and no visible mould lines which is a bonus. Under coating will proceed once weather and Covid symptoms allow the spray can I prefer to be deployed outdoors.

If you would like to peruse the entire range they can be found at Strength and Honour which takes you to Warbases website.

Given that armies in Strength and Honour run between four and fifteen (roughly) units an army will probably cost a maximum of £50 and that includes bases, which is very reasonable.  I'd be a bit more exact about that except I can't access the link for the PDF version of the rules I bought since the Lardies website went down!  The moral of the story being don't be cheap and buy a hard copy not the PDF.


Saturday, 19 October 2024

The other Partizan 2024

So Sunday last saw me hop into my car and drive down to the Newark Showground for The other Partizan Show.   As a bonus I managed to sneak in an illicit McDonald's breakfast muffin on the way.  I'm not supposed to eat stuff like this but it was my first Fast food since this time last year!  It was a fairly clear run down the A15 and A46 and it gave my car a decent run which it hasn't had for a while as we normally do long runs in Mrs E's big VW Tiguan.  I could tell I'd not done much in the way of long drives in my car as when I got back home after an 80 mile round trip my projected tank range reading had actually risen from 205 miles to 240 miles!  If only that meant extra fuel had miraculously formed in the tank eh?

Parking at the Showground was simplicity itself even though the car park was already busy.  There was a long queue to get in but this moved along quickly.  Entering the pavilion the first thing to strike me was 'wow, this is big'.  Really, really big! Plenty of traders around the walls and games in the central area.  In fact it's almost too big as there is so much to see and it takes a moment for it all to sink in.

Swedes at Lutzen. Advancing on the Imperial centre
The display games were my first port of call as some of my re-enactment friends were putting on a refight of Lutzen 1632 in 28mm.  This was an epic undertaking with over 2,000 figures on the table.  I dread to think of the weight of lead involved or the cost of figures, painting and basing!  Ian who was providing the Imperialists joked that he could feel the weight of lead he was transporting pulling his car sideways in bends!  I then had a chat with the guys from North Riding Wargaming who were putting on an Alter of Freedom game using 10mm figures.


Chris Kemp's Not Quite Mechanised game


I spent a pleasant 20 minutes chatting with old friends from the Monday Night Gamers (you know the ones who meet on Tuesdays) as they were running an Edgcote game, and a Not Quite Mechanised game of Longstop Hill, Tunisia in 1942 and manning the Northampton Battlefields Society stand.  Well done those chaps.

The huge Lutzen battlefield.  The town is burning at the other end!

Looking around the games there were at least three ACW games of various sizes, the same for Viet Nam and a lot of games involving beach landings.  The later included a huge D Day participation game.  I spotted a couple of western shoot out games as well.  All in all the standard of games was stunning.

Bloody Omaha participation game.  Nice to see some younger folk having a go.

The above game in close up the detail is stunning


Second day at Gettysburg in 10mm using Altar of Freedom

Another D-Day game.  I really liked the empty battlefield feel of this.


A samurai game which was simply stunning to look at

I tried my hand at the Wargames Developments participation mini game next.  These are always interesting and usually play out in under 15 minutes.  This year it was the armoured drive to relieve the para's at Arnhem.  The game consists of a line of squares each with a mini playing card allocated to it.  The card shows the level of German resistance and some squares have hidden events under the cards!  Cards are valued as in Bridge (well it is a Bridge too Far) with ace counting high and suits ranked Clubs, Diamonds, Hearts to Spades.  The allies win all ties.  The allies are dealt five cards face up. German cards are face down.  Each turn the allies advance one square, or stay put to either resupply or reorganise.  Resupply brings their hand of cards back up to full strength, reorganisation discards the current hand for a re-deal.  Used cards are discarded and not reused.  The hidden events are that the US airborne troops have not secured their bridges and the armoured thrust is stalled for a turn and that a German counter attack happens back down the road which has to be dealt with (Gerry gets an additional card back down the road which has to beaten before moving forward again).  Very simple, very elegant and very frustrating!  I got to the south bank of the Rhine at Arnhem on the last turn so it was a bridge too far for me.

Seven Years War as the action heats up


I then headed off to do some shopping.   First up was Pendragon for some Litko flight stands.  These are two part items a hexagonal base in one pack and the uprights in another.  This allows you to buy different size hex bases and different length height posts.  At ten stands for £9.50 you can't go wrong.  Next was Warbases where I had to restrain myself, they had a full range of the Cactus Creek western shootout building kits and I was mightily tempted by a couple (well rather more than a couple if I'm honest).    What I really wanted was some of their Antonine Miniatures 2mm stuff for Strength and Honour but it turns out they don't bring those to shows...pooh!  However, I got a special code to allow me to buy from their website postage free for 48 hours after the end of the show.  I then bought some western shoot out figures from Empress Miniatures (along with a chat with Paul and Christine) and some Hunnic Noble cavalry from Baccus.  By my standards this was a very restrained shopping frenzy.  Then it was back to looking at the display games.

Lastly I wandered over to the Strength and Honour participation game being run by Mark Backhouse.  This was a really popular game and deservedly won the best participation game award.

Strength and Honour game, this was hanging in the balance at this point.


After all this excitement I had a leisurely drive home and even managed to drop the roof and and have the full cabriolet experience in my elderly tin-top VW Eos.  I'd say 'feel the wind in my hair', but I don't have any 😊.  So all in all a great day out and I really recommend it.

Post script

Sorry for the delay in posting this.  It seems that I had one additional. unexpected acquisition from the show...Covid!  It's so 2020 my dears.


Oh Bugger!

Wednesday, 9 October 2024

The Great War in the Air


 As previously mentioned I have been reading over some of my old blog posts.  A bit narcissistic I grant you, but I'm quite proud of some of the posts and after not rereading them for a few years they read rather better than I thought they would.  One of those I landed on was a WW1 air combat post, which of course meant I read all of the others on that topic.  Reading them two things came to mind, firstly I never did post the amendments I made to the original SPI rules and secondly where the hell did I put my notes and rules!  Worry not, I did find them, eventually.

Now that's a dogfight (except it isn't the picture is mock up created in 1933)

The starting point was the old SPI game "Flying Circus".  I played this to death back in the mid 1970's when it first came out.  So I suppose it was only natural that I would want to tinker with the concepts it through up. The original rules for that game can be found here FlyingCircusRules.pdf (spigames.net) and if you want to follow what I did you should take a look at them.  Like the majority of SPI games it used a hex gridded playing area but I didn't want to have to draw a large hex grid so I simply based the models on hexagonal bases and measured everything with a cardboard hex tool I made.  You can see that in photo one.  Aircraft don't stay in grid alignment with each other so when measuring line of sight and shooting ranges and arcs anything that crosses any part of the models base is 'on target'.

The measuring tool used for movement....


...and for gun range checks

The original rules are three dimensional in so far as aircraft can climb and dive  in the vertical plane but not much more, all other movement is in 2 dimensions within a height band of 1,000 feet, as you would expect from a map and counters game I suppose.  I wanted to add some out of plane manoeuvres like rolls and Immelmann turns that were the key tactics in aerial combat. Other things needed adding as well like energy gain and loss too.  The original game had one thing going for it though, which was that it could be learned in a couple of minutes!  Each aeroplane had a stall speed and top speed defined as movement points.  Making a turn used up movement points and different planes took different numbers of turns to climb to the next height level.  You could only shoot at a target which was within range and that had been in your firing arc for half of your, or their movement points.  Possible damage varied depending on the number of machine guns (single or twin) and the ammunition feed (belt or drum).  Lastly you had a limited number of turns firing and drum fed guns had to change the drum after two turns of firing.  That was pretty much it, a real beer and pretzels game.

Luckily smarter minds than mine had already looked at some of the things I felt needed improving so I borrowed and adapted.  First I changed the combat resolution table outcomes so they reflected pilot morale and experience by having most hits impact not the aircraft but the pilots confidence with any hit having a chance of causing a critical damage result which would have an effect on the aeroplane. As I said in the original posts those early aeroplanes were mostly a lot of nothing wrapped in canvas and wood, the vital systems were a small percentage of the target area.  Talking about the aeroplanes the original game only had statistics for around 20 of them, mostly allied types.  That needed expanding which given the lack of firm data on early combat aeroplanes was a big (read huge) task.  The amendments I ended up with are as follows.

Flying Circus Plus

These adaptions use a mix of advanced flying Circus (SPI), Richtofen’s War (AH) and home brew rules.

Turn Sequence (IGOYGO)

1.      Player 1 spotting

2.      Player 1 Movement

3.      Player 2 spotting

4.      Both player’s firing

Repeat the above for Player 2

Simultaneous Movement codes
Each turn note the aeroplanes movement on the play sheet using the following codes:

·         Number – that number of hexes straight ahead

·         Down Arrow – dive note how many metres

·         Up arrow climb - note how many metres (Max of 100 per hex)

·         R or L one hex side turn in indicated direction in the current hex one letter per hex side subject to a max of three.

·         Special manoeuvres – use code as shown below.

Diving
There are two standard categories of dive and a special manoeuvre available in FCP.  The two standard dives are:

Shallow dive – there is no reduction in MP for a shallow dive each 2MP spent moving a shallow dive loses 100 feet.  Turns may be made while shallow diving.

Steep- dive – an aircraft may only move straight ahead in a steep dive.  Each hex costs 2MP and loses 150 feet a steep dive.  Aircraft gain KE while steep diving.

Power Dive – see special manoeuvres.

Over Speeding (gaining energy)
Additional “speed” may be gained as a result of gaining energy by diving under power (over speed).  There is a maximum safe over speed before structural damage is risked.  This varies between aircraft as shown on the statistics sheet.  The original game rule of diving at a reduced speed is not used in the advanced rules.  Aircraft may dive at the maximum normal level flight speed or faster (due to energy gain) without any restrictions, but may suffer structural damage.

Gaining kinetic energy (KE)
Where an aircraft dives at its maximum speed or above it will gain kinetic energy (over speed) up to its maximum over speed allowance.  Aircraft gain one MP per KE point gained per turn spent diving at or over maximum speed.

Using KE
Once an aircraft has ended its dive it still holds the excess energy which must be bled off.  This happens in one of two ways.  In each turn of level flight KE movement points are lost in addition to any other speed reduction (through Drag).  Alternatively, the excess energy may be used to “zoom and boom”.  This entails converting excess energy (over speed movement points) into additional climb points.  One KE point provides an additional 200 feet of climb.

Damage from diving at over speed
Aircraft diving at more than safe dive speed risk structural damage.  Different aircraft have different safe dive speeds.  This is shown on the statistics chart.  The structural damage modifier will increase depending on how much they have exceeded the safe maximum dive speed.  Use the over speed damage table to check if damage occurs.

Damage from high stress manoeuvres
Where an aircraft performs a high stress manoeuvre roll on hit chart CRT3 to see if damage occurs.  First dice to see if hits are scored.  If so pilot resolution is not reduced as with MG fire instead move on to a critical damage test as per gun fire.  Ignore all results other than structural damage.  If there is structural damage check on the structural damage table for the type of damage incurred.  Fragile aircraft use range 1, normal range 2 and robust range 3 result columns.

Fragile Aircraft
Certain aircraft are considered fragile and have an increased chance of suffering structural failures when undertaking high stress manoeuvres.  Fragility is noted on the data chart for those aircraft.  They have lower resistance to structural critical damage than normal.

Loss of height and turns
Any turn in a single hex after the first hex side creates a loss of height of 50 feet

Front MG Arc of fire (simultaneous movement)
As firing solutions are harder to achieve with simultaneous movement the frontal arc of fire is widened.  It is now as shown below.

This simulates the ability to ‘kick in’ a little rudder to yaw the aeroplane.  Range remains the same.

Arc of Fire


Gunner operated ring and pin mounted guns

The gunner has to anticipate the pilot’s actions which can interfere with tracking targets.  He may also need to switch targets rapidly from left to right above or below.  To simulate this gunners fire at -1 on the CRT dice roll for all targets other than those below their aircraft where they fire at -2.

Spotting
Any aircraft firing is automatically spotted by the target aircraft.  Aircraft in blind spots cannot be spotted.  Line of sight is required to spot.  Clouds block line of sight.  Otherwise roll 2D6 at the start of the turn and adjust the result as follows (all factors are cumulative)

Aircraft firing weapons

+1

Aircraft within 8 hexes

+1

Aircraft below spotter

 -1

Aircraft ‘up sun’

 -2

Aircraft over 20 hexes from spotter

 -2


If the result is 7 or more the aircraft is spotted.  Any other aircraft in close formation are also spotted.  Close formation means in base to base contact and at the same height (+/- 200 feet).  If playing IGOYGO non-moving player’s aircraft check after the moving player has completed all movement

Ranges in 3D firing and spotting
To simulate firing in three dimensions the enemy aircraft must be within 1,000 feet above or below and not in a blind spot.  Only aeroplanes with the prop hang special move may fire directly upwards, and those with power dive fire directly below and only when those special manoeuvres have been used to gain the firing solution.  The chart below gives the actual range in hexes to use on the CRT

Height

Diff’ (feet)

Hexes to target >

0

1

2

3

4

5

6

7

8

0

-

1

2

3

4

5

6

7

8

200

1

1

2

3

4

5

6

7

8

400

2

2

3

4

4

5

6

7

8

600

3

3

4

4

5

6

7

8

-

800

4

4

4

5

6

6

7

8

-

1,000

5

5

5

6

6

7

8

-

-

NB 200 feet height difference equals one hex height difference in spotting

Combat damage and pilot resolution
In FC an aircraft has a damage limit equal to its speed.  Each point of damage reduces the aeroplanes speed by one point until it falls below stall speed when it is considered destroyed.  In these additional rules, particularly strong aircraft have a damage level higher than their speed as shown in the game statistics and fragile aircraft a lower value. 

Firing uses the tables below to ascertain if hits are scored.  These do no damage to the aircraft but reduce the pilot’s resolution (willingness to continue in combat).  Lots of bullets passing through your ‘plane will tend to do that.  The amount scored is subtracted from the resolution of the target pilot.  Once his resolution reaches zero his objective becomes survival and he will attempt to get off the board via any friendly table side.   Standard pilots have a resolution of 10.  Veterans and novices may have their resolution adjusted as players see fit.  In a campaign setting reduce resolution of all pilots by 1 for each friend shot down and killed.  Add 1 for each enemy aeroplane shot down to the shooter who got the kill shot.  Add 1 to all pilots who survive a game.  It is suggested that minimum resolution be set at 6 and maximum be capped at 18.

For damage checks roll a second D6, if the result is equal or lower than the result on the combat CRT add the totals rolled on both dice together and check the critical damage table. 

For example: a Fokker DVII (Twin belt fed MGs) fires at an SE5a at a range of 3 hexes.  A D6 is thrown scoring a 5 resulting in 2 hits.  The SE5a pilot’s resolution is reduced by 2.  As hits were scored a second D6 is thrown this results in a roll of 2 this is equal to the CRT score of 2 hits.  Critical damage may have occurred.  Adding the two dice rolls together gives a total of 7.  This is a control hit, checking on the control hit table requires a final roll of a single D6 this scores a 1 which reduces the SE5a’s turn code to the next lowest level.

Long Bursts
A player may opt to fire a ‘Long Burst’ before rolling the dice.  This adds 1 to the to hit di roll.  It uses up double ammunition and cannot be used if there is insufficient ammunition remaining or for drum fed guns there is only one ammunition point left before needing to reload.  After using a long burst roll 1D6 on a 1 the guns used have jammed and if this is the main gun, the pilot takes a reduction of 1 to his resolution for not being able to shoot.  This remains in place for the rest of the game.  Each following combat turn where the aircraft has flown straight and level for the entire turn roll 1D6 and unjam on a 6.

Special manoeuvres
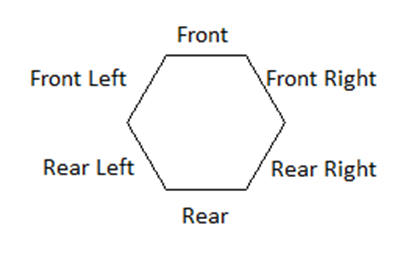
These are all moves which require a climb or dive but which do not follow the FC rules so they are treated as special exceptions to the movement rules.  Some of these special manoeuvres are considered high stress manoeuvres and may lead to structural damage.  This will be detailed on each aeroplane’s data card.  To understand the moves the direction and facing of the aeroplane will use the descriptions in the image below. Front is always the initial direction of movement. 


1.      Side Slip (Code -SS) -The aeroplane remains pointing in the same direction throughout the manoeuvre.  It moves into the Front Right or Front Left adjacent hex at a cost of 2MP and loses 50 feet of height.  The action may be repeated as long as there are MP available to use.  Alternating from right to left or left to right is permitted.

2.      Yo-Yos (Code HYY or LYY + number of hexes) -A Yo-yo allows an aeroplane to reduce distance over ground by alternatively climbing and diving.  A Yo-yo may start with a climb or a dive but must alternate climbs and dives in each successive hex during the manoeuvre.  The first step is always by entering the adjacent front hex.  It uses the energy gained in a dive to recover some of the height lost in the following climb.  Each hex moved through costs 2MP.  A hex in which the aeroplane dives reduces height by 100 feet.  A hex in which the aeroplane climbs gains 50 feet.  The manoeuvre may be carried out while flying in a straight line or combined with turns.

3.      Hammerhead turn (Code HT)HIGH STRESS.  The aeroplane moves forward one hex and enters a vertical climb.  it then revolves around the aircraft’s length (going from nose vertically up to vertically down) it then dives vertically in the same hex.  The aircraft may exit to any adjacent hex.  The manoeuvre costs 6MP.  For targeting purposes 3 MP may count towards acquiring a target for the aeroplane carrying out the action and all 6 for an aeroplane attempting to shoot at it. While carrying out this manoeuvre the aeroplane hangs almost stationary at the top of the climb and any aircraft firing at it does so with a +1 modifier to the to hit dice roll.

4.      Rolling reversal (Code RR)HIGH STRESS a half loop and roll out the modern Immelmann turn.

5.      Full loop (Code O) – The maximum size of the loop and so the number of hexes displaced to the rear is determined by the aeroplane’s rate of climb.  The aeroplane ends the manoeuvre facing in the same direction and the noted number of hexes to the rear of the starting hex.  The ‘plane will lose 50 metres of height in the loop.

Rate of climb

MP cost

End point

50

2

Start hex

100

4

1 hex to rear

150

6

2 hexes to rear

200

8

3 hexes to the rear

250

10

4 Hexes to the rear

300

12

5 hexes to the rear


6.      Displacement roll (Code DR) – In essence this is a combination of a side slip and a roll to slow forward movement while maintaining MP.  The aircraft moves forwards two hexes at a cost of 4MP

7.      Propeller hang (Code PH) HIGH STRESS– Aircraft moves forwards one hex and enters a vertical climb it then stays in the same hex but is assumed to be pointing vertically.  As with a Hammerhead The manoeuvre costs 6MP.  For targeting purposes 3 MP may count towards acquiring a target for the aeroplane carrying out the action and all 6 for an aeroplane attempting to shoot at it. While carrying out this manoeuvre the aeroplane hangs almost stationary at the top of the climb and any aircraft firing at it does so with a +1 modifier to the to hit dice roll.  After the propeller hang the aircraft may carry out a further propeller hang, a hammerhead or a rolling reversal

8.      Power Dive (Code PD) – HIGH STRESS The aircraft moves forwards one hex and then enters a vertical dive.  It gains KE in the dive at double the normal rate.  To end the power dive the aircraft enters a normal dive for half a turn and then level flight for half a turn.  Fragile aircraft check for structural damage on pulling out.

Charts

CRT 1 (twin MG belt fed)

Die/Range

1

2

3

4

5

6

7

8

1

1

0

0

0

0

0

0

0

2

2

1

1

0

0

0

0

0

3

4

2

1

1

1

0

0

0

4

4

3

2

1

1

1

0

0

5

5

4

2

2

1

1

1

0

6

6

5

3

2

2

2

2

1


CRT 2 (Double MG – drum fed)

Die/Range

1

2

3

4

5

6

7

8

1

1

0

0

0

0

0

0

0

2

2

1

0

0

0

0

0

0

3

3

2

1

1

0

0

0

0

4

4

2

1

1

1

0

0

0

5

4

3

2

1

1

1

1

0

6

5

4

3

2

2

2

1

1


CRT 3 (Single MG belt fed)

Die/Range

1

2

3

4

5

6

7

8

1

1

0

0

0

0

0

0

0

2

1

1

0

0

0

0

0

0

3

2

1

1

0

0

0

0

0

4

2

2

1

1

0

0

0

0

5

3

2

2

1

1

1

1

0

6

3

3

2

2

2

1

1

1


CRT 4 (Single MG drum fed)

Die/Range

1

2

3

4

5

6

7

8

1

0

0

0

0

0

0

0

0

2

1

0

0

0

0

0

0

0

3

1

1

0

0

0

0

0

0

4

1

1

1

0

0

0

0

0

5

2

1

1

1

1

1

0

0

6

3

2

2

1

1

1

1

1

NOTE:  Aircraft with both a single belt and single drum fed forward machine gun (e.g. SE5A) use CRT1 until the drum is empty they then use CRT3 until the drum is reloaded. 

Critical Hit Chart

Throw a second D6 if the score is lower than the result on the CDT above a critical hit has been scored.  Throw a second D6and add the scores together to get a score of 2 – 12 and check the table below.

Score

Effect

2

Crew Hit

3

Engine Hit

4

Structural Damage

5

Structural Damage

6

Control Hit

7

Control Hit

8

Control Hit

9

Structural Damage

10

Structural Damage

11

Engine Hit

12

Crew hit

Crew Hit
For multi crew aircraft dice to see which crew member is hit.  Roll 1D6 1 or 2 is KIA all other results are wounded.

Pilot hit if KIA aircraft is out of control and enters steep dive until it hits the ground.  If wounded reduce resolution by 2.  If Gunner hit KIA that gun position is out of action for the rest of the mission.  If wounded reduce pilot resolution by 2.  All fire by that gunner is at minus one to hit.  Further wounds to a previously wounded person reduce resolution by an additional 2 for each wound.

Engine Hit
Throw 1D6

Score

Result

1

Engine seizes.  Power reduced to zero.

2

Oil leak engine runs rough and seizes in next 6 turns 1D6 1 to seize then 1 & 2 etc.

3

Max power reduced by 1

4

Max power reduced by 2

5

Fire - 1 point of damage/resolution per turn until extinguished

6

Fire 2 points of damage/resolution per turn until extinguished

Extinguishing fire – dive the aircraft in a steep dive.  On a 6 on a D6 the fire is extinguished.  In a power dive it is extinguished on a 5 or 6

Structural Damage
No effect until the next high stress manoeuvre is attempted.  Then roll 1D6:

Score

Result

1

No Damage

2

No Damage

3

1D6 Damage

4

2D6 Damage

5

May no longer make high stress manoeuvres as a wing spar has cracked

6

Aircraft disintegrates

 High Stress Manoeuvres are:

·         Steep Dive

·         Any turn of more than one hex side or part hex side after the first.

·         A second turn in a consecutive hex after the first hex in the same turn

·         Special Manoeuvres as noted

Control Damage
Throw 1D6

Score

Result

1

Turn Rate reduces to next lower rate (e.g. A to B or C to D)

2

Unable to turn to Left

3

Unable to turn to Right

4

Climb cost increased by 1D6 steps

5

May only shallow dive

6

May only gentle climb

 No Special Manoeuvres may be used that require a move no longer available as a result of Control damage

Over speed effects
Throw 1D6 add any adjustment for how much over speed the aircraft is

Score

Result

1

No effect

2

No effect

3

1 Point Damage

4

2 Points Damage

5

3 Points Damage – possible structural damage test on next high stress manoeuvre

6

4 Points Damage - wing spars crack no steep dives or climbs

7 to 11

Severe damage wings detach plane breaks up


You don't have everything you need here (yet).  Next post I will put up the playing sheet on which the aircraft data is recorded and explain the abbreviations on that.  I will also post the data for the aeroplanes most commonly seen over the western front.  That will be another long post!