Showing posts with label Product Reviews. Show all posts

Saturday, 1 November 2025

Helion's Bavarian Armies during the TYW - a review

I'm a bit of a fan of the Helion Century of the Soldier series as it covers one of my core periods of interest, the 17th Century.  I have three or four on my bookshelf already including another by Laurence Spring the author of this book.  It is only cost which prevents me having many, many more.  They are best thought of as an step up from Osprey's offering as they are of a higher page count so can go deeper into their subjects.  I'd normally go with Osprey as an introduction on a topic and then the Helion if I then want to delve deeper.  As a bonus Helion have opened a second hand section to their webstore where books both second hand or with minor cosmetic damage (as was the case for this purchase) are offered at a discount.  With this book I made an offer of £7.50, which included postage, against a list price of £25.00 for a new copy and it is the latest updated second edition.

Looks interesting

I have wanted this particular volume for a while now as my re-enactment unit within the Sealed Knot has a connection to Bavaria in the Thirty Years war due to our links with the Memmingen Pikeniere who invite us to join them in the four yearly 'Wallensteinfest'.  If I'm going to take part in a Bavarian Thirty Years War event I felt that it would be nice to have some background information.  This book gives me that, in spades.

My copy is softback but quite robust.  Excluding the rather useful bibliography the main text runs to 212 pages including 16 pages of colour illustrations.  the contents page shows the main areas covered.

There is a lot of information crammed in here

From a tabletop wargamers perspective not all of those chapters are of key importance although for creating a living history background for a re-enactor the information is a gold mine of detail.   So for example Chapters 8,9 and 11 and 12  cover things that don't see much coverage when the dice are being rolled but will add a lot of depth to a living history persona.  On the plus side the plates have some lovely illustrations of colours carried by the Bavarians.  The chapters on "The rank and file and "Organisation" give clues on unit headcounts at various points in the war.  The appendix on Regiments of the Bavarian army gives a potted biography of every unit, even the minor unit we recreate (not brilliantly it has to be said) when over there.  The bibliography is useful even if it does cite a couple of Osprey titles amongst the primary sources.

Now for the not so good points.  For a book subtitled 'The backbone of the Catholic League" it doesn't give a chronology of the League or any information on it's composition.  I had to turn to Wikipedia to for that.   There isn't an index, to me this is a major omission in what is significant reference work.  Then, despite having chapters on Organisation and Tactics it doesn't give me all the detail I had hoped for to allow me to create a table top representation of the units that make up the Bavarian army and to show it's combat deployments, unit formations and battlefield tactics.  I was hoping to have a run down on how Tilly organised and fought his forces and how those things changed after his death.  After all we know Tilly favoured larger infantry combat formations but very little detail is provided.  In fact Tilly is hardly mentioned after the short biography in Chapter 1!  I'd tell you exactly how few but there isn't an index to let me easily do that.  Some information on how the Army fought is there but it is a pretty broad brush approach over all.  We do get some data on unit sizes and pike to shot ratios but very little of the depth and width of infantry formations.  Period military textbooks are quoted but these range from late 16th century material, Gerat Barry's description of the Spanish formations from the early 1630's, through to English sources and post Thirty Years War material without any explanation of what might be relevant and why.

I know hard information is difficult to come by but it would be nice to have comments to say this author writing in 1600 gives us an idea of where tactics stood at the outset of the war, this from 1632 despite detailing Spanish doctrines may show what influenced Tilly.  Such and such a source although written in 1650 may be showing us the final tactical developments.  From a wargaming perspective I have seen this stuff done in much better ways.

Like the other Helion book I have by this author (In the Emperor's Service which covers Wallenstein's armies) it has the feel of an academic paper rather than a book aimed just at wargamers alone.  For anyone doing living history it is a treasure trove of background information on Bavarian forces.  For the pure wargamer it is a little light on the nitty gritty of formations and tactical usages, but still a good source.  I suppose I bring my own bias to the book as what I really want is guidance on how to portray the army on a wargames table and which tactics to use with it.  After reading it I'm still unclear on how (for example) Tilly deployed a foot Battalia and how this changed after First Breitenfeld, There is too great a relance on sources that even at the time would have been considered a secondary source and there are sources used that have no direct bearing on the Bavarian army.  Those are used to show general trends in tactics but if you are buying a book about a single army in a single period it's likely that the reader knows that stuff already. Overall I'd score this book as a 7/10 and I'm glad I obtained it at a deep discount.

Wednesday, 15 October 2025

Product review - Brushes from Rosemary & Co

I'm late to the party with this business I suppose.  I have been aware of them for some time and I've seen a number of figure painters who swear by their brushes, but it was only this last week when I finally got around to buying some.  What delayed my doing so was my preference for actually seeing the brush to be sure it held a good point before spending my money.  However, the number of positive reviews from around our hobby community and the fact that they had brushes which suited my needs on special offer pushed me over the edge.

Ordering was simplicity itself.  The website made selecting the type and size of brush I wanted really straight forward.  I. of course, headed straight to the special offer section (well you know how I like a bargain) and to my joy the type of brush I was looking for was on offer!  Unlike proper artists as I paint figures I work on a tabletop rather than an easel or a slope.  That means I'm looking for a brush which won't roll away if I put it down and has a distinct 'shoulder' between the handle and the ferrule so that the brush doesn't touch the tabletop and pick up dust, flock or basing sand.  It took me a couple of minutes or less to find exactly that style.  Even better the price was really good at around £5.00 per brush for pure sable in size 0 and 1.  I would have paid double that at Hobbycraft.

The brushes arrived within a couple of days via Royal Mail, none of the trouble and strife of xxx who seem to delight in loosing or misdelivering parcels around here!  They were really well packed as well.  the brushes all have great points, so I needn't have been concerned about having to see them in the flesh.  

The proof of the pudding is of course how they behave in use.  The brushes have a nice balance and the triangular 7" handles sit well in my hand when painting. The brushes don’t allow paint to wick down into the ferrule unlike synthetic brushes I have used in the past.  Paint flows well off the point too.  Clean up was straight forward as well.  All that said these are brand spanking new brushes so let’s see how they stand up to my heavy handed usage over the next few weeks.

Thursday, 7 August 2025

Trying 'Through the Square Window' rules out

I finally found a window (Yes it's a a square one) in my busy schedule to give these rules a run out.   As previously mentioned they take a very similar approach to the rules I wrote for the period.  A case of parallel evolution as I was totally unaware of them when drafting my own set.  They are less complex than mine as they don't have rules for the initial deployment stage or for weather and the terrain rules are more straightforward, but are more complex than DBA and it's offspring.

My earlier review is here BTW Small but Perfectly Formed: Through the Square Window Rules review

Setting up the game

Before the game starts there is a bit of admin to do.  This is to calculate the strength of each unit as a numerical value derived from the troop type and the number of bases it has.  This is because there is no casualty removal rather a unit's strength points are reduced by combat until at zero a unit breaks.  The next bit of admin is to determine the Army 'break point' in this case derived from the number of units and their size.  Lastly all units have to be defined with a tactical formation type such as Dutch battalion or Kurassier and a training level.  This influences the tactics they may use and in some cases the number of dice rolled in combat or morale tests. It sounds like a lot of faff but it is very easy to do and given a couple of games would be something I could do in my head.

The appendices to the rules give some general (and quite useful) information on the main armies for the Thirty Years War. Other than that the rules are not specific about how to deploy troops beyond stating that the troops should be within heavy artillery range of 70cm but not closer than 50cm from the enemy.

In my test game I didn't use any artillery and I kept the terrain as a totally featureless plain.  The two armies are vaguely connected to the Bishop's Wars of 1639 and 1640 as one side is Scottish and the other is English.  Although that's about as accurate a reflection of the real history as you are going to get!  It's nice to get my 6mm pike and shot troops onto the table as they haven't been out to play for a few years!


Both sides are set up with three commands; an infantry centre and two cavalry wings.  

The Scots have a unit of Highlanders as a Forlorn Hope in advance of the main infantry formation.  Well there are optional rules for them so I thought I should try them out (I did warn you that it isn't all that accurate).  The pike and shot units are using Swedish tactics to allow a musket salvo and charge to contact option and are classed as trained.  The cavalry are arqubusiers and trained.  I did initially think to define them as light cavalry as a nod to Scots cavalry having lighter horses than the English but it reduced their effectiveness too much.  There is a small unit of dragoons deployed ahead of the Scots horse at the top of the picture.  Overall the Scots horse is outnumbered and probably out classed but they have more and better foot.

Over on the English side the cavalry are 'charging horse' who will attempt to close to melee straight away rather than sitting back and shooting.  They are classed as trained.  The foot is Dutch style so no salvo fire and is classed as poor.  This reflects that the English foot in the Bishop's War were not really enthused about taking on the Scots and were badly trained new recruits in the most part!

A quick  unit count and the resulting army strengths are 17 for the Scots and 18 for the English meaning that the Scots will roll 2D6 and the English 3D6 in any Army morale tests (more on this as it happens).  The unit strength points are as shown in the the next image these are not the same as the Army Strength points..  I'm showing this on the table using the micro dice and dice holders from my 2mm rules.  I know the dice holders are a bit intrusive, that's because I haven't painted them yet. The unit at the top left with a strength of one is a single base of Dragoons.  The largest a dragoon unit can be is two bases so that would give it a strength of two. Dragoons are rather fragile under these rules.

Unit strength points are based on the troop type and number of bases and are a measure of how much damage they can take before being destroyed.  Army strength points are based upon the number, type and size of units.

The end of turn one with individual unit strength points in yellow

The detail orientated will notice that the cavalry formations have changed some what.  That is because my original deployment was by units from my Marston Moor Orbat.  TTSW rules place limits to how many bases make up a unit so I had to change things to ensure that units were not larger than the rules allow.

The games afoot!

On the first turn the English advanced their horse as quickly as possible, while moving more slowly with the foot.  The idea is to get into contact ASAP on the flanks and delay things in the centre.  For the Scots the reverse is happening.  They want to get to grips with the English infantry and hold off the horse to allow a decision to be achieved with their infantry.

Turn two started to show how things can develop very quickly under these rules.  The English horse attempted to charge their Scottish opposite numbers, well they are charging horse it is what they do!  However, the wily Scots elected to evade, which they did successfully.  They then turned back towards the English horse and opened a galling carbine fire upon them.  In the centre their foot closed to close range and opened fire. This stopped some English units in their tracks and caused casualties all along the line.  

Melee combat is resolved using 1D6 per strength point per base so a three base unit of eight strength points can be attacking with 24 dice looking for sixes to to hit.  On average that should be four hits on the opposition.  Firepower is less deadly as it only uses one dice per shooting base but it hits on fives or sixes at short range and sixes at long range and happens before melee.  The number of dice in both types of combat can be increased or reduced according to troop tactics or training although there are only about six possible amending factors.  Plus and this is a big plus hits from shooting trigger a morale test for every hit inflicted. 1D6 is rolled for every hit and extra dice for secondary factors.  These are all rolled together and any twos or ones are failures.  Twos cause an advancing unit to halt in place as does a single one but if two or more ones are rolled the unit routs!

EDIT

Following a helpful comment from Tradeston Wargames Group (the authors of the rules see comments below).  It is clear that I was misreading the rules on melee combat.  I should have been using the strength points for each base to calculate the total dice so a unit of strength 8 is made up of a pike block strength 4 and two musket blocks strength 2 each totalling the units eight strength.  So I should have ben throwing eight dice for the unit NOT eight dice per stand.  This actually removes my one niggle with the rules (as well as making perfect sense and showing that I should read more forensically).

The second turn opened with the English horse attempting to charge home against the Scottish arquebusiers again.  This succeeded in most cases This time the Scots couldn't evade They would have had to have saved an action from their previous turn to use on an evade move.  In the centre the English opened fire all along their front hoping to stop the Scots closing.  This was only partially successful which would have consequences.  The Scots declared charges with their foot and the resulting morale tests were 'interesting'.  Three English foot battalia routed rather than standing to fight and one retired.  The melee phase offset that disaster with Scottish horse being destroyed or routed off the field.

Turn 2 - the position after the Scots opened fire. 
Sideways on Retire markers are halted units


So turn three looked to be hanging in the balance, except both sides failed their army morale test.  That means that they both withdraw from battle.

The army morale test compares the result of a dice roll with army strength points lost, routing, or pursuing off table and not yet returned.  The number of dice rolled is calculated by dividing the original value of the army strength points by six (rounded down),  If the result is equal to or lower than the lost points that army withdraws.

So game over after only two full turns.  However, they were action packed turns with both sides being busy and having decisions to make throughout.

Gratuitous close up of old Scots castings blowing holes in the enemy

You may have noticed that I'm not using the basing suggested in the rules.  It doesn't impact game play in any serious way as far as I can tell.

Oh and the Highlanders never fired a shot or swung a claymore.  They routed on turn one under threat of charging English foot and then spectacularly failed a rally test at the start of turn 2 and broke up and fled!

Conclusions

These are rules that repay a careful reading, which in my case that included taking notes.  This is because some important information is only found in the 'sequence of play' section and isn't repeated in the main body of the rules.  This includes some things that might seem obvious but left me thinking " I'm sure I saw a rule about xyz, but where was it?".    These include:

  • No firing after starting a charge move,
  • No firing after being contacted by chargers,
  • Confirming that firing normally comes before movement unless specifically noted otherwise (any troops who can use salvo fire and Highlanders are specified and possibly Swedish Cuirassiers although that later may be a typo),
  • When rout and pursuit moves are made following morale tests,
  • When rally from rout and pursuit moves is attempted.
Melee combat is brutal and units can be wiped out in a single combat round due to the large number of dice being rolled.  I may introduce some mitigation against that effect in a future test game.  On the other hand using larger armies than I did in this test game with support lines in depth may alleviate the issue and would include an additional level of decision making about conserving units.  Watch this space to see what I come up with on that topic.  EDIT See my edited blue text above and the comments below.  I was misreading the rules on this point.

Morale tests can break a unit which has taken limited casualties but even routers can be rallied so that balances out and the Army morale test can end a game by forcing an army to withdraw even when you think you are ahead.

I rather like these rules, they have a hidden depth and are going to repay repeat plays to fully get to grips with the subtle challenges they pose.  How much do I like them, well lets just say Irregular Miniatures will be getting an order for cuirassiers in the very near future and I will be making some game markers to aid in solo play and upgrade those dice holders once I get this article posted.  I'm also going to attempt to create a QRS,  although I found I could remember the majority of the rules after a couple of moves.

Wednesday, 4 June 2025

Through the Square Window Rules review

I promised a review of the 'Through the Square Window' rules for the Thirty Years War  I picked up at Partizan recently, so here it is.

The rules cover and the one colour illustration

Summary
I like them.  The author has a similar view on how seventeenth century warfare worked to my own.  The combat mechanisms are elegant and uncomplicated and there are straight forward rules for depicting the various combat formations that evolved as the TYW progressed.  There is also a nice section covering the various armies involved and how to depict them on the table top, not dissimilar to my blog posts on the same topic for my own rules.  There are no grids (hooray), but a lot of dice, although this speeds up combat and especially morale/reaction tests so I don't mind that.  They use the battalia/squadron as the standard combat formations which is where I like to operate for pike and shot gaming.  All dice used are D6 so there are no oddball dice to acquire.  I haven't played them yet but other than changing the base sizes and ground scale to reflect the fact that my own troops are 6mm rather than the author's 15mm chaps I don't feel any need to fiddle.  The price doesn't hurt either, my copy came in at £10 from the author and I think they are also available from Caliver for £15.  

Details
The rules come as a spiral bound A4 book with clear plastic front and back covers.  It's printed on a good quality heavy paper, almost a light cardstock, and runs to 50 pages overall.  Of those only the first 16 pages are the rules.  Once set up, unit formations and definitions are taken out of the equation there are only 11 pages of rules covering the fighting on the tabletop.  Don't be put off by the short page run for this section though as despite the larger than average font used (Looks to be around 12-14 point which is nice as my eyes are not as young as they were) there is a lot subtle game play mechanisms in those pages .  This is achieved by the use of different tactical styles and formations.

There are few illustrations and these are simple black and white diagrams covering formations and arcs of fire.  To be honest the rules don't need more.  There is a good contents page so finding things is fairly easy which is good as there is no quick reference sheet.  The author says he tried to create one but couldn't compress the information to a single sheet.

Here are some images of my 6mm troops in the relevant infantry formations.  Apologies for using non 30 Years War figures I went with what I had.


A Dutch style battalion


A Swedish equivalent looks weedy but gets a salvo bonus

Wallenstein style Imperial battalion note shot bases in front of pike

Unit basing and formations all make perfect sense and, as mentioned above, do have an impact on how each different formation fights.  Each formation has a training/morale class of well trained, trained or poor, again this impacts how a formation fights.  I will create some specific mixed pike and shot bases for the Imperial squadron shown above so that they are closer to the concept in the rules.  That is probably the only change to my basing I need to consider.  Units also have a number of strength points based on the troop types in it and the number of bases of each type.  This defines how much punishment a formation can suffer before it breaks.

Spanish style large Tercio


Later Spanish Small Tercio

The rules use square bases but I have not fully followed that  as I already have 6mm troops based and don't want to change them (again).  If I was starting from scratch I would definitely go with the basing as suggested.  As it is my square bases are equivalent to those in the rules and my longer bases are equivalent to two of the square bases.  There was a chat on Face Book about basing and the consensus was (including the author's) was that as long as both sides are using the same base sizes and they are not too different to the rules it will be fine (but see bit about command rules below).

Each unit has a number of actions it can take each turn although there are some restrictions on doing the same thing more than once per turn.  So for example infantry and cavalry have two actions per turn while light cavalry have three.  Infantry cannot perform the same action twice in their turn.  Cavalry (except for shooting) can carry out the same action twice.  This limits how fast foot can move compared to cavalry.  There are 14 possible actions for units to to use, although three are artillery only and one is dragoons only.

Combat is straight forward with each base in a formation allocated a number of dice for shooting and a separate number for melee.  This varies based on the troop type on the base and their training level and brings more period flavour to the rules.  The combat system  is roll the total number of dice for the bases in combat and count hits, which are usually 6's but can be 5or 6's in some situations.  Each hit removes a strength point from the enemy unit.  

Morale works in a similar fashion.  There are several trigger events which cause a morale check and once triggered some additional situations add extra dice to the roll.  Every dice with a score of 1 or 2 can create a morale effect other scores have no impact.  Scores of 2 only effect poor troops while scores of 1 effect all troops and take precedent over the less severe outcomes of rolling a two. Scores of 1 are cumulative within the one set of rolls, think of it as a unit being overwhelmed by the number of things not going their way.  Its quick and effective with minimal charts required.  The effect of failing a roll can halt an advance and then cause a unit to rout if a further dice score of one is in the same set of dice rolls.  It sounds cumbersome but is actually fast to resolve.  It's worth noting routing troops can be rallied.

Command uses a command radii to test if units are able to take new orders directly.  The rules don't ask for specific orders for each unit they simply advance to contact.  Lack of command works by forcing halts and potentially removing a unit's ability to act, which I think means they are stuck in place and can only react to enemy actions.  This is possibly the least well explained part of the rules.  As a unit simply halting and not doing anything seems odd.  I'd expect them to at least be able to shoot.  I suspect that the number of generals is the defining factor here and that command needs to be modelled down to brigade level.  The only clue I can find is in the army costs (page 16) which gives a point cost for a general and says there must be a minimum of four generals.  That would suggest a CinC and a general for each wing and the centre.  This is something where I probably need to have game under my belt to fully grasp. As a secondary point this is where changing the base sizes might cause a slight issue.  Placing troops on much larger bases then recommended would have the potential to move unit's out of command range as it would spread units out more.  There is of course an easy fix, extend the command range by the same percentage that the base sizes are increased by.

Conclusions
Are these a detailed simulation of pike and shot combat ?- No, but no set of rules can cover every detail especially in a period where there was substantial change under way.  I don't hold this against the rules.  Every writer has to make a decision on which aspects to leave out and I think the author has taken a sensible view on this.

Do they provide  differences between the different tactical styles and formations?  Yes, this is one of the strengths of these rules and clearly was at the forefront of the author's mind.  The differences will allow players to feel that an early Spanish Style Tercio has to be used in a different way to a Swedish Brigade and reward doing that.

Do they feel right?  Well I haven't played a game yet but reading through my take is that they will give a period feel to game play.  There are enough differences in troop types to allow an early TYW army to act differently to a late TYW army or a BCW Army.

Overall, I think I have found my go to set of rules for the TYW.

Oh and yes the title is a nod to both The Defenestration of Prague and BBC's old pre-school programme Playschool.  Don't you love it when the author is a similar vintage to yourself?

Thursday, 17 August 2023

How do you test a new set of rules?

A really rather useful  post over on Jonathan Freitag's blog 'Palouse Wargaming Journal'  >>Link<<  reviewing a new set of ACW rules from Helion got me thinking about the review process and what it is that is actually tested.  Over the years I have seen (and played) a number of rule sets that had good mechanisms but which were not a good reflection of the period of warfare they purported to cover.  Equally I have seen rules where there is a good game with good period flavour in there somewhere but the rules fail to properly bring it out.  Lastly there are those rules where everything is covered but they bog down under the weight of that detail (I have probably been guilty of homebrew rules like this).  Personally I believe that rules reviews should tell me what the reviewer would like from a set of rules and then tell me why the rules under review do or don't achieve that .  That's because I'm always going to place a higher value upon a review which is looking for the same things I am in a set of rules.

One thing that really puts me off any new set of rules is a lack of internal consistency.  For example defining the size of a standard unit and then using units representing an entirely different size in scenarios included within the rule book.  Next worst is not properly explaining rules, again something I really worry that I might be guilty of.  After a while drafting and redrafting there comes a point where you know what a rule is meant to do and somehow you simply cannot see that the rule as you have written it doesn't actually convey the meaning you have in your mind's eye.  Which I suppose is where good proof readers and editors come into their own.  One of my personal peeves with Helion is the poor proof reading and editing.  

For me the acid test is can I replay a historical battle with the rules and have (in no particular order):

- orders of battle as defined under the rules that properly represent the troops that were actually engaged on that day,

- decision points that reflect the key issues that the actual commanders had to deal with at the command level the rules focus upon,

- restrictions built into the rules that mirror the key restraints faced by the commanders in the period,

- did it have the feel of a battle of the period,

- was it fun or at least interesting to play (AKA the will I play these rules again test),

- the turn duration - weapon range- movement distance equation hang together properly (and be properly balanced).

I know that other gamers will have different priorities and some are not interested in historical gaming at all, but even in High Fantasy or Science Fiction rules their should be internal consistency not just in rules hanging together but in the trade off between cost/benefit and impact of the technology in those fictional worlds, I like my fiction to have some grounding in reality.

I can live a set of rules where I have to 'tinker' around the edges but not if the fundamentals are flawed.  I also like a set of designer's notes so I can see the process for choosing mechanisms and why aspects were included within or excluded from the rules.  I accept that a set of rules will not and should not include everything that could happen in the real world but it is nice to see the thinking that has gone into the choices made.


Friday, 3 July 2020

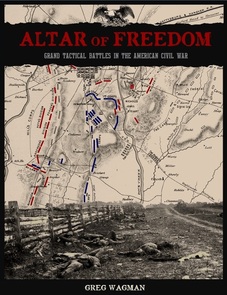
First Sight - Altar of Freedom ACW rules

You know the saying "I need [insert name of thing you don't need here] like I need a hole in the head", well yes it's that, although I could do without any additional holes.  This time it's the American Civil War.  By way of explanation or possibly excuse I should state that after ancient period wargaming the other big period I used to game was the American Civil War in 20mm using Airfix figures.  This stemmed in part from my having been an ACW re-enactor back in the 1970's before I became embroiled in the homegrown variety of civil strife.

It's "The Mild Bunch" circa 1977.
A few days ago while browsing the web I came across a review of a set of rules called 'Altar of Freedom' and they sounded like they were using some interesting mechanisms.  They were available on Wargames Vault for $15 with scenario books for the major battles in the Eastern and Western Theatres for an additional $15 each, available for a simple couple of clicks of a mouse button.  Online purchases, its  what we do in lockdown and it was my birthday on Sunday and they come as a PDF so no incriminating parcels.  Did I mention that the recommended scale is 6mm too.  It's not my fault it was more than mere flesh could bear.  So I bought a set of the rules and the Eastern theatre scenarios.

Picture
Nice cover art work too
Lets say right from the off these are not rules that work well for solo gaming (although I'm going to see what I can do about that).  This is because of the activation and game turn length mechanisms.  The whole point of the rules is to have a live opponent.  What they do cover really well is the grand tactical level command and control issues that the Army Commander focuses on.  Each manoeuvre element is a brigade, there is no micromanagement of Regimental formations to worry about that's happening down the chain of command and is beneath the interest of the Army command.  No this is a game that focuses on the bigger picture with the objective being that full scale ACW battles can be fought on a reasonable sized table (the biggest needed is 6 feet by 4 feet).  They are tailored to refights of actual battles rather than fictional encounters or point based competition encounters which suits me fine.

The rules a short, crisp and have the minimum of modifiers to combat.  The core of the game is the activation bidding system.  Each player has Army and Divisional commanders represented on the table.  These all have command points available plus some traits that may impact how they can allocate those points, along with some which impact on other things such as combat.  At the start of the turn those points are allocated between divisions to determine the sequence of activation.  Highest bids go first.  Points can only be applied to units in that general's chain of command.  Some points can be held back to be used in the admin phase at the end of the turn (where reserves can be moved and units may attempt to rally amongst other things.  The other important use of these points is to gain control of the turn clock.  The turn clock has a value ( determined by the scenario) after each group of divisions on the same bid value have moved and fought both players throw a dice and the player who controls the clock decides which one to use.  The value on the chosen dice is deducted from the turn clock and then the next set of divisions are moved at the end of those divisions turns the players throw the dice again to count down the turn clock.  Once the turn clock passes zero the turn ends.  So by having control of the turn clock a player who needs to do a lot in a turn can choose the lowest dice rolls and delay the end of the turn or if they want to block the oppositions plans they choose the higher dice rolls.  this can be useful if there are a lot of reserves needing to be brought up or broken units to rally.  Although its a bit 'gamey' it does allow the impact of generalship to be modelled.  The traits assigned to generals reflect their performance on the day of the battle so as army commander the player has to deal with the personalities.  This is something I really like.

The units are generic brigades on standard bases which makes creating the units easy.  They have a numerical modifier to reflect larger or smaller formations or a better or worse performance at a particular engagement  allocated for each battle.

The scenarios cover the major battles of the war with a tablelayout, order of battle and specific traits for the relevant commanders for that battle.  These vary from battle to battle to reflect how they behaved on that specific day.

Of course this being me a confirmed 6mm player I decided to try the rules using 2mm figures as the recommended scale for buildings is 2 mm.  Plus I can make markers quickly and easily to get up and running.  In due course I may use 6mm figures, or I may not!

The website for the game is excellent (a real plus in favour of the rules in fact)  there are free introductory scenarios to download, a free Gettysburg campaign rule set (also free) and a select of paper building's to make (again free).  These can be found here https://www.6mmacw.com/ along with the rules and other helpful advice on building terrain.

So I have a start on Brigade bases and terrain.  So its "On to Richmond" next with a try out of First Manassas as soon as the rest of the units are done.

Thursday, 5 December 2019

First sight - 2D6 Anglo Saxon buildings

Robert Fellows of 2D6 Wargames has very recently released a new range of 6mm Anglo-Saxon resin buildings.  So of course I ordered a set.  Using his online shopping cart was extremely easy (far too easy according to Mrs E) and as with most internet shopping sites I could pay with a bank or credit card via paypal without having a paypal account.  The order came through within a couple of days and I received email updates to show how the shipping process was going throughout.  Packaging was good and I'd be surprised if normal handling in the postal system would be able to damage anything.  Excellent customer service throughout.

The castings themselves are in a fairly dense resin similar to that used by Leven Miniatures for their buildings, so they should be robust enough to withstand tabletop wear and tear.  The resin in my order was a pure white and my first thought was that they probably wouldn't need an undercoat, especially as there little or no trace of any mold release agent.  There were no bubbles in the castings and only one tiny bit of tissue thin flash where resin had over topped the mold and that came straight off without damaging the casting.

The detail is crisp and the buildings are well modelled with good proportions.  Over all they are ever so slightly larger than Leven but not as big as Timecast in size. The doors are the right height for 6mm so these are simply models of larger buildings.  The range currently consists of one large and small pit house, two cottages one thatched and one with a wooden shingled roof and a huge great hall model.  The latter is probably twice the length of the Leven offering. I'd say a Royal Hall as much as a great hall.  The differences in size are fine though as it will simply add some variety to my tabletop settlements.


2D6 (unpainted) and Leven Great Halls

from left to right; Timecasr, 2D6 and Leven cottages
Of course me being me I couldn't wait to slap some paint on at least one of the 2D6 models.  I chose the small pithouse, after all its small so wouldn't take too long to do.  I didn't undercoat it although I did wash it in hot soapy water first.  It seems to have worked OK although time will tell if the paint is going to rub off.  I used a very basic technique a straw yellow base on the thatch and a light green-brown for the timber.  I slapped (er I mean lovingly and carefully brushed) a coat of GW Agrax Earthshade over the whole model.  Lastly I applied a heavily thinned pale grey over the highpoints of the woodwork to simulate weathering.  I think that worked quite well and will do it again.  The entire paint job took under 30 minutes including letting coats dry.  The detail in the castings really helped there.  Its going to be no time at all before I have  good sized Anglo-Saxon town ready for the tabletop.


Front elevation of the painted pit house plenty of details to be seen


And the rear is just as well sculpted

The completed pit house, the grid is centimetre squares
I will be painting the rest of the order over the next couple of days and will post more images once I have done so.

To sum up; I'm very impressed, especially as these are 2D6's first foray into 6mm model buildings.  I'd say we have a significant new player in the resin scenics market which can only be a good thing.  I'm looking forward to seeing what comes next from Robert.