It’s the end of 2019 (although not the end of the decade until next year) so have a happy and prosperous New Year. Here’s hoping that next year will be a great one.
Next year I hope to get more games under my belt, find a set of World War 2 rules I like and finally finish my ECW rules. Painting wise I want to complete my Pictish and Scots Irish Armies and replace my Irregular Miniatures Late Imperial Romans and Maurician Byzantines with Baccus figures. There is also the new Anglo-Saxon range from 2D6 to look forward too and at some point I have a lot of 2mm ECW cavalry and dragoon’s needing paint and some World War 1 1/300th aircraft to finish as well.
Of course being me something else will come along and distract me.
So that’s it for 2019 from me. Time to break out the champagne.
Tuesday, 31 December 2019
Sunday, 22 December 2019
Somewhere in Cumbria 810AD - A DBA battle report
Middle Anglo-Saxons (III/24b) v Strathclyde Welsh (II/81d)
Tensions in the disputed lands west of the North Pennines regarding who controls the disputed lands around Caer Luel have led to open warfare. As the Northumbrians march over Stainmoor to assert their claim another force marching south from Strath Clut intercepts them north of the settlement of Pen Rid.
The Armies
Northumbria:
1 x General (4Bd)
2 x Hird (4Bd)
6 x Select Fyrd (Sp)
2 x Great fyrd (7 Hd)
1 x Scouts Ps
Strathclyde Welsh:
1 x General (Cv)
3 x Comitatensis (Cv)
7 x Pedyt (Sp)
1x Archers (Ps)
The Battlefield
The Northumbrians despite being more aggressive rolled low and ended up as the defenders. This suited them as they were able to select terrain to help limit the enemy cavalry's mobility. Choosing from the arable terrain set they selected a hamlet and ploughland from the compulsory list and a river, a steep hill and a wood from the optional list. Dicing for placement allowed the Strathclyde Welsh to position the hamlet but everything else was placed by the Northumbrians.
The Northumbrian master plan was to restrict the table as much as possible to slow the Strathclyde cavalry's freedom of movement. The Great Fyrd elements were placed on the most exposed flank as losing these wouldn't count towards the army break point. Things started to unravel from the start as the plough land was found to be good going (there was only a one in six chance of it not being but you can hope) and the river turned out to be Paltry so also counted as good going. Clearly it had been a dry spring and summer.
The Northumbrian deployment (furthest from the camera) placed the Psiloi alongside the woods, with the intention of occupying them to make it more difficult for the enemy to work around them. The next three elements were the Northumbrian Hird and General all solid Blades. That gave a small advantage over the opposing Spears. Next came the Northumbrian spears and lastly slightly refused the Great Fyrd. At this point the river hadn't been tested so in case it was difficult terrain nothing was deployed into it by either side.
Nearer the camera the Strathclyde Welsh had split their cavalry as 2 elements at each end of the line. The general is the inner of the two elements on the left flank. This was to give some control issues later in the game.
The Northumbrians were being cautious and simply brought the Great Fyrd into line and pushed forwards as a shield wall. On the other side because the ground wasn't as restricted on the right of the Welsh line they pushed forward with their cavalry on that wing. The other wing was slowed crossing the steep hill and is working it's way to the right with the intention of passing down the side of the woods.
The initial clash was between the Welsh cavalry on their left and the Great Fyrd. This was expected to be a bit of a push over, expected but not what actually happened. The general's element recoiled and the other unit only pushed it's opponent back. Not exactly the Ride of the Rohirrim then. Still better luck next time. On the other flank the Northumbrians settled their archers into the woods and there they intended to stay, creating a threat zone to block easy passage of that flank.
In the centre the Welsh Pedytes continued to advance hoping the Nobs on their horses might have the job done before they have to exchange spear thrusts with the Northumbrians. They should be so lucky!
What you can't see in the above shot is the Welsh right flank cavalry clearing the bad going on the steep hill. The dilemma for them is do they try for the gap between the table edge and the woods or turn in towards the end of the Northumbrian shield wall. With the enemy creating a threat zone they cannot avoid to the right of the woods they elect to shift towards the centre. On the other flank the second unit of Great Fyrd is destroyed and the cavalry have cleared the flank of the enemy shield wall.
The Infantry lines finally come to blows but neither side can gain a decisive advantage. Initially the Welsh foot seem to have the upper hand but slowly the Northumbrians start to push them back. The weak spot in the Welsh line is the need to include Psiloi to prevent an overlap while the Northumbrians have to tie up the Welsh cavalry hovering around their open right wing. In the ensuing combat the Psiloi flee while a unit of Northumbrian Spears do manage to stop the Welsh rolling up the flank, at least for this turn.
As the shield wall starts to fragment the ability to provide side support slowly evaporates, and the chance of a decisive combat results becomes slightly more likely. Despite that, neither side is collapsing. The losses are starting to mount but these are all from attacks on the flanks where a element has been flanked and cannot recoil. The Northumbrian Psiloi in the woods have changed their position to place their threat zone alongside the open flank of their shield wall. At this point it's a nail biting 3:2 in favour of Strathclyde (remember the 7 Horde losses don't count towards the Northumbrian break point).
By turn eight the Northumbrian attempt to hold off the Welsh cavalry attack has failed and their right flank is wide open. Things are looking just as shakey on the other flank where its the Welsh hanging on by the skin of their teeth. The Welsh Psiloi have been destroyed and a Hird unit is setting up to hit the flank of the now badly fragmented Strathclyde Welsh shield wall after flanking their Psiloi last turn. It's now 3:3 although I doubt extra time is beckoning! But disaster strikes they roll 1 for Pips and can't close up enough to get the position they need.
Play moved to Strathclyde who having ridden like hell to get to the Northumbrian camp capture it before another dice is rolled. Strathclyde win 5:3.
The Horde elements had held off the collapse of the Northumbrian right wing without contributing to the break point and actually made a better showing than expected. The clash of the shield walls became a shoving match with neither side able to gain a significant advantage until flanks were turned. The basic combat factors are not sufficiently different to create the chance of an easy doubling result in combat even where blades face spear which feels about right. Once the line fragments it becomes a tiny bit easier but still requires the statistically unlikely chance of getting a 1:6 split on the dice to create the result needed. Ultimately it was the mobility of the Welsh horse and their ability to create flank positions which turned recoils into destroyed results that made the difference. If the ploughland had turned out to be difficult going and the river had aided defence things might have turned out differently but then again it may not have done.
All in all a couple of hours well spent on a solo game and a chance to get my recent paint work onto the table. Man of the match award goes to the Northumbrian Psiloi for never having to fight anything while still denying the flank to the Strathclyde Welsh cavalry.
Tensions in the disputed lands west of the North Pennines regarding who controls the disputed lands around Caer Luel have led to open warfare. As the Northumbrians march over Stainmoor to assert their claim another force marching south from Strath Clut intercepts them north of the settlement of Pen Rid.
The Armies
Northumbria:
1 x General (4Bd)
2 x Hird (4Bd)
6 x Select Fyrd (Sp)
2 x Great fyrd (7 Hd)
1 x Scouts Ps
Strathclyde Welsh:
1 x General (Cv)
3 x Comitatensis (Cv)
7 x Pedyt (Sp)
1x Archers (Ps)
The Battlefield
The Northumbrians despite being more aggressive rolled low and ended up as the defenders. This suited them as they were able to select terrain to help limit the enemy cavalry's mobility. Choosing from the arable terrain set they selected a hamlet and ploughland from the compulsory list and a river, a steep hill and a wood from the optional list. Dicing for placement allowed the Strathclyde Welsh to position the hamlet but everything else was placed by the Northumbrians.
 |
| The battlefield (less the gap between the table edge and the woods) |
 |
| After deployment the restricted space seemed to be vouring Northumbria. |
Nearer the camera the Strathclyde Welsh had split their cavalry as 2 elements at each end of the line. The general is the inner of the two elements on the left flank. This was to give some control issues later in the game.
 |
| Both sides slog forwards with the Welsh cavalry starting wide flanking moves. |
 |
| First contact - no not aliens! Welsh horse crashing into the Great Fyrd |
In the centre the Welsh Pedytes continued to advance hoping the Nobs on their horses might have the job done before they have to exchange spear thrusts with the Northumbrians. They should be so lucky!
 |
| One Great Fyrd unit destroyed and the other pushed back. |
 |
| The Northumbrians stand their ground while the Welsh foot slowly close in |
 |
| After the first turn of shield wall on shield wall action. |
 |
| It looks more organised than it is from this flank. Trust me though that isn't an attack 'en echelon' |
 |
| Can the Northumbrians pull something out of the bag? Well No they can't actually |
 |
| Strathclyde poised for victory |
 |
| The survivors at battles end. |
Thursday, 19 December 2019
Second sight - 2D6 Anglo-Saxon Buildings
Second sight posts will be where I give my thoughts on new products after I have painted, based or for rules after I have played a game with them. In this case its a chance to provide some pictures of the painted Anglo-Saxon buildings from 2D6 which I gave an initial review of a few days ago.
The evidence for the appearance of Anglo-Saxon housing isn't great as most buildings were of timber construction so little remains of their architecture other than archaeological evidence. That gives us a good idea of the footprint of the buildings and evidence of the type of construction and the materials used but little or no idea of the look of the finished buildings. For makers of model buildings that means that they have to look at the best reconstructions of these buildings. In this case 2D6 based their models on the structures at West Stow Anglo-Saxon village near Bury St Edmunds. From what I can see on the village's website they are a pretty good reproduction too. Wattle and Daub is known to have been used and there is good evidence for timber planked structures and that latter style is what 2D6 have modelled. There is less evidence (that is to say none that I am aware of) as to how they treated the exposed woodwork to preserve it from the elements. It might have been lime washed or even painted if the building was the hall of a Thegn or an Alderman but for the less wealthy it was probably just as simple to replace planks as they rotted. I have read that the Anglo-Saxons preferred to use logs split in half as planks rather than flat split logs and the models reflect that.
Painting is easy as there is good definition to work with. The thatch is particularly well modeled which means a simple straw yellow block paint with a wash of Agrax earthshade is sufficient. The newer the thatch the more yellow the block painting needs to be and the lighter the coat of Earthshade. The downside to the design is that timber and thatch doesn't create a lot of colour contract for the finished paint schemes, which probably reflects the nature of the original structures really well. Looking at examples of older thatched buildings in real life shows that the thatch quickly weathers to a dark grey-brown colour. As cut timber weathers to a grey almost silver shade I tried a couple of techniques to break things up a bit. For the timber I started with a Vallejo Green Brown (70.879) washed with Earthshade and then dry brushed a really heavily thinned Vallejo Sky Grey (70,989) which creates a bit of contract. I also tried block painting in the Sky Grey and then washing with Earthshade which was OK and had the benefit of being fast but wasn't as nice a finish as the grey dry brush.
The photos are a bit lighter than reality as the lighting was a bit harsh. I should really make a light box!
I'm reasonably happy with the results and will be buying more of the 2D6 buildings as they are released. There are palisade sections due for release next which will allow me to create fenced enclosures around a Hall complex. These were usually ovals so some curved sections would be nice. I should really like to see some wattle and daub versions of the existing cottages and Great Hall too to give a bit of variety.
Lastly if you want to order some for yourself the webshop for 2D6 can be found at https://www.2d6wargaming.com/
The evidence for the appearance of Anglo-Saxon housing isn't great as most buildings were of timber construction so little remains of their architecture other than archaeological evidence. That gives us a good idea of the footprint of the buildings and evidence of the type of construction and the materials used but little or no idea of the look of the finished buildings. For makers of model buildings that means that they have to look at the best reconstructions of these buildings. In this case 2D6 based their models on the structures at West Stow Anglo-Saxon village near Bury St Edmunds. From what I can see on the village's website they are a pretty good reproduction too. Wattle and Daub is known to have been used and there is good evidence for timber planked structures and that latter style is what 2D6 have modelled. There is less evidence (that is to say none that I am aware of) as to how they treated the exposed woodwork to preserve it from the elements. It might have been lime washed or even painted if the building was the hall of a Thegn or an Alderman but for the less wealthy it was probably just as simple to replace planks as they rotted. I have read that the Anglo-Saxons preferred to use logs split in half as planks rather than flat split logs and the models reflect that.
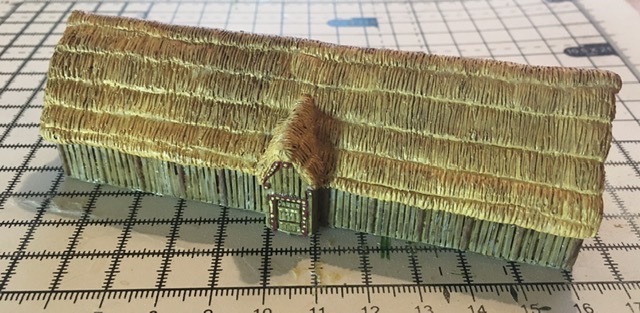 |
| The Great Hall - Timber walls and a thatch roof |
Painting is easy as there is good definition to work with. The thatch is particularly well modeled which means a simple straw yellow block paint with a wash of Agrax earthshade is sufficient. The newer the thatch the more yellow the block painting needs to be and the lighter the coat of Earthshade. The downside to the design is that timber and thatch doesn't create a lot of colour contract for the finished paint schemes, which probably reflects the nature of the original structures really well. Looking at examples of older thatched buildings in real life shows that the thatch quickly weathers to a dark grey-brown colour. As cut timber weathers to a grey almost silver shade I tried a couple of techniques to break things up a bit. For the timber I started with a Vallejo Green Brown (70.879) washed with Earthshade and then dry brushed a really heavily thinned Vallejo Sky Grey (70,989) which creates a bit of contract. I also tried block painting in the Sky Grey and then washing with Earthshade which was OK and had the benefit of being fast but wasn't as nice a finish as the grey dry brush.
 |
| The pit dwelling in the centre plus two huts the light thatch gives the best contrast |
 |
| Cottage with wood shingle roof - the timber walls look lighter here than in reality |
I'm reasonably happy with the results and will be buying more of the 2D6 buildings as they are released. There are palisade sections due for release next which will allow me to create fenced enclosures around a Hall complex. These were usually ovals so some curved sections would be nice. I should really like to see some wattle and daub versions of the existing cottages and Great Hall too to give a bit of variety.
Lastly if you want to order some for yourself the webshop for 2D6 can be found at https://www.2d6wargaming.com/
Saturday, 14 December 2019
Hordes of ..........
........well hordes if I'm honest.
A few posts back I was creating some generic hordes using Irregular miniatures Peasants and Pilgrims fronted with a rank of Viking spearmen. I used the vikings as they are cast in open order and that lets me break the castings up so I can space them out a bit more and get a frontage of eight figures.
I haven't been able to paint as much as normal for the last few weeks as I have been doing a lot of travelling with work so I hadn't made the progress I had hoped for with these. That changed last week and I was able to finish the rest of the job. So here it is a horde. They may not be able to fight but they look good.
A few posts back I was creating some generic hordes using Irregular miniatures Peasants and Pilgrims fronted with a rank of Viking spearmen. I used the vikings as they are cast in open order and that lets me break the castings up so I can space them out a bit more and get a frontage of eight figures.
 |
| All seven elements I'm not sure where Bruce Willis is standing |
I haven't been able to paint as much as normal for the last few weeks as I have been doing a lot of travelling with work so I hadn't made the progress I had hoped for with these. That changed last week and I was able to finish the rest of the job. So here it is a horde. They may not be able to fight but they look good.
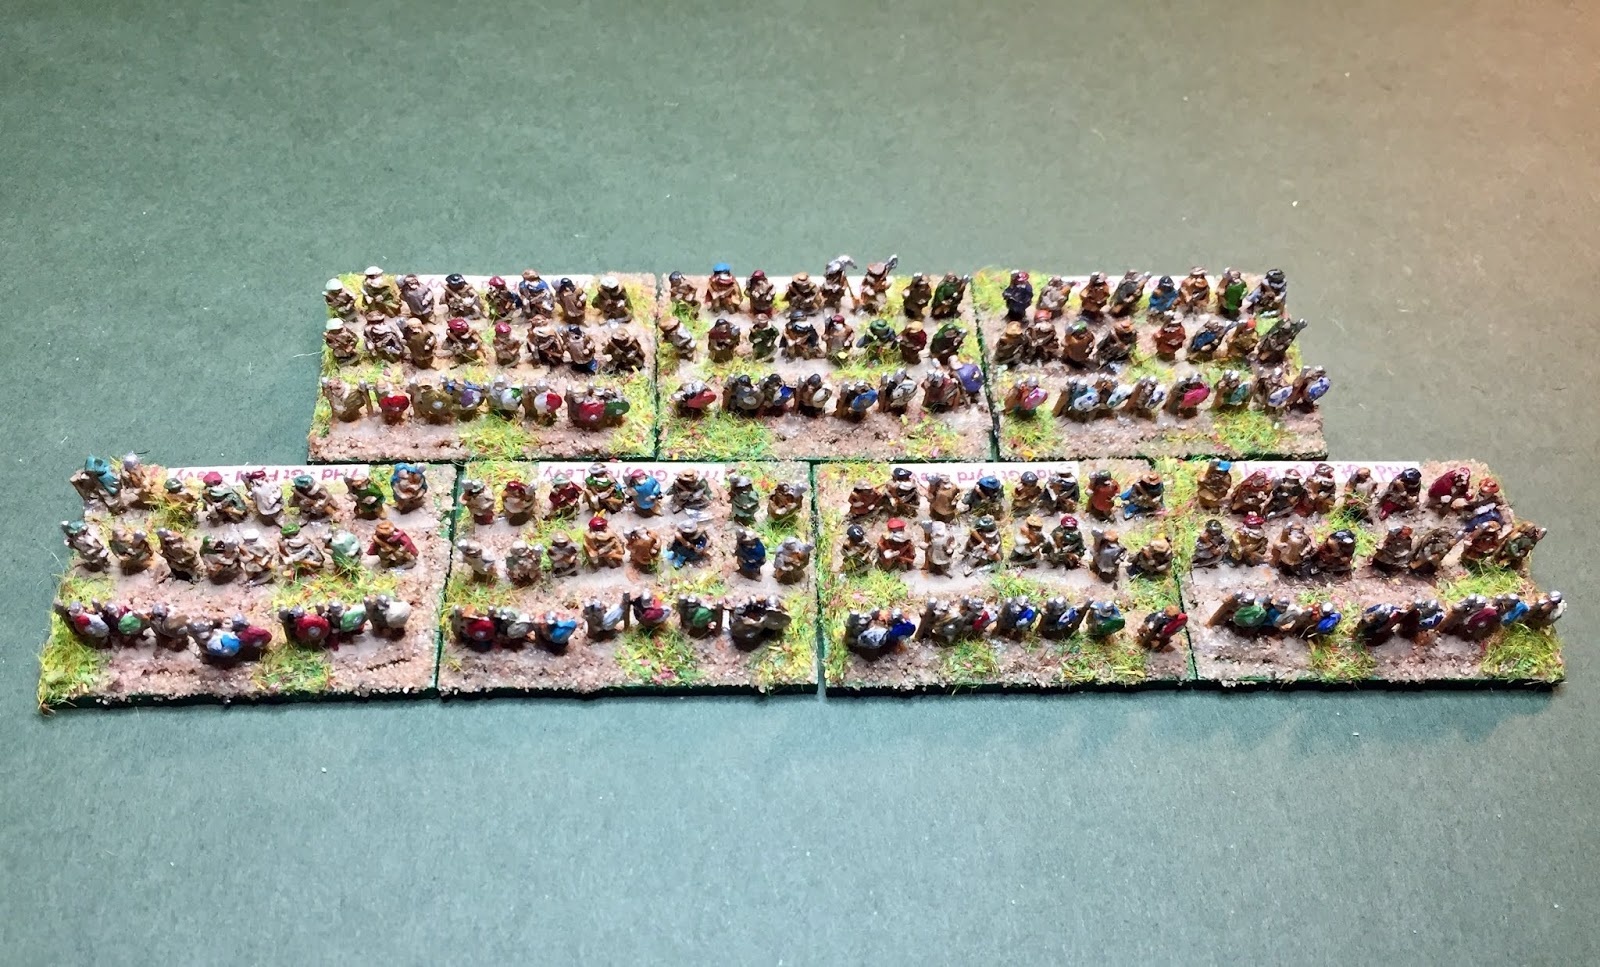 |
| I made the ranks less than perfect, well they are only peasant levies! |
Friday, 13 December 2019
More Welsh
I had a couple of days leave a couple of weeks ago and between some more sorting out of my office and one of the outside storerooms I did some figure painting.
After I posted the photos of my Welsh infantry and cavalry I realised they had no Light Infantry support. A quick flick through the army lists for DBA 3 and ADLG showed that I could have up to four elements of light infantry Javelinmen under ADLG. DBA with it’s smaller armies was less generous but as they also show javelin equipped Psiloi it didn't really matter. Four units of Javelinmen it was to be.
I base Light infantry on deeper bases than the ADLG rules allow, but I’m never going to play a competition game with these armies so it doesn’t really matter. I think the extra base depth works better then the standard depth as it creates a deeper buffer zone in front of a main battle line. I put eight light infantry per base with 6mm figures which makes skirmisher elements fairly quick to create as there are a lot less figures to paint per element compared to the sixteen per element for the infantry in the main battleline.
The figures are Baccus Greek psiloi with javelins which create a slightly different look to the light infantry figures I have used in my other armies as they are shieldless. They are really nice sculpts and have two variants one is standing throwing the javelin while the other is running forward with javelin held across the body. The nice dynamic poses work well for light infantry who should look like they dash about rather more than their more stolid brethren in the shield walls.
I'm happy with them and it has added a bit more resilience to the Welsh army I need to get some sheep or cattle to act as booty for them - not that I'm suggesting that Dark Age welsh were a buncj of cattle thieves or anything!.
After I posted the photos of my Welsh infantry and cavalry I realised they had no Light Infantry support. A quick flick through the army lists for DBA 3 and ADLG showed that I could have up to four elements of light infantry Javelinmen under ADLG. DBA with it’s smaller armies was less generous but as they also show javelin equipped Psiloi it didn't really matter. Four units of Javelinmen it was to be.
I base Light infantry on deeper bases than the ADLG rules allow, but I’m never going to play a competition game with these armies so it doesn’t really matter. I think the extra base depth works better then the standard depth as it creates a deeper buffer zone in front of a main battle line. I put eight light infantry per base with 6mm figures which makes skirmisher elements fairly quick to create as there are a lot less figures to paint per element compared to the sixteen per element for the infantry in the main battleline.
 |
| The Welsh - just lacking some four legged booty |
I'm happy with them and it has added a bit more resilience to the Welsh army I need to get some sheep or cattle to act as booty for them - not that I'm suggesting that Dark Age welsh were a buncj of cattle thieves or anything!.
Thursday, 5 December 2019
First sight - 2D6 Anglo Saxon buildings
Robert Fellows of 2D6 Wargames has very recently released a new range of 6mm Anglo-Saxon resin buildings. So of course I ordered a set. Using his online shopping cart was extremely easy (far too easy according to Mrs E) and as with most internet shopping sites I could pay with a bank or credit card via paypal without having a paypal account. The order came through within a couple of days and I received email updates to show how the shipping process was going throughout. Packaging was good and I'd be surprised if normal handling in the postal system would be able to damage anything. Excellent customer service throughout.
The castings themselves are in a fairly dense resin similar to that used by Leven Miniatures for their buildings, so they should be robust enough to withstand tabletop wear and tear. The resin in my order was a pure white and my first thought was that they probably wouldn't need an undercoat, especially as there little or no trace of any mold release agent. There were no bubbles in the castings and only one tiny bit of tissue thin flash where resin had over topped the mold and that came straight off without damaging the casting.
The detail is crisp and the buildings are well modelled with good proportions. Over all they are ever so slightly larger than Leven but not as big as Timecast in size. The doors are the right height for 6mm so these are simply models of larger buildings. The range currently consists of one large and small pit house, two cottages one thatched and one with a wooden shingled roof and a huge great hall model. The latter is probably twice the length of the Leven offering. I'd say a Royal Hall as much as a great hall. The differences in size are fine though as it will simply add some variety to my tabletop settlements.
Of course me being me I couldn't wait to slap some paint on at least one of the 2D6 models. I chose the small pithouse, after all its small so wouldn't take too long to do. I didn't undercoat it although I did wash it in hot soapy water first. It seems to have worked OK although time will tell if the paint is going to rub off. I used a very basic technique a straw yellow base on the thatch and a light green-brown for the timber. I slapped (er I mean lovingly and carefully brushed) a coat of GW Agrax Earthshade over the whole model. Lastly I applied a heavily thinned pale grey over the highpoints of the woodwork to simulate weathering. I think that worked quite well and will do it again. The entire paint job took under 30 minutes including letting coats dry. The detail in the castings really helped there. Its going to be no time at all before I have good sized Anglo-Saxon town ready for the tabletop.
I will be painting the rest of the order over the next couple of days and will post more images once I have done so.
To sum up; I'm very impressed, especially as these are 2D6's first foray into 6mm model buildings. I'd say we have a significant new player in the resin scenics market which can only be a good thing. I'm looking forward to seeing what comes next from Robert.
The castings themselves are in a fairly dense resin similar to that used by Leven Miniatures for their buildings, so they should be robust enough to withstand tabletop wear and tear. The resin in my order was a pure white and my first thought was that they probably wouldn't need an undercoat, especially as there little or no trace of any mold release agent. There were no bubbles in the castings and only one tiny bit of tissue thin flash where resin had over topped the mold and that came straight off without damaging the casting.
The detail is crisp and the buildings are well modelled with good proportions. Over all they are ever so slightly larger than Leven but not as big as Timecast in size. The doors are the right height for 6mm so these are simply models of larger buildings. The range currently consists of one large and small pit house, two cottages one thatched and one with a wooden shingled roof and a huge great hall model. The latter is probably twice the length of the Leven offering. I'd say a Royal Hall as much as a great hall. The differences in size are fine though as it will simply add some variety to my tabletop settlements.
 |
| 2D6 (unpainted) and Leven Great Halls |
 |
| from left to right; Timecasr, 2D6 and Leven cottages |
 |
Front elevation of the painted pit house plenty of details to be seen |
 |
| And the rear is just as well sculpted |
 |
| The completed pit house, the grid is centimetre squares |
To sum up; I'm very impressed, especially as these are 2D6's first foray into 6mm model buildings. I'd say we have a significant new player in the resin scenics market which can only be a good thing. I'm looking forward to seeing what comes next from Robert.
Monday, 2 December 2019
A change of pace
After a couple of weeks where I have been painting Viking Age figues I wanted a bit of a change. I had some Leven 6mm buildings I had bought last year which for various reasons had either not made it to the painting table or hadn't been finished so I turned to these for a bit of light relief. Or so I thought, I quickly realised that I had forgotten what techniques I had decided on using to paint buildings and my system for 6mm figures doesn't translate to buildings. The problem is that they have large areas of flat, often textureless, space and making sure to get a good even cover is difficult. This easier for the buildings cast in the cream resin than it is for those cast in the grey resin but in both cases I am coming to the conclusion that an undercoat is vital.
I have a mixture of Timecast and Leven buildings. I prefer the Leven stuff myself but the Timecast Anglo Saxon buildings are still top notch castings and I have no hesitation in mixing the two together, I just prefer the proportions of the Leven ones.
Over the last couple of days I have tidied up the Anglo Saxon Great Hall and started on the two Anglo Saxon Cottages. Those were fairly simple paint jobs as they are wattle and daub with a thatched roof which don't provide that many options for colour schemes, darker thatch for older roofs white wash v natural cow dung and straw coloured walls and you are about there! However, lurking at the back of the queue was a Norman Chapel with stone walls and a slate tiled roof. There are a couple of examples of this style of church locally so I have a decent handle on the colours for the materials but getting them right on the model was another thing entirely! The variance in tone from block to block of the sandstone is really causing me some heartache as I just can't get it to look right. It probably doesn't help that I studied Geology in my youth and I know that a rock isn't just a rock. Sandstone colours vary based on the individual grains of sediment which up the rock, those in turn vary based upon the rocks that were eroded to create the sand that is the basis of the sandstone. Sandy Limestones look different to Gritstones and so it goes. I'm two far into the red sandstone end of the spectrum which is fine if i'm recreating Buildings that use Old Red Sandstone or New Red Sandstone but isn't right for south and central England where the stone is a more, well, sandy coloured. I agonised over that paint scheme until I realised that no matter how hard I try my painting will never rival the detail nature puts into real building stone and probably nobody will care anyway.
I have just order some of 2D6's new Anglo Saxon buildings which should arrive in a few days time so once those arrive I will provide a review of this new manufacturer's products. The photos on the website look good and reviews of their WW2 stuff have been universally positive so I have high hopes.
I have a mixture of Timecast and Leven buildings. I prefer the Leven stuff myself but the Timecast Anglo Saxon buildings are still top notch castings and I have no hesitation in mixing the two together, I just prefer the proportions of the Leven ones.
 |
| Leven Norman Chapel with the large Anglo Saxon Cottage and the Great Hall behind |
Over the last couple of days I have tidied up the Anglo Saxon Great Hall and started on the two Anglo Saxon Cottages. Those were fairly simple paint jobs as they are wattle and daub with a thatched roof which don't provide that many options for colour schemes, darker thatch for older roofs white wash v natural cow dung and straw coloured walls and you are about there! However, lurking at the back of the queue was a Norman Chapel with stone walls and a slate tiled roof. There are a couple of examples of this style of church locally so I have a decent handle on the colours for the materials but getting them right on the model was another thing entirely! The variance in tone from block to block of the sandstone is really causing me some heartache as I just can't get it to look right. It probably doesn't help that I studied Geology in my youth and I know that a rock isn't just a rock. Sandstone colours vary based on the individual grains of sediment which up the rock, those in turn vary based upon the rocks that were eroded to create the sand that is the basis of the sandstone. Sandy Limestones look different to Gritstones and so it goes. I'm two far into the red sandstone end of the spectrum which is fine if i'm recreating Buildings that use Old Red Sandstone or New Red Sandstone but isn't right for south and central England where the stone is a more, well, sandy coloured. I agonised over that paint scheme until I realised that no matter how hard I try my painting will never rival the detail nature puts into real building stone and probably nobody will care anyway.
I have just order some of 2D6's new Anglo Saxon buildings which should arrive in a few days time so once those arrive I will provide a review of this new manufacturer's products. The photos on the website look good and reviews of their WW2 stuff have been universally positive so I have high hopes.
Subscribe to:
Posts (Atom)