It’s the end of 2019 (although not the end of the decade until next year) so have a happy and prosperous New Year. Here’s hoping that next year will be a great one.
Next year I hope to get more games under my belt, find a set of World War 2 rules I like and finally finish my ECW rules. Painting wise I want to complete my Pictish and Scots Irish Armies and replace my Irregular Miniatures Late Imperial Romans and Maurician Byzantines with Baccus figures. There is also the new Anglo-Saxon range from 2D6 to look forward too and at some point I have a lot of 2mm ECW cavalry and dragoon’s needing paint and some World War 1 1/300th aircraft to finish as well.
Of course being me something else will come along and distract me.
So that’s it for 2019 from me. Time to break out the champagne.
Tuesday, 31 December 2019
Sunday, 22 December 2019
Somewhere in Cumbria 810AD - A DBA battle report
Middle Anglo-Saxons (III/24b) v Strathclyde Welsh (II/81d)
Tensions in the disputed lands west of the North Pennines regarding who controls the disputed lands around Caer Luel have led to open warfare. As the Northumbrians march over Stainmoor to assert their claim another force marching south from Strath Clut intercepts them north of the settlement of Pen Rid.
The Armies
Northumbria:
1 x General (4Bd)
2 x Hird (4Bd)
6 x Select Fyrd (Sp)
2 x Great fyrd (7 Hd)
1 x Scouts Ps
Strathclyde Welsh:
1 x General (Cv)
3 x Comitatensis (Cv)
7 x Pedyt (Sp)
1x Archers (Ps)
The Battlefield
The Northumbrians despite being more aggressive rolled low and ended up as the defenders. This suited them as they were able to select terrain to help limit the enemy cavalry's mobility. Choosing from the arable terrain set they selected a hamlet and ploughland from the compulsory list and a river, a steep hill and a wood from the optional list. Dicing for placement allowed the Strathclyde Welsh to position the hamlet but everything else was placed by the Northumbrians.
The Northumbrian master plan was to restrict the table as much as possible to slow the Strathclyde cavalry's freedom of movement. The Great Fyrd elements were placed on the most exposed flank as losing these wouldn't count towards the army break point. Things started to unravel from the start as the plough land was found to be good going (there was only a one in six chance of it not being but you can hope) and the river turned out to be Paltry so also counted as good going. Clearly it had been a dry spring and summer.
The Northumbrian deployment (furthest from the camera) placed the Psiloi alongside the woods, with the intention of occupying them to make it more difficult for the enemy to work around them. The next three elements were the Northumbrian Hird and General all solid Blades. That gave a small advantage over the opposing Spears. Next came the Northumbrian spears and lastly slightly refused the Great Fyrd. At this point the river hadn't been tested so in case it was difficult terrain nothing was deployed into it by either side.
Nearer the camera the Strathclyde Welsh had split their cavalry as 2 elements at each end of the line. The general is the inner of the two elements on the left flank. This was to give some control issues later in the game.
The Northumbrians were being cautious and simply brought the Great Fyrd into line and pushed forwards as a shield wall. On the other side because the ground wasn't as restricted on the right of the Welsh line they pushed forward with their cavalry on that wing. The other wing was slowed crossing the steep hill and is working it's way to the right with the intention of passing down the side of the woods.
The initial clash was between the Welsh cavalry on their left and the Great Fyrd. This was expected to be a bit of a push over, expected but not what actually happened. The general's element recoiled and the other unit only pushed it's opponent back. Not exactly the Ride of the Rohirrim then. Still better luck next time. On the other flank the Northumbrians settled their archers into the woods and there they intended to stay, creating a threat zone to block easy passage of that flank.
In the centre the Welsh Pedytes continued to advance hoping the Nobs on their horses might have the job done before they have to exchange spear thrusts with the Northumbrians. They should be so lucky!
What you can't see in the above shot is the Welsh right flank cavalry clearing the bad going on the steep hill. The dilemma for them is do they try for the gap between the table edge and the woods or turn in towards the end of the Northumbrian shield wall. With the enemy creating a threat zone they cannot avoid to the right of the woods they elect to shift towards the centre. On the other flank the second unit of Great Fyrd is destroyed and the cavalry have cleared the flank of the enemy shield wall.
The Infantry lines finally come to blows but neither side can gain a decisive advantage. Initially the Welsh foot seem to have the upper hand but slowly the Northumbrians start to push them back. The weak spot in the Welsh line is the need to include Psiloi to prevent an overlap while the Northumbrians have to tie up the Welsh cavalry hovering around their open right wing. In the ensuing combat the Psiloi flee while a unit of Northumbrian Spears do manage to stop the Welsh rolling up the flank, at least for this turn.
As the shield wall starts to fragment the ability to provide side support slowly evaporates, and the chance of a decisive combat results becomes slightly more likely. Despite that, neither side is collapsing. The losses are starting to mount but these are all from attacks on the flanks where a element has been flanked and cannot recoil. The Northumbrian Psiloi in the woods have changed their position to place their threat zone alongside the open flank of their shield wall. At this point it's a nail biting 3:2 in favour of Strathclyde (remember the 7 Horde losses don't count towards the Northumbrian break point).
By turn eight the Northumbrian attempt to hold off the Welsh cavalry attack has failed and their right flank is wide open. Things are looking just as shakey on the other flank where its the Welsh hanging on by the skin of their teeth. The Welsh Psiloi have been destroyed and a Hird unit is setting up to hit the flank of the now badly fragmented Strathclyde Welsh shield wall after flanking their Psiloi last turn. It's now 3:3 although I doubt extra time is beckoning! But disaster strikes they roll 1 for Pips and can't close up enough to get the position they need.
Play moved to Strathclyde who having ridden like hell to get to the Northumbrian camp capture it before another dice is rolled. Strathclyde win 5:3.
The Horde elements had held off the collapse of the Northumbrian right wing without contributing to the break point and actually made a better showing than expected. The clash of the shield walls became a shoving match with neither side able to gain a significant advantage until flanks were turned. The basic combat factors are not sufficiently different to create the chance of an easy doubling result in combat even where blades face spear which feels about right. Once the line fragments it becomes a tiny bit easier but still requires the statistically unlikely chance of getting a 1:6 split on the dice to create the result needed. Ultimately it was the mobility of the Welsh horse and their ability to create flank positions which turned recoils into destroyed results that made the difference. If the ploughland had turned out to be difficult going and the river had aided defence things might have turned out differently but then again it may not have done.
All in all a couple of hours well spent on a solo game and a chance to get my recent paint work onto the table. Man of the match award goes to the Northumbrian Psiloi for never having to fight anything while still denying the flank to the Strathclyde Welsh cavalry.
Tensions in the disputed lands west of the North Pennines regarding who controls the disputed lands around Caer Luel have led to open warfare. As the Northumbrians march over Stainmoor to assert their claim another force marching south from Strath Clut intercepts them north of the settlement of Pen Rid.
The Armies
Northumbria:
1 x General (4Bd)
2 x Hird (4Bd)
6 x Select Fyrd (Sp)
2 x Great fyrd (7 Hd)
1 x Scouts Ps
Strathclyde Welsh:
1 x General (Cv)
3 x Comitatensis (Cv)
7 x Pedyt (Sp)
1x Archers (Ps)
The Battlefield
The Northumbrians despite being more aggressive rolled low and ended up as the defenders. This suited them as they were able to select terrain to help limit the enemy cavalry's mobility. Choosing from the arable terrain set they selected a hamlet and ploughland from the compulsory list and a river, a steep hill and a wood from the optional list. Dicing for placement allowed the Strathclyde Welsh to position the hamlet but everything else was placed by the Northumbrians.
 |
| The battlefield (less the gap between the table edge and the woods) |
 |
| After deployment the restricted space seemed to be vouring Northumbria. |
Nearer the camera the Strathclyde Welsh had split their cavalry as 2 elements at each end of the line. The general is the inner of the two elements on the left flank. This was to give some control issues later in the game.
 |
| Both sides slog forwards with the Welsh cavalry starting wide flanking moves. |
 |
| First contact - no not aliens! Welsh horse crashing into the Great Fyrd |
In the centre the Welsh Pedytes continued to advance hoping the Nobs on their horses might have the job done before they have to exchange spear thrusts with the Northumbrians. They should be so lucky!
 |
| One Great Fyrd unit destroyed and the other pushed back. |
 |
| The Northumbrians stand their ground while the Welsh foot slowly close in |
 |
| After the first turn of shield wall on shield wall action. |
 |
| It looks more organised than it is from this flank. Trust me though that isn't an attack 'en echelon' |
 |
| Can the Northumbrians pull something out of the bag? Well No they can't actually |
 |
| Strathclyde poised for victory |
 |
| The survivors at battles end. |
Thursday, 19 December 2019
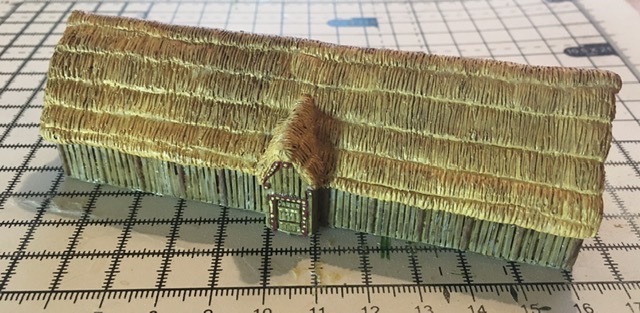
Second sight - 2D6 Anglo-Saxon Buildings
Second sight posts will be where I give my thoughts on new products after I have painted, based or for rules after I have played a game with them. In this case its a chance to provide some pictures of the painted Anglo-Saxon buildings from 2D6 which I gave an initial review of a few days ago.
The evidence for the appearance of Anglo-Saxon housing isn't great as most buildings were of timber construction so little remains of their architecture other than archaeological evidence. That gives us a good idea of the footprint of the buildings and evidence of the type of construction and the materials used but little or no idea of the look of the finished buildings. For makers of model buildings that means that they have to look at the best reconstructions of these buildings. In this case 2D6 based their models on the structures at West Stow Anglo-Saxon village near Bury St Edmunds. From what I can see on the village's website they are a pretty good reproduction too. Wattle and Daub is known to have been used and there is good evidence for timber planked structures and that latter style is what 2D6 have modelled. There is less evidence (that is to say none that I am aware of) as to how they treated the exposed woodwork to preserve it from the elements. It might have been lime washed or even painted if the building was the hall of a Thegn or an Alderman but for the less wealthy it was probably just as simple to replace planks as they rotted. I have read that the Anglo-Saxons preferred to use logs split in half as planks rather than flat split logs and the models reflect that.
Painting is easy as there is good definition to work with. The thatch is particularly well modeled which means a simple straw yellow block paint with a wash of Agrax earthshade is sufficient. The newer the thatch the more yellow the block painting needs to be and the lighter the coat of Earthshade. The downside to the design is that timber and thatch doesn't create a lot of colour contract for the finished paint schemes, which probably reflects the nature of the original structures really well. Looking at examples of older thatched buildings in real life shows that the thatch quickly weathers to a dark grey-brown colour. As cut timber weathers to a grey almost silver shade I tried a couple of techniques to break things up a bit. For the timber I started with a Vallejo Green Brown (70.879) washed with Earthshade and then dry brushed a really heavily thinned Vallejo Sky Grey (70,989) which creates a bit of contract. I also tried block painting in the Sky Grey and then washing with Earthshade which was OK and had the benefit of being fast but wasn't as nice a finish as the grey dry brush.
The photos are a bit lighter than reality as the lighting was a bit harsh. I should really make a light box!
I'm reasonably happy with the results and will be buying more of the 2D6 buildings as they are released. There are palisade sections due for release next which will allow me to create fenced enclosures around a Hall complex. These were usually ovals so some curved sections would be nice. I should really like to see some wattle and daub versions of the existing cottages and Great Hall too to give a bit of variety.
Lastly if you want to order some for yourself the webshop for 2D6 can be found at https://www.2d6wargaming.com/
The evidence for the appearance of Anglo-Saxon housing isn't great as most buildings were of timber construction so little remains of their architecture other than archaeological evidence. That gives us a good idea of the footprint of the buildings and evidence of the type of construction and the materials used but little or no idea of the look of the finished buildings. For makers of model buildings that means that they have to look at the best reconstructions of these buildings. In this case 2D6 based their models on the structures at West Stow Anglo-Saxon village near Bury St Edmunds. From what I can see on the village's website they are a pretty good reproduction too. Wattle and Daub is known to have been used and there is good evidence for timber planked structures and that latter style is what 2D6 have modelled. There is less evidence (that is to say none that I am aware of) as to how they treated the exposed woodwork to preserve it from the elements. It might have been lime washed or even painted if the building was the hall of a Thegn or an Alderman but for the less wealthy it was probably just as simple to replace planks as they rotted. I have read that the Anglo-Saxons preferred to use logs split in half as planks rather than flat split logs and the models reflect that.
 |
| The Great Hall - Timber walls and a thatch roof |
Painting is easy as there is good definition to work with. The thatch is particularly well modeled which means a simple straw yellow block paint with a wash of Agrax earthshade is sufficient. The newer the thatch the more yellow the block painting needs to be and the lighter the coat of Earthshade. The downside to the design is that timber and thatch doesn't create a lot of colour contract for the finished paint schemes, which probably reflects the nature of the original structures really well. Looking at examples of older thatched buildings in real life shows that the thatch quickly weathers to a dark grey-brown colour. As cut timber weathers to a grey almost silver shade I tried a couple of techniques to break things up a bit. For the timber I started with a Vallejo Green Brown (70.879) washed with Earthshade and then dry brushed a really heavily thinned Vallejo Sky Grey (70,989) which creates a bit of contract. I also tried block painting in the Sky Grey and then washing with Earthshade which was OK and had the benefit of being fast but wasn't as nice a finish as the grey dry brush.
 |
| The pit dwelling in the centre plus two huts the light thatch gives the best contrast |
 |
| Cottage with wood shingle roof - the timber walls look lighter here than in reality |
I'm reasonably happy with the results and will be buying more of the 2D6 buildings as they are released. There are palisade sections due for release next which will allow me to create fenced enclosures around a Hall complex. These were usually ovals so some curved sections would be nice. I should really like to see some wattle and daub versions of the existing cottages and Great Hall too to give a bit of variety.
Lastly if you want to order some for yourself the webshop for 2D6 can be found at https://www.2d6wargaming.com/
Saturday, 14 December 2019
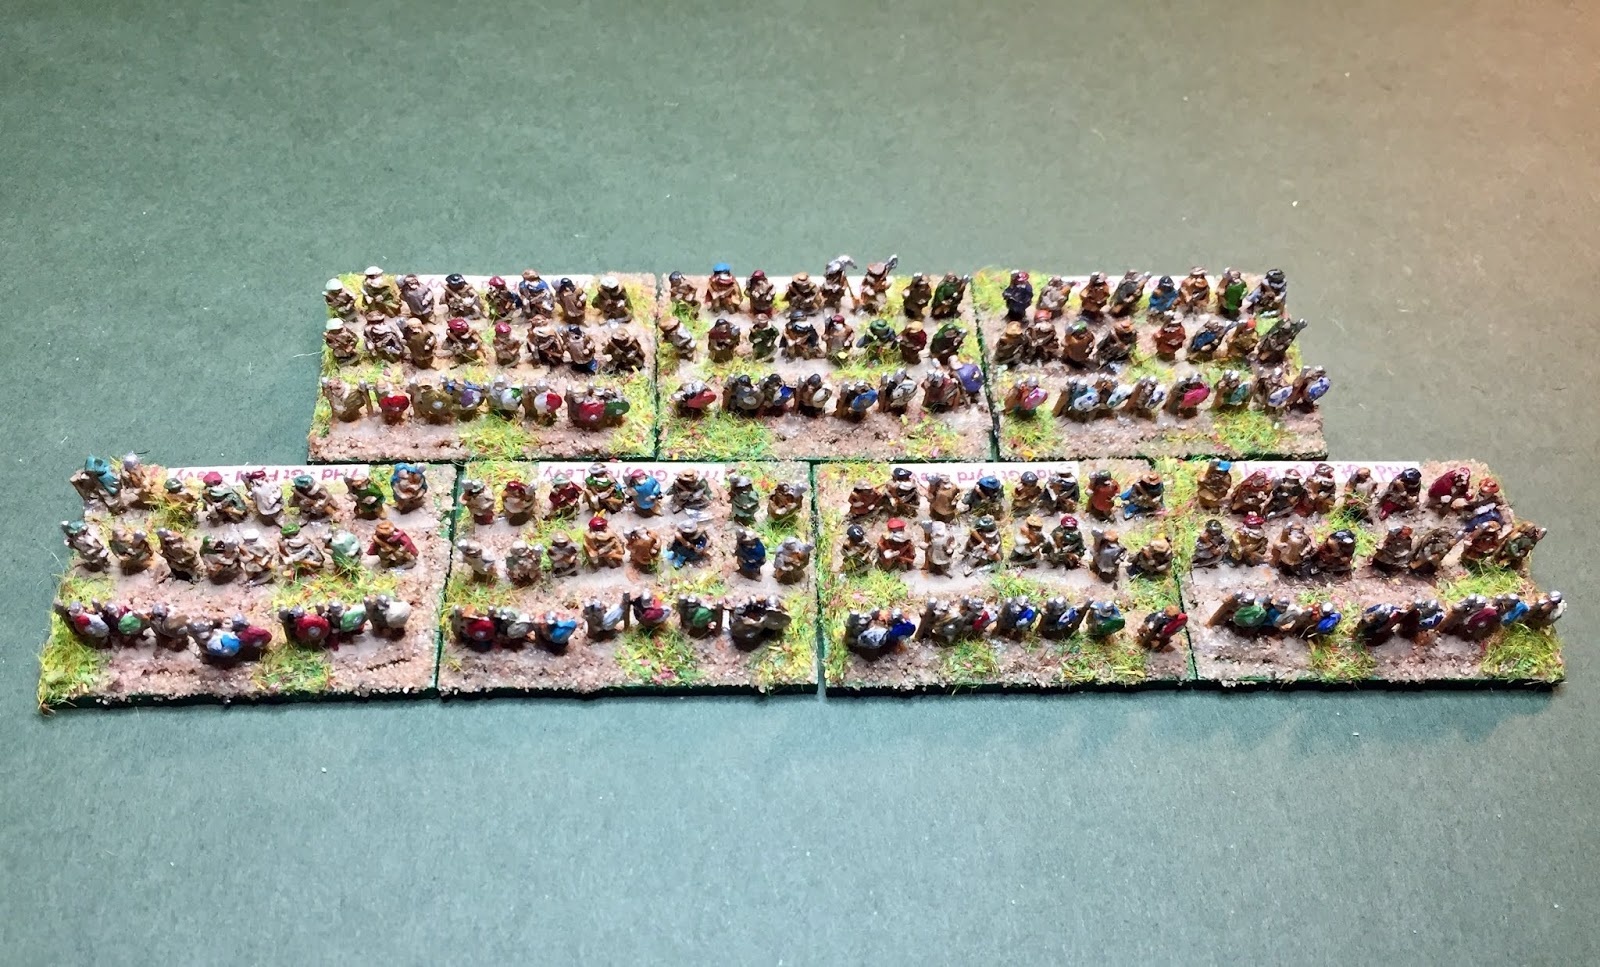
Hordes of ..........
........well hordes if I'm honest.
A few posts back I was creating some generic hordes using Irregular miniatures Peasants and Pilgrims fronted with a rank of Viking spearmen. I used the vikings as they are cast in open order and that lets me break the castings up so I can space them out a bit more and get a frontage of eight figures.
I haven't been able to paint as much as normal for the last few weeks as I have been doing a lot of travelling with work so I hadn't made the progress I had hoped for with these. That changed last week and I was able to finish the rest of the job. So here it is a horde. They may not be able to fight but they look good.
A few posts back I was creating some generic hordes using Irregular miniatures Peasants and Pilgrims fronted with a rank of Viking spearmen. I used the vikings as they are cast in open order and that lets me break the castings up so I can space them out a bit more and get a frontage of eight figures.
 |
| All seven elements I'm not sure where Bruce Willis is standing |
I haven't been able to paint as much as normal for the last few weeks as I have been doing a lot of travelling with work so I hadn't made the progress I had hoped for with these. That changed last week and I was able to finish the rest of the job. So here it is a horde. They may not be able to fight but they look good.
 |
| I made the ranks less than perfect, well they are only peasant levies! |
Friday, 13 December 2019
More Welsh
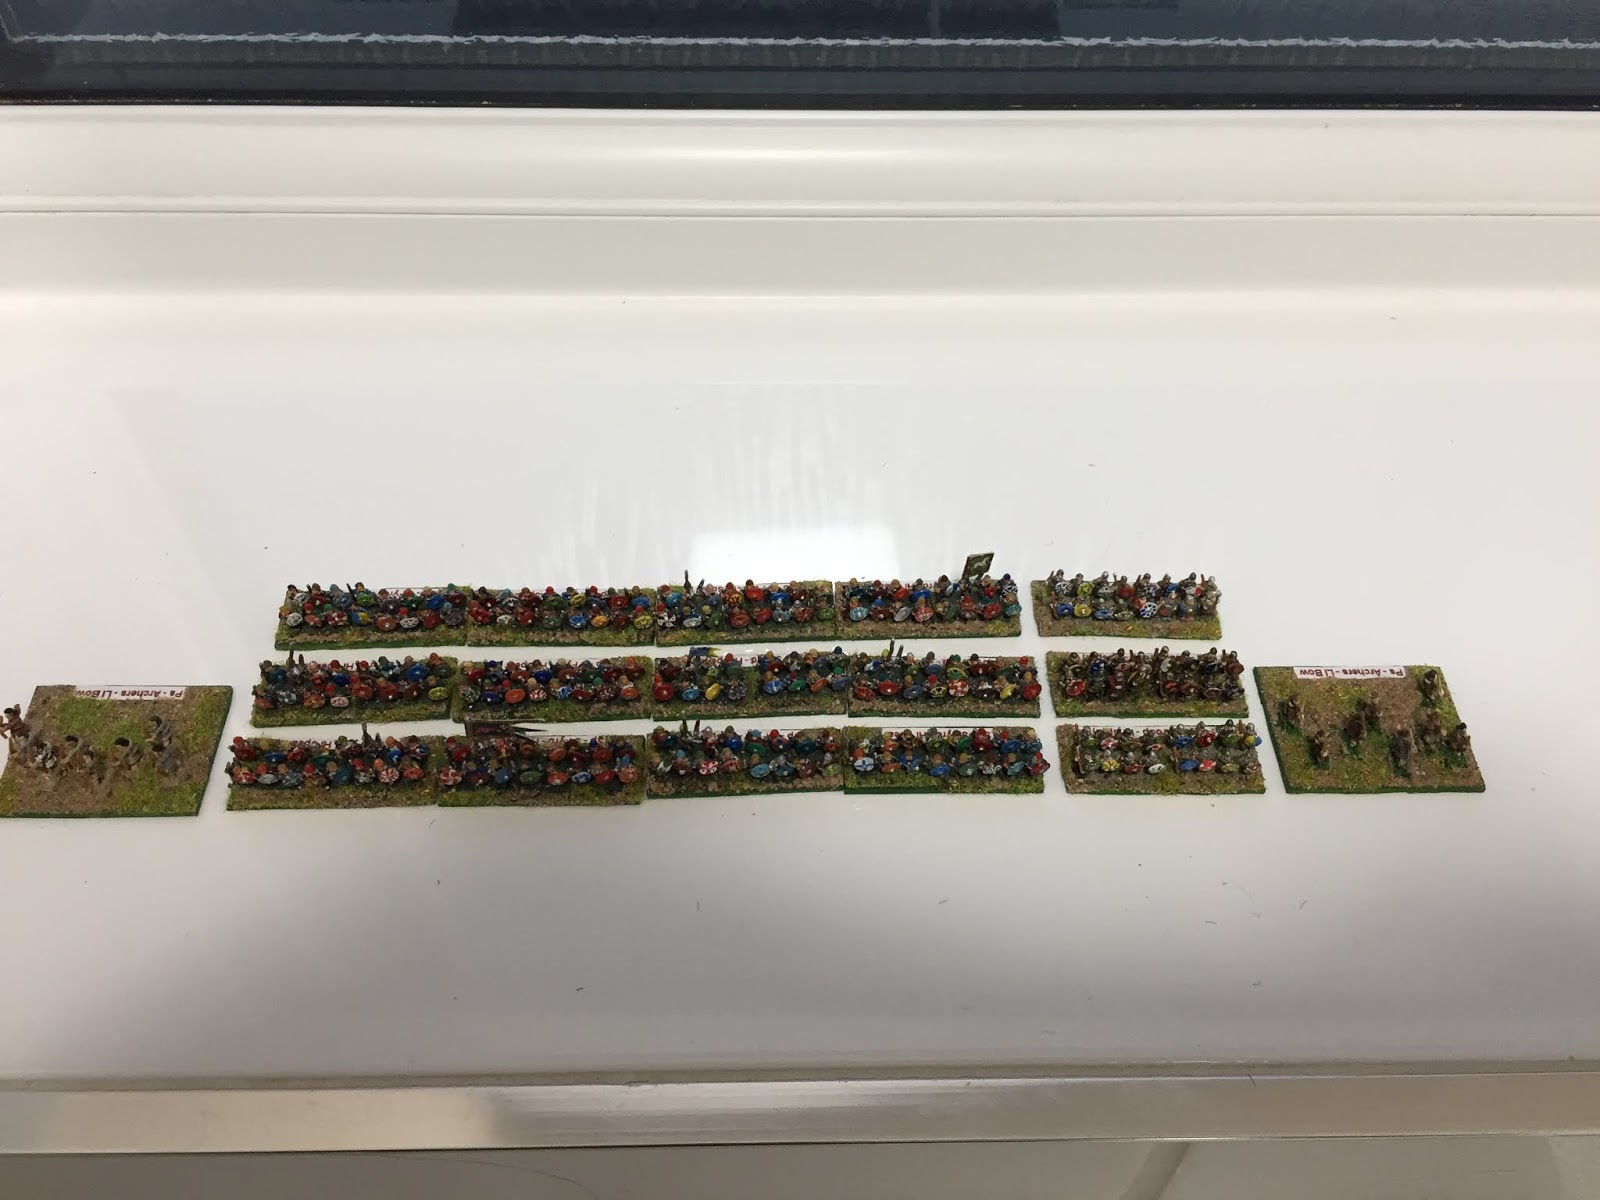
I had a couple of days leave a couple of weeks ago and between some more sorting out of my office and one of the outside storerooms I did some figure painting.
After I posted the photos of my Welsh infantry and cavalry I realised they had no Light Infantry support. A quick flick through the army lists for DBA 3 and ADLG showed that I could have up to four elements of light infantry Javelinmen under ADLG. DBA with it’s smaller armies was less generous but as they also show javelin equipped Psiloi it didn't really matter. Four units of Javelinmen it was to be.
I base Light infantry on deeper bases than the ADLG rules allow, but I’m never going to play a competition game with these armies so it doesn’t really matter. I think the extra base depth works better then the standard depth as it creates a deeper buffer zone in front of a main battle line. I put eight light infantry per base with 6mm figures which makes skirmisher elements fairly quick to create as there are a lot less figures to paint per element compared to the sixteen per element for the infantry in the main battleline.
The figures are Baccus Greek psiloi with javelins which create a slightly different look to the light infantry figures I have used in my other armies as they are shieldless. They are really nice sculpts and have two variants one is standing throwing the javelin while the other is running forward with javelin held across the body. The nice dynamic poses work well for light infantry who should look like they dash about rather more than their more stolid brethren in the shield walls.
I'm happy with them and it has added a bit more resilience to the Welsh army I need to get some sheep or cattle to act as booty for them - not that I'm suggesting that Dark Age welsh were a buncj of cattle thieves or anything!.
After I posted the photos of my Welsh infantry and cavalry I realised they had no Light Infantry support. A quick flick through the army lists for DBA 3 and ADLG showed that I could have up to four elements of light infantry Javelinmen under ADLG. DBA with it’s smaller armies was less generous but as they also show javelin equipped Psiloi it didn't really matter. Four units of Javelinmen it was to be.
I base Light infantry on deeper bases than the ADLG rules allow, but I’m never going to play a competition game with these armies so it doesn’t really matter. I think the extra base depth works better then the standard depth as it creates a deeper buffer zone in front of a main battle line. I put eight light infantry per base with 6mm figures which makes skirmisher elements fairly quick to create as there are a lot less figures to paint per element compared to the sixteen per element for the infantry in the main battleline.
 |
| The Welsh - just lacking some four legged booty |
I'm happy with them and it has added a bit more resilience to the Welsh army I need to get some sheep or cattle to act as booty for them - not that I'm suggesting that Dark Age welsh were a buncj of cattle thieves or anything!.
Thursday, 5 December 2019
First sight - 2D6 Anglo Saxon buildings
Robert Fellows of 2D6 Wargames has very recently released a new range of 6mm Anglo-Saxon resin buildings. So of course I ordered a set. Using his online shopping cart was extremely easy (far too easy according to Mrs E) and as with most internet shopping sites I could pay with a bank or credit card via paypal without having a paypal account. The order came through within a couple of days and I received email updates to show how the shipping process was going throughout. Packaging was good and I'd be surprised if normal handling in the postal system would be able to damage anything. Excellent customer service throughout.
The castings themselves are in a fairly dense resin similar to that used by Leven Miniatures for their buildings, so they should be robust enough to withstand tabletop wear and tear. The resin in my order was a pure white and my first thought was that they probably wouldn't need an undercoat, especially as there little or no trace of any mold release agent. There were no bubbles in the castings and only one tiny bit of tissue thin flash where resin had over topped the mold and that came straight off without damaging the casting.
The detail is crisp and the buildings are well modelled with good proportions. Over all they are ever so slightly larger than Leven but not as big as Timecast in size. The doors are the right height for 6mm so these are simply models of larger buildings. The range currently consists of one large and small pit house, two cottages one thatched and one with a wooden shingled roof and a huge great hall model. The latter is probably twice the length of the Leven offering. I'd say a Royal Hall as much as a great hall. The differences in size are fine though as it will simply add some variety to my tabletop settlements.
Of course me being me I couldn't wait to slap some paint on at least one of the 2D6 models. I chose the small pithouse, after all its small so wouldn't take too long to do. I didn't undercoat it although I did wash it in hot soapy water first. It seems to have worked OK although time will tell if the paint is going to rub off. I used a very basic technique a straw yellow base on the thatch and a light green-brown for the timber. I slapped (er I mean lovingly and carefully brushed) a coat of GW Agrax Earthshade over the whole model. Lastly I applied a heavily thinned pale grey over the highpoints of the woodwork to simulate weathering. I think that worked quite well and will do it again. The entire paint job took under 30 minutes including letting coats dry. The detail in the castings really helped there. Its going to be no time at all before I have good sized Anglo-Saxon town ready for the tabletop.
I will be painting the rest of the order over the next couple of days and will post more images once I have done so.
To sum up; I'm very impressed, especially as these are 2D6's first foray into 6mm model buildings. I'd say we have a significant new player in the resin scenics market which can only be a good thing. I'm looking forward to seeing what comes next from Robert.
The castings themselves are in a fairly dense resin similar to that used by Leven Miniatures for their buildings, so they should be robust enough to withstand tabletop wear and tear. The resin in my order was a pure white and my first thought was that they probably wouldn't need an undercoat, especially as there little or no trace of any mold release agent. There were no bubbles in the castings and only one tiny bit of tissue thin flash where resin had over topped the mold and that came straight off without damaging the casting.
The detail is crisp and the buildings are well modelled with good proportions. Over all they are ever so slightly larger than Leven but not as big as Timecast in size. The doors are the right height for 6mm so these are simply models of larger buildings. The range currently consists of one large and small pit house, two cottages one thatched and one with a wooden shingled roof and a huge great hall model. The latter is probably twice the length of the Leven offering. I'd say a Royal Hall as much as a great hall. The differences in size are fine though as it will simply add some variety to my tabletop settlements.
 |
| 2D6 (unpainted) and Leven Great Halls |
 |
| from left to right; Timecasr, 2D6 and Leven cottages |
 |
Front elevation of the painted pit house plenty of details to be seen |
 |
| And the rear is just as well sculpted |
 |
| The completed pit house, the grid is centimetre squares |
To sum up; I'm very impressed, especially as these are 2D6's first foray into 6mm model buildings. I'd say we have a significant new player in the resin scenics market which can only be a good thing. I'm looking forward to seeing what comes next from Robert.
Monday, 2 December 2019
A change of pace
After a couple of weeks where I have been painting Viking Age figues I wanted a bit of a change. I had some Leven 6mm buildings I had bought last year which for various reasons had either not made it to the painting table or hadn't been finished so I turned to these for a bit of light relief. Or so I thought, I quickly realised that I had forgotten what techniques I had decided on using to paint buildings and my system for 6mm figures doesn't translate to buildings. The problem is that they have large areas of flat, often textureless, space and making sure to get a good even cover is difficult. This easier for the buildings cast in the cream resin than it is for those cast in the grey resin but in both cases I am coming to the conclusion that an undercoat is vital.
I have a mixture of Timecast and Leven buildings. I prefer the Leven stuff myself but the Timecast Anglo Saxon buildings are still top notch castings and I have no hesitation in mixing the two together, I just prefer the proportions of the Leven ones.
Over the last couple of days I have tidied up the Anglo Saxon Great Hall and started on the two Anglo Saxon Cottages. Those were fairly simple paint jobs as they are wattle and daub with a thatched roof which don't provide that many options for colour schemes, darker thatch for older roofs white wash v natural cow dung and straw coloured walls and you are about there! However, lurking at the back of the queue was a Norman Chapel with stone walls and a slate tiled roof. There are a couple of examples of this style of church locally so I have a decent handle on the colours for the materials but getting them right on the model was another thing entirely! The variance in tone from block to block of the sandstone is really causing me some heartache as I just can't get it to look right. It probably doesn't help that I studied Geology in my youth and I know that a rock isn't just a rock. Sandstone colours vary based on the individual grains of sediment which up the rock, those in turn vary based upon the rocks that were eroded to create the sand that is the basis of the sandstone. Sandy Limestones look different to Gritstones and so it goes. I'm two far into the red sandstone end of the spectrum which is fine if i'm recreating Buildings that use Old Red Sandstone or New Red Sandstone but isn't right for south and central England where the stone is a more, well, sandy coloured. I agonised over that paint scheme until I realised that no matter how hard I try my painting will never rival the detail nature puts into real building stone and probably nobody will care anyway.
I have just order some of 2D6's new Anglo Saxon buildings which should arrive in a few days time so once those arrive I will provide a review of this new manufacturer's products. The photos on the website look good and reviews of their WW2 stuff have been universally positive so I have high hopes.
I have a mixture of Timecast and Leven buildings. I prefer the Leven stuff myself but the Timecast Anglo Saxon buildings are still top notch castings and I have no hesitation in mixing the two together, I just prefer the proportions of the Leven ones.
 |
| Leven Norman Chapel with the large Anglo Saxon Cottage and the Great Hall behind |
Over the last couple of days I have tidied up the Anglo Saxon Great Hall and started on the two Anglo Saxon Cottages. Those were fairly simple paint jobs as they are wattle and daub with a thatched roof which don't provide that many options for colour schemes, darker thatch for older roofs white wash v natural cow dung and straw coloured walls and you are about there! However, lurking at the back of the queue was a Norman Chapel with stone walls and a slate tiled roof. There are a couple of examples of this style of church locally so I have a decent handle on the colours for the materials but getting them right on the model was another thing entirely! The variance in tone from block to block of the sandstone is really causing me some heartache as I just can't get it to look right. It probably doesn't help that I studied Geology in my youth and I know that a rock isn't just a rock. Sandstone colours vary based on the individual grains of sediment which up the rock, those in turn vary based upon the rocks that were eroded to create the sand that is the basis of the sandstone. Sandy Limestones look different to Gritstones and so it goes. I'm two far into the red sandstone end of the spectrum which is fine if i'm recreating Buildings that use Old Red Sandstone or New Red Sandstone but isn't right for south and central England where the stone is a more, well, sandy coloured. I agonised over that paint scheme until I realised that no matter how hard I try my painting will never rival the detail nature puts into real building stone and probably nobody will care anyway.
I have just order some of 2D6's new Anglo Saxon buildings which should arrive in a few days time so once those arrive I will provide a review of this new manufacturer's products. The photos on the website look good and reviews of their WW2 stuff have been universally positive so I have high hopes.
Friday, 29 November 2019
Did you ever wonder
How much it would cost to replace your little lead warriors? A post on one of the 6mm wargaming forums on Facebook got me to wondering. A lady had come into possession of a wargames collection which had belong to a family member who had died. She was asking for help in identifying what she had, and advice on disposing of the collection. There seemed to be a lot of old school stuff including Heroics & Ros micro armour, unbuilt 1/72nd scale plastic kits from the 1980s and 90's and some figures that could have been Hinchcliffe although I couldn't be sure. There was a lot of stuff there, some painted and some unpainted and it got me thinking. What will happen to my collection once I have gone, will Mrs E be in the same boat as that poor lady, not knowing what the stuff is or whether it has any value.
That brought me around to wondering what if it was lost or stolen or God forbid melted in a fire!!! How would I go about convincing an insurance assessor of the replacement value of my collection? I messaged Daniel Hodgson of Reveille painting service for an estimate of the cost of painting and basing 6mm figures and set to work with the old spreadsheeting software. The result for just my Ancients and Dark Ages to replace like with like is over £2,000. Significant enough to need a separate entry on our house insurance. Mrs E didn't seem surprised, maybe I'm not as good at smuggling packages into the house as I thought!
I haven't started on the 6mm buildings and scenics or the ECW figures or the WW1 aircraft or the WW2 tanks and infantry and............it certainly mounts up quickly doesn't it! I don't think I have a lot of figures compared to most gamers of my age so what would it cost to replace your toys?
Sunday, 24 November 2019
The battle of Billington Moor - player briefings.
To complete the battle planning I have created briefing packs for the commanders of each side. These are drawn from the original scenario but add a bit of period chrome. I have added one extra game rule. The royal army has to draw up a deployment before the rebels disclose the battlefield layout. This is to simulate an army in column of march having to deploy into line of battle without time to think to much. This is a direct steal from my British Civil Wars rules. From the evidence we have 17th Century armies had a deployment plan in mind and set up the column of march to allow this to be formed quickly and easily by simply wheeling units into line of battle. It seemed to fit this situation so I borrowed it.
The briefings are below in case anyone wants to use them.
The briefings are below in case anyone wants to use them.
Billington Moor 798 AD -
Alderman Wada’s briefing
The rightful King of Northumbria, King
Osbald, has been deposed by the usurper Eardwulf. His rule lies heavy upon the land, especially
yours as his advisors have you marked as a supporter of Osbald. They are not wrong and news is now come from
Mercia that King Ceolwulf will support Osbald’s claim if it is clear that there
is support for his return.
Osbald has sent messages to his supporters
in and around his land in at Osbaldeston and even now they flock to your
side. Your own folk from your lands
around Wadingasham are also here. If you
can march on York more men will come to support the rightful King from his
holdings around Osbaldwick.
The is a single problem to the completion
of your plans. Eardwulf has somehow
learned of your rising and is close at hand with his army his intention is
clear; crush your army and kill it’s leaders.
You are faced with a simple choice fight or desert your folk and flee
into exile in Mercia. For a true born
Northumbrian the choice is clear. We
fight.
Your Forces
·
2 x Generals (4Bd) one representing Wada
as CinC
·
1 x General (Sp)
·
2 x Hird (4Bd)
·
1 x Fyrd (Sp) in effect a third poorer
quality Hird unit
·
24 x Fyrd (Sp) or (7Hd) For each 2 x Sp
selected 1 x 7Hd must be selected
·
3 x Archers or Scouts Ps or Fyrd (Sp)
·
3 x Archers or Scouts (Ps)
·
3 camps which can be massed together at
one point (or the village may be considered the joint camp)
You must form three commands none of
which may contain less than 6 elements.
Each must include a general. The
rules are DBA 3 using the Big Battle DBA additional rules.
The Battlefield
This is your land you know it well and can
choose the battlefield to suit your forces.
You will deploy on the eastern edge of the selected ground. The usurper Eardwulf will deploy on the west.
You will select any 9 squares from the map
which form a 3 x 3 square as the table to fight the battle upon. The Rivers
Ribble and Calder are tested for passability separately to each other.
The standard DBA check is amended so that it is only paltry on a throw of 1, a
2, 3 or 4 makes it slow going and 5 or 6 makes it a slow crossing with effects
as per DBA 3.0. all other streams are 50:50 chance to be either paltry or
slow going (DBA scores of 1-4 with no chance of the worst result of a 5-6
arising) The Roman road counts as a track. The solid green is a steep
hill and the green dotted areas are boggy ground.
Choose wisely Alderman, the usurper will
be attacking and seems likely to have more Fyrdmen and Hearthtroops than
you. Still God favours the righteous
does He not?
Billington Moor 798 AD – King
Eardwulf’s briefing
You were acclaimed King by the Witan of
Northumbria only a few months ago and already those Mercian Dogs to the south
are fomenting unrest. The reasons are
simple King Offa is dead and his successor is weak. Already Kent and the East Saxons have thrown
off the Mercian yoke and Ceolwulf has ridden south and east to crush their
armies. To keep Northumbria from
descending upon his northern borders he needs to keep you busy. If you can defeat this rising then nothing
stands in your way both at home and perhaps in extending your rule southwards.
The depraved despot you replaced, Osbert,
dare not face you and has roused his supporters, men who hope to thrive on the
chaos of civil strife to taking up arms.
They are raising troops in the southwest of your kingdom but you have
stolen a march upon them and even now are marching to bring death and
destruction upon the rebels.
Your scouts have returned and report the
enemy marching towards you from the west perhaps a 1,000 strong or more. There seem to be many old men and boys with
few seasoned warriors capable of standing in the shield wall. Your aim is
clear; crush their army and kill it’s leaders.
Your Forces
- 3 x Generals (4Bd) the King, Alderman Eardbehrt
(Herbert). Herbert's son
- 6 x Hird (4Bd)
- 21 x Fyrd (Sp)
- 3 x Fyrd (7Hd)
- 3 x Scouts (Ps)
- 3 x camps which must be placed one per command
(the king's camp counts as a double loss if captured)
You must form three commands none of
which may contain less than 6 elements.
Each must include a general. The
rules are DBA 3 using the Big Battle DBA additional rules.
The Battlefield
You are advancing from the west. Before you see the battlefield you must
select your troops and draw up a deployment plan (this is to simulate a pre set
line of march deploying into line of battle).
You will be the attacker but Wada will select the battlefield by selecting
any 9 squares from the map which will form a 3 x 3 square as the table to fight
the battle upon.
The
Rivers Ribble and Calder are tested for passability separately to each
other. The standard DBA check is amended so that it is only paltry on a
throw of 1, a 2, 3 or 4 makes it slow going and 5 or 6 makes it a slow crossing
with effects as per DBA 3.0. All other streams have a 50:50 chance to be
either paltry or slow going (DBA scores of 1-4 with no chance of the worst
result of a 5-6 arising) The Roman road counts as a track. The solid
green is a steep hill and the green dotted areas are boggy ground.
Choose you deployment with care for who
knows what terrain you will have to fight upon this day and may God in His
wisdom grant you the victory.
More Objects in Space
Way back in the mists of time, well 2013 to be precise, I had a brief flirtation with Full Thrust the ship to ship space combat game. The rules were OK although they did reminded me of a 1970s naval game I used to play a lot, called Seastrike. This was partly because of the the hit location and damage rules but mainly because the lack of any 3D element to maneuvering. I know how difficult it is to replicate gaming in three dimensions as my struggle with WW1 dogfighting mechanisms demonstrates. As The Hitch Hikers Guide to The Galaxy tells us 'Space is big', so some kind of recognition that not all actions are going to be fought in the plane of the ecliptic should really be present either in the position of units or at least in terms of reinforcing from out of the plane as a sort of 3D flank march. So the search goes on for a set of rules which really hit the spot.
Being a prone to these fits of enthusiasm I have learned not to spend huge amounts on models until I am satisfied that I'm going to stick with a set of rules or a historical period. In this case I bought a handful of Irregular Miniatures spaceships, a few fighter groups from a manufacturer whose name I don't recall and I made the rest.
The basic technique for making spaceships is one I have used since I was an impoverished teenager. In best Blue Peter style (if you don't know what that is ask your grandparents about children's TV in the 1960s) these were made from layers of cardboard glued together to create something that is, if not 3D, at least 2D plus. Details are from the bits box and include furniture fixings, panel pins, cocktail sticks, match sticks and bits and pieces of textured plastic packaging.
After a couple of solo games that were less enthralling than I had hoped I put the models back in their box and there they have stayed. They hadn't seen the light of day from then until today when, while sorting out my office bookcases, I found the box. The home made stands were a bit battered but all in all they haven't been to badly bashed about by relocations over the last six and a half years.
The dark background is the floor tiles in my conservatory which I think it actually looks nicer than some specialist space themed battlemats.
At some point in the future I may drag the rules out and give them another go or I may start tinkering with the bits I feel are missing, if I do I will report on the outcome.
 |
| Part of the fleet the rest need a bit of TLC |
 |
| Scratch built frigates and a sensor corvette |
 |
| Home built merchantmen and Destroyer escort. Scouts are Irregular Miniatures |
 |
| A Fleet Carrier from Irregular, fighter swarms from who knows where and scratch built destroyers! |
At some point in the future I may drag the rules out and give them another go or I may start tinkering with the bits I feel are missing, if I do I will report on the outcome.
Friday, 22 November 2019
Proxy Dark Age troops - The Welsh Princedoms
By the late 8th century the Welsh had been pushed back to the area of the modern principality and the south west of England (Dumonia). Wales itself was made up of a number of small princedoms although for short periods they would be unified under a successful leader such as Hywel Dda. Originally Romano-British in outlook by the late 8th century they had reverted back to something closer to the military organisation and tactics of the tribal societies who had replaced the Romans throughout Western Europe. Each Welsh King had a small band of personal retainers and relied on the land owners (Uchelwyr) to raise their own retainers (Teula) for military service. Kings seem to have had a military house hold of around 50 men but may have hired mercenaries to boost numbers. A Teula may have been a unit of 300, but given the fixation in early Welsh literature with multiples of the number three that can't be guaranteed. There was also a unit called a nifer which may have been a subdivision of a Teula or it may have been an alternative name for the same thing. What we can tell is that the welsh were never able to field huge forces and small raiding forces of between 50 and 300 would have been the norm. These would have been drawn from the Uchelwyr and their retainers and service by bondsmen tied to the land seems to have been rare.
Period accounts speak of their raiding over Offa's Dyke in hit and run attacks. There was some use of light cavalry for scouting but the bulk of their forces were infantry. These are described as fearsome in the initial charge but liable to fade away from a determined resistance. They would precede their charge with showers of javelins but were only a serious threat to a shield wall if it broke. They were fleet footed and little slowed by rough terrain and often based tactics on the use of that terrain to disadvantage more closely formed foot.
This suggests that they were not fighting in close order bodies themselves but were more akin to what the old WRG ancients rules termed Light Medium Infantry (LMI). DBA 3.0 treats them as Warband, DBMM as fast warband and ADLG as MI sword. Personally I'm not fully convinced by the ADLG definition and feel that they could be better represented by using LMI Javelinmen as the standard type but giving an option to upgrade to MI Sword.
No one does figures specifically for Welsh viking age figures in 6mm so its back to looking for a good proxy. I have chosen to use Baccus Moorish Infantry as these are nicely animated in a variety of poses that suits the less regimented style of combat formations I imagine these troops to have fought in. Phil Barker suggests the Welsh troops of this period were armed with swords and targets so there may be an option to use Irregular Miniatures Scots Irish swordsmen figures for them. For their mounted troops I have used the ever popular Gothic Medium Cavalry from Baccus 6mm's Roman Range.
They give opposition to and a different tactical style to the Anglo-Saxon and Viking forces which form the bulk of the forces in play during the period. I just need more of them so I can field a decent force and probably some sheep and cattle for them to steal!
Period accounts speak of their raiding over Offa's Dyke in hit and run attacks. There was some use of light cavalry for scouting but the bulk of their forces were infantry. These are described as fearsome in the initial charge but liable to fade away from a determined resistance. They would precede their charge with showers of javelins but were only a serious threat to a shield wall if it broke. They were fleet footed and little slowed by rough terrain and often based tactics on the use of that terrain to disadvantage more closely formed foot.
This suggests that they were not fighting in close order bodies themselves but were more akin to what the old WRG ancients rules termed Light Medium Infantry (LMI). DBA 3.0 treats them as Warband, DBMM as fast warband and ADLG as MI sword. Personally I'm not fully convinced by the ADLG definition and feel that they could be better represented by using LMI Javelinmen as the standard type but giving an option to upgrade to MI Sword.
 |
| Welsh Infantry or Moors in disguise perhaps? |
 |
| Uchelwyr (No I can't pronounce it either) |
Thursday, 14 November 2019
Peasants and Pilgrims
For Billington Moor (see earlier posts) I am going to need to represent the less well equipped Great Fyrd. ADLG counts these as levy and DBA 3.0 as solid horde (7Hd). Now hordes or levy crop up in a number of army lists in both sets of rules so I decided that some generic units of ill armed peasant types would give me the flexibility to use any thing I created in a number of different armies.
Baccus is my preferred figures range but the nearest they have for representing what I wanted were clubmen from their 17th century range. So I went with Irregular’s Peasants and pilgrims from their medieval range. These are noticeable smaller than Baccus but using a slightly thicker base would help disguise that. I also wanted to have some figures representing slightly better equipped troops in the front ranks. So off went an order to Irregular for the peasants and pilgrims along with some Viking spearmen. I also took the opportunity to order some laser cut 2mm PDF bases from Warbases which would give me a thicker base than my usual 1.5mm plywood bases.
Ordering was easy Irregular now having a proper online ordering and payment system which is much easier to use than the old system. Both orders came within a couple of days, well packed and with no damage. The laser cut bases were a bit of a revelation to me as I have always cut my own using a straight edge and a Stanley knife. Because these are laser cut there is no variation, all totally accurate. I’m a convert. Next time I will try the 1.5mm plywood option. The figures were less impressive but acceptable for what I wanted. There was a fair amount of flash between the figures on all of the peasant castings. The Vikings were much better but compared to Baccus the casting detail is much less well realised. Still these are figures from an earlier generation of sculpting styles so differences in quality are to be expected. It was nothing that a couple of hours with some micro files and modelling tools couldn’t deal with.
Unlike Baccus who cast figures as strips with space between each figure Irregular has three styles of castings based on old WRG base width requirements. Close order castings are shoulder to shoulder 6 figures wide. These can’t be separated into smaller groups unlike the open and loose order blocks which have some gaps. Both castings I had chosen were loose order so out came the side cutters to break the castings down into the smaller groups I needed. I wanted to have a frontage of 8 figures per rank so groups of four and of two were the order of the day.
Painting makes a huge difference to Irregular’s 6mm figures. The detail is there but it is often surface detail with little depth so careful painting is vital to pick this out. The thing about Irregular's 6mm figures is that initially they look a bit like vaguely man shaped blocks but after painting they look fine. I tried a different undercoating technique for these, using a coat of Vallejo ‘Earth’. I wanted these troops to be less colourful so I used a range of muted earthy shades with the odd bit of colour on headgear to make the figures show as individuals.
I will let you judge if the final result passes muster. Only another 144 figures to make the remaining 6 elements to do then.

Baccus is my preferred figures range but the nearest they have for representing what I wanted were clubmen from their 17th century range. So I went with Irregular’s Peasants and pilgrims from their medieval range. These are noticeable smaller than Baccus but using a slightly thicker base would help disguise that. I also wanted to have some figures representing slightly better equipped troops in the front ranks. So off went an order to Irregular for the peasants and pilgrims along with some Viking spearmen. I also took the opportunity to order some laser cut 2mm PDF bases from Warbases which would give me a thicker base than my usual 1.5mm plywood bases.
Ordering was easy Irregular now having a proper online ordering and payment system which is much easier to use than the old system. Both orders came within a couple of days, well packed and with no damage. The laser cut bases were a bit of a revelation to me as I have always cut my own using a straight edge and a Stanley knife. Because these are laser cut there is no variation, all totally accurate. I’m a convert. Next time I will try the 1.5mm plywood option. The figures were less impressive but acceptable for what I wanted. There was a fair amount of flash between the figures on all of the peasant castings. The Vikings were much better but compared to Baccus the casting detail is much less well realised. Still these are figures from an earlier generation of sculpting styles so differences in quality are to be expected. It was nothing that a couple of hours with some micro files and modelling tools couldn’t deal with.
 |
| Ready for priming. There is detail there just in low relief. |
Unlike Baccus who cast figures as strips with space between each figure Irregular has three styles of castings based on old WRG base width requirements. Close order castings are shoulder to shoulder 6 figures wide. These can’t be separated into smaller groups unlike the open and loose order blocks which have some gaps. Both castings I had chosen were loose order so out came the side cutters to break the castings down into the smaller groups I needed. I wanted to have a frontage of 8 figures per rank so groups of four and of two were the order of the day.
Painting makes a huge difference to Irregular’s 6mm figures. The detail is there but it is often surface detail with little depth so careful painting is vital to pick this out. The thing about Irregular's 6mm figures is that initially they look a bit like vaguely man shaped blocks but after painting they look fine. I tried a different undercoating technique for these, using a coat of Vallejo ‘Earth’. I wanted these troops to be less colourful so I used a range of muted earthy shades with the odd bit of colour on headgear to make the figures show as individuals.
I will let you judge if the final result passes muster. Only another 144 figures to make the remaining 6 elements to do then.

Sunday, 10 November 2019
Yet another unfinished project!
This time it is another campaign. About 35 years ago I became really interested in the period from the Death of Offa the Great of Mercia though to the fall of Anglo-Danish England to the Normans. So just the odd 260 some years then. I blame the BBC and Michael Woods series 'In Search of the Dark Ages'!
I had just finished playing in a long running Wars of the Roses campaign which was a mix of play by mail and battles on a table which had lasted something like 4 or 5 years so there was a gap in my wargaming life. The idea formed of running a campaign set in the Viking Age dealing with the conflicts arising from the formation of the modern nations of Great Britain. The game quickly grew into a monster project and despite players signing up and a few moves being played quickly fizzled out as people's real lives got in the way.
The game started with the following states or tribal groupings in play:
 |
| A very poor photo of the book that started it all |
I had just finished playing in a long running Wars of the Roses campaign which was a mix of play by mail and battles on a table which had lasted something like 4 or 5 years so there was a gap in my wargaming life. The idea formed of running a campaign set in the Viking Age dealing with the conflicts arising from the formation of the modern nations of Great Britain. The game quickly grew into a monster project and despite players signing up and a few moves being played quickly fizzled out as people's real lives got in the way.
The game started with the following states or tribal groupings in play:
- Wessex
- Mercia
- Northumbria
- Strathclyde
- Pictia
- Dal Raidia
- Dumonia (modern Cornwall and Devon)
- Guined (Welsh)
- Pouis (Welsh)
- Gwent (Welsh)
- Morgannwg (Welsh)
- Brecheniaug (Welsh)
- Devet (Welsh)
- The East Saxons
- The East Angles
- Kent
About to come into play were the two main Viking nations the Danes and the Norse who would start as raiders and become larger forces if they made enough loot from raiding. The general idea was to have the main English and Scottish Kingdoms player controlled with the smaller ones and the Welsh controlled by Scottish Players. rebels would be controlled by players opposed to the state facing the rising. This meant that I would need 5 or 6 players to make it work but additional ones could be slotted in to the unassigned kingdoms if required.
The key game mechanic was influence. The leader of each state would have influence points to spend in each turn. The number available would be allocated according to the ability of actual the historical person or at random if this was not known. Players would gain influence from winning battles and loose them for lost battles. The points would be spent on a number of things such as keeping home provinces loyal and attempting to incite unrest in rivals provinces. The further from a player's heartland the target was the higher the influence cost became. This worked very nicely and by allowing players to negotiate in real time treaties could be put in place by both sides using influence for the same thing, equally rival states could be forced to the will of a very influential leader. Points spent on loyalty (either plus or minus) were cumulative but half were lost on the death of the leader who allocated them.
There was a limited amount of cash available used for buying loyalty or disloyalty or paying troops beyond the minimum period of service or as bribes to keep the vikings away (yeah right that was going to work). A peace turn was 1 year long and consisted of use of influence collecting cash and checking for births, deaths and marriages. War turns were one month long and with a peace turn at the end of each year.
In the original campaign following Offa's death Wessex, East Anglia, Essex and Kent all break from Mercia and the Mercians were trying to bring them to heal and the Welsh were trying to unify (with extreme prejudice!). Wessex was attempting to pacify Dumonia before facing up to Mercia and the scots were playing influence games trying to forge two v one alliances with little actual success.
We played through one peace turn then a year of war turns resulting in a couple of field actions before it petered out. I have all the maps and the rules, although in 35 years I have come up with some changes to the rules and I think I might try the campaign solo to see how it hangs together.
Monday, 4 November 2019
More little things
Just a short post today. On Friday Mrs E spotted a desk in the local Red Cross charity shop. Its an office computer desk which although basic is like new. Saturday was spent moving some of the existing bookcases around in my home office to make space for it. It assembled without any issues and gives me probably double the desk area I had before, all for £20! Well done Mrs E.
As a bonus at the same time as spotting the desk she also bought two pristine Ikea Billy bookcases at a bargain price. Ikea price is £55 plus I would either have to rent a van to collect them or pay £35 delivery. These are £35 each and £10 delivery! In effect I am getting an extra bookcase for less than purchase and delivery of one from IKEA, oh and they are already assembled too. Those are being delivered next week. That is a bit of a result as I had two of the same bookcases and one collapsed recently when we tried to store LPs on it. These are even the same colour as the one I have left. So that will give me a 33% increase to my book space. As a bonus our local Red Cross charity shop makes a wedge of cash for use in exceptionally good causes.
At the moment the office is totally topsy-turvy but once the new book cases arrive I will be able to move the existing bookcases around so everything fits into the room and get things back onto shelves where they belong. For now I have space to work and paint soldiers so all is well with the world.
As you can probably tell little things do please me, especially when there is a significant saving in cost to be had.
 |
| I know desks are not all that exciting ...but |
At the moment the office is totally topsy-turvy but once the new book cases arrive I will be able to move the existing bookcases around so everything fits into the room and get things back onto shelves where they belong. For now I have space to work and paint soldiers so all is well with the world.
As you can probably tell little things do please me, especially when there is a significant saving in cost to be had.
Friday, 25 October 2019
The Battle of Billington Moor - re jigging the scales
I spent last night working out a couple of representative armies for the game using the lists I created. This came in at 36 elements a side (obvs!) and about 570 figures a side. Working towards a headcount of about 1,000 a side means I'm working with a figure to man ratio of 1 figure to 2 men so the armies come in around 1,150 combatants each. This is where I had to do the rejigging of the game. The two armies could cover a table top frontage of 1.44 metres each, if no reserves are used and blades don't deploy in depth to get rear support. Using my original three foot square game table was going to be a touch crowded at that so I needed to rethink things.
I mount 16 figures on each 40mm frontage for spears and blades in two ranks. Assuming three foot a man for spears and blades as a starting point that means that a 40mm element at 2:1 figure to man ratio covers 16 yards.
8 figures x 2 = 16 men
16 men x 1 yd each = 16 Yards....simples!
Maximum army frontage in game scales is 36 elements x 16 yards = 576 yards. I'm missing a few steps out here regarding frontages for Horde and Psiloi but just go with me as I have assumptions about troop densities built in here.
So 1.44 metres game table equals 576 yards in reality (and yes I know I'm mixing imperial and metric measurements here but stick with me) so 1 metre on the table equals 400 yds of real ground. The maximum army frontages are 576 yards so the table needs to be at least 1.5 metres square or 600 yards square to scale. Now that may sound tight but allowing for blades deploying in depth, camp guards and reserves ( Ok probably no reserves these are wargamers we are dealing with after all) the frontages will be less perhaps around a metre or so. The map is going to have to be rescaled in relation to the tabletop to make this work.
Fortunately that wasn't too hard. Splitting the original squares into nine smaller squares was sufficient. Each square is roughly 400 yards game scale and 50cms on the table. Giving us a table of 1.5 square metres or 600 square yards and the figures will fit. Yes there is a bit (a lot) of fudging with the map but it now all comes together in a reasonable approximation of the correct frontages on the ground without needing a huge table. The defender can still choose their ground using any 9 map squares which form a larger 3 x 3 square. I already have the ground picked for my play test.
Thursday, 24 October 2019
The Battle Of Billington Moor (part the second)
Having decided that this would be a something to put on for the Monday Night Gamers I came up with both a map and forces for use in the game (see my last post). Although Phil has said he has most of the troops and Graham can provide some proxies I thought I would check if my 6mm collection can cover the force requirements.
Looking at the army lists the game needs to have available:
13 x 4Bd
42 x Sp
11 x 7Hd
9 x Ps
(Edit - I haven't tried embedding a video before it seems to be working OK. What do you think worth doing or do you prefer stills?)
Looking at my figures I have (with some proxies being used)
3 x 4Bd (Anglo-Saxon on ADLG HI bases)
12 x Sp (Anglo-Saxon on ADLG HI bases)
2 x Ps
18 x Sp (Strathclyde Welsh on ADLG MI bases)
2 x Ps
6 x 4Bd (Viking on ADLG HI bases)
10 x 3Bd (Viking on ADLG MI bases)
4 Ps
so allowing Viking 3bd to proxy as Sp that gives me total available elements of
9 x 4Bd
40 Sp
8 Ps
Almost but not quite sufficient, time to get the Dacians out!
They can provide the additional Sp elements or I could finish up the Sp on my painting table which would give me another 6 Sp on HI bases. So no Dacians needed as Sp but I can use their Ps to fill out that roster. I'm going to need some more 4 Bd as well one pack of Bacus' Armoured Vikings will cover that.
The observant amongst you will have spotted that I haven't mentioned the 11 elements of 7Hd required. That's because I only have Hd as Sassanid Persians and even I draw the line at using them as proxies for Anglo-Saxons. Clearly I need to get buying and painting (what a bind!...not). Baccus Gothic Infantry should do very nicely for the less well equipped Fyrd three packs would cover it. Its a good job there is a wargames show this weekend at Leeds, its almost as if I had planned it.
Looking at the army lists the game needs to have available:
13 x 4Bd
42 x Sp
11 x 7Hd
9 x Ps
 |
| Anglo Saxons on video and The Strathclyde Welsh - I will be using their Spearmen and Psiloi |
(Edit - I haven't tried embedding a video before it seems to be working OK. What do you think worth doing or do you prefer stills?)
Looking at my figures I have (with some proxies being used)
3 x 4Bd (Anglo-Saxon on ADLG HI bases)
12 x Sp (Anglo-Saxon on ADLG HI bases)
2 x Ps
18 x Sp (Strathclyde Welsh on ADLG MI bases)
2 x Ps
6 x 4Bd (Viking on ADLG HI bases)
10 x 3Bd (Viking on ADLG MI bases)
4 Ps
so allowing Viking 3bd to proxy as Sp that gives me total available elements of
9 x 4Bd
40 Sp
8 Ps
Almost but not quite sufficient, time to get the Dacians out!
They can provide the additional Sp elements or I could finish up the Sp on my painting table which would give me another 6 Sp on HI bases. So no Dacians needed as Sp but I can use their Ps to fill out that roster. I'm going to need some more 4 Bd as well one pack of Bacus' Armoured Vikings will cover that.
The observant amongst you will have spotted that I haven't mentioned the 11 elements of 7Hd required. That's because I only have Hd as Sassanid Persians and even I draw the line at using them as proxies for Anglo-Saxons. Clearly I need to get buying and painting (what a bind!...not). Baccus Gothic Infantry should do very nicely for the less well equipped Fyrd three packs would cover it. Its a good job there is a wargames show this weekend at Leeds, its almost as if I had planned it.
Subscribe to:
Posts (Atom)