I spent last night working out a couple of representative armies for the game using the lists I created. This came in at 36 elements a side (obvs!) and about 570 figures a side. Working towards a headcount of about 1,000 a side means I'm working with a figure to man ratio of 1 figure to 2 men so the armies come in around 1,150 combatants each. This is where I had to do the rejigging of the game. The two armies could cover a table top frontage of 1.44 metres each, if no reserves are used and blades don't deploy in depth to get rear support. Using my original three foot square game table was going to be a touch crowded at that so I needed to rethink things.
I mount 16 figures on each 40mm frontage for spears and blades in two ranks. Assuming three foot a man for spears and blades as a starting point that means that a 40mm element at 2:1 figure to man ratio covers 16 yards.
8 figures x 2 = 16 men
16 men x 1 yd each = 16 Yards....simples!
Maximum army frontage in game scales is 36 elements x 16 yards = 576 yards. I'm missing a few steps out here regarding frontages for Horde and Psiloi but just go with me as I have assumptions about troop densities built in here.
So 1.44 metres game table equals 576 yards in reality (and yes I know I'm mixing imperial and metric measurements here but stick with me) so 1 metre on the table equals 400 yds of real ground. The maximum army frontages are 576 yards so the table needs to be at least 1.5 metres square or 600 yards square to scale. Now that may sound tight but allowing for blades deploying in depth, camp guards and reserves ( Ok probably no reserves these are wargamers we are dealing with after all) the frontages will be less perhaps around a metre or so. The map is going to have to be rescaled in relation to the tabletop to make this work.
Fortunately that wasn't too hard. Splitting the original squares into nine smaller squares was sufficient. Each square is roughly 400 yards game scale and 50cms on the table. Giving us a table of 1.5 square metres or 600 square yards and the figures will fit. Yes there is a bit (a lot) of fudging with the map but it now all comes together in a reasonable approximation of the correct frontages on the ground without needing a huge table. The defender can still choose their ground using any 9 map squares which form a larger 3 x 3 square. I already have the ground picked for my play test.
Friday, 25 October 2019
Thursday, 24 October 2019
The Battle Of Billington Moor (part the second)
Having decided that this would be a something to put on for the Monday Night Gamers I came up with both a map and forces for use in the game (see my last post). Although Phil has said he has most of the troops and Graham can provide some proxies I thought I would check if my 6mm collection can cover the force requirements.
Looking at the army lists the game needs to have available:
13 x 4Bd
42 x Sp
11 x 7Hd
9 x Ps
(Edit - I haven't tried embedding a video before it seems to be working OK. What do you think worth doing or do you prefer stills?)
Looking at my figures I have (with some proxies being used)
3 x 4Bd (Anglo-Saxon on ADLG HI bases)
12 x Sp (Anglo-Saxon on ADLG HI bases)
2 x Ps
18 x Sp (Strathclyde Welsh on ADLG MI bases)
2 x Ps
6 x 4Bd (Viking on ADLG HI bases)
10 x 3Bd (Viking on ADLG MI bases)
4 Ps
so allowing Viking 3bd to proxy as Sp that gives me total available elements of
9 x 4Bd
40 Sp
8 Ps
Almost but not quite sufficient, time to get the Dacians out!
They can provide the additional Sp elements or I could finish up the Sp on my painting table which would give me another 6 Sp on HI bases. So no Dacians needed as Sp but I can use their Ps to fill out that roster. I'm going to need some more 4 Bd as well one pack of Bacus' Armoured Vikings will cover that.
The observant amongst you will have spotted that I haven't mentioned the 11 elements of 7Hd required. That's because I only have Hd as Sassanid Persians and even I draw the line at using them as proxies for Anglo-Saxons. Clearly I need to get buying and painting (what a bind!...not). Baccus Gothic Infantry should do very nicely for the less well equipped Fyrd three packs would cover it. Its a good job there is a wargames show this weekend at Leeds, its almost as if I had planned it.
Looking at the army lists the game needs to have available:
13 x 4Bd
42 x Sp
11 x 7Hd
9 x Ps
 |
| Anglo Saxons on video and The Strathclyde Welsh - I will be using their Spearmen and Psiloi |
(Edit - I haven't tried embedding a video before it seems to be working OK. What do you think worth doing or do you prefer stills?)
Looking at my figures I have (with some proxies being used)
3 x 4Bd (Anglo-Saxon on ADLG HI bases)
12 x Sp (Anglo-Saxon on ADLG HI bases)
2 x Ps
18 x Sp (Strathclyde Welsh on ADLG MI bases)
2 x Ps
6 x 4Bd (Viking on ADLG HI bases)
10 x 3Bd (Viking on ADLG MI bases)
4 Ps
so allowing Viking 3bd to proxy as Sp that gives me total available elements of
9 x 4Bd
40 Sp
8 Ps
Almost but not quite sufficient, time to get the Dacians out!
They can provide the additional Sp elements or I could finish up the Sp on my painting table which would give me another 6 Sp on HI bases. So no Dacians needed as Sp but I can use their Ps to fill out that roster. I'm going to need some more 4 Bd as well one pack of Bacus' Armoured Vikings will cover that.
The observant amongst you will have spotted that I haven't mentioned the 11 elements of 7Hd required. That's because I only have Hd as Sassanid Persians and even I draw the line at using them as proxies for Anglo-Saxons. Clearly I need to get buying and painting (what a bind!...not). Baccus Gothic Infantry should do very nicely for the less well equipped Fyrd three packs would cover it. Its a good job there is a wargames show this weekend at Leeds, its almost as if I had planned it.
Friday, 18 October 2019
The battle of Billington Moor 798AD - The scenario
Following on from my post 'Do I do any actual wargaming' I mentioned re fighting Billington Moor to the MNGers and they seem interested. Phil has 15mm DBA troops including Anglo-Saxons and Pre-Feudal Scots so we may be able to do something in 15mm rather than in 6mm. Which means I now need to look into the numbers and make up of the forces with a view to having a couple of commands a side. So big battle DBA (BBDBA) is looking favourite for this one. The rules are DBA 3.0
Rather than getting too hung up on numbers I have decided to focus on the number of elements required and then amend the battlefield layout to suit. Using BBDBA would normally give 36 elements drawn from the DBA lists with min-max numbers multiplied by three. Each side is then divided into three commands of no less than 6 elements. While DBA doesn't stipulate a maximum size for any of the command a bit of basic math tells me that it cant be larger than 24 elements and that this is probably going to be an issue for PIP allocations if a 24 element command is chosen. For this refight I am creating modified army lists to reflect the slightly different compositions of the two sides but sticking with the overall number of elements.
These lists are:
Middle Anglo-Saxon (Alderman Wada's Rebels)
As an aside I am currently having serious problems on my PC with posting photos between windows and blogger. It seems to be an issue with memory overflow but I can't seem to get to the bottom of it. The second I click the insert button on the blog the PC crashes and I find myself looking at the dreaded blue screen of death! All pictures posted over the last half a dozen posts have been shipped out to my smartphone posted to the blog from there before I return to the PC to ensure they are exactly where I want them. It isn't really an issue when its a photo as those are generally on my smartphone anyway. Where it does become an issue is where I have created a map in a graphics program as that won't easily transfer to the phone. Thus it was with the map for Billington Moor!
It would be probably accurate to add some scrubby woods in a thin band along the banks of the head waters of the streams as a scenic item but I wouldn't give any terrain effect to them. The banks of the Ribble and Calder were probably not wooded. At least not in this location.
The map is divided up into one foot squares. The idea is that the defender is able to choose which 3' by 3' area to fight over by choosing the nine adjacent squares which will make up the battlefield. No matter which area is chosen Wada's troops are the defenders and will deploy on the east side and Eardwulf will be the attacker and deploy on the west. The Rivers Ribble and Calder are tested for passability separately to each other. The standard DBA check is amended so that it is only paltry on a throw of 1, a 2, 3 or 4 makes it slow going and 5 or 6 makes it a slow crossing with effects as per DBA 3.0. all other streams are 50:50 chance to be either paltry or slow going (DBA scores of 1-4 with no chance of the worst result of a 5-6 arising) The Roman road counts as a track (its not been properly re-surfaced since the late 4th Century after all). The solid green is a steep hill and the green dotted areas are boggy ground.
If any one plays this out under DBA or any other rules I'd be interested in your feedback.
Rather than getting too hung up on numbers I have decided to focus on the number of elements required and then amend the battlefield layout to suit. Using BBDBA would normally give 36 elements drawn from the DBA lists with min-max numbers multiplied by three. Each side is then divided into three commands of no less than 6 elements. While DBA doesn't stipulate a maximum size for any of the command a bit of basic math tells me that it cant be larger than 24 elements and that this is probably going to be an issue for PIP allocations if a 24 element command is chosen. For this refight I am creating modified army lists to reflect the slightly different compositions of the two sides but sticking with the overall number of elements.
These lists are:
Middle Anglo-Saxon (Alderman Wada's Rebels)
- 2 x Generals (4Bd) one representing Wada as CinC
- 1 x General (Sp)
- 2 x Hird (4Bd)
- 1 x Fyrd (Sp) in effect a third poorer quality Hird unit
- 24 x Fyrd (Sp) or (7Hd) For each 2 x Sp selected 1 x 7Hd must be selected
- 3 x Archers or Scouts Ps or Fyrd (Sp)
- 3 x Archers or Scouts (Ps)
- 3 camps which can be massed together at one point (or the village may be considered the joint camp)
Middle Anglo-Saxons (King Eardwulf's Royal Army)
- 3 x Generals (4Bd) the King, Alderman Eardbehrt (Herbert). Herbert's son
- 6 x Hird (4Bd)
- 21 x Fyrd (Sp)
- 3 x Fyrd (7Hd)
- 3 x Scouts (Ps)
- 3 x camps which must be placed one per command (the king's camp counts as a double loss if captured)
 |
| Scenic Ribblesdale. The top of the map is North. The village is 'Old Langho' Billington is roughly south of there. |
The map is divided up into one foot squares. The idea is that the defender is able to choose which 3' by 3' area to fight over by choosing the nine adjacent squares which will make up the battlefield. No matter which area is chosen Wada's troops are the defenders and will deploy on the east side and Eardwulf will be the attacker and deploy on the west. The Rivers Ribble and Calder are tested for passability separately to each other. The standard DBA check is amended so that it is only paltry on a throw of 1, a 2, 3 or 4 makes it slow going and 5 or 6 makes it a slow crossing with effects as per DBA 3.0. all other streams are 50:50 chance to be either paltry or slow going (DBA scores of 1-4 with no chance of the worst result of a 5-6 arising) The Roman road counts as a track (its not been properly re-surfaced since the late 4th Century after all). The solid green is a steep hill and the green dotted areas are boggy ground.
If any one plays this out under DBA or any other rules I'd be interested in your feedback.
Wednesday, 16 October 2019
Little things
As grandma used to say “please little minds”. I’m not going to argue with her, after all it would be pointless she has been dead since the 1970’s! Oh and the fact that in my case she was right on the money.
The latest little thing to please my little mind is this it’s a nail varnish rack but it does an excellent job of holding my paints. I like the riser system as it lets me see the actual colour rather than having to look at the label I wrote on the bottle lids. Result ... a happy Elenderil and all for under £15
The latest little thing to please my little mind is this it’s a nail varnish rack but it does an excellent job of holding my paints. I like the riser system as it lets me see the actual colour rather than having to look at the label I wrote on the bottle lids. Result ... a happy Elenderil and all for under £15
 |
| Add caption |
Monday, 14 October 2019
Do I do any actual wargaming?
From reading this blog you might be forgiven for thinking that I spend my time painting figures which never get used in a wargame. To some extent it is true that I have been doing a lot of 6mm painting of late courtesy of having a painting table set up 24/7 which makes it easy to do a few minutes here and there most days.
My gaming has mostly been provided by the Monday Night Group, you know the ones who meet on a Tuesday evening. Graham blogs the details of the games over on Wargaming for Grown Ups and as they are his games, by and large I don't like to steal his thunder. This year we have had some excellent games ranging from Ancient Mesopotamia through the mid 20th Century Spanish Civil War. What I have not done is provide the game rules or scenario for any of these run outs.
With that in mind and considering that I don't really want to inflict an untried game on the MNGWMOAT (Monday Night Gamers Who Meet On A Tuesday) I am thinking of suggesting a game I have played solo a couple of times before using BBDBA and DBM. This is the first Battle of Whalley, not the one fought in 1643, but the one from 798 during one of the regular Northumbrian Civil Wars, AKA the Battle of Billington Moor. Unlike the later ECW battle where there is a reasonable amount of information available, this one is shrouded in mystery. The Anglo Saxon Chronicle has a very laconic entry. It reads:
'AD798. This year a severe battle was fought in the Northumbrian territory, during Lent, on the fourth day before the nones of April, at Whalley; wherein Alric, the son of Herbert was slain and many others with him.'
I had to look up Nones of April. Its Roman calendar reckoning and in the shorter months fell on the 5th day of the month so by my arithmetic this means the Battle was fought on 1st April. I'm pretty sure that the name in my copy of Stenton's translation of the Anglo-Saxon Chronicles isn't Herbert but as I can't get to it at present I will have to accept it for now. I'm guessing that it will turn out to have been Eardberht or similar and that he was famous enough to warrant mention by virtue of his rank although it is of passing interest that his son's name wasn't worth mentioning.
Not much to go on there then. We know from other sources that the Northumbrian crown was in dispute at the time and one of the claimants, the previously deposed King Osbald, seems to have held lands around York at Osbaldwick and more importantly based on place name evidence perhaps also close by the site of this battle at Osbaldeston.
Osbald's claim seems to have had support from Mercia who following the death of King Offa were struggling to keep their status as the leading English kingdom. They were campaigning in the East and South East and an internal succession dispute would have been useful to keep their Northern frontier secure. The Northumbrian dispute could also have roots in the earlier organisation of the kingdom which had two power bases Bernicia on the North East Coast and Deira based in Yorkshire and the Pennine valleys of what is now East Lancashire. The pro Osbald party was lead by Alderman Wada possibly from Waddington a few miles up the Ribble valley. He met and was defeated by King Eardwulf at Billington Moor.
There is little evidence as to exactly where the battle was fought but there is a well used Roman Road which runs down the Ribble Valley along the East bank of the Ribble angling of to the west after Whalley to the old Roman fortress of Ribchester. It would make sense for the combatants to have used this route.
So in my scenario I have Wada rallying support from Osbald's holdings between Ribchester and Whalley and calling in others from his own supporters. The easiest way to move into the Northumbrian heartlands would be march North East along the Roman Road with a view to attempting the Aire Gap at Skipton. Some historians suggest that the battle was fought somewhere close to Billington or Langho South West of Whalley (Hence Billington Moor). So that's the ground I'm recreating and as a bonus it helps me to visualise the location as I went to school at Billington!
The Ribble valley is open here with flat land to the east of the river rising to a steep ridge above Billington with a number of small streams running down from the ridge to join the Ribble. Slightly further to the North East at Whalley itself the River Calder joins the Ribble and personally I wouldn't want to fight with that to my back so I'm placing the action a little further down the valley towards Old Langho which matches with the description of the Battle as being at Billington Moor.
The two forces are both essentially similar consisting of the Nobles Hearth troops backed up by Fyrdmen drawn from the rest of the local population. Neither side would have been particularly numerous so I'd guess at no more than 1,000 a side. The Royal Army would probably have an edge in quality over Wada, but Wada knows the ground so gets to choose the battlefield.
I'm going to allow Wada his own Hearth Troop plus some supporters of Osbald who are equally well equipped as a second unit of Hearth Troop. The balance of his forces will be Fyrdmen split roughly 1:2 between the better so called 'Select Fyrd' and the the less well equipped 'General Fyrd'. The Royal Army will have the Kings Heath Troop, plus Herbert's and one other Hearth troop unit. The balance of his force will be 'Select Fyrd' quality. Both sides will have some light infantry as skirmishers. I normally give slightly more of these to Wadda as he is on home ground and can drum up more support from the locals.
I need to think about how many units to use overall as I may work to a lower figure:men ration to get more toys on the table.
Tuesday, 8 October 2019
Proxy Dark Age troops - Strathclyde Welsh
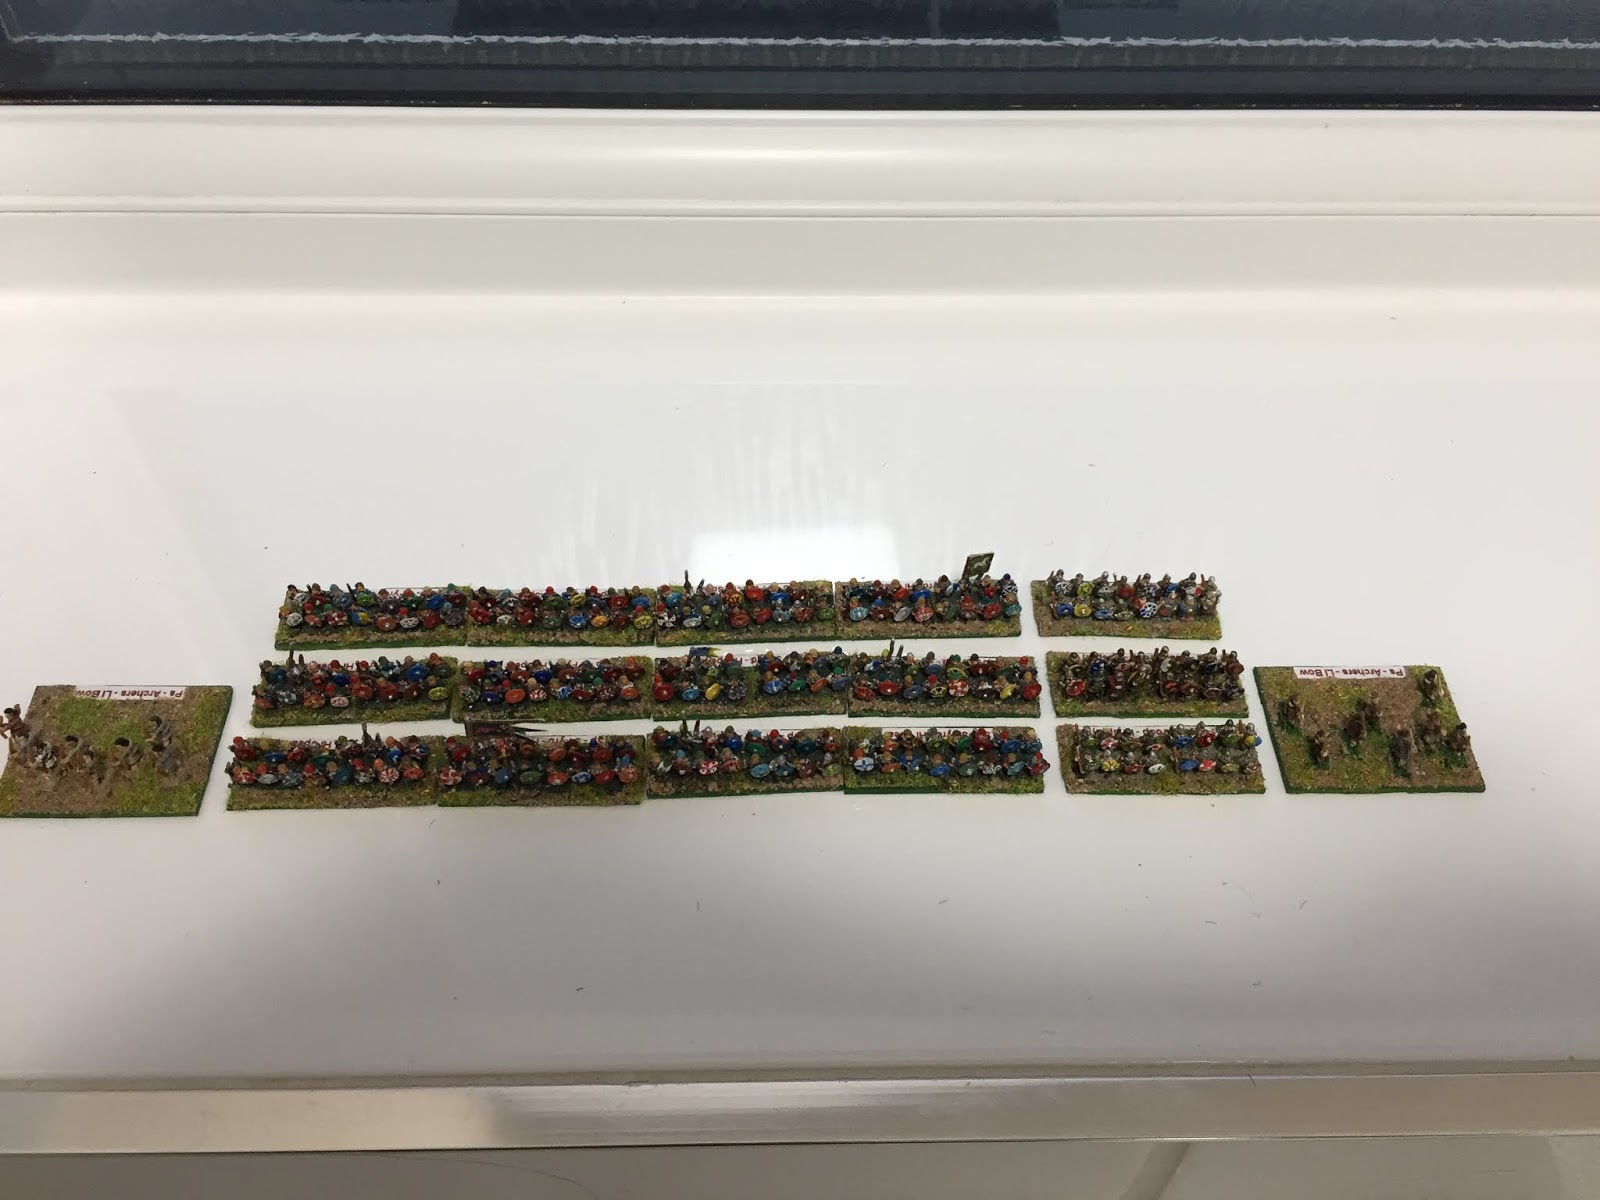
The last few weeks have seen a few more bases added to my Viking Age Britain forces. I have been mainly adding to the Strathclyde Welsh contingent.
Two elements of Heavy Cavalry on the Right (top!) wing two elements of Medium Cavalry on the Left (bottom!). The Centre consists of eleven elements of Pedyt Medium Infantry spear and two elements of Light Infantry archers. There enough figures on the painting table for a further three MI elements and two Heavy Infantry Spear elements. The HI will be Anglo Saxon figures so they will look better dressed.
As I had to use proxy figures I used Baccus 6mm figures from the Gothic part of the Roman range. The spearmen make a really useful generic Dark Age warrior capable of being anything from early Franks through to lower grade Anglo-Saxon Fyrdmen and of course they can always be Visigoths or Ostrogoths. The Gothic Medium cavalry are equally useful; bare headed and unarmoured they can proxy for almost any early medieval unarmoured cavalry or mounted infantry. The Heavy cavalry work well for late Roman or early Byzantine heavy cavalry or as is the case here Sub Roman heavy cavalry. To be fair they might be a little too well equipped for Strathclyde in the 9th Century but they do resemble the mounted troops on the Pictish Aberlemno stone so that's good enough for me.
Jolly Broom Man on his blog 1642andallthat has just had an interesting debate about Anglo-Saxon use of cavalry much of which derives from interpretations of the above stone. Well worth the time to go and read it. I’m in the ride to battle and dismount to fight camp, but it seems pretty obvious that the occasional mounted combat would have occurred either during pursuits or if caught without time to dismount. I don’t think that they deliberately intended to fight as cavalry or had experience as cavalry. I consider that at best they were mounted infantry. Certainly at Hereford in the early 11th century they came off second best when fighting against Welsh raiders from horse back.
As no one except Irregular do much in 6mm for the fringe nations of the Britain in the Viking Age ( and they only add two castings to the choices - Pictish spearmen and Scots Irish swordsmen) so for now it will have to be other figures acting as proxies. Fortunately conversion by paint brush is quick and easy.
 |
| Hmm can't seem to rotate this image! Strathclyde Welsh defying gravity it is then |
Two elements of Heavy Cavalry on the Right (top!) wing two elements of Medium Cavalry on the Left (bottom!). The Centre consists of eleven elements of Pedyt Medium Infantry spear and two elements of Light Infantry archers. There enough figures on the painting table for a further three MI elements and two Heavy Infantry Spear elements. The HI will be Anglo Saxon figures so they will look better dressed.
As I had to use proxy figures I used Baccus 6mm figures from the Gothic part of the Roman range. The spearmen make a really useful generic Dark Age warrior capable of being anything from early Franks through to lower grade Anglo-Saxon Fyrdmen and of course they can always be Visigoths or Ostrogoths. The Gothic Medium cavalry are equally useful; bare headed and unarmoured they can proxy for almost any early medieval unarmoured cavalry or mounted infantry. The Heavy cavalry work well for late Roman or early Byzantine heavy cavalry or as is the case here Sub Roman heavy cavalry. To be fair they might be a little too well equipped for Strathclyde in the 9th Century but they do resemble the mounted troops on the Pictish Aberlemno stone so that's good enough for me.
 |
Jolly Broom Man on his blog 1642andallthat has just had an interesting debate about Anglo-Saxon use of cavalry much of which derives from interpretations of the above stone. Well worth the time to go and read it. I’m in the ride to battle and dismount to fight camp, but it seems pretty obvious that the occasional mounted combat would have occurred either during pursuits or if caught without time to dismount. I don’t think that they deliberately intended to fight as cavalry or had experience as cavalry. I consider that at best they were mounted infantry. Certainly at Hereford in the early 11th century they came off second best when fighting against Welsh raiders from horse back.
As no one except Irregular do much in 6mm for the fringe nations of the Britain in the Viking Age ( and they only add two castings to the choices - Pictish spearmen and Scots Irish swordsmen) so for now it will have to be other figures acting as proxies. Fortunately conversion by paint brush is quick and easy.
Saturday, 5 October 2019
Horse Archers
Just painted some Sassanid horse archers from Baccus. The Galloping version rather than the standing ones. These are a lovely casting with lots of detail that are a pleasure to paint. Horses have a nice animation to them and a mix of long tails and bound up ones which matches the evidence for how they actually groomed them. As these are light horse I went for a mix of Brown's Chestnuts and Bays for the horse colours and used a palette of colours based on Hyacinth Bloom colours for the riders silk clothing. I chose the Hyacinth colour palette as it seems to match the colours in things like the Osprey on Sassanids and Parthians.
I still need to do the texture on the base to finish them but they look so nice I wanted to share. I just have the odd 35 left to paint!

I try to base light cavalry in a less regimented layout then close order cavalry hence the two outside riders starting to turn away.
Once the Baccus shopping cart reopens after the workshop revamp I will be ordering a second pack of the Sassanids plus two packs of Parthian Horse Archers which will do very nicely for allied horse archer types. The Parthian's are bare headed with a headband while the Sassanid's have a mix of 'light bulb' style hats. I'm wondering if a few Scythians might work for mercenary horsemen. The main difference between them and the Sassanid and Parthian castings is that they have a three lappet cap.

I have been making inroads into the lead mountain but everytime I think I have cleared my desk some one adds more to the 'to paint' pile. The fact that that person is me doesn't help!
Still If I'm reducing the lead pile it is probably time to buy more!
I still need to do the texture on the base to finish them but they look so nice I wanted to share. I just have the odd 35 left to paint!

I try to base light cavalry in a less regimented layout then close order cavalry hence the two outside riders starting to turn away.
Once the Baccus shopping cart reopens after the workshop revamp I will be ordering a second pack of the Sassanids plus two packs of Parthian Horse Archers which will do very nicely for allied horse archer types. The Parthian's are bare headed with a headband while the Sassanid's have a mix of 'light bulb' style hats. I'm wondering if a few Scythians might work for mercenary horsemen. The main difference between them and the Sassanid and Parthian castings is that they have a three lappet cap.

I have been making inroads into the lead mountain but everytime I think I have cleared my desk some one adds more to the 'to paint' pile. The fact that that person is me doesn't help!
 |
| This parade of unpainted lead is taking a long time to clear. |
Still If I'm reducing the lead pile it is probably time to buy more!
Subscribe to:
Posts (Atom)