Thursday 31 December 2020

Happy New Year and a short reflection

Overall it's been a restful Christmas break spent reading, painting toy soldiers, watching TV and playing video games

I have spent a part of the break watching the new (fifth) season of The Expanse on Amazon.  This season was a short one, perhaps because of coronavirus issues,  however it was still worth watching.  In fact the whole series is well worth seeing if you like science fiction and it does stay remarkably true to the original books.  As an aside the books are also well worth a read.  They consist of the main story arc and a number of novellas exploring back stories and parallel events to the main story.  The TV series manages to blend a number of these into the main narrative in a fairly seamless manner.

Another unlooked for TV gem has been El Cid also on Amazon.  It is a Spanish production overdubbed into English, but don't let that put you off.  It's a more detailed version of El Cid's story than the Charlton Heston movie and seems more rooted in history.  Think Game of Thrones meets the Last Kingdom but with way better kit standards.  The first series covers the reign of King Fernando the Great of Leon until his death and the splitting of his kingdom between his sons.

On the book front, but as yet not started, I have the last of the Last Kingdom sequence of novels and the latest Simon Scarrow Roman adventure to keep me amused.

On the wargaming front I'm starting to map out a project which has been on the back burner for a number of years, which watching El Cid has kick started into life again.  Yes folks its the 11th Century, it's Spain it's the wars of El Cid.  For reasons which will not immediately (if ever) be clear but which involve the quiz show host Jim Bowen and a failed attempt to play football at age 11 my nick name at school was El Cid, shortened to Cid or as most people thought plain old Sid.  Ever since I started wargaming I have had a hankering to field the army of El Cid, so that means the project has been on the back burner since the early 1970's.  But 2021 is the year where I intend to create the three relevant DBA armies; Feudal Spanish, Andalusian and Islamic Berber.  There will be a lot of proxying if I'm going to achieve this using Baccus figures alone but it can be done.  The shopping cart is meant to reopen in January so I will be ready and waiting to pounce when it does.

So all that remains is to wish you all health, wealth and happiness for 2021.  'Lang mae yer lumb reek' as some Scottish bloke said. 


Monday 28 December 2020

Made it! - I beat the lead pile!


There is nothing like leaving things to the last minute, is there?

I set myself the challenge of painting more figures than I bought in 2020.  That meant I needed to paint and base 758 6mm figures, I know some people could do that in a couple of weeks. but for me this is a biggie!  In 50 years of wargaming I have never before ended a year with less unpainted figures than I started with!

I finished and based a couple of DBA elements of early Byzantine Skoutatoi.  I need to texture the base but they are eligible for use under my house rule of no unpainted lead on the table for solo games.  As an aside I have finally found a way of using yellow that will not allow darker colours to show through.  The answer is to use a coat of pale sand or tan yellow over the darker colour then the bright yellow over that.  not my own discovery but something from one of the pro painters out there.  As I type this I am ahead by 5 figures overall but I have three days still to go.


And here they are the first over the finishing line.


Thursday 24 December 2020

Pushing for the finishing line

 The 2020 painting target is in sight.  It wasn't a huge amount of lead by the standards of some of the commercial 6mm painters out there.  No, I don't mean the painters are 6mm tall, the figures were what I meant, although it does create an interesting whimsy. What if the figures could be life sized and shrunk to 6mm once painted? I could paint them with acrylic house paint using an emulsion brush.  Even the sloppiest paint job would look sublime once shrunk back to 6mm.  But I digress (again).  When I look at the output of those commercial figure painters I know of via Facebook I am continually amazed at the numbers they can paint.  Daniel at Reveille seems to be able to get through the equivalent of my monthly out put ( and I mean a good month's output) each and every day with no loss of quality.  It would be nice to achieve that level of through put just for a few days every so often, but alas my grasshopper mind always has about a dozen other things vying for my attention which takes me away from the painting table! 

I finished work for the Christmas holiday on Monday evening.  I usually try to have a long break over Christmas and New year as it is the one holiday where I don't have to rush about packing and getting to holiday locations, instead I can spend a few days doing very little other than catching up on a few jobs around the house and doing hobby stuff.  So with a decent break in sight, the promise of the Baccus shopping cart reopening in January and nothing to get in the way, painting can continue apace.  As things stand I should hit my target in the next day or so even with interruptions for video gaming, TV watching and dog walking!  Which will clear the decks ready to restock in the new year.  

Will 2021 be the year of 6mm Wars of the Roses?  Or will it be more Late Romans and Early Medievals?  Oh and there is a small matter of the ACW side project where I'm thinking of trying 3 mm figures either 3D printed courtesy of Forward March Studios or possibly from Magister Militum.  So perhaps 2021 will also be the year of 3D printed armies.

Last but not least I wish all of you a very merry Christmas.


Monday 21 December 2020

Unexpected gifts and In Deo Veritas

I don't think I have ever really mentioned anything to do with my working life.  I work in the world of tax, no not H.M. Revenue and Customs.  I did once work for them, well the Inland Revenue as it was back then, but not since 1999!  I now work for a niche tax consultancy which in turn is part of a larger US based corporation.  Usually at this time of year there are the usual corporate events to thank the staff for their efforts and this would normally include a nice bottle of something and a box of choccies.  Of course this year isn't normal, the Coronavirus has put paid to any staff get togethers and as we are all working remotely issuing physical gifts was going to be a nightmare.  So image my surprise, and pleasure to receive an email giving me the choice of a £100 Amazon voucher or a donation to a charity in the same amount in place of this years' Christmas get together and gift.

So there was I with an unexpected £100 burning a hole in my pocket and the whole of Amazon to go at!  I bought some additional Christmas gifts for the ever lovely Mrs E and the rest I spent on goodies.  A few painting materials and then military history/wargaming books.  In no particular order I splurged on:

  • In Deo Veritas wargames rules for the 17th Century (Helion & Co)
  • Twilight of Divine Right also 17th century rules (Pike and Shot Society)
  • A rabble of gentility - The Northern Horse (Helion & Co)
  • In the Emperor's Service - Wallenstein's Army 1625 - 34 (Helion & Co)
All books I wouldn't have thought of purchasing apart from my unexpected windfall.  The Helion & Co books are all from their 'Century of the Soldier' range which covers the pike and shot period with the current focus being on European conflicts in that period.  I'm very impressed with what I have seen so far.  Good production values, excellent content and coverage of stuff that hasn't previously been easily available in English language material.

I also downloaded a copy of the 'Tilly's very bad day' free rules for the Thirty Years War.  These are by Steve Thomas who co authored the first edition of Twilight of the Sun King, the predecessor to Twilight of Divine Right.  'In Deo Veritas' arrived on Friday so I have had chance to skim read both sets and I also read a few reviews of Twilight (as my set hasn't arrived yet).


The good production values start with the cover 

All three sets claim to be fast play and in each case they do this, at least partly, by using manoeuvre units which are brigade or tercio sized.  Less units means less things to move so faster play, seems to be the idea.  

One common criticism I keep seeing in reviews of all three sets is that the definition being used of these brigades or tercio sized units is imprecise both in terminology and unit size.  To be fair to the authors, I had the same issue with my rules mainly because there is no standardisation between armies as to what to call military units, especially of foot.  This leads to a need for rules to use a catch all title for all armies, at all places and times in the period which didn't really exist.  The complaint being that it makes it hard to convert orders of battle for use under these rules if you don't know what a brigade actually is.  I would have thought that this would have been easily dealt with by explaining the problem upfront.  IDV especially seems to play fairly fast and loose with the concept.  The rules include about a half-dozen sample battle scenarios and one of these is Marston Moor 1644.  This is a battle I know fairly well having lived close to the battlefield for a number of years and having based my 6mm army on the forces deployed at that battle.  The scenario order of battle reduces the number of actual units by between a half and a third.  Some of the amalgamations make sense as they match known composite formations but others don't.  Some description of the process would have been helpful.  As it is it presumes either no interest in the actual battle or an in depth knowledge good enough to allow the player to work things out from scratch! 

I can't help but think that this will loose some of the period flavour. The 17th Century was a period of military evolution and part of this showed as different formations and tactical styles at brigade level.  Now I may be wrong here and those differences may well shine through in play.  Reading has made me decide that as I have a fair few 17th Century figures in 6mm that I will give 'In Deo Veritas' a try out.  I will then be able to compare the feel with the rules I have written which are more flexible on formations and tactics as the manoeuvre units are less restricted.  I'm hoping for some inspiration on unit basing and victory conditions as a minimum out come and perhaps even a 'Road to Damascus' moment producing a conversion to this approach to fast play. 

Thursday 17 December 2020

My first painted 6mm ECW figures figures for a very long time


I have been trying to meet one of 2020's New Year's resolutions for the last few weeks; having less unpainted figures by midnight on December 31st then I had at January 1st!  So a personal challenge to reduce the lead pile by painting more than I bought over 2020.  It should have been easy, mainly because Baccus 6mm's shopping cart has had to close for a large part of the year to manage demand and I prefer to buy from Peter's range where he has the figures available, or something close enough to be a viable proxy.  As a result chances to splurge have been restricted.  On the other hand lockdown and the need to be strict in observing the social distancing that came with it dealt my painting mojo a blow and there were three months without any figures getting finished!

Additional Late Imperial Romans.  Legionaries, Auxilia and Equites Sagittarii

All of which meant that I entered November needing to pull my finger out.  At this point please imagine the sound of a finger making that popping noise as it flicks out of the side of your mouth.  You know the one, the cork out of a bottle sound, better yet...do it, go on... you know you want to!  Well I have extracted said digit (more popping sounds here) to the extent that I have run out of unpainted Late Imperial Roman infantry and proxy Byzantine infantry figures!  


Baccus Sassanid Infantry as Byzantine Skoutatoi.  Those shields need some work.

In desperation I turned to the deeper reaches of the lead pile and found unpainted Irregular Miniatures 6mm ECW figures lurking in the shadows.  ECW in 6mm was my earliest foray into sub 25mm gaming.  The bulk of the figures were purchased in the late 1980's from a wargaming store a few hundred yards from Kings Cross station at the end of Pentonville Road if memory serves.  Looking over the tray of unpainted lead made me realise how far 6mm sculpting has come in the intervening years.  The majority of the infantry look like clothes peg dollies scaled down to 6mm!  But in the middle of those were a handful of better sculpted casts.  These were the newer irregular miniature casts.  I have no idea when they were introduced or where I got them from.  I suspect some now long forgotten benefactor gifted them to me.  So onto the painting table they went.  Partly I wanted to reduce the numbers in the 'to paint' pile but also I wanted to see how my painting style had changed in the intervening thirty some years.  So here they are.


Older casts with older paint jobs in the centre.  At this range they all look reasonable

As you can tell the older casts are prone to snapping at the ankles.  A trip to the surgeon and a dose of superglue should fix that.  The new casts need separating so as to have a firing and a ported rank so they are more work than the old ones, but the animation of the figures is far better.  My painting was simpler back then but my eyes were better so I picked out more detail, or at least what detail there was to be picked out.  I'm more ambitious but probably less able now, well my eyes are 35 years older then when I painted the first figures

At the time of writing this I am 53 figures short of target with half of December still to go and with 98 figures on the painting table at various stages of completion.  Fingers crossed I may actually achieve a New Year's resolution for the first time ever this year!


Sunday 6 December 2020

The Dark Ages campaign - some musings

 The original campaign rules included some detail that I can't use in a solo game.  The main one was a system to provide some ability to create alliances and exert influence over other players.  Each ruler would have had points of influence allocated based upon the battles won or lost, and their personal ability to rule.  These were to have been used to maintain loyalty in their populations and sub commanders, or to create unrest in other player's home provinces and to influence other players policies through agreements.  

The idea was that a strong successful leader would be able to 'lean' on neighbouring players and if he managed to 'outbid' them with influence points to force through treaties and agreements.  The effect would be cumulative so a long reigning king with a high influence rating should leave a relatively stable country to his successor.  I say 'should' as a proportion of spent influence points would be lost on the death of a leader to represent the personal nature of kingship.  This would have been useful in the current situation in south west Wales as the attack on Devet would probably been replaced or offset by player negotiations and agreements.  In the original campaign the Welsh Princedoms were threatened by Mercian aggression and would have had an option to set up non aggression and support agreements which would have possibly left a small princedom like Devet less exposed.

Historically Devet (or Dyfed or Ceridigan depending on the source) had a tough time of it, Formed in the mid to late 8th century it was ultimately swallowed up by Seisslywch in the 840's to form a larger political entity under Hywel Dda.  Before that it may have been a client state of Seisslywch as there is an interregnum possibly due to Viking or Mercian attacks after which a new royal line appears which may have had links to their northern neighbour through marriage.  it seems to have been a thing with the Celtic kingdoms as the Scots and the Picts eventually merged through intermarriages rather than military conquest.  

In my mind, in this solo variant the conquest of a province doesn't automatically mean occupation and boots on the ground.  Instead it represents an extension of influence as much as conquest, although I haven't really thought it through in any great detail.  This gives me an option for these one sided battles. The threat of unresistable force exerts a lot of influence (well war is the extension of politics by other means as Clauswitz told us) so I could simply surrender control to Seisslywch.

In the far North I realised that I have missed an option and a playing faction.  So lets all say hello to the Norse the Norwegian Viking faction.  They have a toe hold off map in the Shetlands and historically raided and settled the North and Western Isles, Parts of Ireland, the Isle of Man and the North west of England.  At the start of the campaign, some areas are not under any player control which was originally intended to provide the Norse with options beyond ripping straight into Pictia.  Their first game action will be to attempt to occupy and settle the Orkney's.

Monday 30 November 2020

Dark Ages Campaign - 799AD Shattered shields in Seissllwch?

Well actually it's going to be in Devet down in the south west of Wales, but that doesn't have the same ring.  The Prince of Seissllwch has decided that Devet would make a nice country estate for his son and heir.  Late in the summer he assembles his fighting men for a strike to the South West.  

Now this is a unbalanced affair as Devet can only put 4 elements into the field to face 10 from Seissllwch.  Its not really the kind of tabletop action wargamers would normally fight out, but that's the joy of a campaign.  They throw these unbalanced scenario's up from time to time and they need to be fought out.  It creates a different mindset to the line 'em up and let 'er rip type of game where both sides have some chance of a win.  Instead in these games different objectives come to the fore.  Can the men of Devet do any damage to the invaders or do they decide discretion is the better part and all that and hide in the mountains.  If they hide in the mountains how do the invaders winkle them out?  Does Joe peasant farmer really care who the local bigwig is?  If he does, does he care enough to fight for a loosing cause or does he just get on with working the land?  After all the land is always there, while Princes come and go, tithes and taxes will still be due no matter who sits on the throne.  It will still be a Welshman won't it  which probably counts for something.

So the issue is would this result in a battle, Guerrilla warfare or an acceptance that there is a new ruler?

What does the hive mind think?  I may even take it into account! 

Thursday 26 November 2020

Random thoughts #11 - when funerals outnumber weddings

 That's when you know age is catching up with you, or so said my old Grandad.  Like much of his received wisdom this turns out to be truer then I should like.  No weddings this year but three funerals all of which I had to attend virtually via video feed.  I'd like to say technology is defeating lockdown but it really isn't.  There is no chance to get together after the funeral and have a wry smile over the long gone antics of the dear departed, you know those 'do you remember when [insert name here] did [insert weird shit [insert name here] did 40 plus years ago] moments.

Which led me to wonder what would the random weird thing be that comes up at my post funeral get together.  It's not like there isn't a good selection to choose from!

Wednesday 25 November 2020

Its been a funny old year


 I think it's due to the self-isolating but my painting mojo had deserted me for the best part of three months.  I simply couldn't summon up the enthusiasm to put paint to figures.  Even the frequency of my blog posts slowed down. Happily I can report a slight return to form and I have managed to finish painting  over seventy 6mm figures so far this month, mostly Late Imperial Romans and Maurikian Byzantine proxies.  

The bad news is that while I'm not out of figures to paint, I am running low on the stuff I need for the projects I'm working on, and I missed the Baccus ordering window to top off stocks!  I will have to peruse the Irregular Miniatures catalogue instead.  I'm also running low on some DBA/ADLG bases but I have an order on its way to cover that so that shouldn't be a problem and I have included 60 x 30mm ones for Alter of Freedom units as well.


Lots still to paint, mostly mounted troops.

As you can see there is still plenty to go at on the painting table at the moment and I might just end the year without increasing the size of the lead pile!  Currently the lead pile is ahead by something like 230 6mm figures for the year.


Wednesday 18 November 2020

Dal Raitia 799AD - Pictia attacks Comgail (Dal Raitia)

The Pictish Forces are advancing from the North East and near an insignificant settlement called An Cladach they clash with the Dal Raitian royal army.  The Dal Raitian Scots are defending and the invading Picts are being run by the AI rules.  I am again using De Bellis Solitarius which are available as a free download from the Fanaticus and other, websites.  Versions are available for DBA 2.0 and 3.0 and I find that they give an interesting game by virtue of setting constraints on what the AI side is allowed to do while allowing player input within those constraints.  Before the game started I decided on the Scots deployment.  I then rolled up the Picts overall tactical stance for the encounter and then their deployment.  Think of that as the commanders pre-battle briefing from the CinC something like:

"Right settle down and listen up,  here is the plan.  We outnumber them almost two to one so they either have to hit us hard and fast before we have the line properly set up or they will want to defend and use the ground to their advantage.  If they attack their initial charge is a problem but if we stack the spearmen deep we should be able to absorb the impact.    

Moravin, you have the larger command so act aggressively, I'm putting you out on the right flank with Mar.  You have the majority of the mounted lads so if you get a chance to get around their flank, take it. Especially if you see a chance to attack their camp.  Nothing like having your women attacked to take a man's mind off the fighting eh?  

I will be in the centre with the rest of the Army, so that's you three, Strath Erin, Athfotla and Monath.  Your boys will hold the centre and cover our camp.  Nothing too clever required there, I think we can hold back in a defensive posture and see how things develop on the right.  If they attack us then all the more space on the flank for the mounted lads to use.  I'm pretty sure their entire strength is in the field against us but I'm not ignoring the risk of them trying to land behind our flank from boats.  Moravin the beach is on your flank so have a think about about what you might do to cover that eventuality will you. 

Everyone happy?  Excellent well grab what sleep you can and we shall see what the morning brings."

Or as the dice rather more prosaically gave me; place the camp as near the centre line as possible and behind any available bad going.  Command 1 (The King with  8 elements) deploy in the centre with a defensive stance.  Command 2 (11 elements) deploys on the right flank and takes an aggressive stance.  Pike form up two deep if facing warbands.  Fastest troops deploy on the end of the line.  

The Scots have 11 elements to deploy including the King.  There is nothing to loose and a defensive strategy just will not cut it.  The Scots will probably never have more men in the field than they have today, so they have to take the fight to their Pictish cousins.  Accordingly I have decided to go with a littoral landing.  That will be on the Pictish Right which it turns out are under orders to be aggressive and so with any luck it will land behind their flank.

The Scots briefing is an altogether more downbeat affair.

'Alright then sit down and take a drink it may be the last one you get from me.  You all know the Picts outnumber us and have a point to prove having had a beating from the Strathclyders of late.  They have crossed the mountains to get at our heartlands so I doubt they just want to talk.  Tomorrow is going to be bloody, the only question is whose blood will be on the heather?

We don't have the luxury of giving up this ground and there are no reinforcements coming. What we do, win or loose, we do with the men we have, here, at this place.  They will come on fast and that is our one advantage as it will give us the option of turning their flanks.  I will have the main body but  you Comgail,  you will lead a small group to land on the beach behind them.  Hit them in the flank or rear and hit them hard.  Make them rue the day they came to Dal Raitia.  You will be the hammer, we will be the anvil and between us I intend to crush them.  Now go see to your men, tell them of certain victory on the morrow and, remind them that they are fighting for their homes and families.

The Day of Battle

'The day of battle  dawned and looked set fair so the fight commenced almost immediately. Our landing party sprang into action as soon as the Picts were in reach and charged up the beach into the end of their line.  Two units of Pictish light horse turned to meet the threat.  Meanwhile our main line advanced as quickly as they could but it was clear that the landing party would be on their own for a wee while.  We could tell that the attack from the beach had the Picts rattled as their advanced stopped dead on that flank.'  

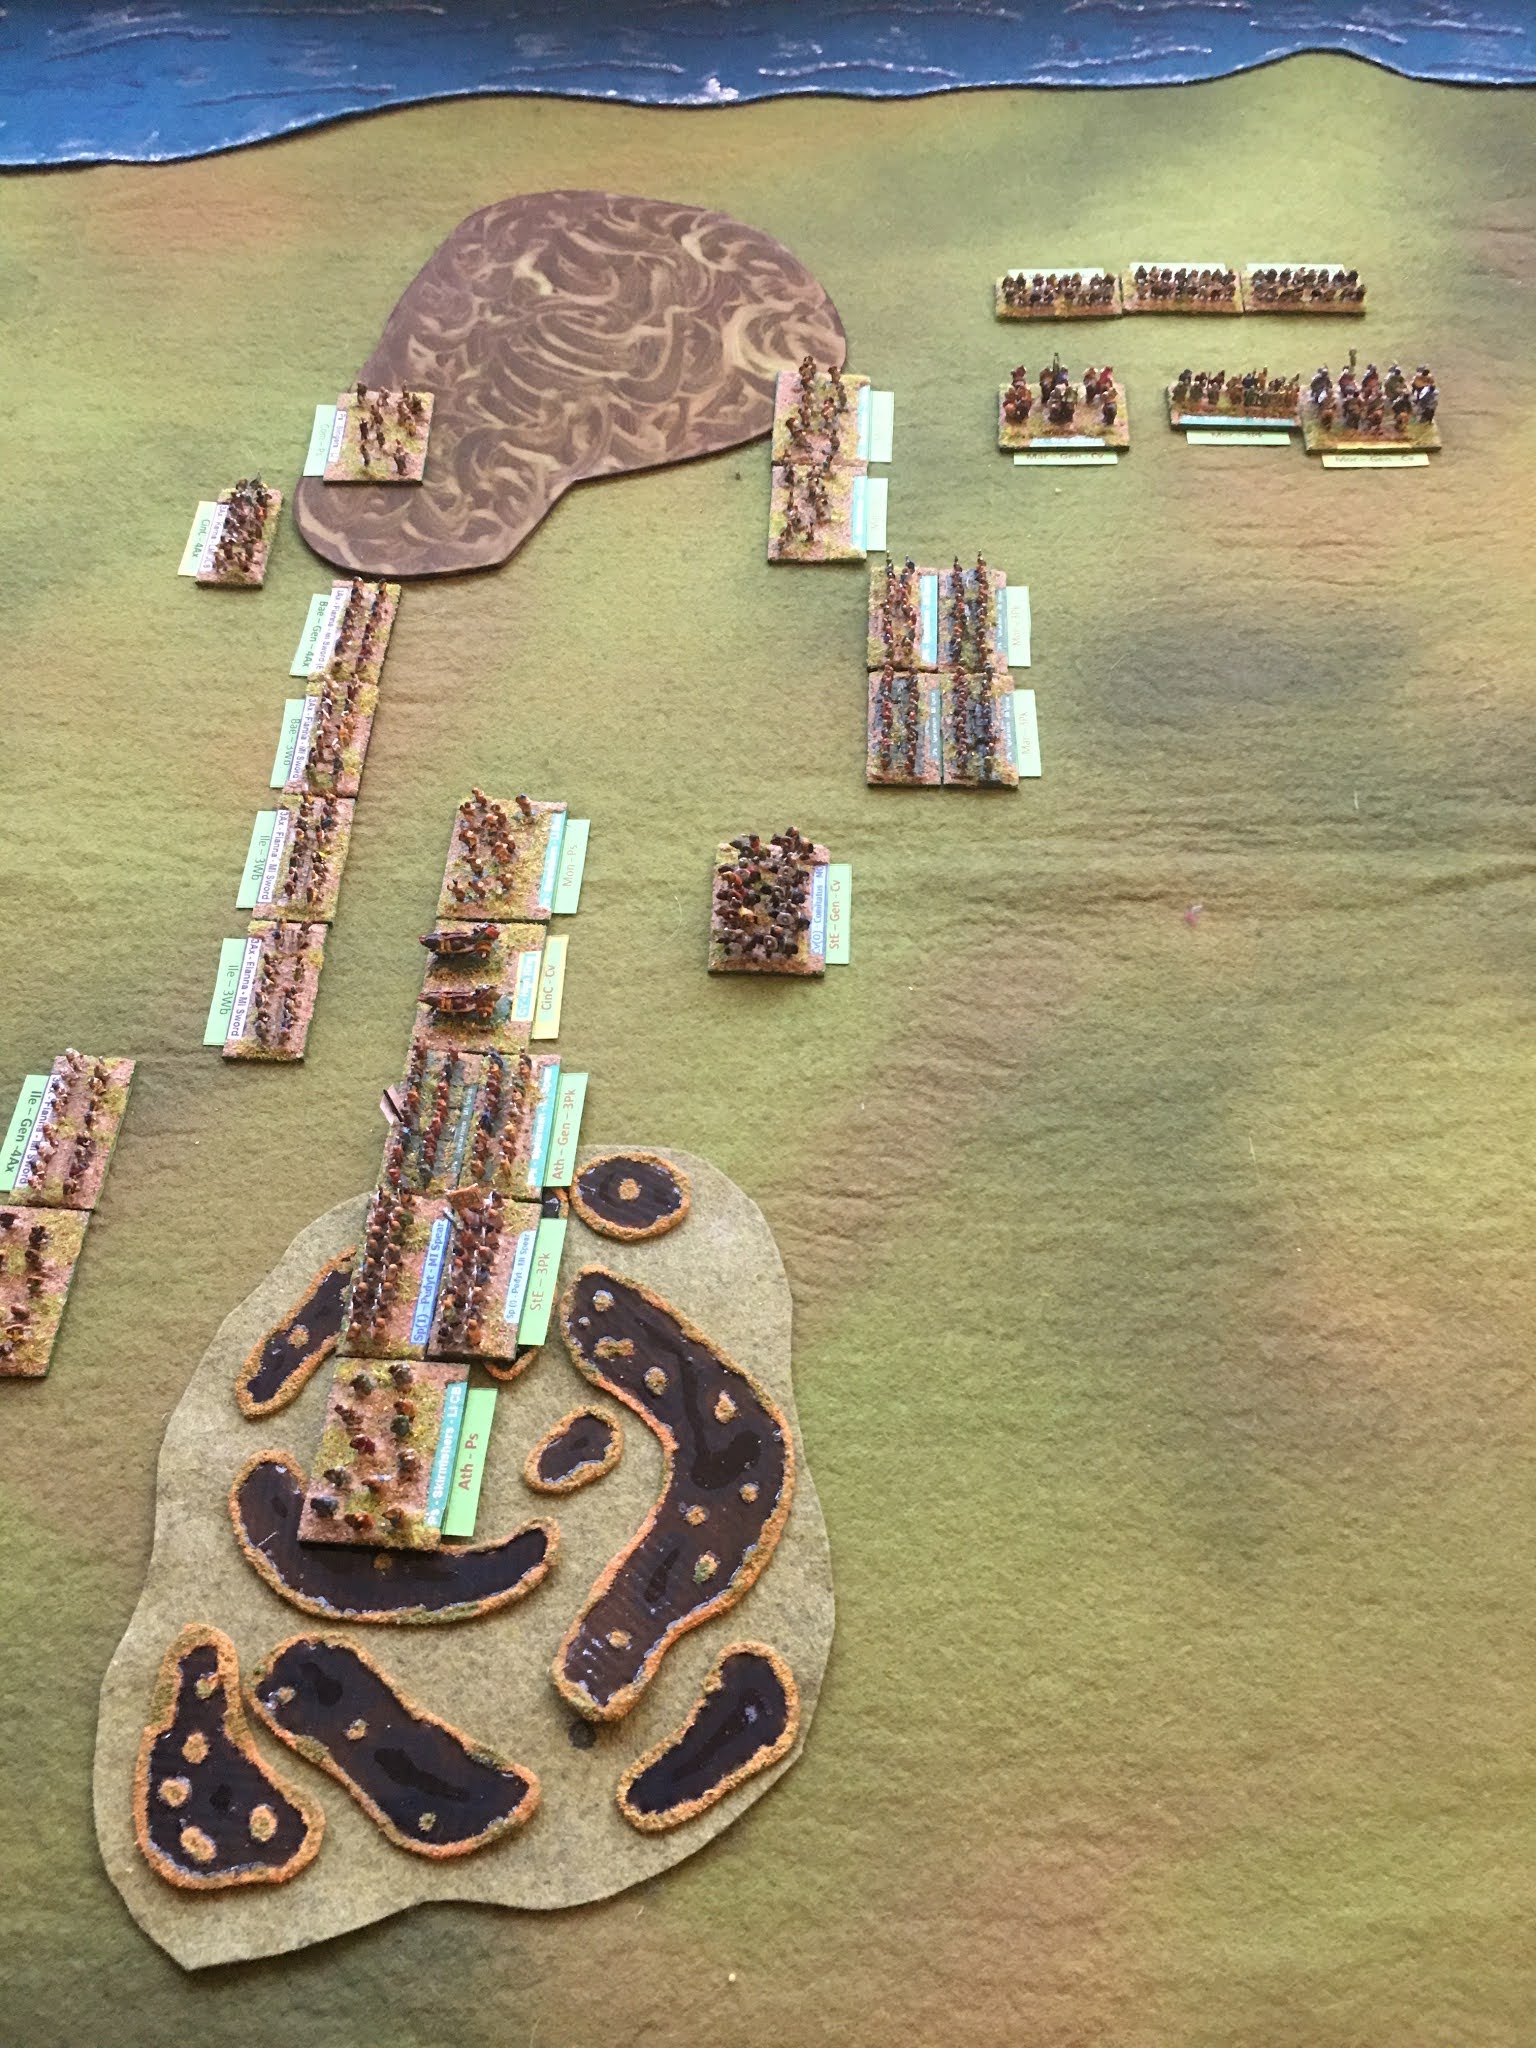
1. The armies deployed -landing party ready to storm up the beach!

A good opening pip score allows the out of command littoral landing to get into contact with the end of the Pictish line.  In their turn both Pictish commands get abysmal pip scores and low aggression scores meaning that the right hand command who are meant to be moving up stall as their flank units have to deal with the Scottish attack. The left hand command does manage to advance to occupy the boggy ground to their front.  This was repeated for the next two turns where the Picts consistently rolled single pips for both commands.

'We couldn't believe that the beach attack had thrown the enemy into such confusion, we could see that the fighting was muckle fierce on that flank and one group of Pictish light horse was soon destroyed.  The rest of that wing seemed incapable of reacting to the attack.  Our main body continued to push forward towards the enemy with our wilder tribesmen leading the advance.'

2. Picts in a pickle - down one LH already

I roll two dice for each Pictish command the large dice is the aggression for this turn the smaller the Pip score.  The aggression roll is adjusted based on the starting aggression and the pip score.  The photo below shows just how bad the Pictish rolls were!

3. On the defensive. Awful dice mean the Picts cannot put attacks together!

As the day rolls on the landing party takes out a second light horse unit it had pinned back against the end of the Pictish line. The poor Pictish command rolls are really hurting them and the right wing is only one unit away from becoming demoralised.

4. It looks better than it really is for the Picts (on the left here)

The terrain is helping the Scots.  The aggressive Pictish right wing has to overcome the flanking attack and get through the woods to to turn the Scot's left.  The other flank, which is wide open, is facing the defensive Pictish wing who are less likely to take advantage.  The boggy ground is doing nothing to slow either side but it is preventing the Pictish spearmen gaining the rear support bonus  Fast Pike would gain in clear terrain.

5. The Scots have a decent defensive line at least

It isn't until turn five that the Picts get a decent pip and aggression roll and with the Scots racing forwards to the attack with their main force it isn't a moment too soon.  They bring more troops up to the fight on the right wing and push forwards in the centre where the two lines come to close combat.  There the fighting leads to a first casualty for the Scots and the usual confusion as the neat lines dissolve.  At this point you would have thought that things are about to improve for the Picts, they are in contact all along the line and should be able to bring the advantage of numbers to bear.  You might have thought that but, the dice gods really have it in for the painted people and in the first combat they loose another unit.  Even worse this is from their right wing command which pushes them over the edge into demoralisation.  There is a single ray of hope now as a second scots unit was destroyed in the combat round, so the Scots are edging closer to their break point. 

6. A turn later and the battle is slipping away from the Picts

The next couple of turns have the Picts attempting to keep their right wing on the table by using pips to force unit's hold their ground.  Because they are demoralised that wing can't do anything but hold or retreat and it takes a pip to have a unit hold in place, they can't initiate combat although they can defend.  Their biggest problem is that if they hold the units closest to the edge of the table in place then those who are pinning the Scot's beach landing in place have to retreat and that opens the way for a camp run.  On the other wing I successfully override the standing orders for a turn and send a Pictish light infantry unit sprinting for the Scot's camp but with my Scot's cap (should that be bonnet?) on I counter that with a Scots light infantry unit in the following turn by bringing close enough to pin the Picts in their threat zone.

7. Although the Picts' left is holding men a streaming to the rear on the right wing

Things are looking bleak for the Picts now as the only command that can act has defensive standing orders so is going to struggle to advance to combat.   Poor dice rolls on the other wing are allowing units to head to the rear there.  Although the Pict's have managed to get into a good position for an attack the defensive stance stops them from capitalising on it and I failed the override dice roll for them.  A poor pip roll for the demoralised command sees four elements leave the table and that is game over.

Although not particularly heavy, the losses will have an impact on both sides the Picts have lost three elements and the Scots two.  At least the King of Picts was able to escape the disaster.

The Pictish chronicles simply recounts 

'The fury of the Scotsmen knew no bounds'

This game taught me a few things about these troops.  Fast pike are capable troops but only if well deployed the +3 rear support bonus would have made a huge difference had I been able to use it.  It was only the poor initial deployment that worked against them and I should have redeployed the line to get them into good going.  The terrain made no difference to movement for the infantry as both sides have fast foot or solid auxilia who are not slowed in bad going.  Still the Picts are not going to let a little thing like two defeats in one turn change their ambition and they will be be back.

Saturday 31 October 2020

More Tiny Terrain

 You have probably noticed a delay in fighting the next Dark Ages campaign battle.  That is due to my wanting to create a better terrain piece for the boggy ground which is going to be used in that battle.  I made an initial version a few weeks ago but wasn't at all happy with the design or the execution, to be blunt, it looked pants!  I did like a couple of things and I learned some useful lessons.  The key lesson being that Woodlands Scenics' Realistic Water shrinks as it sets and can warp the terrain base if a large area of water is being modelled, even with thin pours.  I did learn that it is worth taking time to paint the area under the water to show deepening water through darkening colours though.

This time I changed the design.  I decided that using several small areas of water on a felt former would be easier to model and less prone to problems.  It cuts down the chance of warpage and gives flexibility as the water elements can be used on different felt outlines for different shape/sizes of boggy ground.  

I used some heavy card salvaged from some packaging for the base layer of the pools, I painted the under side with a cheap craft acrylic to help stop warping. I then edged each pool shape with my normal PVA and sand mix which was left to dry for a couple of hours until hard. I followed that with a dry brush over the sand in an orange tawny colour to represent the sedges and reeds fringing the open water and gave a final dry brush of olive green for the areas of new growth.  Once that had dried I worked on the pool floor areas which were painted chocolate brown, then a darker brown then black in concentric rings from the edge towards the centre to give the look of deepening water.  This looks a bit stark at this stage but pouring the water effect compound in the final stage softens the impact.  A word of advice here DO NOT shake up the realistic water as it creates bubbles which are next to impossible to remove from the pour. 

I pour some of the realistic water into a container and add some blue acrylic ink to tint the clear fluid and gently mix it with a bamboo skewer (an old a brush handle would do just as well) the secret is to be slow with the stirring action as speed creates those pesky bubbles. You can use quite a deep tint as you are only going to use a thin layer of the water effect (although I went a bit OTT in this case).  That said where I grew up boggy water was always stained with peat so it needs to be dark.

The mark two bog!

The problem with the Realistic Water is avoiding bubbles and getting a smooth final finish right up to the edge of the pour area.  I used a small measuring syringe we get with liquid medicine for our dogs (not the sort with a needle) if you don't have dogs then they can be found online I'm sure.  I suck up a few mils of the tinted water effect in the syringe and place a few drops onto the bases and gently tease it out with the skewer point.  If you get any bubbles the syringe can be used to suck them back up which is a bonus. By using the skewer it ensures that the fluid flows right up to the edges and adding more drops of the 'water' once that is done gives the depth as it flows across the are already covered.  If there ant areas not covered just add a drop to that place.

Now comes the hard part! Put the terrain aside and wait 48 hours for the water effect to completely dry.  A good trick is to do a test piece you can check for drying so you don't ruin a piece you have spend time on...don't ask how I learned this it was a painful experience, but touching tacky water effect leaves marks that are impossible to smooth out or cover over!  

Looking at the photo I can see a couple of places where some touching up is needed along the edges of the water features and a couple of tufts of longer grass might add to the effect.   I may add a layer of clear to the water to mask the slight ridges in the card which are showing through too but overall I'm fairly happy with the look. 


Saturday 17 October 2020

Tiny Terrain

Building terrain is one of those things I do for fun or when I can't get exactly what I want from a retailer.  I often turn to terrain building when I'm in a bit of a painting slump to give me a change of focus.  Terrain is more freestyle than figure painting as I create from scratch rather than try to recreate an actual uniform or colour palette.  Plus I only make a single version of each.  Over the years I have built lots of small scale items and a selection is presented below.  Mostly made from bits from the parts box or stuff I found laying around.  

First up are a pair of log bunkers I made for World War Two micro armour games about 15 years ago.  made from matchsticks and cocktail sticks held together by a generous blob of Bostick.


Log bunkers.   Not sure that the flock works though.

Next up are two bridges which are the first 6mm terrain items I ever made, probably in the early 1990's when I started getting into 6mm in a big way.  Back then there was very little 6mm terrain to be had, and in any event I didn't have a lot of cash to splash.  They are for general pre-mechanised era games and still see a lot of action.  Construction is matchsticks and card.

Two versions of the one bridge - before and after a heavy traffic day

More recently I needed some ruined buildings so it was out with the cereal package card and the trusty matchsticks  plus some model railway ballast.  Floors were printed using MS Paint..  The floor plan is based on the block of terraced cottages I grew up in.  We lived in the right hand end house.  It seemed bigger when I was a child!


They looked better in reality, with roofs and everything

The sand dunes are the latest thing I have completed, they are primarily for DBA use. The dune shapes are from Milliput and textured with basing sand.  I'm not fully happy with them to be honest as the dunes should be 'thicker' in cross section with a longer downwind slope, but they will do for now.


 My favourites are the bridges, because they work as well for 2mm as for 6mm and they can cover a long period of history.  Which probably accounts for their gaming longevity and frequent use.  

I'm working on some DBA bog and swamp markers at the moment (I'm bored of painting horses and wanting a break) but I'm struggling to get the look I want.  I know how they should look but just can't get it right in small scale reproduction!  Any ideas gratefully accepted.

Friday 9 October 2020

The Dark Ages campaign - 799AD Scots v Picts setting the stage

With the dawning of 799AD comes new strife. It's in the North in the lands of the Picts and Scots where a dispute over the little travelled region of Comgail has erupted into armed conflict. Although nominally allied under a single family in reality there are different clan allegiances within the ruling blood lines and it is by no means certain which line of descent will rule North of the Forth- Clyde line.  The Pictish side of the family have decided to strengthen their hand or at least weaken the Dal Raidian side

The Picts have assembled a royal army led by High-King  Caustantin mac Fergus which extends the area they can recruit from.  The Dal Raidian Scots have a much smaller recruitment base but are assembling every fighting man they can muster under their King Taidg mac Donncoirce.  For this clash the forces arrayed are as follows:

Pictia will have two commands.  King Caustantin has the first command of 8 elements and the Mormaer of Moravin commands the second made up of 12 elements.  These consist of:

  • The King (Cv) plus 1 x Cv, 4 x 3Pk and 2 x Ps.
  • Mormaer of Moravin (Cv) plus 1 x Cv, 2 x LH, 5 x 3Pk and 2 x Ps.

While Dal Raidia is fielding a single command of 11 elements commanded by King Taidg

The King (4Ax) plus 3 x 4Ax, 5 x 3Wb and 2 x Ps

This is the second outing for the Picts in this campaign turn and losses from the earlier fighting have reduced their numbers.  Strath Erin is still recovering from casualties suffered against the men of Alt Clut.

The Dal Raidian Scots will be the defenders and will choose the terrain.  The dice gave me the Scots so I can determine the terrain without using the solo rules.  Their home terrain is Littoral so I chose a waterway (compulsory) a difficult hill, a marsh and a woods.  It will look something like the image below.  Picts deploy on the bottom edge Scots on the top.

It will look something like this.

In reality we don't know for certain who was king of Dal Raidia at the turn of the 8th Century.  the Annals of Ulster give names but these may have only been kings of the Irish Dal Raidians.  Still I needed a name for the campaign so King Taidg mac Donncoirce it is.

Tuesday 6 October 2020

The hunt for a Late Imperial Roman shield pattern

back when I war gamed with 25mm Hinchcliffes I bought a copy of 'What the Soldiers wore on Hadrian's Wall' from lovely little bookshop on The Shambles in York.  Long gone now of course as online book stores have conquered most of the world.  The book was written by H Russell Robinson and illustrated by Ronald Embleton.  

A classic and still worth a read

It has some lovely colour plates including this one which was Late Imperial Roman period.  As a modeller the thing which grabbed my attention was the nice simple shield pattern and a British association to boot! The booklet only describes the carriers as Roman soldiers of the 4th Century.

It's the shield that grabbed my attention.

The same pattern (albeit the other way up) crops up again in the Osprey Men at Arms title 'The Roman Army from Hadrian to Constantine' again illustrated by Ronald Embleton.

It's that shield again

The same shield (perhaps) this time described as Infantrymen c. 300 - 400AD.  There is still no identification of the unit or where the design comes from.  It's not in the Notitia Dignitatum and the Osprey simply states the design is associated with infantry of the period in the sketches...of H Russell Robinson.  

I hunted but could find no source for the shield but it was a nice simple design pattern to pain and one of my Hinchcliffe legions received it.  Since then I have reproduced the shield on 6mm Late Imperial Romans from irregular miniatures and am currently re doing that unit using Baccus 6mm figures.  However, in the 30 odd years since putting brush to 25mm Hinchcliffe legionary I had never found any original source for the design or even anything close.

Then in one of those little side expeditions we all tend to take when looking something up on Google I found this.  It comes from this really useful site http://lukeuedasarson.com/NotitiaPatterns.html in the section discussing the authenticity of the illustrations in the Notitia.  In a link to an article on Roman Shield patterns of the 3rd Century I spotted this which is from Piazza-Amerina Mosaics a set of 4th Century hunting scenes.

At last I found a source

I still can't tie it back to an actual military unit but at least I have a clear example of the basic design.  some times Google really does come good.

Random thoughts # 10 - catching up on my music backlog

 I recently discovered the joy of Spotify the music streaming service.  I normally either listen to CD's, vinyl, or iTunes all of which are my own purchases.  Spotify is a free service which allows me to listen to stuff I might not necessarily wanted to buy but did want to listen to again or in some cases listen to for the first time.

Now I'm of a 'certain age' my teenage years spanned the late 60's and early 70's so there is a fair amount of music from that period which I recall but haven't listened too in the intervening years, and as I said some I have never listened to at all.  A prime example of that is Lindisfarne.  I have the first three albums but hadn't heard any of the later stuff other than singles on the radio.  The break up in 75 spawned Jack the lad who I saw live once but never sat down and listened to on record.  Coming to it with fresh ears after 45 years was 'interesting'.  I made me realise how much of the pull of the music from that time is based on the memories it triggers and not necessarily the music itself.  A lot of it is good music but it simply doesn't speak to me in the way stuff I knew well back then does.  it's almost an intellectual exercise listening to it as I can hear not just the band I am listening to but the echoes of bands they have influenced (possibly at two or three removes) that I do know well.  Bands I expected to really enjoy have done very little for me while bands that I didn't expect to enjoy suddenly ring a chord and I realise that I know a track because I have heard it before.  in other cases bands I once liked but haven't heard in years have caused me to wonder what I ever liked about them!  

But the most saddening thing is finding a service that opens so many doors into the past and finding some doors are resolutely shut as the records are not available.  I guess I may never hear those again unless I find a CD in a charity shop.  Curse you Spotify you have made me melancholic!

Wednesday 30 September 2020

Mercia 798AD - The battle of Wudiandum continued

At the end of the last post things the West Saxon centre was finally in action, their right was potentially in trouble as the Mercian command facing them was getting it's act together and the left was starting over the river to come to grips with the Mercian right wing.  As far as I can tell (I haven't started to play the rest of the game as I write this introduction) the key to this battle is the fight in front of Wudiandum village.  If this goes against the men of Wessex the flank of their main command will be open.  Although they have a few troops in reserve in a second line in the centre the time needed to get them into a new line to cover this risk may not be granted them.  The fight over on their left is almost a separate battle as even if they should win over there it would be a big ask for those troops to re-enforce the centre because of terrain restrictions.  No pressure then!

Its the start of the third hour of this battle (in game time).  The Mercian shield wall pushes back in the centre but make little headway.  They are slowly and methodically setting up a shield wall on their left and have rushed what troops they can towards the river bank on their right.  It would help if they could roll well just once.  The West Saxon reply is to keep the meat grinder going in the centre and to push more troops across the river on their left.  On their right where they really need to disengage they roll 1 pip!  It's not just the Mercians the dice have it in for.  The only good news for the hard pressed West Saxon right is that the Mercians just can't get a decisive attack in to push the command over the edge, all they achieve is a series of recoil results which helps the West Saxons by opening up some space between the lines. 

1. Fighting on the river bank as the Wessex Left command attempts to cross

The next few turns see the West Saxon left slowly chip away at the Mercian command facing them.   The Mercians are hampered by inconsistent dice rolls, whenever they have the chance to be aggressive the pip dice is against them.  As a result they are forced to give up the defence of the river bank allowing the West Saxons to gain a toe hold.

2.  It's soon more than a toe hold, but the Mercian defenders look to be ready for the onslaught

Once the West Saxons are over both sides face off against each other but the Mercians are soon on the back foot.  How are things over on the other flank?

 
3. On the Mercian left things look better, for the Mercians!

With a couple of good dice rolls in succession the Mercian left wing recovers from it's earlier confusion and continues to advance.  The West Saxons seem to have the same problem the Mercians have on the other flank.  They are slowly pushed back but the Mercians just can't seem to get their act together and fight as well as they manoeuvre.

4. The king glances towards his threatened right flank

The centre is getting messy with recoils on both sides fragmenting the shield wall.  The Mercian's manage another kill here but its anything but decided as yet.

5. The central commands pushing and heaving

The West Saxon right proves remarkably resilient and despite being one element loss away from demoralisation hangs on in the face of repeated Mercian attacks.  All the Mercians can do is create recoils.  This goes on for another four turns until they manage to hard flank an isolated Wessex spear element.  This tips the West Saxon command over the edge.  Now they are demoralised and all the Saxon Sub General can use his pips for is to hold elements in place. Where he doesn't have the pips to hold elements in place they flee towards the rear base edge each turn.  Even then he gets decent pips and manages to fight a reasonable withdrawal action.

6.  See that gap between the two units facing each other?  There were West Saxons there a moment ago!

The fight in the centre continues to be a mess.  The threat zones prevent any serious reorganisation of the front lines and overall the West Saxons are getting the better of things.  This continues until the Mercian centre is one element away from demoralisation with the West Saxons nowhere near that state.  Both sides are throwing their reserves forward but the Mercians are trying to fill holes in the line while the West Saxon's are hunting for overlaps.  The two Kings are both in the thick of things now and in danger of getting isolated.  They tend to have the better of combats because of the plus one for a general in combat and as they are blades they pursue while any spear elements around them don't.

As the Mercian left continues to push the demoralised West Saxon command facing it slowly backwards options for detaching elements to go to the aid of the beleaguered centre start to present themselves.  However on the other wing a disaster is unfolding.

7. The Mercian right: a lone element of spears is in deep trouble attacked frontally and in flank

Over the last few turns the Mercian right has taken steady casualties until it is only one element away from collapse.  The West Saxons exploit the gaps created by defensive tactics and low pips and pounce on an isolated element of spears. Unbelievably the dice off is a draw on the first round and it is in the following Mercian combat round that it is killed.  The command is now the second to become demoralised.  The next two turns are inconclusive the centre has no decisive fights but gaps are opening up and the Mercian left is slowly hooking around onto the exposed flank of the West Saxon's centre. 

8. The Mercians teeing up the flank attack against the centre

It takes a while for the Mercian left to move into position against the open flank of right flank of the West Saxon Centre.  Part of the command is shadowing the fleeing West Saxons (aka not enough pips to bring them over to join the preparations for the attack).  In the centre of his command I imagine that King Beohtric is having a Wellington at Waterloo moment "Give me Bearruc Scir or give me dark" kind of thing. and the day is dragging to a close after close to 4 hours fighting but dark is still a ways off.  However over on the West Saxon left the men of Bearruc Scir and Dorseate have finally broken the Mercian command facing them and a racing through the woodland to the aid of the central command.

The Mercian assault goes in, but trouble is brewing at the other side of the field

Things are now very close the Mercian left made up of the Fyrds of the Wrocensaetan and Hendrica slam into the open flank of King Beohtric's centre In the first moments of the attack aa west saxonlight infantry element is destroyed and the end of the line is forced to recoil.  It is only the fragmented nature of the line that prevents major casualties as there are no units to the rear of the recoiling troops for them to break against.  In the West Saxon turn the dice are kind to their left wing but less so to the centre command where a paltry one is rolled.  I use this to pull the King's element back thinking he may be needed to help bolster up the right flank.  Both central commands are at breaking point one element away from becoming demoralised and ending the game.

The next turn starts with the Mercians continuing the assault on the West Saxon centre but the central command is handed a defensive tactical stance and the best they can do repair their line the left is aggressive but has only one pip and can't make any significant contact with the enemy.  King Beohtric breathes a sigh of relief.  There is one final roll of the dice now for the West Saxons, literally so in fact!  Another high roll for the left allows the men of Bearruc Scir to crash into the Mercian centre.  They lose an element but the second attack kills a Mercian spear and then to add insult to injury the central command kills the Heathtroop of Ealderman Aethelmund of the Hwicce.  Dicing for the command casualty shows that the Ealderman died with his men.  This ends the West Saxon turn and the game.  It was a close run thing the Mercians could have, should have won it the turn before if the dice had been kinder.  The final casualty count was 10-11 in favour of the West Saxons.  A pyrrhic victory that badly weakens both kingdoms for the rest of the campaign turn. 

The end of the affair but both sides have suffered heavy casualties
 

This was the biggest game I have yet fought using DBA and I found that the BBDBA rules have a few wrinkles which need to be ironed out.  The demoralisation rule is one of them.  I like the concept, in fact I like it a lot, but is assumes that the commands will always be 12 elements, or more accurately, that they will be exactly divisible by three.  At least I assume that to be the case as the rule is that a command becomes demoralised once a third of it's units have been lost.  The rules have no mechanism for coping with commands not divisible by three, nothing to say round up or down for example.

So I have introduced a house rule.  Divide the number of elements by three and if it is not a whole number round down to reach the trigger loss number.  However the demoralisation trigger point is 'once that number is exceeded' not once it is reached.  So a command of 14 elements divided by three gives a demoralisation trigger of 4.66.  Round that down to a value of 4.  So that has to be exceeded so hitting a loss of 4 elements equals it but doesn't exceed.  Hitting 5 does exceed the trigger point (and for completeness sake also exceeds 4.66) so that's sorted then.  I also think that the standard DBA rule of Hordes not counting as a loss and perhaps extending that to light infantry as well.

I also decided after the battle that demoralised troops should take a minus one to combat dice if they ever end up having to fight in close combat.  I don't think I will extend that the troops who can shoot though, although that won't be a problem in this campaign as there are no archers or artillery to worry about.

The other issues is that the maximum size an army is set as three times the size of a standard DBA army.  For BBDBA historical refights the rule is use the actual number of troops converted to elements.  This means some really large commands can be created.  In the current game the two opposing central commands are both 19 elements in size.  I ignored my previous rule of capping command sizes but I think this was a mistake and will reintroduce it in any future large scale actions.

All that said I do rather like the BBDBA version of DBA3.0  it feels more like a historical battle, not that I have ever been in one to know for sure!

Oh and I almost forgot: the mandatory chronicle entry.

798AD Mercian chronicle

And in this year did Beohtric of Wessex basely break from his allegiance with his sworn lord Coenwulf and come in arms to Mercia.  There he did ravage the land of the Hwicce until at length he was met by the King and all his host in battle.  There was slain Ealderman Aethelmund of the Hwicce and a multitude of others with him as well and the West Saxons had possession of the field.


Thursday 24 September 2020

Dark Ages Campaign - 798AD Battle of Wudiandum

So to battle.  As previously posted I have the men of Wessex with the Mercians being run by the solo play rules.  I have decided that each command will have its own pip dice to reflect the poor command and control of the period so co-ordination between commands will be more difficult.  I’m also going to move the centre commands first for each side as they are the ones commanded by the two respective kings.


1. The initial deployments, Mercians furthest away

Both sides deployed with a strong centre and weaker flank commands.  The AI placed its troops to the front and centre of the deployment box, but it wasn't possible to fit them all in so I over ruled it and mirrored the West Saxons while staying as far forwards as possible.  It looks  neat, but trust me that's not going to last.  The Mercian pre-battle dice rolls gave their right command a defensive stance and the other two commands received neutral stances.  This impacts on the tactical choices of each command by pulling the dice result towards that overall stance each game turn.  It is still possible for a defensive command to take aggressive action but it is less likely.  The Mercians will move first each turn which may or not be of benefit.

The first couple of turns see both sides pushing forwards.  The west Saxons are the first to have their formation come apart as the rush to get across the river before it turns into a contested crossing.  The river turns out to difficult to cross.  This means that only single elements or columns of elements can cross for each pip expended, movement is slowed and defenders gain an advantage against troops crossing.

2. West Saxon start crossing the Coln

The first to start crossing are the troops on the right of Wessex's line.  The light infantry are not slowed but the shield wall's tight formation breaks up and the close order infantry are slowed.  In the centre the line is moving up towards the river in a race to get there before the Mercian's can line the far bank and contest the crossing.  Middle Anglo-Saxon's may not be the most tactically clever armies but even they know a disputed river crossing is not a good thing!

3.  The crossing continues on the West Saxon right.

The crossing on the West Saxon right is unopposed as the Mercian command facing them is in disarray!  They rolled aggressive but couldn't easily follow the instruction and became tangled up in the approaches to the village.  Their line fragmented into a number of small groups.  In the centre the Mercians are also rushing forward towards the river having rolled an aggressive stance and decent pips.  On the far side of the table West Saxon light troops are over the river and fronting up to their Mercian opposite numbers. On that flank the Mercian command is slowed while they are traversing woodland.  


4. The view from the Mercian right wing.

By the next turn the Mercians have reached the river with their central command but are unsure about what to do (a low pip score limited their options).  Light Infantry are exchanging arrows and insults on the right and the Mercian left is in a real mess.  The nice neat line has broken up around the village and with instructions to take aggressive action they are throwing small groups of men forward to attempt to come to spear thrust and sword stroke with the enemy before they can reorganise their shield wall after the river crossing.  As a result they close as fast as possible but as the line attempts to move around the left of the village the formation ends in total confusion.  This is one of the points with the solo rules, orders from the AI can result in odd decisions and if the dice swing back and forth between aggression and defence it can result in this kind of chaos.  Players have the right to ignore results three times under the rules but I'm not using these yet in case I need them later.  Probably a mistake to be honest, after all how much worse could a situation get than this?


5. A closer view of the Mercian left wing, it's chaos over there

Its one of the interesting things about solo games the AI mechanics create situations and as a player I like to create a narrative to make sense of it, it also gives me a story for the AAR here on the blog.  

In the next turn the Mercian centre is following a second aggressive stance but on limited pips the entire command simply surges forwards and starts to cross the river, only for them to get a defensive stance and limited pips the next turn.  So they retreat to form a defensive line on the river bank.  I rationalise this as a rush of blood and a desire to come to grips with the invaders followed by the nasty shock when the water is cold and realising that there's a solid looking shield wall over on the other bank, so maybe we should stay this side and defend the river bank instead!  Something similar happens on the Mercian left a defensive stance roll and maximum pips allows form defensive line to be an option and the fragmented line starts to reform.  Possibly older more experienced heads have prevailed over there.

There has also been the first few clashes light infantry facing off over on the Mercian right saw a psiloi doubled by their West Saxon opponents and killed with the same thing happening on the other wing but with a West Saxon psiloi destroyed to even the score at one element lost each.  Else where West Saxon Light Infantry are recoiling and fleeing from the Mercian shield walls.

The two armies have been facing each other for over an hour in game time now with no significant fighting yet.  As you can see below the Mercian left wing is regaining some kind of cohesion and their West Saxon opponents are over the river but disorganised.

6. The Mercian left starts to reorganise while their opponents are still struggling to reform their line

This would be a good turn to get good aggression scores and high pips.  Which is probably a good point to show how I'm handling the AI dice.  I roll red for the left (port in nautical terms), green for the right (so that would be starboard) and blue is the central command.  The relevance of the nautical terms is that boats and planes show red lights to port and green to starboard so the colour s help me remember which dice goes to which command.  The larger dice give me the aggression (before adjustments) and the small ones the pips.  These need to be thrown together as the pip score adjusts the aggression score low pip reduces aggression high pips increase it.

8. The Mercian dice, red for port, green for starboard,  blue you can guess.

So having said this would be a good time to roll lots of sixes what we get is the above!  Its about typical for the Mercian dice so far.  The left and centre are feeling like attacking but don't have many options other than go straight in while the right has decent pips but is feeling a touch nervous.  Hey ho (or what ever the Mercian equivalent is) you do what you can with what the dice provide.  Its enough to start a moving into the village on the left and consolidating in the centre.


9. The Mercian left more organised but still tangled up in the village

Now the West Saxons take the bull by the horns and with a decent pip score their central command storms over the river and slams into the Mercian shield wall.  The Mercians are pushed back with recoils but only one casualty.  The flank commands continue to slowly advance and the first troops from the left hand command cross over the Coln to the Mercian held bank.  This is getting to look like a fight now.

10. Wudiandum still in Mercian hands

The Mercians still hold the village, mainly because the West Saxons have been slow to move against it, but there is a fight coming.  The fighting in the centre is hanging in the balance both Kings have been fighting alongside their household warriors.  So far with no risk to either of them.  The shield walls a pushing and shoving but there have been few casualties as yet.

11. The aftermath of the attack in the centre both Kings in the thick of it.

Which is where I am leaving it for this post.  I will finish the game and post the last part of the AAR in a day or two.