All that research. all those good ideas and it turns out I'm reinventing the wheel! A chance reply to a Facebook post this morning pointed me towards the old Avalon Hill game 'Richtofen's War' which was released about the same time as Flying Circus. Guess what/ Someone has already published amended those rules to that game to include some special moves and added chrome to the flight model.
I'm almost certain I never saw this game but the way the special moves has been modelled is almost identical to the ideas I was working on. So either I did see something twenty or thirty years ago and it has been lurking in my subconscious or this is a case of parallel evolution. Either way some of my game issues have been ironed out already. I will need to adjust the game scale so everything is in metric distances to be able to convert RW amendments to fit with my FC amendments but that will be relatively easy. My issue with handling rate of climb and dive, energy gain and loss and even overspeed in dives is all in there too. It evens seems to follow my approach on how to model those things.
I should have these rules wrapped up in a couple or three weeks with luck.
In other news I have to have some medical tests later this week. After which I will have to rest the arm used in the test so no typing or painting for a few days. Blog posts will be lacking for a week or so. Do I hear cheering in the distance?
Sunday, 23 February 2020
Saturday, 22 February 2020
Back to the Front
The Western Front that is for some dog fighting shenanigans. I haven't dragged out my air combat rules for a while and still had some rule additions to play test to cover out of plane maneuvers (which is not where a pilot falls out of his aircraft). No, what they are manoeuvres where the aircraft climbs or dives as part of it's movement. Last time out was a 1916 scenario with Eindeckers v a DH2 and a Sopwith Strutter. I'm more than happy with the basic movement and combat rules so no changes are needed there. It was the use of aerobatics that had been causing the problems. Having had time for my ideas to simmer I think I have a workable solution but need to test it with aircraft whose wings won't fall off at the mere hint of a hammerhead turn! So it's off to 1918 for this one for some SE5A v Fokker DVII/Albatros DVa action (well I need at least one 'plane where the wings may fall off I suppose).
Most WW1 dogfights had very little in the way of out of plane elements to them and especially in the early part of the war, were mostly rate of turn contests. Hence the term dogfights as apparently this is what dogs actually do while trying to get to the back of the other dog to bite without being bitten. Snoopy aside most dogs are not really up for boom and zoom tactics. Max Immelmann started to change that with his use of the famous turn named after him which was more of a 'wingover' in today's terminology than the half loop and roll out that is called an Immelmann today.
The out of plane rules create a maneuver move which requires a number of movement points to execute and finishes with the 'plane in a different position, height and facing than a normal move using the in plane rules would be able to do. They can allow a 'plane to cover less horizontal distance without shedding speed (or at least not too much speed) to prevent overshoots or to turn into an opponent to obtain a firing position quickly. Some are high stress moves which will need a check on the damage table. Fortunately I only need a limited number of these maneuvers as WW1 aeroplanes didn't have the power for many of the basic combat maneuvers we see in WW2 and later air combat. These will include:
 |
| The assembled cast - no signs of any wings coming off yet! |
The out of plane rules create a maneuver move which requires a number of movement points to execute and finishes with the 'plane in a different position, height and facing than a normal move using the in plane rules would be able to do. They can allow a 'plane to cover less horizontal distance without shedding speed (or at least not too much speed) to prevent overshoots or to turn into an opponent to obtain a firing position quickly. Some are high stress moves which will need a check on the damage table. Fortunately I only need a limited number of these maneuvers as WW1 aeroplanes didn't have the power for many of the basic combat maneuvers we see in WW2 and later air combat. These will include:
- Hammerhead turn (High Stress)
- Left and right side slips
- High and low Yo Yo
- Displacement rolls and Barrel rolls (High Stress)
- Half loop and roll out (modern Immelmann turn) (High Stress)
- Full Loop
Scouts will have a some or all of these special moves available to them. I don't envisage any high stress maneuvers being available for two seaters or multi engine craft with a couple of exceptions such as the Bristol Fighter. So for example early war scouts will have side slips and possibly Yo Yos available while a late war type like a Fokker DVII will have all of them.
As a bonus a fellow member of the Sealed Knot has some WW1 Heroics and Ros Aircraft he doesn't want and is letting me have them. From what he has said there are about 25 of them in reasonable condition although one or two will need a bit of TLC. Nothing some plasticard and superglue can't fix.
So onto the scenario. Nothing too complicated just straight air supremacy for this one. Two flights of scouts contesting the airspace. Last man standing wins. One the British side a pair of SE5a Scouts and for the Germans a Fokker DVII and an Albatros DVa. Both enter the table at 6.000 feet plus 1D6 x 1,000 feet flying towards each other neither side has spotted the other at the start of turn one.
The aircraft models are from Heroics and Ros (the Albatros) and Irregular (the others). As always the Irregular castings look a lot better when painted and are easy to assemble. The H&R are trickier to build as they have more parts (seven in total for the Albatros) but they are stunning little castings. There are some other 6mm manufacturers out there but I haven't had any samples of their wares cross my painting desk yet
Chocks away chaps.
Friday, 14 February 2020
The lead pile and projects
As a follow up from the post about 'The Pledge' I thought I might monitor the movements of my lead pile a little more closely this year. Just to stop things from getting out of control and as a set of defensive statistics in case of questions from the Memsaab. Plus it motivates me to make inroads into the unpainted lead. I don't quite have enough unpainted stuff to allow me to be safe from a radioactive fallout, but it must be getting there. My trip to Vapnartak has been my only buying activity this year (so far) and painting didn't happen during January for various reasons.
Vapnartak saw the purchase of 150 6mm Cavalry figures (15 of those are mounted generals) and 444 6mm Infantry figures plus 1 (yes that's one) 25mm figure. In my defence that was a freebie from Galloping Major. So far I have completed 30 cavalry and 8 infantry figures. So I make that as the lead pile being in the lead by 556 figures.
Project wise I have made a start on replacing my Irregular Miniature's 6mm Late Imperial Roman's with Baccus figures. I bought enough to form the core of an ADLG army. Although most of the Vapnartak purchases were for that project, I still have some gaps in the Dark Age Britain armies and I bought some Irregular Miniatures 6mm to cover those. The idea is to ensure that I have at least a DBA army for all of my dark ages forces and then to head out towards an ADLG 200 point army for each.
Longer term I have a couple of other project ideas, one is to create an Early/Justinian Byzantine army and to create at least the core (DBA sized) of some barbarian migration period forces for my Late Imperials or Byzantines to fight. That would probably mean Huns, Franks, Ostrogoths/Visigoths and Avars. I also have it in mind to upgrade my original 6mm ancient period army of Irregular Maurikian Byzantines bought back in the late 80's or very early 90's. The problem with creating Byzantine armies is a lack of figures. Baccus don't do any specifically Byzantine figures so it will be an exercise in proxying. The early Byzantines are less of an issue as the Infantry didn't look very much different from Late Imperial Romans and the cavalry had enough Sassanid, Hunnic and Avar influences that proxies exist within the Baccus range. The Maurikians are more of an issue but I'm thinking that a mix of Later Sassanid and either Hunnic, Sarmartian, Gothic or Moorish horse might cover most things.
Tuesday, 11 February 2020
Random thoughts
Wargaming and time and motion studies
I was recently reminded by a friend that wargames rules are essentially time and motion studies in practice. That thought has crossed my mind from time to time in the past but I never really gave it serious thought before. Many years ago I studied some of the social aspects of industrial working methods. This brought up the rise of time and motion studies and their use to create more profitable work flows by increasing the speed at which things are done or reducing the number of people who are required to carry out a process. Having been on the receiving end of time and motion reviews I'm not a huge fan as it usually results in everyone having to do more for the same pay or someone losing their job. However, the rise of time and motion analysis also seems to coincide with the rise of wargaming as a hobby for people outside of a military context. Which leads me to wonder if there is a link? After all wargames rules are a measure of how much violence a set number of of people can do to another in a defined period of time, how far they can move in that same period and what factors exist to vary the outcomes. We add other imponderables like command and control which still part of the same time and motion equation really and morale, which isn't.
It's always the morale rules that cause me trouble as it isn't easy to create valid statistical models. I suppose that is because we are dealing with the psychology of an emotion. Primarily fear in our case coupled with the impact of the herd instinct on group behaviour.
So what do we think, when we are gaming are we avatars of heroic warriors or canny commanders, or are we really channelling a bloke in a long brown coat clutching a clipboard and stopwatch?
Friday, 7 February 2020
Painting 6mm figures the Elenderil way - part 2
In the last post I had reached priming and why the colour of primer matters. Just to drive the point home, the basic fact is that a six foot man even when several hundred yards away, and appearing to be the same size as a 6mm figure at painting distance, is still about 285 times bigger than the 6mm soldier. That means that he is reflecting about 285 times more light back to our eyes. So we have to trick the eye into thinking the 6mm figure reflects light in exactly the same way as the real man does. The first part of this deception is to ensure that the colours look right. A bright undercoat will reflect more light back through the top coats than a dark one. If you do go for the option of a dark primer you will need colours to be adjusted and possibly more than one coat of the top colour. In fact no matter what primer we use the colours are going to have to be adjusted in some way compared to reality. That real six foot man is always going to seem brighter than our model soldier because more light reflected means more colour saturation (or at least that's how I understand it).
What this means is that we have to paint in brighter shades than the real thing to get the same look! If you want to see this in reality buy a tester pot of household paint in a fairly bright colour, lets say red and a piece of white card. Paint the card in the paint and also paint a figure in the same colour (ideally undercoat that in white so you are comparing like with like). Next on a a reasonably nice day with good even daylight go outside and have someone hold the card against their chest and walk away until they are about the size of the figure at arms length and compare the two colours. The card should look brighter. Oh and be prepared for some strange looks if you do this in the street!
To help the figure stand out on the table I usually look for the things that make a figure 'pop'. Usually that's headgear, faces and especially shields for ancient period figures. I paint shields and metallics last and with shields will go back over the original ink washed primer in white to help the finished shield stand out.
Before we start - more preparation
To make sure that the paint is going to cover and give the depth of colour you are going to want I add a small stainless steel ball bearing into each of my dropper bottles of paint to help the pigment and medium mix together when I shake them up. You can by them from some of the paint manufacturers but its cheaper to buy from engineering suppliers on line. Just make certain they really are stainless steel, you don't want them going rusty and ruining your paint. I put a couple of drops of paint onto my palette (Palette, who am I trying to kid its an old coffee jar lid). Don't forget to close the paint container as it dries out quickly if you don't.
What I aim to do (but don't always get right) is to thin my paint down to the consistency of milk from the thicker consistency in the bottle or pot. I use ordinary tap water or if I'm worried about the additives in that, bottled distilled water (The stuff sold for topping up car batteries or for use in clothes irons). A drop or two to two drops of paint is usually about right. A drop of flow enhancer sometimes helps. This gives me a very thin paint that flows into the castings and lets the previous ink wash I added after priming come through. It almost acts like a contract paint. This is a technique sometimes called stain painting. Again start with thin paint, if it doesn't cover add a little more paint to the mixture. It is better to go over with a second coat as taking paint off is tricky (as in almost impossible).
As an aside, I have tried wet palettes but can't get to grips with the them. They are intended to keep paint wet so you don't have to remix a colour you have blended each session. I only paint in small batches so I make up the colour I want for each batch. As I'm painting troops who were wearing civilian clothing I don't want too much uniformity any way, so variation between batches of paint is a good thing!
Brushmanship
Don't overload your brush which means don't dip the entire brush into the paint, about a half to a third of the brush with paint is good. To much paint means less control over where the paint goes as it delivers too much paint on the first stroke. Too little is better than too much until you get a feel for what you are comfortable with. Don't forget to thoroughly clean the brush if you change colour either. That is easier if you haven't overloaded as less paint gets down into the base of the brush. Thats something to avoid as dried paint at the point where the hair is joining the handle makes the hair splay out and you will loose the point making the brush no use for detail. Don't throw it out though as it will still be good for dry brushing or varnishing. This may seem obvious but pull the brush don't push it, you want the paint to flow down the hair of the brush and flow off the point onto the casting. Try to avoid dabbing at the model with the brush for the same reason, if you do need to do that to create a specific effect use a stiff brush with short hair.
Time to paint
The fastest way to get figures ready for the table is to paint block colours and then ink wash them. Once you have more experience then you can add embellishments like dry brushing highlights and picking out fine detail.
Figures are sculpted with an eye to helping you to achieve a decent paint job. The sculptor does that by creating well defined edges to items of clothing and equipment so they act like a guide to let the paint go where you want it. You need to learn to work with the edges the casting defines for you.
Start with the base which I do in Vallejo Khaki as it is a similar colour to my basing sand. Then move to the large areas of clothing usually from top layer towards the lowest, so tunics before trousers as the sculpted edges help more that way around. Once you learn brush control you can ignore this rule but for now it is helps. Flesh, hair, bags, other equipment and weapons are next. On these figures the javelins are sculpted touching the body so just a line of paint on the top and side is enough to define the spear shaft. Because feet disappear into the basing I often leave those or just give a touch of the shoe colour. High boots do get painted though as they will show up. Once everything is painted and dry the next step is a coat of varnish.
The sharp eyed will have noticed I haven't painted the bases first in this example, thats so you can see the primer on the base to tell which figure is which, I didn't forget in my hurry, honest!
Did you spot what I haven't painted? There are two main things - no belts as the ink wash should deal with that and only one shoe (it's on the raised foot).
I use a satin acrylic varnish as it gives a smooth finish for the next stage which is the ink wash. Ensuring the varnish is dry I give a wash of GW Agrax Earthshade for shading and keep the figures upside down until that dries so the ink pools on the bottom of folds etc. Its a kind of zenithal shading on the cheap. Agrax Earthshade creates a nice brown shading effect than also matts down the satin varnish. Lastly I repaint anything I want to be really bright first in white than in the actual colours I want. For me as I'm painting pre gunpowder era figures this includes shields and flags and banners. Very last is to do all the metallics; spear points helmets and bright plate armour (the really shiny silver looking stuff hollywood seems to love). I tend to do most other metal body and horse armour when I do clothing and let the ink wash pick out the details.
In case you haven't come across the term, zenithal shading is highlighting the upper surfaces of the model to represent sunlight catching on those areas. Remember we need to fool the eye and the difference between light and shade on our 6mm figure is less defined than on our six foot man so we paint in the effect or at least hint at it. We humans are good at adding in detail which may not actually be that clear, rather like we are programmed to see a face in anything which has even the slightest resemblance to facial features, again this is something we can use to our advantage.
I have been deliberately vague about the details of painting figures as this is a skill you will learn by doing and mistakes don't show up that much on a 6mm casting once they all based in groups. Practice and you will quickly learn what works for you and before long you will have a style you are comfortable with.
Highlighting and detailing
The next skill to learn is an optional one, highlighting. Personally I very rarely do this on 6mm figures. If you want to experiment one way to do it is by a light dry brushing. Use an older brush as this technique is rough on the hairs and don't thin the highlight colour use it straight from the bottle or pot. Put a very small amount of paint on the brush and wipe the brush against a cloth. A slightly larger brush than used for the main painting say a size 1 or 2 is a good choice. Test on your thumbnail by gently drawing the brush across it, paint should only be left on the raised parts of the nail. Then wipe it on the cloth again! Test on your thumb nail again until it hardly leaves a mark. When you get to that point do the same across the figure running from the head and shoulders down towards the feet. Better to have to do three or four passes leaving almost no highlight than one pass which is too heavy, as I have just done on the demonstration figures for this post! Nothing a quick reprime and new paint job won't solve. The highlight shade needs to be a good deal lighter than the base shade other wise the effect is lost at table distances.
I can tell what you are thinking at this stage ....how on earth do I individually highlight each different item of clothing separately to all of the others, each one is a different colour! The answer is you don't. Try a neutral light shade such as a very pale sand or beige across all of the clothing and bags etc. By using a very fine dry brushing and building it up you should leave just enough of the main colour showing to disguise the fact that all of the highlight is the same colour. Or like me you can just do without!
Detailing is the last thing I do. For my figures this is mostly shield patterns. I use artists permanent fineliners and disposable drawing pens to produce lines under 1 mm in thickness. The Pilot drawing pens are particularly good for this although they only come in black or sepia. For colour I use Staedler triplus fineliners with a 1mm nib, you will need to take care with these though as they are not permanent and varnish applied over the ink will smear the pattern so they are the very last step in my process. I have tried acrylic paint pens but don't like the results as they tend to blot. I have read about some refillable pens made by Liquitex that give better results but haven't tried these out yet. As an example the patterns on the Anglo-Saxon Foot pictured earlier were done using pens. Sometimes I use a pen to mark out a belt but usually I leave it. Check out the third of the three varnished groups above, can you really notice the lack of painted belts? The wash settles either side of any belt on the casting which for me is more than enough.
My error with the highlighting stresses another point, "more haste, less speed". These figures don't take long to do even if you are taking a lot of care over the painting. There is nothing to gain from rushing. Speed will come with practice. At this stage if you can't paint well slowly, you definitely can't paint well fast. Slow down and aim for the best quality result you can achieve.
More on mixing and blending colours
A couple of suggestions on blending colours, if you want a red to seem richer add the tiniest drop of blue to the red. The same works in reverse for blue just add add a tiny amount of red. A small bit of yellow added to a green makes it seem fresher. As you get your eye in you begin to realise that a colour has hints of other colours within the range of shades of that tone. So for example blue can be more towards the green or towards the purple end of the range. I suggest that you search online art sites for 'colour wheel' and 'colour theory' to help explain this. This is a site I found just a single google search away, Colour Theory Artists have been doing this stuff a long time and have learned a lot along the way that we can adapt for miniatures so it makes sense to piggyback off their techniques.
Darkening and lightening colours is never as simple as just adding white or black. Often adding a brown or a blue works better always depending on the base colour. I'm told but have never tried it that a good colour for highlighting black is mid green! Don't be afraid to experiment. The failures can always be painted over and hidden in the middle of a unit!
Where do you paint?
Somewhere with a bit of elbow room and good light (or space for good artificial light with a daylight bulb, especially if you are going to paint in the evenings) should be your objective. Ideally a permanent painting station is best as you can just sit down and get stuck in without loosing painting time in setting up and putting away. Space to sit part painted figures to dry is useful. I batch paint so I may have 70-80 figures on the go at once so there is a production line going. For dark age warriors I might have four strips of Baccus infantry on a stick (so 24 figures) but because I want variety I will mix a colour and do lets say, five tunics and two trousers on one stick then four trousers and three tunics on the next until some figures on each stick have that colour. Then clean brush, new colour and round I go again. That means I have to be able to set sticks to one side while I work on the next one.
If you are going to work in a living room (or anywhere else where you don't want abstract colours adding to the flooring, consider a cloth or plastic mat underneath the place you paint. Sooner or later you will drop a brush or a figure with wet paint on it, or worse yet a pot of paint! An ounce of prevention is worth a pound of cure (or grams and kilograms if you prefer).
So there you have it, all that is left now is to set up your painting area and start painting. This is a skill where the 10,000 hour rule really does apply. Spend 10,000 hours at doing anything and by hour 10,001 you will be really good at it. Above all enjoy the experience your 10,000 hours starts now!.
Post Script
The highlighting disaster wasn't actually that bad when I looked at it the following day. I was able to correct the worst of the problem by repainting the hair and using the Baccus 'dot & dash' painting technique (which you can find here How to paint 6mm figures) over the highlighted areas on the torso using the original tunic colour. A further coat of varnish and a new ink wash did the rest. Which goes to show that almost every painting error can be fixed without too much trouble.
Edited to correct some typing errors and added a couple of words here and there to make things a little clearer and add missing points.
What this means is that we have to paint in brighter shades than the real thing to get the same look! If you want to see this in reality buy a tester pot of household paint in a fairly bright colour, lets say red and a piece of white card. Paint the card in the paint and also paint a figure in the same colour (ideally undercoat that in white so you are comparing like with like). Next on a a reasonably nice day with good even daylight go outside and have someone hold the card against their chest and walk away until they are about the size of the figure at arms length and compare the two colours. The card should look brighter. Oh and be prepared for some strange looks if you do this in the street!
To help the figure stand out on the table I usually look for the things that make a figure 'pop'. Usually that's headgear, faces and especially shields for ancient period figures. I paint shields and metallics last and with shields will go back over the original ink washed primer in white to help the finished shield stand out.
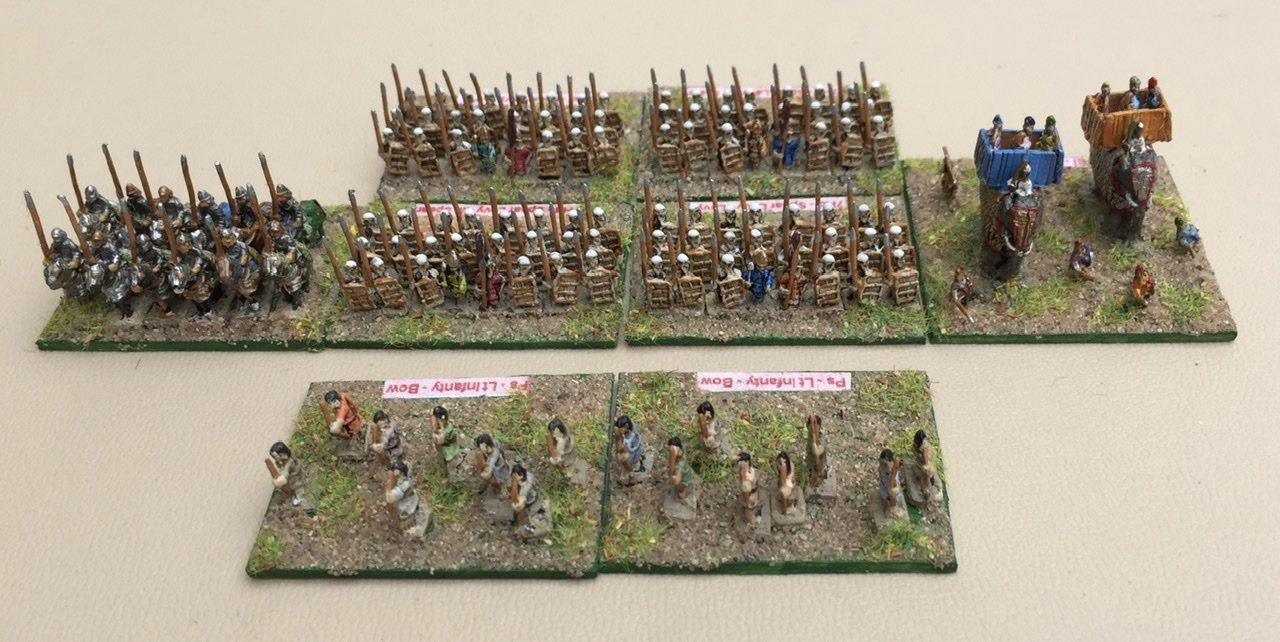 |
| See how those white hats pop out at you? |
Before we start - more preparation
To make sure that the paint is going to cover and give the depth of colour you are going to want I add a small stainless steel ball bearing into each of my dropper bottles of paint to help the pigment and medium mix together when I shake them up. You can by them from some of the paint manufacturers but its cheaper to buy from engineering suppliers on line. Just make certain they really are stainless steel, you don't want them going rusty and ruining your paint. I put a couple of drops of paint onto my palette (Palette, who am I trying to kid its an old coffee jar lid). Don't forget to close the paint container as it dries out quickly if you don't.
 |
| You don’t need a palette when coffee jar lids are free |
As an aside, I have tried wet palettes but can't get to grips with the them. They are intended to keep paint wet so you don't have to remix a colour you have blended each session. I only paint in small batches so I make up the colour I want for each batch. As I'm painting troops who were wearing civilian clothing I don't want too much uniformity any way, so variation between batches of paint is a good thing!
Brushmanship
Don't overload your brush which means don't dip the entire brush into the paint, about a half to a third of the brush with paint is good. To much paint means less control over where the paint goes as it delivers too much paint on the first stroke. Too little is better than too much until you get a feel for what you are comfortable with. Don't forget to thoroughly clean the brush if you change colour either. That is easier if you haven't overloaded as less paint gets down into the base of the brush. Thats something to avoid as dried paint at the point where the hair is joining the handle makes the hair splay out and you will loose the point making the brush no use for detail. Don't throw it out though as it will still be good for dry brushing or varnishing. This may seem obvious but pull the brush don't push it, you want the paint to flow down the hair of the brush and flow off the point onto the casting. Try to avoid dabbing at the model with the brush for the same reason, if you do need to do that to create a specific effect use a stiff brush with short hair.
Time to paint
The fastest way to get figures ready for the table is to paint block colours and then ink wash them. Once you have more experience then you can add embellishments like dry brushing highlights and picking out fine detail.
Figures are sculpted with an eye to helping you to achieve a decent paint job. The sculptor does that by creating well defined edges to items of clothing and equipment so they act like a guide to let the paint go where you want it. You need to learn to work with the edges the casting defines for you.
Start with the base which I do in Vallejo Khaki as it is a similar colour to my basing sand. Then move to the large areas of clothing usually from top layer towards the lowest, so tunics before trousers as the sculpted edges help more that way around. Once you learn brush control you can ignore this rule but for now it is helps. Flesh, hair, bags, other equipment and weapons are next. On these figures the javelins are sculpted touching the body so just a line of paint on the top and side is enough to define the spear shaft. Because feet disappear into the basing I often leave those or just give a touch of the shoe colour. High boots do get painted though as they will show up. Once everything is painted and dry the next step is a coat of varnish.
 |
| Tunics and trousers done, see how the primer impacts on the top coat |
 |
| Ready for the varnish #1 |
 |
| Ready for the Varnish #2 |
I use a satin acrylic varnish as it gives a smooth finish for the next stage which is the ink wash. Ensuring the varnish is dry I give a wash of GW Agrax Earthshade for shading and keep the figures upside down until that dries so the ink pools on the bottom of folds etc. Its a kind of zenithal shading on the cheap. Agrax Earthshade creates a nice brown shading effect than also matts down the satin varnish. Lastly I repaint anything I want to be really bright first in white than in the actual colours I want. For me as I'm painting pre gunpowder era figures this includes shields and flags and banners. Very last is to do all the metallics; spear points helmets and bright plate armour (the really shiny silver looking stuff hollywood seems to love). I tend to do most other metal body and horse armour when I do clothing and let the ink wash pick out the details.
 |
| The shields create a focal point to draw the eye |
 |
| Shaded with a black ink over gloss varnish. It’s too stark and too shiny! |
 |
| Satin varnish but with Agrax Earthshade as a wash. See how it kills the shine and is less stark. |
 |
| Resurrected after the highlight error and with shields ready to be painted. |
I have been deliberately vague about the details of painting figures as this is a skill you will learn by doing and mistakes don't show up that much on a 6mm casting once they all based in groups. Practice and you will quickly learn what works for you and before long you will have a style you are comfortable with.
Highlighting and detailing
The next skill to learn is an optional one, highlighting. Personally I very rarely do this on 6mm figures. If you want to experiment one way to do it is by a light dry brushing. Use an older brush as this technique is rough on the hairs and don't thin the highlight colour use it straight from the bottle or pot. Put a very small amount of paint on the brush and wipe the brush against a cloth. A slightly larger brush than used for the main painting say a size 1 or 2 is a good choice. Test on your thumbnail by gently drawing the brush across it, paint should only be left on the raised parts of the nail. Then wipe it on the cloth again! Test on your thumb nail again until it hardly leaves a mark. When you get to that point do the same across the figure running from the head and shoulders down towards the feet. Better to have to do three or four passes leaving almost no highlight than one pass which is too heavy, as I have just done on the demonstration figures for this post! Nothing a quick reprime and new paint job won't solve. The highlight shade needs to be a good deal lighter than the base shade other wise the effect is lost at table distances.
I can tell what you are thinking at this stage ....how on earth do I individually highlight each different item of clothing separately to all of the others, each one is a different colour! The answer is you don't. Try a neutral light shade such as a very pale sand or beige across all of the clothing and bags etc. By using a very fine dry brushing and building it up you should leave just enough of the main colour showing to disguise the fact that all of the highlight is the same colour. Or like me you can just do without!
Detailing is the last thing I do. For my figures this is mostly shield patterns. I use artists permanent fineliners and disposable drawing pens to produce lines under 1 mm in thickness. The Pilot drawing pens are particularly good for this although they only come in black or sepia. For colour I use Staedler triplus fineliners with a 1mm nib, you will need to take care with these though as they are not permanent and varnish applied over the ink will smear the pattern so they are the very last step in my process. I have tried acrylic paint pens but don't like the results as they tend to blot. I have read about some refillable pens made by Liquitex that give better results but haven't tried these out yet. As an example the patterns on the Anglo-Saxon Foot pictured earlier were done using pens. Sometimes I use a pen to mark out a belt but usually I leave it. Check out the third of the three varnished groups above, can you really notice the lack of painted belts? The wash settles either side of any belt on the casting which for me is more than enough.
My error with the highlighting stresses another point, "more haste, less speed". These figures don't take long to do even if you are taking a lot of care over the painting. There is nothing to gain from rushing. Speed will come with practice. At this stage if you can't paint well slowly, you definitely can't paint well fast. Slow down and aim for the best quality result you can achieve.
More on mixing and blending colours
A couple of suggestions on blending colours, if you want a red to seem richer add the tiniest drop of blue to the red. The same works in reverse for blue just add add a tiny amount of red. A small bit of yellow added to a green makes it seem fresher. As you get your eye in you begin to realise that a colour has hints of other colours within the range of shades of that tone. So for example blue can be more towards the green or towards the purple end of the range. I suggest that you search online art sites for 'colour wheel' and 'colour theory' to help explain this. This is a site I found just a single google search away, Colour Theory Artists have been doing this stuff a long time and have learned a lot along the way that we can adapt for miniatures so it makes sense to piggyback off their techniques.
Darkening and lightening colours is never as simple as just adding white or black. Often adding a brown or a blue works better always depending on the base colour. I'm told but have never tried it that a good colour for highlighting black is mid green! Don't be afraid to experiment. The failures can always be painted over and hidden in the middle of a unit!
Where do you paint?
Somewhere with a bit of elbow room and good light (or space for good artificial light with a daylight bulb, especially if you are going to paint in the evenings) should be your objective. Ideally a permanent painting station is best as you can just sit down and get stuck in without loosing painting time in setting up and putting away. Space to sit part painted figures to dry is useful. I batch paint so I may have 70-80 figures on the go at once so there is a production line going. For dark age warriors I might have four strips of Baccus infantry on a stick (so 24 figures) but because I want variety I will mix a colour and do lets say, five tunics and two trousers on one stick then four trousers and three tunics on the next until some figures on each stick have that colour. Then clean brush, new colour and round I go again. That means I have to be able to set sticks to one side while I work on the next one.
 |
| My painting station -it doesn't have to be a huge space. My table is 56cm square but with space to stack things around it. |
So there you have it, all that is left now is to set up your painting area and start painting. This is a skill where the 10,000 hour rule really does apply. Spend 10,000 hours at doing anything and by hour 10,001 you will be really good at it. Above all enjoy the experience your 10,000 hours starts now!.
Post Script
The highlighting disaster wasn't actually that bad when I looked at it the following day. I was able to correct the worst of the problem by repainting the hair and using the Baccus 'dot & dash' painting technique (which you can find here How to paint 6mm figures) over the highlighted areas on the torso using the original tunic colour. A further coat of varnish and a new ink wash did the rest. Which goes to show that almost every painting error can be fixed without too much trouble.
Edited to correct some typing errors and added a couple of words here and there to make things a little clearer and add missing points.
Monday, 3 February 2020
Vapnartak 2020
Yesterday I visited, what is for me at least, the opening show of the year, Vapnartak, held at York race course. It has a lot going for it, good parking easy to get to as its an out of town venue and a good range of games and traders. The show is held in the main stand of the race course and uses all three floors, well three and a half as one is a mezzanine floor. There are lifts for those who are not as mobile as they might like which is a bonus. Its a nice airy well lit venue as pretty much all of one wall is glass
This year bridges seemed to be a bit of a theme with a Pegasus Bridge demonstration game, and an Arnhem Bridge and a Chicago Way 'Untouchables' participation games. That last one including Mounties on horseback and from what I could see an accountant with a pump action shotgun. Most of the other games seemed to have a bridge on display. You know the scene it’s the one where Sean Connery integrates a corpse, with ‘maximum prejudice’.
The usual traders were in attendance although there was no Peter Pig stand this year which was a shame as I had half a mind to pick up some of their Russian Civil War figures. There were a few new faces including my long standing friend Lance of Galloping Major with his ever increasing range of French and Indian Wars figures and some really rather nice T-shirts too. I picked up a copy of 'A Song of Drums and Tomahawks' from them. These are a set of skirmish rules to me, and a first read through shows them as an interesting set with a feel similar to some of the original skirmish rule sets form the 1970's. I have to say that despite being a 6mm nut these are some of the nicest figures I have seen in a long time. There are some new figures due in the next few weeks of Rangers and Colonists in campaign dress that look really nice. What I really liked was that they look like soldiers in campaign kit. I'm not sure my painting will do them justice but I mean to give it a good go. Lance is an excellent painter and its going to be hard to turn out a finished figure which is a tenth as good as his display figures.
The Games were a nice mix of displays, demonstrations and participation games, The Arnhem game seemed busy all day as did the Wings of Glory game. There were a couple of locally themed games on including the Viking taking of York and a game set in Dark Age Beverley. As always the League of Gentlemen Kriegspielers found another little known conflict of the early 20th century to put on as a game. This time set in the Adriatic 1920 where the city of Fiume is the focal point (No I never heard of the place either!).
Its always nice to meet up with a few friends and pick up some new toys. This years haul was mainly Baccus 6mm with a handful of Irregular Miniatures which I needed to fill out my Pictish and Scots Irish armies. Mainly I was buying figures to create a 200pt Late Imperial Roman ADLG army from Baccus. That will also morph into a Patrician Roman army at need. Some Sassanid regular Infantry also came home with me as i think I may be able to use them as a proxy for Byzantine Scutatoi. I also picked up a nice folding dice tower for Warbases and a few di, well you can never have enough di can you?
The show was busy but as it is spread over three floors not difficult to walk around. The bring and buy seemed quieter than previous years, perhaps eBay is having an impact there? Numbers seemed to be about the same as the last time I attended and when I left at around 1.30pm people were still coming in.
All in all a good day out and if you have never been to Vapnartak it is worth the trip. York as a City has plenty to see so you could easily make a long weekend of it. For me all I have to do now is smuggle the additions to the lead pile past Mrs E!
This year bridges seemed to be a bit of a theme with a Pegasus Bridge demonstration game, and an Arnhem Bridge and a Chicago Way 'Untouchables' participation games. That last one including Mounties on horseback and from what I could see an accountant with a pump action shotgun. Most of the other games seemed to have a bridge on display. You know the scene it’s the one where Sean Connery integrates a corpse, with ‘maximum prejudice’.
 |
| The Chicago Way - Tommy Guns seemed to appeal to the younger audience |
 |
| On the top shelf are Galloping Major's new figures - I want some! |
 |
| Meanwhile in The Adriatic |
 |
| Arnhem -Grabner's assault over the Bridge seemed to stall most games and yes I know it's sideways on the image just won't turn! |
All in all a good day out and if you have never been to Vapnartak it is worth the trip. York as a City has plenty to see so you could easily make a long weekend of it. For me all I have to do now is smuggle the additions to the lead pile past Mrs E!
 |
| Somewhere over Kent? |
 |
| Entebbe The Limo is in front of the third Hercules |
 |
| Pegasus Bridge, this was a big table |
Painting 6mm figures the Elenderil way
This is one of those posts which has been a long time coming, I have thought about doing a figure painting tutorial in the past but decided against it as there are so many others out there, plus I'm not painting to to anything other than gaming standard. My mind was changed by a couple of posts on Facebook asking for advice on starting out on painting in 6mm. While Facebook is great for instant replies I can never find a post a second time unless I remember to bookmark it, which I rarely do. As I suspect most facebook users are the same as I am I decided that if I had a blog post I could simply link to it the next time someone asks for advice. If you already paint miniatures then you can miss the first part of the post as its aimed at those who have never painted wargames figures before.
Before you start
I'm going to start with some comments on the basic skills that I feel are important. First up is to develop your observation skills. This might seem like a strange thing to say, but if you don't really know what something looks like you can't recreate it in miniature. When I say observation I mean really looking closely at things in real life and not assuming that you know how a thing looks. Think about a tree as an example. Most people, if asked, would say the trunk is brown and the foliage is green, but what shades, is the trunk actually brown or is it more gray or green? For that matter what shade of brown are we talking about?
Before you start painting figures take a look at people at different distances and start to think about the detail you can see and what just disappears into the background. Compare that to the detail on your figure at arms length. There will be things you can actually leave out or just hint at. If you look at people's faces at a distance, you see a shadow under the forehead rather than eyes, perhaps a slightly lighter patch where the nose, cheekbones and forehead catch the light. Beards may show up if dark enough but may be lost into the shadow under the chin. The secret is to paint what you can see in reality not what you know is there when standing face to face. You will learn a lot about what to paint and what not to paint by observing people, especially in crowds as that shows up the shadowing effect of lots of people close together.
The next skills are all practical ones. The first is choosing your brushes, you need to understand how different brushes work. Riggers (the ones with longer hair coming to a point) are my go to brush for detail work. The paint flows well from the tip and they hold a good point for detail work. Round brushes are better for applying washes and varnishes as they get into the recesses of the models. I'd also use them for for large areas on buildings and bases as they give a wider brush stroke.
Size wise I have given up on using anything smaller than a 0. They don't hold much paint and wear out too fast. Its not the size of the brush that matters anyway, but the quality of the point. Because of that I don't like to buy brushes over the internet I like to test the point before I buy. A good retailer will provide a small tub of water, if needed, so you can see if it will come to a good point. They really don't like us sucking the brush and forming a point using our tongue and if you think about it someone else might have done the same thing with that brush a few moments earlier...ughhh!
Having a range of brushes is useful. I currently have 14 brushes on my painting table, I find I tend to accumulate them over time because when I find a brush I like I buy a couple so I have spares. Eight of the 14 are sable the smallest is a size 0 the biggest a 2 (and that's a 'round') three of these haven't been used yet. The rest are a real mix, two large brushes which I use for painting bases, the rest are round heads used for varnish and washes probably about size 3 or 4. Try different brushes out until you get a feel for what you like. Even when you get to that stage try the occasional new size or shape in case you have been missing something.
The quality of the brush is not the only factor here; what about ethical considerations?. I'm happy to use animal hair but others are not and so limit their choice to synthetic hair. I used to use these when I couldn't afford sable brushes but I don't like them. I find these don't last as well and have a nasty tendency to develop a 'hook' at the very tip of the brush. I spent years telling myself that the cost of a sable brush simply wasn't worth paying, until I used one. They last longer and keep a point better than any synthetic brush I have ever used. I do still use a synthetic brush for varnishing as that really does kill off brushes so its a waste of a nice sable brush.
The next skill is brush cleaning. Good cleaning regimes will do wonders for the extending the useful life of a brush. Learn to wash them in a little soapy water and dry them on a cloth (not a paper towel as they damage the hair) I use a gentle soap intended for face washing like Dove or a proper brush cleaning soap. A drop of hair conditioner helps from time to time, but just like your own hair only leave it on for a couple of minutes then rinse it off.
Choosing your paint is the next thing to understand. Not all paints are equal. I only use acrylics and don't use any craft paints at all. Although others have achieved great results with cheap craft paint I just can't get the results I want with them. I do use some artists quality acrylics which are a slightly different kettle of fish. My favourite of those is Windsor and Newton Galeria especially the sap green which i use on bases. For everything else its Humbrol and Vallejo acrylic in the main with the odd GW and Revell pot. The difference with specialist model paint is the fineness of the paint pigment and the medium it is suspended in. These have an impact on the colour coverage and the flow of the paint. Good paint does help you get a good result.
Paint blending and mixing is next but thats one of those skills that you develop by doing. Initially there is nothing wrong with using just the colours that you can buy off the shelf. It is worth reading some painting websites about the use of colour. You can learn a lot from art pages about colour combinations and what colour to use as a highlight or a shader. It's usually not as simple as adding white to lighten the colour or black to darken it. Read blogs by figure painter's whose work you admire try to copy the style, there is nothing wrong in mimicing someone with good skills it helps you develop your own style. Finally there is no substitute for actually painting. The more you do it the better you will get. Every brush stroke, every experimental paint job, even the ones you are not happy with, is a lesson learned.
Brushes are not the only useful tools
After my brushes, for me, the most vital tool is some form of magnification, I use inexpensive non prescription reading glasses. After that comes a daylight lamp, this needs to be flicker free and give a good bright daylight tone. The other tools I use a lot are files (both a large metal file and needle files), side cutters, a set of micro drills and a pin vice and probes. A pair of tweezers are also really useful. Oh and a nice box to keep everything tidy and stop other family members borrowing things!
Let's Paint
The first thing to do is prepare the figures. File down the underside of the bases to ensure a smooth surface, remove any flash and wash the figures to remove any mold release agent that will otherwise stop paint adhering to the figures. When they are dry use a spot of glue (I use cheap PVA for this) to fasten the figures to a holder. I use craft lolly sticks as they provide a good flat surface to glue the figures to and are big enough for me to hold. as a bonus they stop figures falling over during painting. Place a couple of three bases on each stick wait for the glue to dry then its time to prime.
There are lots of options for priming figures I prefer a rattle can of spray on automotive primer. Some people swear by priming with black others with a mid brown. I like white. White helps a figure reflect the maximum amount of light and doesn't dull the finished colours. The downside is that any areas you miss with your topcoats will standout like a sore thumb. to avoid this I give the figures a dark wash which settles into the low parts of the casting, which are the bits most likely to be left unpainted. This also creates a kind of pre-shading effect.
The different primer colours have different effects on the next coats as you can see from the above photo. I deliberately used yellow as an example as it always struggles to give a good coverage. The primer used (from left to right) are black, brown, white with ink wash and pure white. The black breaks through far more than the other colours and dulls the yellow.
That's it for this post next up will be a review of Vapnartal 2020 and then the second part of this how to do it blog.
Before you start
I'm going to start with some comments on the basic skills that I feel are important. First up is to develop your observation skills. This might seem like a strange thing to say, but if you don't really know what something looks like you can't recreate it in miniature. When I say observation I mean really looking closely at things in real life and not assuming that you know how a thing looks. Think about a tree as an example. Most people, if asked, would say the trunk is brown and the foliage is green, but what shades, is the trunk actually brown or is it more gray or green? For that matter what shade of brown are we talking about?
Before you start painting figures take a look at people at different distances and start to think about the detail you can see and what just disappears into the background. Compare that to the detail on your figure at arms length. There will be things you can actually leave out or just hint at. If you look at people's faces at a distance, you see a shadow under the forehead rather than eyes, perhaps a slightly lighter patch where the nose, cheekbones and forehead catch the light. Beards may show up if dark enough but may be lost into the shadow under the chin. The secret is to paint what you can see in reality not what you know is there when standing face to face. You will learn a lot about what to paint and what not to paint by observing people, especially in crowds as that shows up the shadowing effect of lots of people close together.
 |
| Look at the people in the background how much detail do you see? |
Size wise I have given up on using anything smaller than a 0. They don't hold much paint and wear out too fast. Its not the size of the brush that matters anyway, but the quality of the point. Because of that I don't like to buy brushes over the internet I like to test the point before I buy. A good retailer will provide a small tub of water, if needed, so you can see if it will come to a good point. They really don't like us sucking the brush and forming a point using our tongue and if you think about it someone else might have done the same thing with that brush a few moments earlier...ughhh!
Having a range of brushes is useful. I currently have 14 brushes on my painting table, I find I tend to accumulate them over time because when I find a brush I like I buy a couple so I have spares. Eight of the 14 are sable the smallest is a size 0 the biggest a 2 (and that's a 'round') three of these haven't been used yet. The rest are a real mix, two large brushes which I use for painting bases, the rest are round heads used for varnish and washes probably about size 3 or 4. Try different brushes out until you get a feel for what you like. Even when you get to that stage try the occasional new size or shape in case you have been missing something.
 |
| My current selection of brushes. They all have a purpose. |
The next skill is brush cleaning. Good cleaning regimes will do wonders for the extending the useful life of a brush. Learn to wash them in a little soapy water and dry them on a cloth (not a paper towel as they damage the hair) I use a gentle soap intended for face washing like Dove or a proper brush cleaning soap. A drop of hair conditioner helps from time to time, but just like your own hair only leave it on for a couple of minutes then rinse it off.
Choosing your paint is the next thing to understand. Not all paints are equal. I only use acrylics and don't use any craft paints at all. Although others have achieved great results with cheap craft paint I just can't get the results I want with them. I do use some artists quality acrylics which are a slightly different kettle of fish. My favourite of those is Windsor and Newton Galeria especially the sap green which i use on bases. For everything else its Humbrol and Vallejo acrylic in the main with the odd GW and Revell pot. The difference with specialist model paint is the fineness of the paint pigment and the medium it is suspended in. These have an impact on the colour coverage and the flow of the paint. Good paint does help you get a good result.
Paint blending and mixing is next but thats one of those skills that you develop by doing. Initially there is nothing wrong with using just the colours that you can buy off the shelf. It is worth reading some painting websites about the use of colour. You can learn a lot from art pages about colour combinations and what colour to use as a highlight or a shader. It's usually not as simple as adding white to lighten the colour or black to darken it. Read blogs by figure painter's whose work you admire try to copy the style, there is nothing wrong in mimicing someone with good skills it helps you develop your own style. Finally there is no substitute for actually painting. The more you do it the better you will get. Every brush stroke, every experimental paint job, even the ones you are not happy with, is a lesson learned.
Brushes are not the only useful tools
After my brushes, for me, the most vital tool is some form of magnification, I use inexpensive non prescription reading glasses. After that comes a daylight lamp, this needs to be flicker free and give a good bright daylight tone. The other tools I use a lot are files (both a large metal file and needle files), side cutters, a set of micro drills and a pin vice and probes. A pair of tweezers are also really useful. Oh and a nice box to keep everything tidy and stop other family members borrowing things!
Let's Paint
The first thing to do is prepare the figures. File down the underside of the bases to ensure a smooth surface, remove any flash and wash the figures to remove any mold release agent that will otherwise stop paint adhering to the figures. When they are dry use a spot of glue (I use cheap PVA for this) to fasten the figures to a holder. I use craft lolly sticks as they provide a good flat surface to glue the figures to and are big enough for me to hold. as a bonus they stop figures falling over during painting. Place a couple of three bases on each stick wait for the glue to dry then its time to prime.
There are lots of options for priming figures I prefer a rattle can of spray on automotive primer. Some people swear by priming with black others with a mid brown. I like white. White helps a figure reflect the maximum amount of light and doesn't dull the finished colours. The downside is that any areas you miss with your topcoats will standout like a sore thumb. to avoid this I give the figures a dark wash which settles into the low parts of the casting, which are the bits most likely to be left unpainted. This also creates a kind of pre-shading effect.
 |
| Primed in White |
 |
| And with the added black ink wash - see how the detail stands out. |
 |
| You can see the difference in coverage in this shot. |
That's it for this post next up will be a review of Vapnartal 2020 and then the second part of this how to do it blog.
Subscribe to:
Posts (Atom)