Showing posts with label terrain. Show all posts

Thursday, 3 August 2023

What's been did and what's been hid!

 You may have noticed that I haven't made a painting table post for a couple of months.  I doubt that many people will have missed them, if I'm being honest.  A monthly exercise in showing a seemingly random selection of part painted stuff on an untidy table isn't that enthralling really.  Mainly I was using those posts as a way of motivating myself to clear at least some of the lead mountain, and to a large extent it worked.  In fact the posts were victims of their own success.  I have shifted a goodly amount of my 28mm back log but then I went and added to it!  I was also posting to show completed work which left very little positive news for the painting table posts.  So I have done away with them instead I will continue to post when I complete something or hit a milestone on a project.

On that latter point then; July has seen the completion of a mini-game board intended for a gunfight at the OK corral game (but you sort of knew that anyway).  The good thing about the OK Corral is that it can be modelled with a really small playing surface and minimal buildings.  My board is under three feet square and only required four buildings and a few odd and sod items of street furniture.  In terms of figures it needs eleven plus two horses and that includes Sheriff Behan who doesn't do anything other than act as mobile scenery.  I made a second, smaller version of the Harwood House using foam board and card to replace the shack which was proxying for that building.  I took an idea from another site to use the frames from an MDF kit to draw around (on the inside of the space where the kit parts had been cut out) to create the shapes of the foam walls.  That made things easier than having to measure and check angles for corners and the like.  All in all it worked rather well.

Smaller than the MDF parent model but the original was also smaller than the main house

Wargame terrain standard is good enough for me

I also made some amendments to the Old West Skirmish rules I use.  The main ones being that wounds no longer knock down the wounded party in every case.  My reading shows that the vast majority of people don't realise they have been shot and continue to act as if they are not seriously injured for a longer period then you would expect.  With that in mind I reduced the cases that cause a knock down to serious leg wounds and light head wounds from a high impact weapon.  Characters still have a moment of being stunned (the "what the hell just happened" moment) but generally stay on their feet.  Near misses cause a flinch effect that causes either a duck back into available cover or a pause unless a bravery test is passed.  Reaction speed and draw speed are now two separate things based on the fact that reaction time is a mental ability thing, while draw speed is a manual dexterity thing.   However, in a fast draw situation both shooters will have to check reaction and draw speeds to see who gets the drop on the other.  I also created a wound location and key rules summary sheet so that new players (or me) don't have to refer to the rules book. 


Friday, 30 June 2023

Building Empires at War kit of Fly's photography studio

If you are going to do wild west gaming at some point the gun fight at the OK Corral is going to appear on your 'to do' list. Empires at War are the only supplier I'm aware of which do buildings in 28mm for the OK Corral.

The first thing to say is that the Fly's studio kit scales almost exactly to the ground footprint on the Sandborn map which is a big bonus to me and the kit looks great when completed.  Delivery turn around was excellent, I received my parcel within a week of ordering even though I used the cheapest postage option, Royal Mail second class post.  I bought two buildings, Fly's  lodging house and photography studio and the Harwood house because those two buildings define the space the gunfight occurred in.  In this post I will look at building Fly's lodging house and photography studio, I will cover the Harwood house build in a second post.


Unpacking the kit, there are over 90 parts.

The kit itself is rather nice although it is a more complicated build than either the Warbases or Sarissa Precision MDF items I have previously put together.  It also features an interesting double wall construction system.  All of the outer walls of the building come as two parts that glue together back to back, which means laser etching inside and out when completed.  There are decent instructions with photos which give a step by step walk through of the building process.  Although these images give enough detail to build the kit, I would have liked them to have been larger to allow the trickier  construction details to be clearer.   Perhaps adding them to the online store would be an option?

These are the four supports for placing the end panels on the hipped roof.  I was puzzled by them for a while!


Clamping the two part gable end walls together

I only have two minor points about the physical components firstly there are no internal walls (possibly because we don't know what the internal layout was) and second the roof assembly is rather fiddly.  That is because the flat roof panels are finished off with sets of separate slats.  Those are an exact match in shape and size on the two main roof panels but need trimming for the porch and the roof of the photo studio itself.  It's not a major issue with a set of side cutters, but I would have expected that with the precision of laser cutters those parts could have been pre cut to be an exact match.  Again to give the benefit of the doubt this may be because it reduces the risk of breakage when popping those parts out of the MDF sheet as they are rather thin.  What I do like is that they are laid out rather like the teeth of a comb with a spine holding them the correct distance apart which makes positioning fairly simple.

Here you can see the roof slats prior to trimming

As I mentioned the build itself was a level of difficulty higher than the previous kits I have made up but even then with a bit of thought it came together well.  I'd say that this is a kit where a dry run to make sure you are certain that you know where everything goes is vital.  Time spent there will ensure a good build.  I also found that it was necessary to build one part of the building and then clamp it and put it aside while the glue set rather than trying to do the whole thing at once.  However, by doing that I ensured a good fit on things like the two piece walls and roof sections (but see below).  If you are in any doubt, the photos on the web site of the finished model are a really useful aid to checking how things should go together.

Fixing the roof panel to the underlying frame

The only part of the build that gave me problems was the roof of the small photo studio to the rear of the main building.  This is a hipped roof where there are four roof panels two that form the main roof coming together at a ridge and two triangular end sections that lean inwards and are joined to the sides of the main sections (see image).  After building this I found some of the fit I had achieved wasn't great, this was down to me not the accuracy of the kit's parts though.  The best advice I can give is to build the underlying roof frame and then to use blue tack or double sided tape to test fit the four outer roof sections before getting busy with the glue!  I made a mess of that but was able to use some bits of the MDF 'sprue' to fill in the unwanted gaps I had created.

The roof of the photo studio.  I should have mounted the big roof panels so that the tops touched 

I only really ignored the instructions on one point which was the placing of the windows.  The instructions seem to be saying to fit the windows to the internal wall section with the window frames to the outside panel.  I did this with those on the smaller photo studio part of the building.  I found that it made any minor mismatch between the inner and outer wall sections really stand out.  So for the main building I set them into the outer wall section but with the rear of the window frame flush with the back of that part (see the sketch below).  I much prefer the look that way.

Sketch of my window placement looking in cross section from above

Overall this is a very nice representation of the actual building.  The double wall panel system creates a really robust basic structure.  The pre-painted parts show a bit of laser burn staining but I don't mind that as it looks like weathering.  If I hadn't liked it, it would be easy enough to touch up.  I didn't feel the need to add anything, other to hide my errors on the studio roof and a ridge piece to the main roof.  The only paint I needed to apply was some grey to the ends of the roof slats to hide where they had been trimmed.  This model will take pride of place on my table anytime a western shoot out game is played and I wouldn't hesitate to buy other kits from Empires at War.


Wednesday, 31 May 2023

Banking upon Success

From this to....(see end of post)

Yes you guessed it De Lancy now has a financial centre. A branch of The Freedman's Saving Bank to be exact. The bank actually existed for a few short years after the American Civil War but not perhaps in the South West where I am placing this one. The bank was set up to provide support to freed slaves, hence 'Freedman's' but by the early 1870s had gone bust. Given that banks were often named for their founders I thought I could use this as a bank founded by a Mr Freedman or as the actual Freedman's Saving Bank. That latter would make it an obvious target in the immediate aftermath of the war too.

The basic box frame with a start on the planking

And a start on the front façade with match stick framing

Just like the original wooden buildings I cut and applied planks to a frame.  However, in this case the frame wasn't timber scaffolding, it was a dog food box!  The build is mostly recycled cardboard also from dog food boxes.  I found that the recycling process used to make the card packaging creates a sturdy cardboard with a nice mid brown finish on the unprinted inner surfaces.  The packaging around tins of food is single ply while that around sachets is a thin corrugated card and both are great to work with.  They take paint and inks well and with a bit of stiffening from coffee stirrers hold their shape.  Best of all when given a layer of planking glued on with PVA wood adhesive they are fairly robust.

The planking effect is a bit rough and ready but I can live with that

The build wasn't particularly difficult.  I used the dog food sachet box as the frame as it had a 9.5 x 19cm footprint which fits well with other buildings.  I cut this down to the height I wanted (the original box would be great for a two storey building if you don't need access to both floors).   Planks were cut 5mm x 56mm from the single ply card .  I cut the doors and windows out and deconstructed the box for the frame so I could turn it 'inside out' as I wanted to hide the printed side under the planks and leave the brown as the inner walls.  I have settled on 20mm wide by 35mm high door spaces with a frame around the edge of the gap.  Matchsticks provided those door and window frames.  These I glued to the frame before planking.  A useful trick is to use multiples of the plank widths as the height from ground level to the window base to make planking easier.  Same at the top between the top of the frame and the roof line, not forgetting to allow for the size of the matchstick frame work around the cut outs.  once all the planks are glued in place edges can be tidied up using kitchen scissors and if you want a nice look glue an L profile edging strip around the corners to hide any ragged edges.  I didn't bother doing that for this build.  

Base added and side walk planked

To finish off I added a card board base under the building ensuring it extended 40mm beyond the building frontage to create a base for a side walk. I used some 5mm square section pine moulding rods from B&Q to lift the building and side walk off the playing surface.  I planked the sidewalk in the same way as I did the building sides.  Inside to help the card stay in shape a used more of the pine moulding as a rafter across the building to prevent the tops of the walls curving outwards and I added a counter, internal walls and a strong room.

Painting was acrylics on the frontage and staining to the other three walls using good old Agrax Earthshade on the side walk and a wash of highly diluted Vallejo Bone white  paint on the other outside walls followed by a light wash of Earthshade.

I can’t help but wonder how long it will be before someone either robs it or burns it down or both!


....to this a building with a decent Pedigree, chum

Friday, 12 May 2023

Street Map of De Lancy

Now that I have enough buildings to play a game I have had to turn my mind to how the town of De Lancy is laid out.  Previously I have stated that the town grew around an old stone block house built by the Mexican authorities back in the early 1830's so that has to be fairly central.  The Livery and Blacksmith's would be best on the outskirts of the town with corral space close by.  After that it was a case of slotting buildings in.  The initial street plan I eventually came up with looks like this.

De Lancy in1869

The solid grey blocks show buildings I already have the grey outlines are where I intend to add buildings.  The red lines are building plot boundary lines to aid me in deciding where to place stuff.  The game's ground scale is one centimetre to the yard which is slightly out compared to the figure scale.  As a result while the buildings are more in scale to the figures (I worked to roughly 1/56th scale) the ground scale for movement is about 2/3 of that.  This works for me as I prefer to have weapon ranges and movement lower than the building sizes rather than higher, I find it easier to reconcile slower movement and shorter shooting distances than I do faster and further, I clearly have more cautious shootists than average.

I'm hopeful of filling some of the spaces on Main Street and First Street before the end of the month. Longer term there will be some more MDF kit buildings and some scratch build adobe dwellings.   I have it in mind to add abank,  cafe, more stores and some residential housing in this first stage.

For my reference to town planning in the wild west I found a really useful web discussion that has really helped me plan the layout and especially with things like road widths and plot sizes.  It can be found here History 📆 - 19th century Western town layout: myth vs reality | Cyburbia | urban planning, placemaking, and more .  Its an interesting read for anyone who, like me, is on the far side of the Atlantic and too far away to visit the actual locations.

Tuesday, 2 May 2023

Shacking up

What De Lancy doesn’t currently have are any homes. Not everyone lived over the store or out on the range so I need some homes. Period photographs show that in frontier towns these were often little more than shacks. So I thought about it a bit and came to the conclusion that I could make shacks especially run down ramshackle ones!

The basic shape of the floor and sides is all one piece

I decided on card clad with coffee stirrers.  Foam would be good for adobe buildings but I wasn’t fully happy with the material when I made the De Lancy store model as the walls felt too thick.  Strangely the card and cladding technique felt much more robust than the foam method.  The recycled card used in a lot of pet food packaging is great for this as it is thicker than cereal box cardboard.  Fortunately we have a dog so there is usually plenty around awaiting recycling.

Sides clad and assembled, roof under way (but wonky)

The card is easy to cut and fold the tricky bit is drawing up the building plan, and even that isn’t really too hard.  Cutting the stirrers would be easier with a mini band saw but a sharp Stanley knife and a cutting mat works OK.  Corner cladding was more card with everything glued together with PVA wood glue.  to finish I gave a liberal coat of brown ink (I wanted a darker look than the timber of the bath house to suggest tarred or creosoted wood.  The flat roof is the card with a coat of Vallejo German Grey to look like tar paper.   A thinned red wash for door and window frames with a white ink wash to give a distressed look and voila it's done.

The finished article (with lurking bad guy)

The build didn't take too long all complete in probably 4-6 hours, not certain as I did it in short bursts between other stuff.   The next one will be easier now I have established the technique, I might try a shotgun house next, or even a dog run house, (honest those are real styles) or I may just make more shacks.

Sunday, 30 April 2023

Let's clean up this town!

Cleanliness is next to Godliness or so they say, and as De Lancy has no church yet I thought that a bath house might be a half way decent alternative. I also had a couple of ideas on how to make some of the tented temporary buildings which often sprang up as a town was growing, so the bath house is located in just such a structure.

Basic framework done

The core of the building is made of cardboard with a balsa and coffee stirrer frontage.  The external timber footings are also coffee stirrers and the canvas is printer paper laid over the card and soaked in PVA wood glue.  A nice simple construction technique.  As always the key is to measure twice and cut once.  In this case that meant drawing the front elevation at full scale and then measuring the sides and sloped top on the drawing so I knew the dimensions to make the card tent top and sides.  I was still out by a small amount but the papier-mache covering hid that.  The trickiest part was gluing the front and back to the top and sides piece, but I got there in the end.  To create the illusion of a frame I cut some thin strips of card and glued them to the tent shape which worked rather well.  I put a groove down the centre of the coffee stirrers (length ways) to make each one look like two narrower planks and added some grooves for the ends where planks butted up against each other.

Frontage added along with 'canvas'

Painting was fairly basic; a wash of GW Agrax Earthshade over the wood work and to create the impression of shadows in folds in the 'canvas'.  I searched the web and found some useful signage that I reduced in size so it was roughly to scale. After gluing them to the frontage I added a wash of Windsor and Newton white acrylic ink to the top of the false front and some rolled up PVA soaked loo paper as rolled canvas over the doors.  and a half open curtain inside the doors.  I'm really quite pleased with the result.

First stage of painting completed

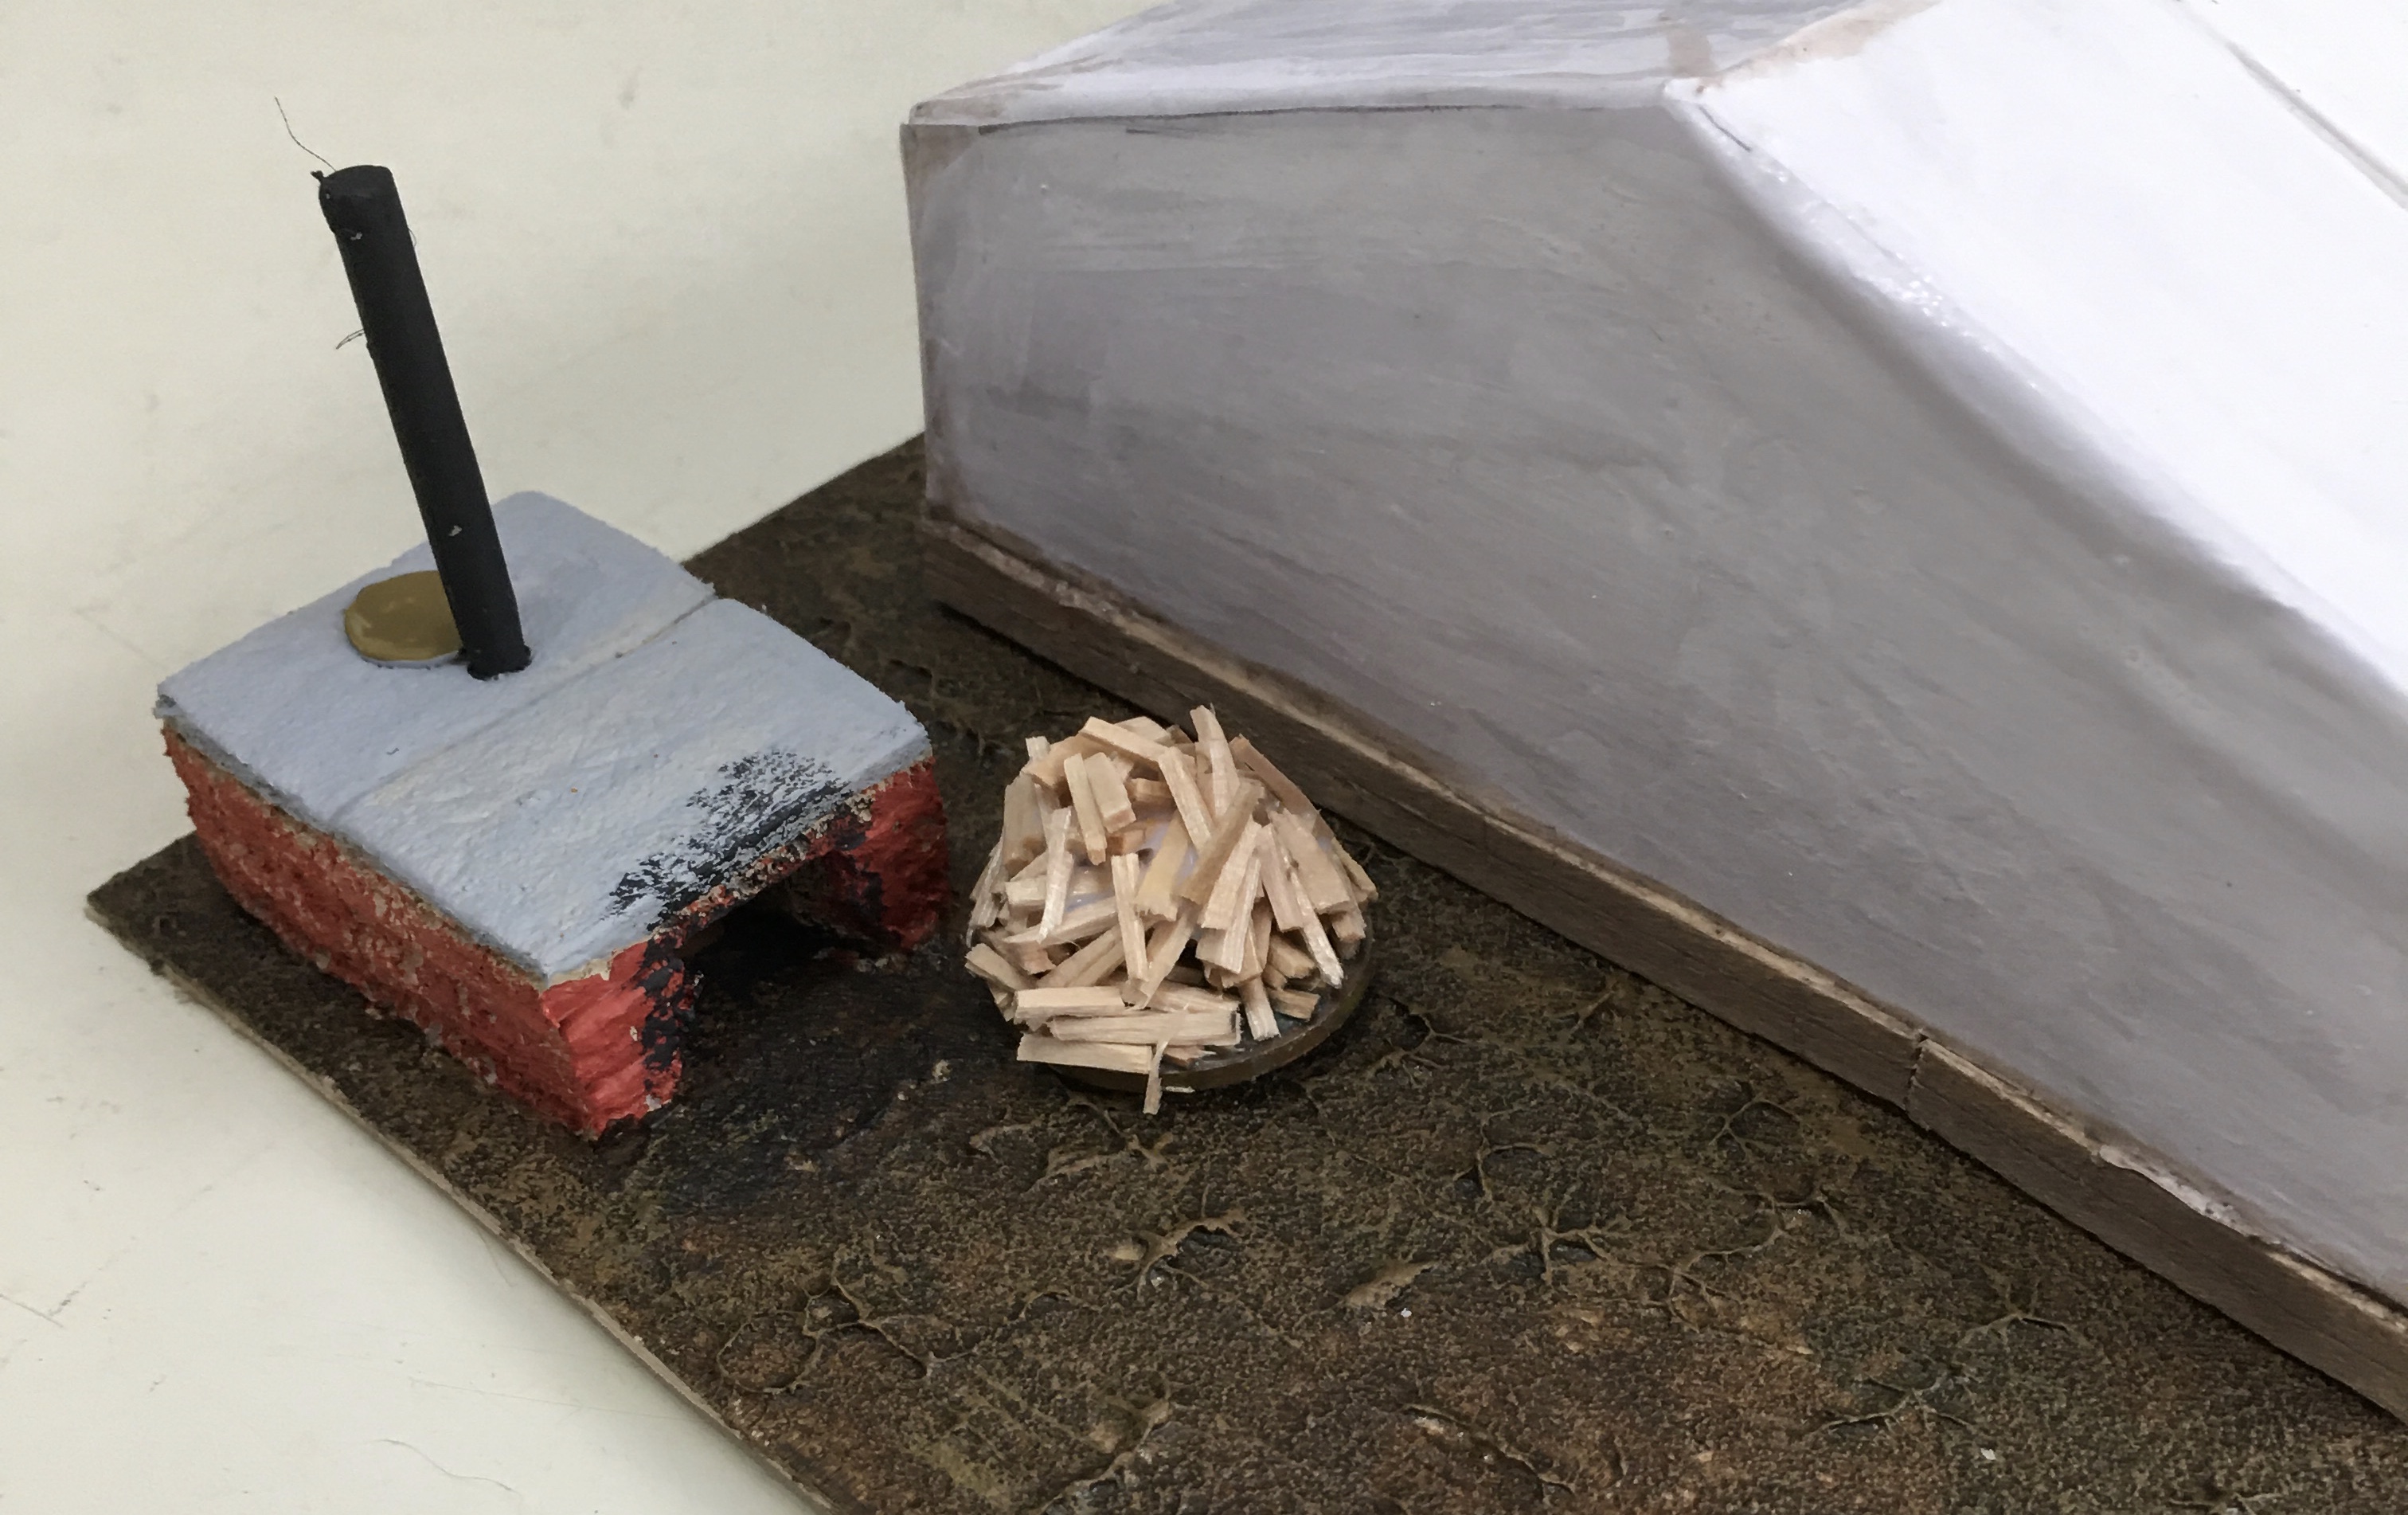
This being a bath house means that hot water would be available (for a small extra fee) so I needed to create the means of heating water.   Further Google searching gave me an example of wood fired water heating used in the 19th Century that looked easy to create.  This is a brick box with a door for fuel and an enclosed cauldron above it.   This was made from three layers of 5mm insulation foam, a skewer and the head of a roofing nail as the caldron lid. 

Around back is the water heating system and fuel

Closer view of the frontage

To flesh out the town I have also been making more fences.  There are going to be quite a few of these so to aid with that chore I created a framing tool to line everything up and mark sizes and fence post locations.  It isn't exactly high tech but it does the job.

The fence framing jig in all it's low tech glory
 
Of course you didn't expect me to stop at one new building did you?  No I didn't think so.  I have started work on a very basic shack or maybe it's going to be an outside store.  Either way it's an extra building.  As you can see in this case measure twice cut once didn't work!  Fortunately dog food card packaging is pretty forgiving and a new false floor hides a multitude of sins (and Tesco branding).  Cladding the exterior walls is a slow job and I need to go find a new Stanley knife blade as the current one is now very blunt so that's it for this post.   

Next up is a very basic shack

Sunday, 26 February 2023

De Lancy - Blacksmith's Forge

The Dog House Saloon is completed so it's onwards to the Sarissa Precision Blacksmith's Forge.  This is a lovely little model and as a bonus I found a You-Tube video on assembling it.  To be honest the instructions which came with the kit were more than enough but sometimes it's nice to hear that there were no unexpected snags.  The kit consists of a stable with an attached outdoor forge so there is a bit of overlap with the Livery Stable but apparently a bit of competition is healthy for the market place (although Colonel De Lancy seems to favour the monopoly system as long as it's him who holds that monopoly).  Unlike the Warbase's Livery stable the Sarissa kit has internal detail so I don't need to do any scratch building on this kit.  Mind you it was also around 20% more expensive than the Warbases offering so you pays your money and all that.

It goes together very nicely but I didn't glue the forge roof, forge, troughs, or hitching rail into place so I could easily paint them.  I also wanted to texture the base which is easier without these being glued into place.  Other than that there is very little I can say about assembling the kit.  I made very few additions;  some off cuts of MDF into the forges fireplace as fuel, some ridge tiles to cover the gap where the two main roof parts meet at the roof apex and some rough covering for the forge roof's open area, but other than that I had no need to add anything major.


Blacksmith's Forge and wagon

Side view of the forge

I do strongly suggest painting all the door and window frames and the main structure before gluing the window frames to the (now painted) walls as it makes for a much neater finish to the edges of the frames.   In the photos I can see where some touching up is needed as I didn't paint before assembly, lesson learned for next time!  Other than that the painting was fairly straightforward as well.  The brickwork areas were painted in a Vallejo Scarlet Red to which I had added Orange fire and some Moon Yellow to lighten the mix.  This gave a nice brick red tone.  I added some Vallejo Black-Grey as soot marks around the mouth of the fire place and the top of the chimney.  The roof and beams were painted in Vallejo Dark Sand and then washed these with a couple of coats of  GW’s Agrax Earthshade.  I hummed and hawed about the colour of walls of the stable block but settled on trying for a slightly faded white wash look.  For that I used an off white which I painted on rather unevenly and then added spots of Agrax Earthshade which I smeared into streaks with a finger tip, making sure the streaks were parallel to the planking on the model.

To texture the floor I used the chopped sisal string 'straw' in the horse stalls but tried a new technique for the earth floor of the smithy area.  I used a sand texture paste from Hobbycraft and as it was almost dry used the flat surface of a plastic glue spreader to create some ripples.  Mrs E says it's a bit like the way she makes decorative peaks in Christmas cake icing but less tasty.  Once the sand texture dried I painted it Burnt Sienna (Windsor and Newton Galleria paint) then dry brushed heavily using Vallejo Earth followed by a lighter drybrush of Vallejo Khaki.  I quite like the result.

Inside view of the main building

Close up of the forge floor area

I also assembled the wagon which looks really nice alongside the buildings.  This was painted in the same way as the forge's timber.  As a bonus I added some extra signs to the saloon's frontage. 

New Saloon signs attached to the balcony and the roof has been finished

That's the new MDF kits completed which leaves the figures from Vapnartak to paint now.  These have only been spray undercoated so far.  I'm going to have to rethink my normal approach to figure painting for them and revert (or at least try to revert) to an older painting style of high and lowlighting similar to the Dallimore method.  They may have to sit on the back burner for a while as the next order of business is to finish the 2mm ACW project.

Wednesday, 15 February 2023

De Lancy - building Annabelle's Bar

De Lancy Texas is turning into a bit of a cattle boom town with new buildings popping up all over Main Street.  At Vapnartak I purchased a saloon (Annabelle's Bar), a blacksmith's shop plus an open wagon and a hitching post and two tethered horses.  I have made a couple (or more) of lengths of fencing as a test for construction and painting techniques and have started on constructing the Saloon which will be named 'The Dog House' owned by G & B Dogge. 

The saloon is from Warbases’ Cactus Creek range.  It doesn't come with any assembly instructions and in this case that is a drawback as the second story and the ground floor are very similar.  So I set too and dry fitted everything together before reaching for the wood glue.  Two things become obvious the first is that the key part of the build is the ground floor front wall.  This can be identified as different from the second floor one as it has holes for the supports for the balcony on the second story.  Importantly it is also slightly taller than the front wall of the second floor.  Matching two sides and a rear wall to the height of those two front walls allows you to tell which floor they are for.  It is also pretty obvious that the front of the ground floor needs to be painted before assembly, as getting a paint brush in once its all glued together would be tricky.  The floor for the second storey sits inside the walls of that storey rather than having those walls slot into holes in the floor.  To be honest it sounds more complicated than it actually is, but a dry run is a must.

Just need to paint to roof a nice grey-black as tar paper

The only other potentially tricky part is placing the supports for the balcony.  I found that gluing the wall end in place first was best as there is more flex in the vertical part which allows positioning it into the socket in the sidewalk part of the base easier than doing it the other way around.

One thing about the Warbases' buildings is that the roof sections come without any texture, you might recall that I had to scratch build shingles for the livery stables.  For the Land Office I papered the roof in toilet tissue and PVA to create a tar paper effect (complete with the odd wrinkle) painted in a dark grey it looks fine.  I'll be doing something similar for the saloon roof.

I also dry fitted the wagon together, this is a Sarissa Precision model and does come with some straight forward assembly instructions.  It is pretty easy to put together and is a very nice little model.  I need to break it back down for painting which will be a fairly simple one colour scheme.  Which brings me to the subject of painting MDF to look like weathered wood.  The look I want is the old weathered silver grey wood look and I'm struggling to find a way of creating the effect which I like.  Suggestions will be gratefully received. 

The fencing was made from coffee stirrers, match sticks and lolly sticks.  The stirrers are used as planking and when split lengthways also make the stringers on the vertical planked fences.  The match sticks are used for fence posts and lolly sticks for the bases.  A good wood glue worked perfectly to glue the fence components together and some Milliput on the base served well as a foundation to stick the fence posts into.  I think that they look the part and will do nicely as line of sight blockers.

I have made two styles of fence for the moment.  The vertical planked ones for domestic use and the horizontal ones for corral or stockyard use.  I started with just lolly sticks for the entire build but the planks felt over thick so for the mark 2 versions I went with coffee stirrers as planks.  I also changed how the posts were attached so I used a single length of match stick rather than short sections, which frankly was a real pain.

Planks cut

Framed (This is mk1 all made from lolly sticks)

And based

The Mk2 using coffee stirrers as planking is more to scale


Sunday, 29 January 2023

Building a better battlefield

For the recent ACW game I had to create a close approximation of an actual battlefield which I haven't needed to do before. American Civil War battlefields also have more terrain (yes I know that sounds stupid, but bear with me) than any previous battlefield set ups I have created which caused me to reconsider how I made terrain items. Previous DBA battlefields and those for my 2mm 17th Century games depict much smaller areas of ground than do those of the ACW and so you are looking at terrain features which are smaller than those I needed to make for the battlefield of 1st Manassas where the ground scale means that the six foot by four foot table is a scale six miles by four miles. Smaller armies need less space to deploy and historically tended to choose relatively open areas so other battlefields I have created needed less terrain features. That allowed me more freedom to create detailed terrain features and to try to make the table more diorama like. Don't get me wrong I could do that for the American battlefields of the 1860's but it would be time consuming. Which brings me back to the 'more terrain' comment. The battlefields of the ACW were more heavily wooded than those I have modelled before, the larger ground area includes more water ways and hills too, so more items need to be created and playability has to be considered.

In making the terrain for 1st Manassas I was under time (and cost) pressure as I had the game scheduled for only a couple or three weeks in the future.  I was going to need more and larger woods and hills and about nine linear feet of river.  No pressure then!  What I needed was something which looked reasonable, was quick to make, easy to play on and didn't cost the earth.  Ok so some pressure there maybe.  Here is what I came up with.

Hills

I wanted hills I could use in other games as well as with Altar of Freedom.  That meant step hills, the old tiered wedding cake approach. For AoF the contours seem to be about 25 feet apart, so with a ground scale of 25mm to 150 feet that equates to 5mm to 30 feet (and yes mixing metric and imperial units in the same calculation drives me nuts as well but needs must) so 5mm per 25 feet vertically is close enough for jazz.  I’m mixing metric and imperial because the building materials are in metric but US measurements are in Imperial, so as I said needs must and all that!  I already had polyurethane foam insulation sheets in 5mm thickness so in some (OK all) respects I knew the answer and was really only looking to show it was workable, 5mm contours it was going to be.  To make it an even better fudge for 2mm figures I usually work to a rule of thumb of 1mm equals six feet so five sixes are thirty…I’m happy with that.

The basic bare foam hill shapes

As a bonus the scenario map scales out to 1mm to 1cm on the table so establishing the rough size of terrain foot prints is straightforward.  For each hill I measured the size of a rectangle that the feature could sit within and set to with a pair of kitchen scissors.  The foam cuts well and only needs a light sanding to smooth the edges.  I gave the foam a coat of green house paint and then a couple of coats of acrylic spray paint after some further trimming to ensure everything sat properly on the table in relation to other terrain (more on that later).

Woods

My normal system is to make canopy woods by gluing chunks of foam foliage to a base.  For ACW battlefields there are a LOT of woods, and I didn’t have time to make that number of canopies.  So what to do?  Enter a grass effect carpet from the local Lidl store Mrs E bought me a couple of years ago.  I simply cut the shapes with the trusty kitchen scissors.  Again the carpet cut easily and as a bonus I could cut it in layers to sit on the steps of those hills which were wooded.  Again after a trial fit to the table and some judicious trimming it was job done.  In due course I can either add a scatter of trees or use the shapes as the bases for canopy woods.

The woods, a little flat but a nice colour

Rivers

I had a good head start here as I already had a lot of river sections made.  I only needed to create the tight bend in the North West section of Bull Run and to create a link piece to ensure the sections connected up.  My existing rivers are made in a couple of different ways.  The best system uses a rubber base and sand glued to the edges to create the banks.  A fast dry brush with a olive green over the sand gives a grass effect.  Confession time; I didn’t have time to paint the new sections but they didn’t look too bad.

Rivers and canopy woods under construction 

Buildings

These are a mixture of Brigade Models, Irregular Models and home made buildings from very old monopoly houses.  So old in fact that they are wooden!

Roads and minor streams

These were simply drawn on with chalk.  The playing surface is felt fabric sprayed with acrylic paint and it takes chalk well and it brushes off without too much trouble.  So that's fairly quick and cheap!

Finishing touches

My table is made from MDF sheets and they (of course) are cut in metric sizes, imperial would be too easy.  So the table is not exactly 6 x 4 feet but the map I scaled the terrain from was converted as if my table was exactly 6 x 4, or to put it another way the area terrain items were over sized.  Which is why everything was test fitted to the table.  The important point being that distances between features needed to be as close to the map as possible while still fitting everything on to the playing area.  Cue some more minor scissor action to reduce some footprints and hey presto there before me was a reasonable representation of the battlefield of 1st Manassas.


Test fitting - some adjustments were needed
The final version some smaller hills and woods and the river rerouted

The whole set up cost under £50 excluding the base board and tables and I already had all the materials  in the resources pile so that £50 was actually spent a couple of years ago rather than from this years wargaming budget.  It is great to play on, it is clear what each item is and it looks OK for 2mm use.  Plus I can tart it up as required and everything is reusable.  


Tuesday, 23 November 2021

Making Chilli Jam (again) and some terrain builds

As it is now officially the run up to Christmas I made a batch of Sweet Chilli Jam over the weekend using the recipe I posted here  https://elenderilsblog.blogspot.com/2018/10/chilli-jam.html.  It has come out nicely and one pot has already been eaten!  

In other news Mrs E and I have had our annual flu jabs and the booster Covid jab this week.  I felt a bit under the weather the following day but nothing too extreme and no unexpected side effects such as a constant need to tell Amazon what I'm thinking of buying next!.  Sadly the expected wi-fi boost from the first two jabs never materialised either.  I blame the quality of conspiracy theorists we get now a days!

Its a new product to me but I like it so far

I have started on making some extra river sections using the gasket rubber I purchased a couple of months ago.  I'm glad to report that some of the smell has worn off that so my painting table no longer smells like a tyre fitting shop (I was actually starting to like it which is a bit worrying).  The stuff is really easy to work with.  It cuts using scissors, takes glue well and still flexes after the first coat of spray paint.  I used good old UHU clear glue along the edges and then sprinkled fine sand over it to show where the banks are.  I then primed it with a new spray paint I bought at Hobbycraft - Montana cans Gold NC acrylic in 'sand'.  It sprays well and seems to work at least as well as Humbrol rattle cans but is in a bigger can, although more expensive so it evens out.  It seems easier to obtain the shades I need than the Humbrol range which always seem to be out of stock.  Oddly they don't come with a snap on top though.  All the cans are this gold colour with the actual shade being shown on the domed bit below the nozzle.  

First stage completed now to paint in the wet stuff

I need to sit down and paint in the water and then give it a coat of high gloss varnish, dry brush the banks in a grass green and brown mix and add a few clumps of foliage to finish them, but like everything else post retirement I never seem to have enough time!  I really need to knuckle down and stop wasting time on important jobs around the house!  I also found a supply of high density foam in 5mm thick sheets which is perfect for making hills for 2mm gaming, so once those pesky important jobs are done I will be testing the spray paint on that prior to hill raising.

Wednesday, 29 September 2021

How … making canopy woods

How is going to be the generic term for how I do things or make things. It may not be in the title but I will tag all of the how posts with that word going forward and in the next few days I will go back and add the tag to earlier posts.

I’m starting off with how I make canopy woods as a few people have commented positively on them and in some cases asked how I make mine.

First things first I suppose I should define what I mean by a canopy wood,  it’s a model of a wooded area where instead of using individual trees the entire wood is modelled as a single entity.  It works best for 6mm and smaller figures as the look is more in keeping with a view of an entire wood from above.  The top of the wood, the leafy canopy covering the branches and trunks is made as a single item so it can be lifted to hide troops moving through the wooded area.  Hence canopy woods.  Most of what follows is based on other people’s work and isn’t my own original ideas.  So I’m not taking credit for any great original concepts here.

To make these you will need:

Clump foliage (I use the smaller ‘bush’ sized stuff)

Felt

A flexible material to glue the foliage to

A glue similar to UHU or Bostick 

Some aluminium cooking foil (optional)

A sharp set of scissors

A Sharpie or similar fine permanent marker pen

An understanding wife or partner (construction could get messy)

I pick up materials from a number of places.  The felt and ‘flexible material’ are from craft stores (Hobbycraft here in the U.K.) the flexible material is a thin foam/rubber sheet available in Hobbycraft in a number of colours.  I use black as it creates a shadow effect if I miss small spots when applying the flock.  

Foam sheet - you can see it is flexible

This is the product data for the UK item

To start I cut two identical outlines; one in the foam sheet and one in the felt.  Using the Sharpie I draw on the felt creating the traditional map symbols for woodland (a sort of wavy curved line repeated to symbolise foliage) although that's not vital it’s just that I'm a bit anal like that.  This creates the ground foot print of the woods that the canopy part will sit on.  That’s the quick and easy part done.

Next turn to the foam sheet.  First make sure that you are going to work on the correct side of your cut out shape so the completed canopy will match the felt foot print.  Before you get really serious test the glue on an off cut of the foam to make sure it doesn’t melt it!

Felt location marker and foam canopy base with a start on the foliage gluing.

  If you wish you can now scrunch up some aluminium foil into a tightly packed shape.  Push it down hard onto a firm flat surface to create a flat base.  This will be glued to the foam to create some height for the clump foliage to be glued to to give the illusion of taller trees in parts.  It only needs a couple of small areas to create the effect.  Using this technique does have a downside as it stiffens the canopy and prevents it conforming to any hills you might like to drape it over.

Scrunched foil.  Note the flattened base

Next comes the messy part, gluing on the foliage.  Smear a layer of glue to an area of about one square inch and add foliage and press it into the glue quite firmly.  The idea is for some of the glue to be soaked into the foam foliage.  Don’t add glue to too large an area as it will go off before you have added the foliage.  I usually start somewhere in the middle and work towards the edges.  Once the top is covered and the glue dry flip it over and add a small strip of foliage all around the edge of the underside.  Let this dry and then fill in any parts around the edge where the foam shows through and any areas on the top where there are gaps.  Sounds easy but the glue will get stuck to your finger tips followed by foliage pieces, bits of foliage will get lifted out of place on your sticky fingers and other small items will probably get stuck to them too!

Top done no bald spots or unintended extras glued in!


The strip around the underside lifts the canopy off the table


Fill in any gaps on the edges and it's finished

You can see how the use of a foil 'core' lifts part of the flocked area to create an illusion of taller trees in the centre of the finished woods in the photo above.  I only tend to add between a couple of millimetres and a centimetre of additional height this way as trees don't vary in height too dramatically in the real world. 

Now set the completed canopy to one side and let it dry.  I mean really dry so overnight is good.  Next spray the canopy top and bottom with a sealer of your choice.  In the past I have used hairspray, matt varnish and watered down PVA.  The one thing I have never tried is the stuff woodland scenic makes specifically for the job!

You could call the job done now and for 2mm or 3mm figures the canopies will look fine.  Alternatively you can add more height by placing spacers between the felt and the base of the canopy.  Some people use things like cocktail sticks or flat headed roofing nails.  Personally, I think this risks making the wood look too 'leggy' so if I use anything at all I use small cubes of wood about 1cm a side.  If you look at real woodland from a distance the trunks of the trees are almost invisible.  The foliage comes down to within a few feet of the ground and often seems to meet the woodland undergrowth.  The only time where this isn’t the case is with some pines and spruces where the first 15 feet or so have no foliage and the pine resin dropping to the ground inhibit the growth of ground cover.  All my woods must be broadleaf deciduous ones, yours don't have to be though!

I don’t make my own clump foliage instead I buy it.  I use the summer foliage colour, a sort of mid olive green tone.  I don’t add different coloured clumps as I don’t like the effect.  I also don’t use autumn colours as it limits the usefulness of the models by restricting the time of year it applies to.  I know that it could argued that using green does the same but most battles are fought in periods where trees are in full leaf so summer green is my favoured colour.

I have said this before about painting but it is true for terrain builds too, the key skill is observation.  Really, really look at woods from a distance see what is actually there not what you expect to be there.  Then recreate that look in miniature.  Good aerial views will help with the look of canopies from our playing view point (you know, the 1,000 foot general viewpoint). A quick trip out to the country or use of Google Maps Street View feature will also help with the table level look.

Look at the woods here on the Yorkshire Wolds (Bing Images) 

So that’s how I make my canopy woods, hopefully it was useful.  If you don’t like the effect this gives don’t be afraid to experiment, after all it’s your table not mine they are going on.

If you want to make individual larger trees see my article on using the cones from Alder trees which is here Small but Perfectly Formed: From Tree to tree - making 6mm trees. (elenderilsblog.blogspot.com)  the same technique would work on other formers than alder cones and I have used scrunched up foil on a cocktail stick in the past.

So good luck with the miniature forestry I hope you like the results of your sticky fingered work.