Monday, 14 August 2023

A Napoleonics game at Chez Dawson

Long term readers will have gathered by now that the one period I have really struggled to come to grips with are the Napoleonic Wars. So it may come as something of a surprise to find me driving to York, last Wednesday, for a game of Shako 2, Arty Cunliffe's rules for that period. This was all due to Paul Dawson commenting on the fact that some aspects of Altar of Freedom reminded him of those rules during our AoF game of First Manassas earlier this year. This was enough to intrigue me and intrigue crystallised into a suggestion that we give the rules an airing at our next get together. Which was why I was off to fight the Battle of Abbach (22 April 1809).

While I understand a little bit about the Peninsula War (thanks to the Sharpe Novels) and something about the 100 days I'm pretty hazy about the rest of the Napoleonic Wars.  So a game set in Bavaria in 1809 is not playing to my strengths.  Fortunately the rules were pretty easy to pick up and for a non specialist like me seemed to give a reasonable feel for the period.  I especially liked the command and control system and the really straight forward combat and morale rules.  The game is set at Corps level with manoeuvre units being infantry battalions, cavalry regiments or artillery batteries (lets call these units).  Each unit has a morale value which is the number of 'Hits' the unit can take and also the base score it has to roll under to pass morale tests and do other stuff.  In this game that value ranged between 3 and 5.  The Austrians also gained a bonus for having large units, not that we had any actual Austrian troops on the table instead Prussians proxied for them.  Large units take one more hit to destroy than their actual morale value and the Austrians have a number of these.  If you want to read a review of the rules by an actual Napoleonic gamer this link will let you do that: Mad Mac's Attic: Search For The Holy Grail - The Best Napoleonic Rules, Part 6 (madmacsattic.blogspot.com) 

The game scenario came from Michael Hopper's "Eagles over Bavaria" which is a set of scenarios for battles in the 1809 campaign written for Shako 2 but actually pretty much rules agnostic.  A French force initially consisting of two commands (which I think were roughly division sized) is on the table.  This consists of Boudet's Division of seven average battalions (Morale 4), two skirmish units and 1 Field Artillery battery and Pajol's Division of 2 elite battalions (Morale 5), 1 skirmish unit and three regiments of light cavalry.  Reinforcements will arrive on turns three, seven and nine.

The Austrians have superior numbers at the start, organised in four Divisions (IIRC).  They certainly had a lot more troops on the table than the French.  In total they deployed 16 Infantry Battalions, 4 cavalry regiments and 4 artillery batteries.

1. The Battlefield.  One square equals on foot on the table

The initial French plan was to defend all along their frontage.  The Austrian's were attacking.  Command and control in Shako means defending units cannot move more than 12 inches away from their formation commander while attackers must move towards the enemy at a minimum of half speed.  Orders cannot be changed without a direct order sent from the Commander in Chief to the formation commander by ADC, who may not get there on time or at all!  Lines of attack must be defined on a map by drawing an arrow showing the route and objective.

When I arrived at Paul's the table was already set up and initial  deployments were being made.  Paul  had also invited a second wargaming friend to take part, who to prevent me becoming confused has cunningly arranged to be called Paul as well!  This latter Paul was commanding the Austrians and I was to take the French.  The French right was deployed on either side of the stream north of the village of Massing with their flank anchored on the village of Poigen.  Their left was deployed around Peising with two elite battalions garrisoning that village.  The centre was lightly held by three regiments of Light Cavalry.  The Austrians were massed south of Seedorf and around Abbach.

The game victory conditions rewarded the Austrians for exiting troops via either of the roads on the south edge of the table, occupying Peising and Poigen villages and destroying French units.  As the French I had to hold the two villages the Austrians wanted, prevent their southern exit and destroy units.  Which, to be honest, looked like a big ask.

2. Battlefield from the east showing initial deployments

Apparently the Duke of Wellington once wrote that "The history of a battle, is not unlike the history of a ball. Some individuals may recollect all the little events of which the great result is the battle won or lost, but no individual can recollect the order in which, or the exact moment at which, they occurred, which makes all the difference as to their value or importance.".  I know exactly how he felt as I try to write up this game!  The telling is entirely from the French viewpoint, some of my recollections don't entirely gel with the sequence and time stamps on the photo's and some bits I'm struggling to put into the right point in the game entirely, and that's without anyone shooting at me (or asking me for a waltz).  Still I will do my best to give an outline.

The initial deployments are as shown in photo 2 above, the French are on the left, the Austrians (actually Prussians) to the right.  Units with blue glass markers are 'large' units.  Each turn commences with dicing to determine the order in which divisions move, this is a straight dice roll with no modifiers.  in the case of ties formations with attack orders move first.  The game started with the Austrians surging forward all along the line.  Things are not looking good for Napoleon's boys! In response I placed most of my infantry into line keeping a couple of battalions in column as a more mobile reserve and awaited the coming storm.  Infantry in column move further than those in line but can't shoot but gain an advantage in melee. 

3.  The cavalry and their supporting artillery attack

The first blow was a combined cavalry and artillery attack against my right wing (Photo 3).  I managed to form a hasty square with one battalion but the left most one failed to do this and was swept away.   After which the Austrian cavalry decided to ignore the infantry in square and retired to rest their horses. After one turn of melee become 'blown' and only recover after a turn out of combat.  Being attacked while your horses are blown is not a good thing!  Blown horses are noted by a red glass bead in the pictures.

4.  The Austrian infantry pick up the assault

Hard on the heels of the cavalry charge came the Austrian infantry.  They quickly moved into Poigen village and started a musketry dual prior to a bayonet charge.  This staggered some French formations but did little else.  The French musketry in response was distinctly lack lustre (I threw a lot of ones, I mean a LOT!).

5. Turn three and the first re-enforcements arrive

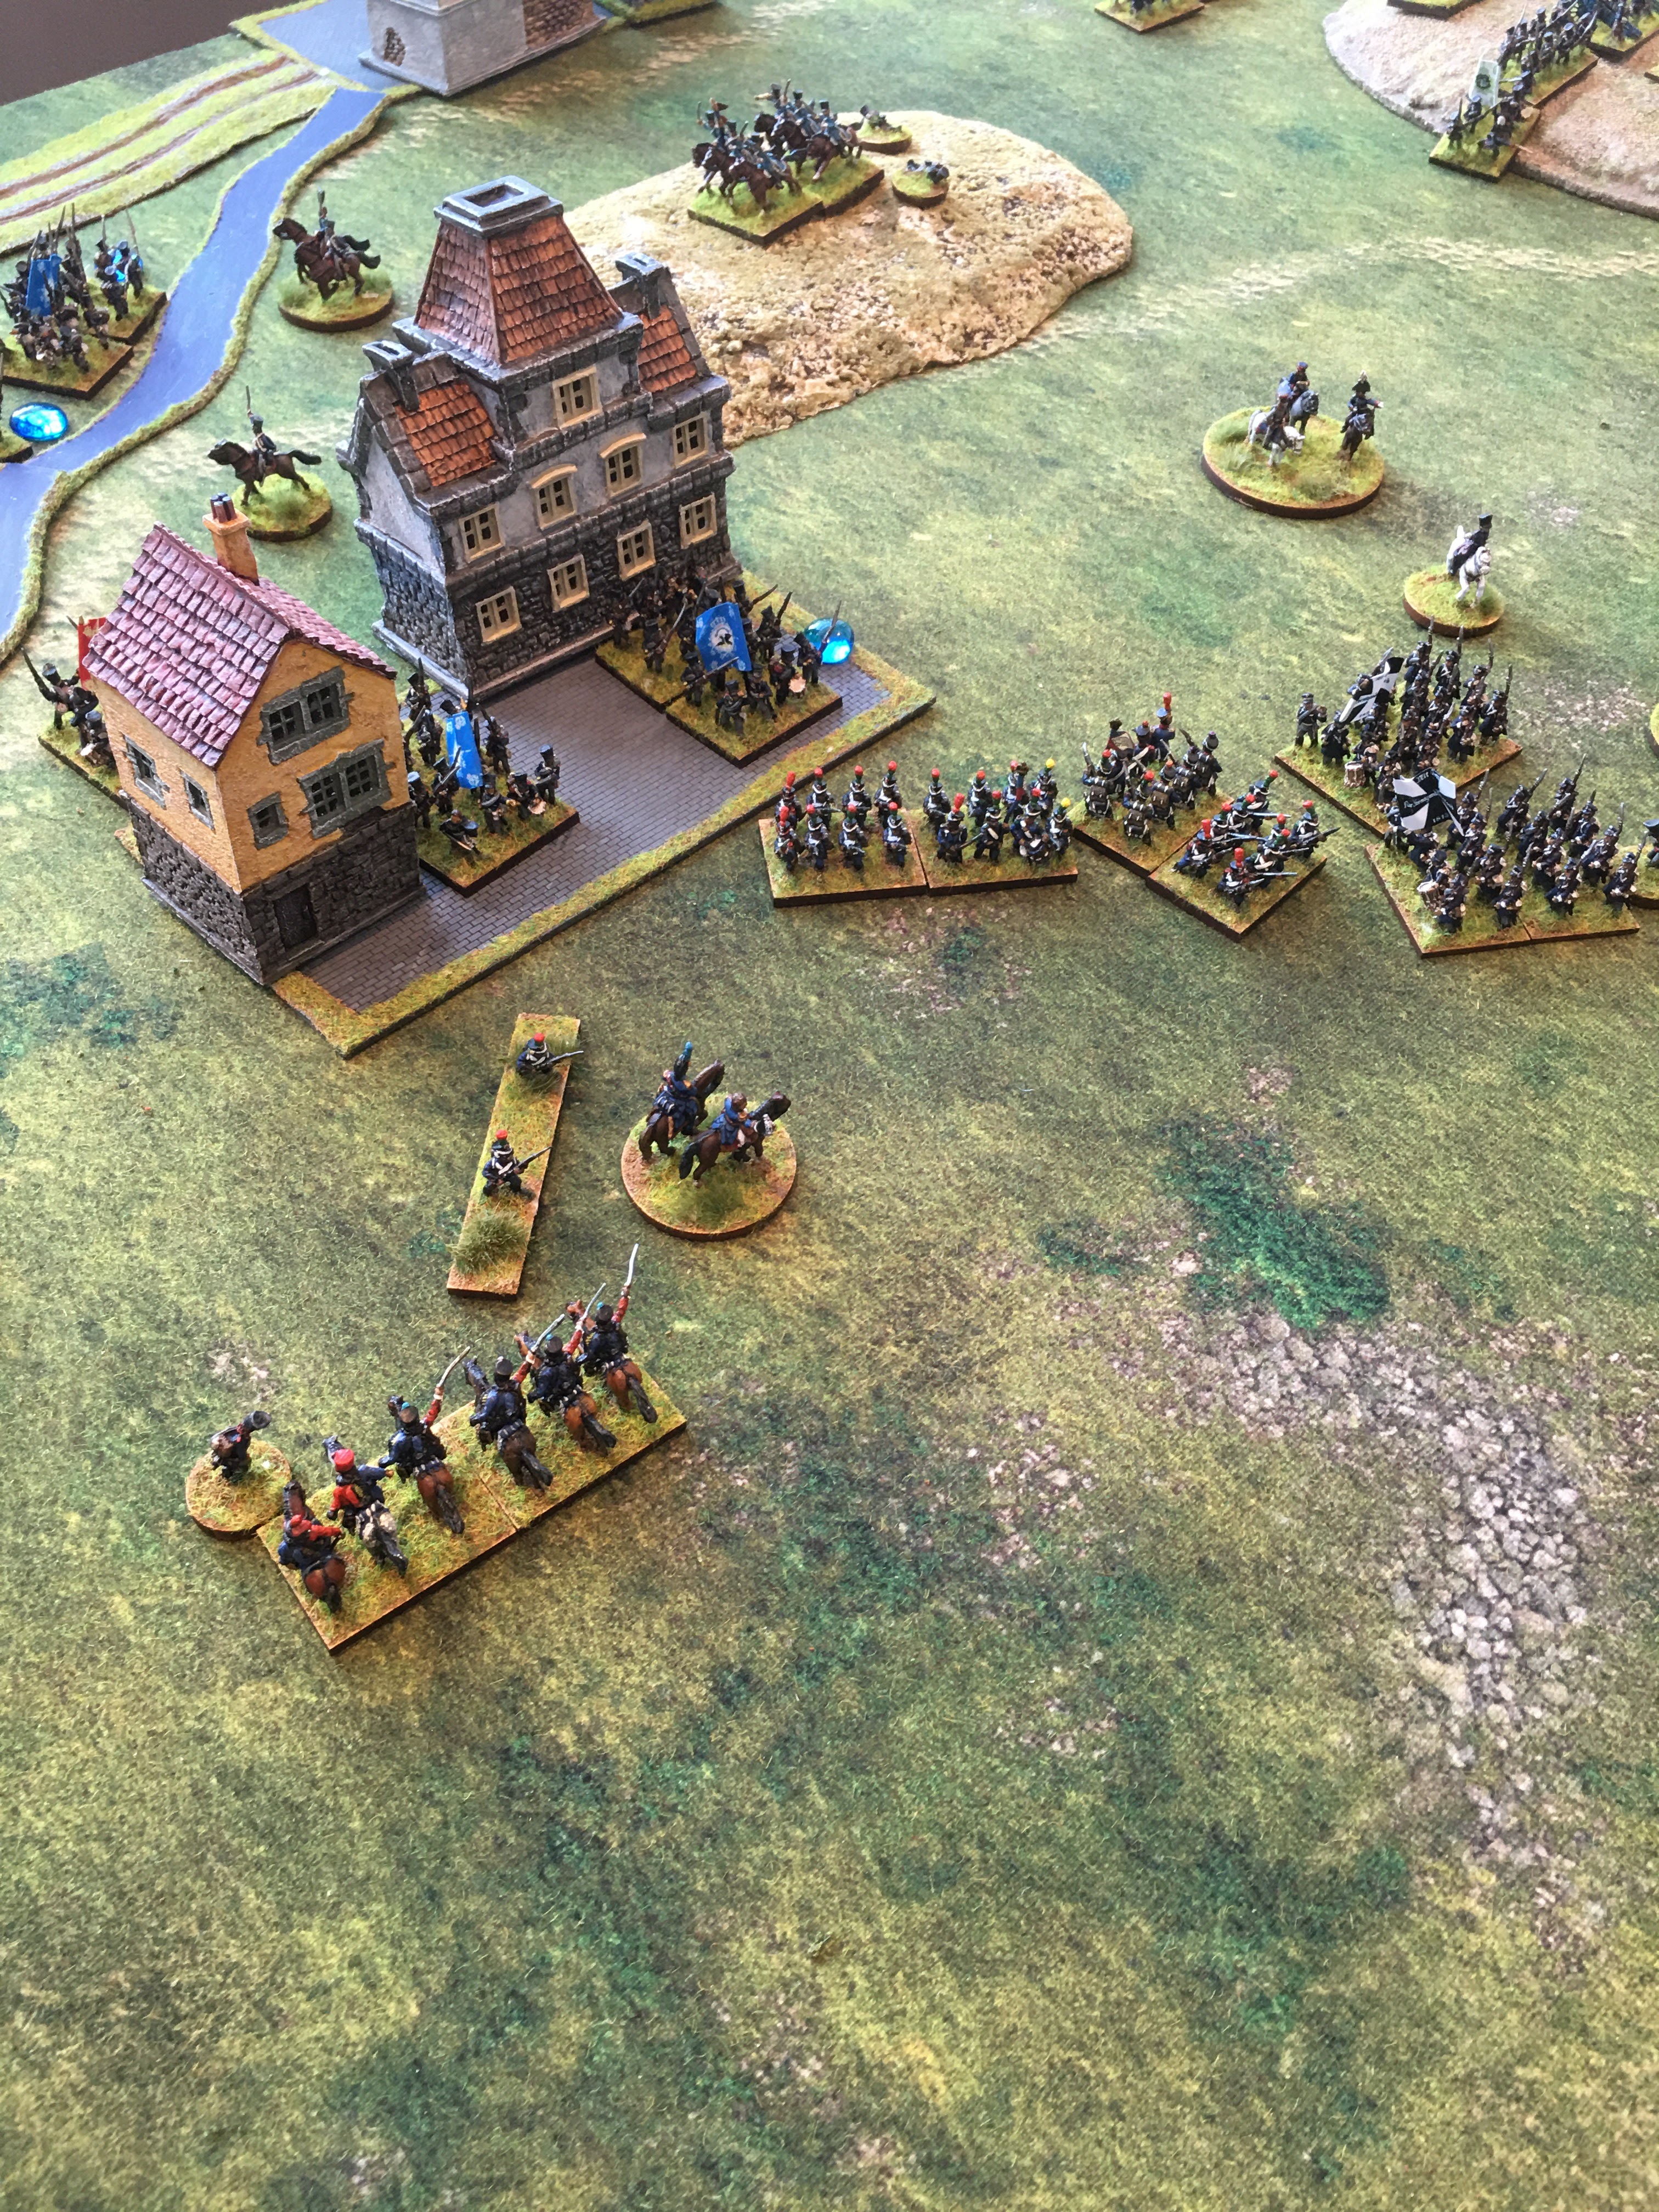
Meanwhile on the left the Austrians held a huge numerical advantage and pushed cavalry and infantry south down the road out of Abbach.  I moved one of the cavalry regiments in the centre to the south of Peiping with a view to launching a spoiling attack against the rapidly advancing Austrian columns.  I also moved one of the elite battalions out of the village to hold off the Austrians moving south towards the central sector of the battlefield.  Although they slowed the advance doing so allowed the Austrians to slip a battalion into the southern half of the village.  The French also gained much needed re-enforcements in the shape of two light cavalry regiments entering in the South West corner.

6.  The French centre is now wide open

However, that left the centre looking distinctly under garrisoned!  One battalion of infantry is having to hold off three Austrian ones and having sent one cavalry regiment to support my left wing I had precisely two remaining cavalry regiments in support.  Following a round of combat with the Austrian Dragoons opposite me that quickly dwindled to one regiment, as shown in Photo 6.  My remaining cavalry are blown and staggered.  Staggered is the equivalent of disrupted or disorganised so far as I can make out, certainly a staggered unit is at a large disadvantage.

7. The Austrian infantry pressing forwards on my right

Over on the Right the Austrian Infantry continued to close on my defensive line (Photo 7). I'm unclear how many turns of musketry occurred or if they attempted to close to melee but overall things were looking pretty shaky on this wing.  In a desperate attempt to reverse the tide of events I decided to go for it and attacked all along the line.  Austrian volley fire failed to prevent my infantry getting into melee and a series of poor Austrian rolls and good French rolls saw Austrians fleeing to the rear in large numbers.

8. The Austrian push around and into Peising village

Things were even more desperate on the left side of the battlefield.  Although so far the Austrian's had not been able to make their numbers tell, but it was only a matter of time before they did.  My elite battalion which had left the village was not just holding it's own against the Austrian assaults but was actually beating them.  I was in serious doubt as to how long that could be maintained though as Austrians were poised to leave the village to their rear.  The light cavalry re-enforcements plus the regiment diverted from the centre launched death or glory charges to hold the Austrian's back and had some success but at a cost.  I was beginning to look for the next set of re-enforcements arriving to rescue things.  In an attempt to hang on until then  I abandoned the village and moved the second Battalion of infantry out to support their colleagues facing the enemy.

At this point we broke for lunch; I'd like to claim that this was taken in the saddle surveying the field of battle, but in fact it was taken sitting very comfortably in Paul's conservatory discussing the pros and cons of domestic solar panels! Very nice it was too. 

9. The aftermath of the French close assault on the right flank

The French counter attack around Poigen was far more successful than I had hoped (see photo 9).  In fact the Austrian's were even worse off than the photo suggests.  Shako 2 has a cascade morale failure rule.  When units reach set levels of troop loss their chance of passing morale tests declines dramatically and entire divisions can simply melt away.  So it was for the Austrians.  Over the course of two turns both Divisions on the French right failed tests and were removed from the table.

10.  Fighting is still continuing around Peising

Back at Peising the fighting was continuing the second Battalion had deployed from the village to shield the rear of Battalion which was already engaged but at the cost of abandoning the village which the Austrian's quickly fully occupied.  The Austrian attacks to the east of the village were starting to falter as they were unable to make headway against the better quality French.

11.  Two regiments of my light cavalry holding Austrian columns at bay

Ignore what looks like Austrian re-enforcements at the top of photo 11, those are some of those troops who are no longer 'combat effective'.  There are still eight battalions of Austrian infantry and a regiment of medium cavalry in play though most of which are in good shape.  Facing them are around half that number of French.  This would be a good time for additional French troops to arrive, which they do in the shape of six battalions of infantry, 2 skirmisher bases and a battery of artillery all entering south of Peising (Turn 7 of 12).  These are not the greatest of quality but hey, quantity has a quality all of it's own as someone once said.

The newly entering troops slogged forward through the woods, to enter the open ground effectively blocking any chance of the Austrian's exiting the table at this end of the board.  

12.  The situation around Poigen at the start of turn 8

Things had now turned around quite dramatically  Over on the right I was able to occupy Poigen and despite still being on defensive orders at least start moving units towards the centre of the battlefield.  Orders were sent from the C in C to change orders to attack  which would free them to move to support the left wing in the next turn or two.  The situation over on the left was now looking to be more stable anyway and had a decent counter attack developing all on it's own.  A quick tot up of victory points showed that the Austrians were a long way behind and had no chance of pulling things back.  On the plus side they controlled both sectors of Peising but against that their losses were substantially higher than the French and the exit points were both under French control.  Accordingly at the start of what I'm almost certain was turn 9 we called the game as a French win.

This was my first Napoleonic game against real live opposition in around thirty years and I have to say I enjoyed it and not just because I was on the winning side!  The rules played well, although as always I could see a couple of areas where a house rule might make things more interesting.  The game see sawed and for most of it I was convinced I was going to loose, and it was sufficient to have me trawling that electonical inter-web thingy to see if I could find a copy of Shako 2 and the scenario books for the Peninsula War.  Well I got given some figures for the peninsula a couple of years back so I may as well use them I suppose.  All in all a great day, with nice people, what more could you ask for.  Thanks to Paul Dawson for putting the game on, advice on the rules and providing lunch plus to his friend Paul for being good company and not laughing too much when my dice seemed to only have ones on them.

The next get together will be back to my place for an ECW encounter using my homebrew rules, which should be interesting.

Friday, 4 August 2023

The Gunfight at the OK Corral - a play through

Both of the Empires at War buildings are complete and for now I can proxy the other buildings needed, so it's time to play out the gunfight. The Land office is proxying for the Assay office which was next door to Fly's and I scratch built the second building on Harwood's two plots. The idea of the play through is to see what skill levels and draw speeds best replicate the actual outcome. That in turn will give me some indication as to where these should be set for fictional encounters.

These ratings are mostly guesses but they do have some background in fact. So as examples I have factored in any reputation for being proficient, known past participation in gunfights, previous behaviour and in Doc Holliday's case foolhardy levels of courage as he seems to have courted death perhaps due to his incurable TB.  So without further ado here are the details for all of the participants:

Name

Experience

Draw

Courage

Aware

Pistol

Rifle

H-2-H

Virgil Earp

Average

Average

6

6

6

6

7

Morgan Earp

Average

Average

6

6

5

5

6

Wyatt Earp

Professional

Fast

7

6

6

7

7

Doc Holliday

Professional

Fast

8

6

7

7

5

Ike Canton

Average

Slow

3

6

5

5

4

Billy Clanton

Average

Average

6

5

7

6

6

Frank McLaury

Professional

Fast

7

6

7

6

6

Tom   McLaury

Average

Average

7

4

5

5

6

Billy Claiborne

Novice

Slow

3

5

5

6

5

Wes Fuller

Novice

Average

4

6

5

5

5

All numerical factors are on a 1-10 scale with 1 being poorest and 10 being best.  The factors are for use with the Skirmish Wargames Group "The Old West" rules.  I'm using the (I think) second edition set printed in 1977.  The latest edition is still available via John Curry's History of Wargaming project.  (Sorry the table is a bit squashed up on the blog.  It looked fine on the draft and the preview, honest)

Although most accounts state he was unarmed I have elected to give Tom McLaury an 1871 .41 Colt Cloverleaf, this is a short barrelled Light Impact pistol holding a maximum of four rounds.  Other than that weapons are as detailed in my last post.  I didn't give Doc Holliday the Colt Lightning double action revolver for this game leaving him with the coach gun in hand and a holstered Colt single action Army revolver.  

In terms of the game plan of the two sides I'm going to follow the actions of the real individuals until the first decision point which is where the Earps turn into the lot between Fly's and the Harwood house.   As background it is important to realise that the Cowboys are badly disadvantaged.  The Earps know where the Cowboys are as Sherriff Behan inadvertently gives them that information when he says he has gone down there and disarmed them.  This means that the Earps don't need to react to a surprise sighting on turning the corner of Fly's, they do need to order the cowboys to hand over their guns though.  The Cowboy's need to react to the Earp's turning the corner (unless one of them is out in Fremont Street to give advance warning).  Both sides need to react to the other going for their guns.  Once all of that is out of the way the lead starts to fly.  I'm going to treat the narrow space between Fly's and Harwood's as if is indoors for visibility through smoke as it was a chilly day and smoke would hang, but that would be after the first round of shooting.

The Game

The Earp's start out in line abreast outside the Assay Office (proxied by the Land Office for this game).  Sherriff Behan has already stated that he has been down there and disarmed the Cowboys but has been ignored by the Earp party.  For purposes of this run through I'm using Figures from Empress Miniatures as the Earp party.  Virgil is in a black Stetson, Wyatt in a Brown one and Morgan is the figure in the brown Derby (Bowler hat to us Brits) while Doc Holiday is the figure carrying the rifle.

1. The Earp's ignore Behan (on the sidewalk) and set off down Fremont

The Earp's walk down Fremont until they gain a view into the vacant lot between Fly's and Harwood's.  The Cowboys are leaning against the wall of the Harwood house.  Frank McLaury is in a red shirt, his brother Billy wears a duster and Tom McLaury is in the pale blue shirt, these are the three armed members of the Cowboys.  Wes Fuller is at the back of the lot in a red-brown coat and hat, Billy Claibourne is the figure in the sheep skin jerkin and Ike Clanton is in a brown suit and Derby hat.

2. The Cowboy's initial positions

As the Earp's get close to the corner of Fly's they can see the Cowboys.  Because Behan had told them they were there no reaction test is required for them.  The Cowboys have to take observation tests to spot the Earps.  Tom McLaury is the first to see them and reacts at once shouting and pointing to alert the rest of the Cowboys. 


3. The Earp's first sight of the Cowboys, Behan ducks into Fly's

The Earps swing their line into the space between the two buildings and close in on the Cowboys while Virgil shouts "We are here for your guns".  This takes two phases to utter and in that time the gap closes to a mere five yards.  Meanwhile the Cowboys are reacting to the Earp's appearance.  Courage tests are taken all round. Each character has a courage rating of between 1- 10 rolling under that value using a D10 is a pass rolling above the target number is a fail.  Billy Claibourne, Wes Fuller and Ike Clanton all fail the test and panic causing them to run away.  Morgan Earp fails but only hesitates.  The result of the Courage test has four possible outcomes pass, hesitate, freeze or panic.  Pass allows the character to continue as ordered, hesitate is a single turn before they can act, freeze prevents action until a courage test is passed and panic causes the character to run away.  There are adjustments for wounds, near misses, being unarmed and having panicked and not recovered.

4. Both groups move towards the other

At this point Frank McLaury goes for his gun, he is a fast draw which means he will draw and shoot in one round.  Wyatt reacts immediately (professionals react immediately to events) and also draws he is also a fast draw so shooting is simultaneous.  Frank misses Wyatt (by a lot) but Wyatt hits Frank in the right arm causing a light wound.  Frank is stunned for a turn and drops his pistol.  Doc Holliday reacts to the firing and brings his coach gun to a firing position.  

5. The first two shots ring out

The next turn all hell breaks out,  Doc fires both barrels at Tom McLaury and hits him twice a serious right arm wound and a light body wound.  Virgil and Morgan are drawing their pistols. They are average draw speed so draw in one turn and shoot in the next.  Wyatt snap fires a second round at Frank McLaury but misses.  Billy Clanton fires at Virgil Earp and inflicts a serious body wound.  Virgil is stunned for 10 turns and is effectively out of the fight.  The lot is filling with smoke now so I impose a 15% reduction in the to hit value from this turn.

Wyatt now switches target to Tom Mclaury and hits him causing a serious body wound.  Doc fires at Tom as well but misses, Morgan also misses his shot at Frank Mclaury.  No shots are returned from the Cowboys as Frank has dropped his pistol, and both he and Tom McLaury are stunned while Billy Clanton is reacting to events.  Both Tom and Frank have dropped their horses reins and the horses bolt away from the noise of the gunfire taking the holstered Winchester rifles with them

6. The smoke clears with only Frank is on his feet from the cowboy side

Doc now takes time to aim his next shot at Billy Clanton for a turn.  As a result he kills him outright with that shot. Each turn spent aiming adds 10% to the chance of a hit and the dice rolled very low too.  Wyatt needs a turn to shift target but his next shot is fired at the same time as Doc's he hits Frank again inflicting a serious left leg wound which knocks Frank to the ground.  All three Cowboys who stayed to fight are now wounded or dead.  Wyatt demands their surrender which triggers a courage test which they fail.  Frank and Tom McLaury surrender and the Gunfight at the OK Corral is over.

The Aftermath

By my count fifteen shots were fired inflicting seven hits so this creates a hit rate way higher than the actual gun fight did.  This suggests that either my skill factors are too high or my dice are rolling high.  Maybe a to hit reduction for being shot out in the previous turn for average and novice characters of five and ten percent respectively would do the trick.

The casualties were less severe than the real thing though with only one death.  I think that I need to consider serious wounds as potentially fatal.  Perhaps treat a serious body wound from a high impact weapon as a fatal shot and all other serious wounds as fatal in 25% of cases from a high impact weapon and 10% for normal impact.

Lastly for solo play there can be a lot going on which needs to be tracked so some kind of marker to show wounds, perhaps hidden under the base might help.  Time to have a think about a final set of amendments.

I hope you found the series of posts about the Gunfight at the OK Corral interesting, please do follow the blog and leave comments if you did.

Thursday, 3 August 2023

What's been did and what's been hid!

 You may have noticed that I haven't made a painting table post for a couple of months.  I doubt that many people will have missed them, if I'm being honest.  A monthly exercise in showing a seemingly random selection of part painted stuff on an untidy table isn't that enthralling really.  Mainly I was using those posts as a way of motivating myself to clear at least some of the lead mountain, and to a large extent it worked.  In fact the posts were victims of their own success.  I have shifted a goodly amount of my 28mm back log but then I went and added to it!  I was also posting to show completed work which left very little positive news for the painting table posts.  So I have done away with them instead I will continue to post when I complete something or hit a milestone on a project.

On that latter point then; July has seen the completion of a mini-game board intended for a gunfight at the OK corral game (but you sort of knew that anyway).  The good thing about the OK Corral is that it can be modelled with a really small playing surface and minimal buildings.  My board is under three feet square and only required four buildings and a few odd and sod items of street furniture.  In terms of figures it needs eleven plus two horses and that includes Sheriff Behan who doesn't do anything other than act as mobile scenery.  I made a second, smaller version of the Harwood House using foam board and card to replace the shack which was proxying for that building.  I took an idea from another site to use the frames from an MDF kit to draw around (on the inside of the space where the kit parts had been cut out) to create the shapes of the foam walls.  That made things easier than having to measure and check angles for corners and the like.  All in all it worked rather well.

Smaller than the MDF parent model but the original was also smaller than the main house

Wargame terrain standard is good enough for me

I also made some amendments to the Old West Skirmish rules I use.  The main ones being that wounds no longer knock down the wounded party in every case.  My reading shows that the vast majority of people don't realise they have been shot and continue to act as if they are not seriously injured for a longer period then you would expect.  With that in mind I reduced the cases that cause a knock down to serious leg wounds and light head wounds from a high impact weapon.  Characters still have a moment of being stunned (the "what the hell just happened" moment) but generally stay on their feet.  Near misses cause a flinch effect that causes either a duck back into available cover or a pause unless a bravery test is passed.  Reaction speed and draw speed are now two separate things based on the fact that reaction time is a mental ability thing, while draw speed is a manual dexterity thing.   However, in a fast draw situation both shooters will have to check reaction and draw speeds to see who gets the drop on the other.  I also created a wound location and key rules summary sheet so that new players (or me) don't have to refer to the rules book. 


Sunday, 16 July 2023

Painting the Empress Miniatures Wild bunch figures


Stumpy and a Wargames Foundry Lady Friend


Regular readers may recall that I bought some figures from Empresses' Old West range at Vapnartak back in February, so it might come as a surprise that I have taken so long to paint them.   The truth is that it's some twenty years since I have painted 28mm figures using anything other than block colour and ink shading techniques.  I knew these figures deserved better than that so I had to go back to the basics as taught me my Lance Cawkwell of Galloping Major many years ago.  Lance was a graphic designer and transferred those skills to make him a very talented figure painter, way back before the days of glossy wargames magazines promoting GW and similar high end painting styles.  He taught me the triad method before it was called the triad method.  So that's what I decided to use for these figures.  Over the years I had settled on a system of block painting the mid-tone before shading and highlighting with the dark and light shades of the triad.  The key skill being to get those two shades in balance with the mid-tone which I don't always manage as I mix those shades rather than buying pre-mixed sets of three shades.

The Baxter's from Open Range - a fine looking bunch of bad hats

Overall I don't think I have done too bad a job on these castings.  I'm not fully happy with the facial features but they are good enough for the table top. The Empress castings repay taking your time and I admit to going back over a couple of things to get the best result.  If I was painting 28mm all the time I'd get better but it will be back to the 6mm stuff for me before long.  The only trouble being that I may have to learn how to paint those all over again now!

The Supporting cast from Unforgiven.  I particularly like English Bob

Saturday, 1 July 2023

The OK Corral - who carried what

A fairly straight forward post this time as almost all of the information is available on line.  I trawled several web sites to get as accurate a view of the guns used as possible.  Wikipedia's Gunfight at The OK Corral page was a good starting point.  I also Found the 'Guns in Movies' pages on IMFDB really useful Internet Movie Firearms Database - Guns in Movies, TV and Video Games (imfdb.org).  I picked up some odd snippets from the transcripts of witness statements given in the Spicer Hearings and lastly Guns and Ammo magazine has a four part article of the shoot out online starting with Gunfight On Fremont Street: O.K. Corral Part 1 - Guns and Ammo.  So without further ado here is what I have gleaned.

Tom Mclaury - probably unarmed.  However, some witnesses claim to have seen that he was firing even after he was shot.  It does make a certain amount of sense for someone carrying $3,300 in cash to have had something in case of trouble.  If he was armed it would have to have been something small enough to evade Sherriff Behan's cursory check before the fight.  Something like a short barrel Colt, or a clover leaf.

Frank McLaury - Carried a Colt Frontier which was a Colt 1873 Single Action Army (aka The Peacemaker) rechambered to fire a Winchester 44-40 round.  He also had a Winchester rifle in a saddle holster.

Billy Clanton - Armed in the same way as Frank McLaury.

Ike Clanton - Unarmed.  He had been pistol whipped earlier in the day and disarmed.  He was also probably still drunk from the all nighter he had just pulled!  Some witnesses claim he fired at the Earp's after fleeing into the street but I can't see what he would have used to do that.

Billy Claibourn - Unarmed.  Like Ike he had been pistol whipped earlier in the day and probably disarmed.

Wes Fuller - The simple answer is no-one knows.  Tombstone required all persons coming into town to give up their firearms and knives by lodging them at a livery, saloon or hotel unless leaving town.  There is no suggestion that Wes was amongst those Virgil was intending to disarm so he had probably already handed his weapons in.

Virgil Earp - carried a revolver, probably a Smith & Wesson Model three Scofield .  In his evidence at the Spicer hearings he stated that he had fired four shots in the fight but doesn't state what his gun was.

Morgan Earp - In the absence of any evidence one way or another I'm going to make a guess and say that Morgan would have used one of the common pistols available so either a Colt single Action Army or a Smith & Wesson Model 3.  For most rule sets it will not make any difference as the gun's performance is broadly similar.

Wyatt Earp - Wyatt may have carried a Colt 1873 Single Action Army Cavalry model but there is a strong possibility that he used a Smith & Wesson New Model 3 this was chambered for the Smith and Wesson.  .44 Russian cartridge.  One site I have seen states that he was definitely carrying the Smith as this was stated in the Spicer hearing.  I have read as much of the testimony as is available on line and cannot find any such reference.  In fact almost all of the witnesses use the term 'six shooter' when talking about hand guns so that isn't of any help.

Doc Holliday - He was passed the 10 gauge coach gun Virgil had collected as he could hide it under his long coat.  This was to avoid triggering trouble by being seen to be armed.  He also had a nickel plated Pistol possibly a Colt .38 Lightening double action but more probably a Colt 1873 Army Cavalry model.

Notes on the Guns

The Colt 1873 Single Action Army is the most commonly seen sidearm in westerns.  It was a very common weapon historically as well.  It came in three standard barrel lengths, Civilian (or Quick Draw) with a 4.75 inch barrel, the Artillery model with a 5.5 inch barrel and the Cavalry model with a 7.5 inch barrel.  Why the difference?  Well the longer the barrel the longer the combustion gases from the cartridge being fired have to accelerate the bullet and impart spin from the rifling.  There is a law of diminishing returns at play and once the gas has expanded to it's maximum extent no further acceleration can be imparted and the barrel will start to actually slow the round.  Plus longer barrels create issues with balance and speed in drawing.  Colt would actually make almost any length barrel required as a custom build.  They also made versions with shorter barrels such as the Sheriff or Storekeeper model at 3.5 inch both custom made or cut down by a gunsmith.  These had problems with lower muzzle velocities and due to the short barrel no extraction rod could be integrated under the barrel to remove spent cartridges.

7.5 inch barrel Colt 1873 Single Action Army

The Colt Frontier was a variant of the 1873 single action Army chambered to take the Winchester 44-40 round so that the same ammunition could be used in sidearm and rifle.

Smith and Wesson made popular revolvers which used metal cartridges from well before Colt.  They also featured a tip up frame where the gun hinged open to allow easy access to the cylinder for loading and emptying cartridges.  By the 1880's the Model 3 was the most common Smith & Wesson but it came in three variants, the American, the Russian and the Schofield.  Essentially the American and Russian were the same gun chambered for different rounds both were .44 calibre but the Russian had a bigger powder charge and so more stopping power.  The Scofield was chambered for S&W .45 but not Colt .45 ammunition.  It also had some improvements to the break mechanism and latch.  The New Model Three carried at the fight was a final version of the Model Three.  This was chambered for the .44 Russian cartridge although eventually it was available in a number of different popular ammunition sizes.

S&W Model 3 Russian (top) and New Model 3 (bottom) nickel finish

In fact most popular pistols were available in a wide (almost bewildering!) range of ammunition choices and barrel lengths.  The only one that I can be fairly confident in saying was not used at the gun fight was Wyatt's 'Buntline Special' as it probably never existed!  Colt did make Single Action Army revolvers with long barrels but there is no evidence of Ned Buntline ever commissioning any as gifts for famous law men.  On top of which Wyatt placed his side arm into a specially reinforced side pocket of his top coat and was able to draw it with great speed at the start of the fight.  A twelve inch barrelled pistol would not have fitted into such a pocket and would have been slow to draw. 

All of the above are single action pistols meaning that the hammer has to be cocked manually with the shooter's thumb with the trigger releasing the hammer when pulled.  Self cocking and double action revolvers also existed.  The difference being that a double action could have the hammer cocked manually or simply pulling the trigger would both cock the hammer and release it on one pull.  A self cocking action could only be cocked by a trigger pull.  These generally do not have a spur on the hammer or had a hammer concealed within the frame.   Most shootists favoured a single action as the trigger pull was lighter so less likely to pull the gun off target. Even then the trigger pull was some 6-8lb so much heavier than modern pistols unless 'fettled' by a gunsmith.  The Colt Lightning which Doc Holliday May have carried was a double action weapon.  This allowed second and subsequent shots to be fired faster than with a single action as the hammer did not require manually cocking before each shot but at the cost of reduced accuracy.

Coach guns (also termed a messenger gun) were essentially a sawn off double barrelled shotgun.  Usually in 10 or 12 gauge and loaded with buckshot.  Before the late 1880's or early 1890's these did not feature a choke so had a wide spread of shot and a fairly short range compared to modern sporting shotguns.  They were a side by side double barrel design and generally had hammers which had to be cocked manually (single action).  Some examples are known which had a single trigger set to fire both barrels although it was more common to have a trigger for each barrel.  Double action and self cocking variants exist but the most likely model to have been used at the OK Corral was a single action type.

As a last point I found the four part article in the online Guns and Ammo magazine about the shoot out.  That made the point that the hit rate of around 25% is in line with modern police findings in shooting incidents.  It seems that the tech really doesn't make that much of a difference it's the man behind the gun which counts.  To be honest most of the reading I did was nicely summarised in those four articles and if I had found them earlier in the process I would probably have had everything I needed.

Friday, 30 June 2023

Building Empires at War kit of Fly's photography studio

If you are going to do wild west gaming at some point the gun fight at the OK Corral is going to appear on your 'to do' list. Empires at War are the only supplier I'm aware of which do buildings in 28mm for the OK Corral.

The first thing to say is that the Fly's studio kit scales almost exactly to the ground footprint on the Sandborn map which is a big bonus to me and the kit looks great when completed.  Delivery turn around was excellent, I received my parcel within a week of ordering even though I used the cheapest postage option, Royal Mail second class post.  I bought two buildings, Fly's  lodging house and photography studio and the Harwood house because those two buildings define the space the gunfight occurred in.  In this post I will look at building Fly's lodging house and photography studio, I will cover the Harwood house build in a second post.


Unpacking the kit, there are over 90 parts.

The kit itself is rather nice although it is a more complicated build than either the Warbases or Sarissa Precision MDF items I have previously put together.  It also features an interesting double wall construction system.  All of the outer walls of the building come as two parts that glue together back to back, which means laser etching inside and out when completed.  There are decent instructions with photos which give a step by step walk through of the building process.  Although these images give enough detail to build the kit, I would have liked them to have been larger to allow the trickier  construction details to be clearer.   Perhaps adding them to the online store would be an option?

These are the four supports for placing the end panels on the hipped roof.  I was puzzled by them for a while!


Clamping the two part gable end walls together

I only have two minor points about the physical components firstly there are no internal walls (possibly because we don't know what the internal layout was) and second the roof assembly is rather fiddly.  That is because the flat roof panels are finished off with sets of separate slats.  Those are an exact match in shape and size on the two main roof panels but need trimming for the porch and the roof of the photo studio itself.  It's not a major issue with a set of side cutters, but I would have expected that with the precision of laser cutters those parts could have been pre cut to be an exact match.  Again to give the benefit of the doubt this may be because it reduces the risk of breakage when popping those parts out of the MDF sheet as they are rather thin.  What I do like is that they are laid out rather like the teeth of a comb with a spine holding them the correct distance apart which makes positioning fairly simple.

Here you can see the roof slats prior to trimming

As I mentioned the build itself was a level of difficulty higher than the previous kits I have made up but even then with a bit of thought it came together well.  I'd say that this is a kit where a dry run to make sure you are certain that you know where everything goes is vital.  Time spent there will ensure a good build.  I also found that it was necessary to build one part of the building and then clamp it and put it aside while the glue set rather than trying to do the whole thing at once.  However, by doing that I ensured a good fit on things like the two piece walls and roof sections (but see below).  If you are in any doubt, the photos on the web site of the finished model are a really useful aid to checking how things should go together.

Fixing the roof panel to the underlying frame

The only part of the build that gave me problems was the roof of the small photo studio to the rear of the main building.  This is a hipped roof where there are four roof panels two that form the main roof coming together at a ridge and two triangular end sections that lean inwards and are joined to the sides of the main sections (see image).  After building this I found some of the fit I had achieved wasn't great, this was down to me not the accuracy of the kit's parts though.  The best advice I can give is to build the underlying roof frame and then to use blue tack or double sided tape to test fit the four outer roof sections before getting busy with the glue!  I made a mess of that but was able to use some bits of the MDF 'sprue' to fill in the unwanted gaps I had created.

The roof of the photo studio.  I should have mounted the big roof panels so that the tops touched 

I only really ignored the instructions on one point which was the placing of the windows.  The instructions seem to be saying to fit the windows to the internal wall section with the window frames to the outside panel.  I did this with those on the smaller photo studio part of the building.  I found that it made any minor mismatch between the inner and outer wall sections really stand out.  So for the main building I set them into the outer wall section but with the rear of the window frame flush with the back of that part (see the sketch below).  I much prefer the look that way.

Sketch of my window placement looking in cross section from above

Overall this is a very nice representation of the actual building.  The double wall panel system creates a really robust basic structure.  The pre-painted parts show a bit of laser burn staining but I don't mind that as it looks like weathering.  If I hadn't liked it, it would be easy enough to touch up.  I didn't feel the need to add anything, other to hide my errors on the studio roof and a ridge piece to the main roof.  The only paint I needed to apply was some grey to the ends of the roof slats to hide where they had been trimmed.  This model will take pride of place on my table anytime a western shoot out game is played and I wouldn't hesitate to buy other kits from Empires at War.