Sunday, 22 October 2023

17th century armies - Part one The Spanish

Having done my best to define the key troop types used in 'Stand with me to fight the field' (I'm beginning to think that title might be a bit too long!) I had to think about the way the main armies of the period differed one from another during the period and how they evolved across it.  Before starting into defining them, there are a couple of things to bear in mind.

Firstly period accounts, including drill manuals and also modern sources especially wargame guides can be a bit 'loose' in their terminology!  They tend to mix and match Regiment , Battalia, Squadron, Troop and Tercio with no regard to what they actually represent.  The second thing is that the actual building block for tactical units was the Company for foot or the Troop (or it's equivalent) for horse.  These were not the actual tactical units but the parts which were assembled to make them.  Lastly seventeenth century generals seem to have had a liking for having infantry units of  the same size across their armies and to have a minimum number of them available to deploy, which means that they could be larger or smaller as circumstances dictated.  Plus different armies had different views on the optimal unit size and that could differ quite dramatically!

We are used to thinking about Regiments as the tactical unit but in reality these, along with Tercios were an administrative unit which were split or merged as required to create the actual tactical formations.  These tactical formations were described in a number of different ways depending on the nationality of the army and sometimes the time period.  Common terms used are Battalia, Battalion, Squadron, Escuadron and of course Regiment.

Cavalry also suffer from a change in terminology across the centuries.  I'm a child of the WRG ancient rules so I have distinct views on what light medium and heavy cavalry are.  I suspect Napoleonic gamers share a similar mental map to mine.  Seventeenth century writers seem to have had a different set of definitions.  Harquebusiers and Finnish Hakkapeliitta are defined as light cavalry in a lot of sources as they are not in three quarter armour!  I would define them as being the standard melee cavalry type used in the rules with Reiter's and Demi-Lancers classed as armoured to account for the three quarter armour.  Light cavalry are the likes of Croats and similar types who do not charge into melee as a matter of course.  So in my rules we have three categories of cavalry, Light Horse, Horse and Horse with the armoured dice modifier.  I hope that makes sense.

This is a big topic (actually a huge topic if I'm being honest) so I'm going to take a few posts to look at some of the main players within the timeframe 1618-1660AD within Western and Central Europe.  Starting with:

THE SPANISH

Why start with the Spanish?  Well in the early years of the 17th century this was the military benchmark every other European nation measured themselves against.  It was a multi-national force with troops not just from Spain but also drawn from  Italians, Walloons, Germans, Swiss and Catholic volunteers from England and Ireland as well.  The Spanish Army was a professional force with some excellent infantry.  Their cavalry was not so well regarded and they made use of mercenary troops to offset this.   

It's a difficult force to define as it evolved steadily across the period and the army of 1618 looks very different to that of the 1650's.  This isn't helped by a lack of sources in English (well a lack of any sources on what formations were used in which battles is pretty scarce full stop) and a number of web based sources having disappeared, Pierre Picouet's excellent site  on  the Tercios being a prime example, (although I have found bits of it on the Internet archives way back machine).  Other printed sources are hideously expensive as they are out of print.  So what follows is the best I could come up with from those sources available to me. 

The Spanish army was a conservative one which stuck with large formations deployed in depth longer than most of their contemporaries.  They also continued using large numbers of Arquebus armed shot well into the 1640s.  Despite being conservative in some regards their tactics were exceptionally flexible with their shot acting almost as semi independent bodies capable of acting separately to the parent body of pikemen.

THE CAVALRY

I'm starting here as it's fairly straight forward.  In 1618 the Spanish cavalry consisted of just three types:

  • Cuirassiers (Reiters)
  • Demi-Lancers
  • Harquebusiers 

Light Cavalry was added in the late 1630s.  Most of the heavier cavalry were supplied by German or Italian mercenaries.

 Painting by Sebastiaen Vrancx cica 1610- 1615 Showing a Harquebusier, Demi-Lancer and Reiter (from Wikipedia).  Probably the Siege of Ostend.

The quality of Spanish cavalry was lower than the infantry and did not improve until 1648 when large numbers of experienced German mercenaries became available at the end of the Thirty Years War.  Both native Spanish and Mercenaries fought in squadrons of around 150 - 250 horsemen.  Although on occasions much larger formations were fielded to maximise the number of ranks for firepower attacks.

Demi Lancers 

Armed with Lances and melee side arms.  These were only available in small numbers as General's Lifeguards.  I'd suggest deploying as single troops of 50 horse. They were formally abolished in 1633.  They seem to have fought in shallow formations to maximise the effect of the charge.  Reiters and Harquebusiers would provide fire support prior to the charge.  Give a weapon reach advantage for being lance armed and the melee bonus as armoured.

Experience: Veteran & Elite

Training: Trained

Fighting style: Shock

Cuirassiers (Reiters)

Cuirassiers aka Reiters

Armed with pistols and melee side arms. These were the commonest cavalry type in Spanish armies.  Fought in 6 - 12 ranks using fire by ranks although not in the caracole style.  Instead they stood and fired one or two ranks at a time before retiring to the rear of the body.  After 1635 they may reserve pistols for use in melee rather than shooting from a distance.  From 1635 to 1640 they started to reduce the amount of armour worn.  Between those dates they may have the armoured melee trait or not. After 1640 they can no longer count as armoured as their armour was on a par with Harquebusier armour.   Unit sizes of around 250 up until 1630 and 150 - 200 there after.

Experience: Before 1648 Raw or Experienced.  From 1648 Experienced or Veteran

Training: Trained

Fighting style: 1618 - 1635 Mixed firepower, 1635 - 1660 Mixed shock

Harquebusiers
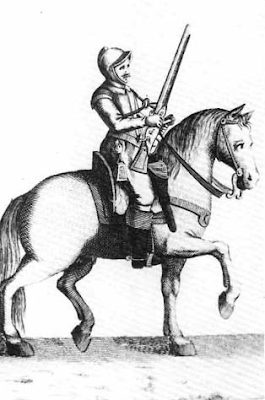
Harquebusier or possibly a Light Horseman (Note the lack of back and breast plate)

Armed with an Arquebus or carbine, pistols and a melee side arm and commonly armoured with a buff coat, helmet, and back and breast plates.  At the start of the period their main role was to provide fire support to the Demi-Lancers or Cuirassiers and fighting in melee was a secondary role.  As cuirassier armour was reduced they became more capable of fighting in melee on an equal footing.  They could also dismount and fulfil the same role as dragoons albeit with less effective fire arms.  As Cuirassiers began to disappear the Harquebusier became the primary cavalry force, probably from the 1650's onwards.  Unit sizes were probably the same as for Cuirassiers.

Experience: Before 1648 Raw or Experienced.  From 1648 Experienced or Veteran 

Training: Trained

Fighting style:1618 - 1635 Mixed firepower, 1635 - 1660 Mixed shock (if dismounted post 1635 count as mixed firepower.  

Light Cavalry

17th Century engraving of Croat light horse

Spanish armies started to use light cavalry later than most other participants in the Thirty Years War.  This was due to the nature of the warfare they engaged in which mainly consisted of sieges until 1640.  It was not until 1638 that they hired similar mercenary light horse types to those in use in Imperial armies.  These were sourced from Eastern Europe and would have consisted of Croats and Huzzars (Hungarian or Polish).  These would be unarmoured hussars rather than the Winged Hussar heavy horse.

They were armed with arquebus or carbines, pistols and melee side arms.  A lance was an option in Imperial service so this may have carried through to Croats and Huzzars in Spanish service.  Count as poorly equipped horse for melee purposes.  If they entered into melee they are at a disadvantage so would only do so against flanks or rear of units already engaged frontally or against a fleeing enemy.  They were hired in regiments of around 500 men but these seem to have been split into 2 or 3 squadrons in combat.

Experience: Experienced

Training: Trained

Fighting style: Skirmish

DRAGOONS

Armed with a musket and sword.  The Spanish only started to raise Dragoon units from 1632 onwards.  Prior to this Harquebusiers had provided dismounted fire support if required.  Like Harquebusiers Dragoons can shoot while mounted.  They may charge and fight in melee while mounted as described in the rules.  The quality of these troops was not particularly good and those engaged in fighting in Spain and Portugal had a very poor reputation.  Units were around 500 strong.

Experience: Raw or experienced

Training: Part trained or trained

Fighting Style: Firepower or mixed firepower

As this post is getting a bit lengthy I will look at the Spanish Infantry in my next post.

Wednesday, 18 October 2023

I'm not a well man, Carstairs!

Back in the far off days of my youth I read a set of humorous short stories about mountaineering which I can now find no trace of using my Google-Fu.  The two central characters were a pair of Brits; Carstairs and Carruthers.  One of the running jokes was that Carruthers was always complaining of various ailments while actually having the constitution of an ox (do people still say that?).  His running refrain being "I'm not a well man Carstairs" before successfully performing some herculean feat of physical performance.

Well here is the thing, unlike Carruthers, it turns out I actually am not a well man at the minute (Carstairs).  Out of the blue last Friday evening  I had a 'significant cardiac event' which is medic code speak for a heart attack.  On Friday the thirteenth for God's sake how unoriginal! As a result, I was rushed into the local cardiology unit where I was fitted with two stents as soon as they wheeled me through the door.  Well not immediately they had to have a bit of a look see and poke around first, but certainly within 15 minutes of arrival!  

Thanks to the wonders of the NHS I'm now back at  home and on a recovery plan and lots of tablets ( I swear I rattle if I move about too much) but I have to avoid sitting for too long.  I have to take things easy for a week or ten days to allow the stents to bed in which will have an impact on research and blogging,  Tabletop gaming is right out for the present as well.  Oh the joys of getting old ....... getting, be honest you are there already - it's the joys of getting even older now!  

But fear not dear reader I feel fine as a result of the stenting and will be back in full harness before too long.


Friday, 13 October 2023

Defining the troops in 'Stand with me to fight the field'


2mm Infantry Battalia 2:1 shot to pike so classed as mixed fire power
Now this looks like a big body of troops

Because I started these rules with a single battle in mind (Naseby 1645) I didn't give a great deal of thought to any troops other than the basic British Civil War types. As time passed and the rules started to take on a life of their own other troop types started to make their presence known! This started with the Scots at Marston Moor, led me to the 1645 campaign of Montrose and onwards to Cromwell in Scotland. Then other wars and campaigns started to impinge, what about Irish troops for Montrose or the Thirty Years War or the Irish Confederate wars or ..... well you get my drift!

I realised that when I started drafting the rules the definitions and traits used to calculate a units combat effectiveness (CE) actually acted as a 'pick n mix' troop generator and with only a little tweaking I could use them to create almost all of the 17th Century troop types found in Western and Central Europe.  Whether it will also work for Eastern Europe remains to be seen as I haven't considered the Polish Lithuanian Commonwealth and their enemies or the Ottoman armies as yet.

I will start with a recap on previous posts on the rules, A units ability to stay in a fight is measured by it's initial Combat Effectiveness (CE) rating.  As this reduces they become more brittle until they eventually break and flee on a CE of zero (assuming that they are not replaced with reserves before that point.   A unit’s CE is reduced by one step once one hit per base has been inflicted on the unit.  This makes larger units more robust than smaller ones as they have more bases. To offset that advantage large units suffer movement penalties. 

In turn CE is calculated by starting with a base value of five and adding or subtracting from that based upon training, experience and status.  That latter factor is based on whether the unit is elite or unwilling.  The resulting value is the units CE and has an impact on reaction tests and is reduced by combat outcomes and reaction test results. On top of those factors a unit may have a trait of being armoured, poorly equipped and for melee have a weapon reach adjustment.  Basic weapons differences for ranged combat are also included.  All units have a combat style ranging from Shock to Skirmish which create different combat adjustments and impact willingness to enter melee.

A units Experience, training and status will be tied into the army they are part of, based upon historical performance.  More on that in future posts though.

At the moment I have:

Reiters/Currassiers are defined as armoured with a weapon reach advantage for pistols in melee.  They fight as shock, mixed shock or mixed fire power.  They tend to deploy in deeper formations than either Lancers or Harquebusiers 

Demi-Lancers are Reiters armed with a Lance and close combat weapon but no firearms.  They are classed as shock.  Just about unknown in Western Europe in the period.

Harquebusiers are defined as cavalry with a weapon reach advantage for using pistols in melee.  They may also be able to stand off and shoot in support of Reiters if armed with carbines or similar early in the period.  Later they replace Reiters as the mounted melee arm.  As a result their fighting style may be mixed fire power, mixed shock or (pure) shock.

2mm Irregular Miniatures Horse using their Armoured Pistolier castings
These could be Reiters or Harquebusiers depending on the paint scheme

Poorly armed horse are defined as Harquebusiers who lack back and breast plates and rely mainly on close combat weapons such as swords.  They have the poorly armed combat adjustment and have no reach advantage in melee.  These represent units such as the Royalist Northern Horse.  They will count as mixed shock.  They are not classed as light cavalry as they are still a melee type.

Scots (and other) unarmoured lancers are treated as having a melee reach advantage for using lances.  Otherwise they count as Harquebusiers or poorly armed horse depending on the level of equipment.  In all cases they will be shock or mixed shock.

Irregular Miniatures 6mm Covenanting lancers

Light Horse are defined as skirmishers.  They have carbines, or arquebus, pistols and close combat weapons.

For Infantry I have;

Bodies of pike and shot are classed as mixed shock if pike outnumber shot or mixed firepower if shot out number pike.  Pike bases (only) gain a bonus in melee and a reach advantage.

6mm mixed fire power infantry, these are later Irregular Miniature sculpts


Same again but in 2mm and a deeper (Dutch style) formation

Musket only units will count as mixed firepower or firepower depending on their willingness to enter melee.

6mm Musket only formation

Scottish Highlanders are given mixed shock as a combat style and all fight as if pike armed in melee but with a pole arm reach advantage.  If they lack firearms they count as having bow support from the rear ranks which gives a melee bonus in the first round of combat.

6mm Highlanders from Irregular Miniatures (some of my earliest 6mm)

That about covers the main troop types.  Play tests will tell me if it all works as intended.


Tuesday, 12 September 2023

Stow on the Wold 1646 using 'Stand up with me to fight the field'

'Stand up with me to fight the field' is the name I have chosen for my home brew pike and shot rules.  These rules started way back when I was living a lot closer to the Naseby Battlefield than I do now.  Looking on my computer it seems that the first draft I saved was back in December 2002, clearly I'm not one to rush these things!  My original objective was to create a set of rules which would allow me to refight Naseby using 2mm figures.  To date that hasn't happened due to life and , well you know, stuff!  

I'm now planning on trying them out for the refight of Stow on the Wold, which I posted the scenario for in the previous post.  I have played a number of other battles solo using these rules and the they have gone out to various play testers but I have never inflicted them on real live opponents before! 

Having real live opponents has forced me to edit the final rules draft to create something other people will understand more easily.  I was pleasantly surprised to find that mostly the editing has consisted of adding cross references and moving sections around so they sit in the logically correct place.  There is actually very little amending of the text going on.

All of which is very reassuring but one thing it did remind about is that I haven't actually generated any traits for the commanders or calculated the over all combat effectiveness value (CE) of the two armies.  In turn that made me complete the army calculator spreadsheet I had left in limbo for a few years.  The value of an army is essentially the initial CE value of all of it's units, essentially the measure of the robustness of the army, sort of like hit points.   It's a rough and ready guide to the fighting power and resilience of an army for players who might not want to fight purely historical battles.  

I have also created a mechanism to give armies who historically had better or worse command structures restrictions on the quality of generals available.  I allocate a point budget equal to 10% of the army CE total for players to spend on generals and their command factors.  Each general has an initial point cost which is dependant on the overall command quality of the army.  That cost is higher for the less able armies.  Which leaves less points to spend on command traits!  So the Swedes at First Breitenfeld might have a base command cost of 4 points while their less able Saxon allies might be on 6 points and the League army under Tilly would be on 5 points.  

Bigger armies generate a larger command budget as the troops CE value is higher but they normally need more commanders so it sort of balances out.  Of course for historical refights I'm going to simply pre-set the ability levels to something which seems correct for each general on the day of the battle.

So for my Stow refight here are the runners and riders.  Parliament first.


The Army total CE is 382  plus another 35 points for the three generals coming to a total value of 417.


The Royalist army totals 311 CE and it's three generals add a further 31 points for a total value of 342 points.

The Royalists have a a seemingly huge disadvantage, as they did in reality.  The actual battle was over and done in about an hour.  So if the Royalists can hold off the Parliament juggernaut for an hour they have done better than was the case historically.

Friday, 1 September 2023

Wargame scenario - Last stand in the Cotswolds -21 March 1645

To be fully accurate it was actually counted as 1645 by contemporaries, although by our reckoning it was actually fought on 1 April 1646 (see footnote marked *).  The place is Stow on the Wolds and the battle that is about to be fought sees the last active Royalist Field Army brought to bay.  Traditionally it is seen as the last battle of the First Civil War.

Background

Sir Jacob Astley had been trying to gather troops from isolated garrisons along the Welsh borders to both lift the siege of Oxford and to re-enforce the garrison there.  The men he has gathered have been pulled together by stripping the isolated garrisons of the West Midlands. They are experienced soldiers,  many of them being Reformado officers serving in the ranks after their regiments have been destroyed or so reduced in size as to no longer need them.  As he pushed south Astley found himself being pursued by three Parliamentarian forces.  He is cut off from Oxford by two New Model Army cavalry regiments under Fleetwood and Whalley somewhere between Oxford and Burford so on 20th March he turns to make a stand near Stow.  Facing him are troops from the Parliamentarian garrisons of Gloucester, and Hereford along with cavalry released following the fall of the Royalist garrison at Chester.

The Battlefield

The exact location of the battle is disputed  the traditional site by Donnington village, north of Stow, has yielded little evidence to support the idea that a significant field action was fought there while a site closer to Stow does show evidence of spent musket and pistol balls.  That evidence also suggests a running fight or fighting withdrawal into Stow, which accords with period descriptions of the fight.  Accordingly I have placed the scenario on the outskirts of the modern town (just north of the Tesco Store if you want to visit!).

The Battlefield - played on a 4 x 4 foot table

The centre of the table is a ridge line with Stow on the Wold sitting on the main North South route, the old Roman Fosse Way. Branching off towards the South East is the road to Burford and Oxford.  The Fosse Way exits directly south of Stow and leads to Cirencester.  Running around the table edge from there in an anti-clockwise direction are roads to Gloucester, Evesham, Coventry and Leicester.

The Parliamentarians deploy first, any where behind a line running from the centre of the Eastern edge and the centre of the Northern edge.  The Royalists then deploy anywhere within the four central squares.  This represents the Royalists covering their route towards Oxford and having a line of sight onto the advancing Parliamentarian forces.

The Forces

Sorting out an order of battle for Stow requires an element of guesswork (as do most battles of the period). The best estimates I could find on line are as follow:

Royalist 1,500 foot, 200 dragoons & 900 Horse  CinC - Sir Jacob Astley (Infantry centre), Sir William Vaughan (Left  cavalry wing), Sir Charles Lucas (Right cavalry wing)

Parliament 2,000 Foot, 200 dragoons & 1,500 Horse - CinC Col Thomas Morgan (Infantry centre), Sir William Brereton (Right cavalry wing),  Col John Birch (Left cavalry wing)

This is my conjectural order of battle.  Dragoons placed between the Horse are blocks of 50 men

Royalist Horse and Dragoons I would rate as veteran and trained,  The foot should (using the deployment above) have two veteran and trained battalia and one experienced and trained battalia.  The artillery I would class as experienced and trained.  

Parliament are a more mixed bag.  Brereton's wing of Horse and Dragoons I'd class as veteran and trained although I might be tempted to drop one squadron to experienced and trained.  Birch's wing of Horse I would class as experienced and trained.  The infantry I would consider to be experienced and trained.  Again I'd class the artillery as experienced and trained.

The order of battle above is entirely fictional so do feel free to tinker with it.  At some point I need to get my hands on the Helion book on the battle 'The Last Army' as the above is the result of minutes of detailed research on Google!

I considered giving "In Deo Veritas" a run out for this scenario but in the end went with my own home brew set "Stand with me to fight the field" as I wanted some flexibility in unit sizes.  In Deo Veritas assumes units to be of one of three standard sizes which slightly grates when trying to create a historical OOB.  It should be possible to rework my OOB and battlefield plan to suit your preferred rules.

I'm planning on inflicting this scenario on Paul Dawson on our next get together so there will be an after action report once that has happened.

* Now for the footnote; this makes my headache!

England didn't change from the  Julian to Gregorian calendar until 1752.  The change had two effects the change over year lost 11 days and the date upon which the old year ended and the new year began changed from 25 March to 1 January.  So when looking at dates in original documents the English Gregorian calendar year runs from 25 March to the following 24 March but the period between 1 January and 24 March sits in the 'wrong' year.  The difference between the two calendars was 11 days at the time the adjustment occurred so 21 March 1645 Julian, is 1st April 1646 Gregorian  (it's to do with errors in the application of leap years).   

The date of the battle on a contemporary grave memorial is given as 21 March 1645 hence my saying 1 April 1646 for the corrected date.  That said, most historians change the year but ignore the missing days and state 21 March 1646, as it is less confusing.  Just to make matters even more 'interesting' Scotland and much of Western Europe had already changed to the Gregorian calendar so there was an international date line between England and Scotland!

It always intrigues me that tales of ghosts appearing on anniversaries of events seem to give the ghost the ability to update their appearance to meet the modern calendar date!  Who knew the dead were so savvy.

Thursday, 17 August 2023

How do you test a new set of rules?

A really rather useful  post over on Jonathan Freitag's blog 'Palouse Wargaming Journal'  >>Link<<  reviewing a new set of ACW rules from Helion got me thinking about the review process and what it is that is actually tested.  Over the years I have seen (and played) a number of rule sets that had good mechanisms but which were not a good reflection of the period of warfare they purported to cover.  Equally I have seen rules where there is a good game with good period flavour in there somewhere but the rules fail to properly bring it out.  Lastly there are those rules where everything is covered but they bog down under the weight of that detail (I have probably been guilty of homebrew rules like this).  Personally I believe that rules reviews should tell me what the reviewer would like from a set of rules and then tell me why the rules under review do or don't achieve that .  That's because I'm always going to place a higher value upon a review which is looking for the same things I am in a set of rules.

One thing that really puts me off any new set of rules is a lack of internal consistency.  For example defining the size of a standard unit and then using units representing an entirely different size in scenarios included within the rule book.  Next worst is not properly explaining rules, again something I really worry that I might be guilty of.  After a while drafting and redrafting there comes a point where you know what a rule is meant to do and somehow you simply cannot see that the rule as you have written it doesn't actually convey the meaning you have in your mind's eye.  Which I suppose is where good proof readers and editors come into their own.  One of my personal peeves with Helion is the poor proof reading and editing.  

For me the acid test is can I replay a historical battle with the rules and have (in no particular order):

- orders of battle as defined under the rules that properly represent the troops that were actually engaged on that day,

- decision points that reflect the key issues that the actual commanders had to deal with at the command level the rules focus upon,

- restrictions built into the rules that mirror the key restraints faced by the commanders in the period,

- did it have the feel of a battle of the period,

- was it fun or at least interesting to play (AKA the will I play these rules again test),

- the turn duration - weapon range- movement distance equation hang together properly (and be properly balanced).

I know that other gamers will have different priorities and some are not interested in historical gaming at all, but even in High Fantasy or Science Fiction rules their should be internal consistency not just in rules hanging together but in the trade off between cost/benefit and impact of the technology in those fictional worlds, I like my fiction to have some grounding in reality.

I can live a set of rules where I have to 'tinker' around the edges but not if the fundamentals are flawed.  I also like a set of designer's notes so I can see the process for choosing mechanisms and why aspects were included within or excluded from the rules.  I accept that a set of rules will not and should not include everything that could happen in the real world but it is nice to see the thinking that has gone into the choices made.


Monday, 14 August 2023

A Napoleonics game at Chez Dawson

Long term readers will have gathered by now that the one period I have really struggled to come to grips with are the Napoleonic Wars. So it may come as something of a surprise to find me driving to York, last Wednesday, for a game of Shako 2, Arty Cunliffe's rules for that period. This was all due to Paul Dawson commenting on the fact that some aspects of Altar of Freedom reminded him of those rules during our AoF game of First Manassas earlier this year. This was enough to intrigue me and intrigue crystallised into a suggestion that we give the rules an airing at our next get together. Which was why I was off to fight the Battle of Abbach (22 April 1809).

While I understand a little bit about the Peninsula War (thanks to the Sharpe Novels) and something about the 100 days I'm pretty hazy about the rest of the Napoleonic Wars.  So a game set in Bavaria in 1809 is not playing to my strengths.  Fortunately the rules were pretty easy to pick up and for a non specialist like me seemed to give a reasonable feel for the period.  I especially liked the command and control system and the really straight forward combat and morale rules.  The game is set at Corps level with manoeuvre units being infantry battalions, cavalry regiments or artillery batteries (lets call these units).  Each unit has a morale value which is the number of 'Hits' the unit can take and also the base score it has to roll under to pass morale tests and do other stuff.  In this game that value ranged between 3 and 5.  The Austrians also gained a bonus for having large units, not that we had any actual Austrian troops on the table instead Prussians proxied for them.  Large units take one more hit to destroy than their actual morale value and the Austrians have a number of these.  If you want to read a review of the rules by an actual Napoleonic gamer this link will let you do that: Mad Mac's Attic: Search For The Holy Grail - The Best Napoleonic Rules, Part 6 (madmacsattic.blogspot.com) 

The game scenario came from Michael Hopper's "Eagles over Bavaria" which is a set of scenarios for battles in the 1809 campaign written for Shako 2 but actually pretty much rules agnostic.  A French force initially consisting of two commands (which I think were roughly division sized) is on the table.  This consists of Boudet's Division of seven average battalions (Morale 4), two skirmish units and 1 Field Artillery battery and Pajol's Division of 2 elite battalions (Morale 5), 1 skirmish unit and three regiments of light cavalry.  Reinforcements will arrive on turns three, seven and nine.

The Austrians have superior numbers at the start, organised in four Divisions (IIRC).  They certainly had a lot more troops on the table than the French.  In total they deployed 16 Infantry Battalions, 4 cavalry regiments and 4 artillery batteries.

1. The Battlefield.  One square equals on foot on the table

The initial French plan was to defend all along their frontage.  The Austrian's were attacking.  Command and control in Shako means defending units cannot move more than 12 inches away from their formation commander while attackers must move towards the enemy at a minimum of half speed.  Orders cannot be changed without a direct order sent from the Commander in Chief to the formation commander by ADC, who may not get there on time or at all!  Lines of attack must be defined on a map by drawing an arrow showing the route and objective.

When I arrived at Paul's the table was already set up and initial  deployments were being made.  Paul  had also invited a second wargaming friend to take part, who to prevent me becoming confused has cunningly arranged to be called Paul as well!  This latter Paul was commanding the Austrians and I was to take the French.  The French right was deployed on either side of the stream north of the village of Massing with their flank anchored on the village of Poigen.  Their left was deployed around Peising with two elite battalions garrisoning that village.  The centre was lightly held by three regiments of Light Cavalry.  The Austrians were massed south of Seedorf and around Abbach.

The game victory conditions rewarded the Austrians for exiting troops via either of the roads on the south edge of the table, occupying Peising and Poigen villages and destroying French units.  As the French I had to hold the two villages the Austrians wanted, prevent their southern exit and destroy units.  Which, to be honest, looked like a big ask.

2. Battlefield from the east showing initial deployments

Apparently the Duke of Wellington once wrote that "The history of a battle, is not unlike the history of a ball. Some individuals may recollect all the little events of which the great result is the battle won or lost, but no individual can recollect the order in which, or the exact moment at which, they occurred, which makes all the difference as to their value or importance.".  I know exactly how he felt as I try to write up this game!  The telling is entirely from the French viewpoint, some of my recollections don't entirely gel with the sequence and time stamps on the photo's and some bits I'm struggling to put into the right point in the game entirely, and that's without anyone shooting at me (or asking me for a waltz).  Still I will do my best to give an outline.

The initial deployments are as shown in photo 2 above, the French are on the left, the Austrians (actually Prussians) to the right.  Units with blue glass markers are 'large' units.  Each turn commences with dicing to determine the order in which divisions move, this is a straight dice roll with no modifiers.  in the case of ties formations with attack orders move first.  The game started with the Austrians surging forward all along the line.  Things are not looking good for Napoleon's boys! In response I placed most of my infantry into line keeping a couple of battalions in column as a more mobile reserve and awaited the coming storm.  Infantry in column move further than those in line but can't shoot but gain an advantage in melee. 

3.  The cavalry and their supporting artillery attack

The first blow was a combined cavalry and artillery attack against my right wing (Photo 3).  I managed to form a hasty square with one battalion but the left most one failed to do this and was swept away.   After which the Austrian cavalry decided to ignore the infantry in square and retired to rest their horses. After one turn of melee become 'blown' and only recover after a turn out of combat.  Being attacked while your horses are blown is not a good thing!  Blown horses are noted by a red glass bead in the pictures.

4.  The Austrian infantry pick up the assault

Hard on the heels of the cavalry charge came the Austrian infantry.  They quickly moved into Poigen village and started a musketry dual prior to a bayonet charge.  This staggered some French formations but did little else.  The French musketry in response was distinctly lack lustre (I threw a lot of ones, I mean a LOT!).

5. Turn three and the first re-enforcements arrive

Meanwhile on the left the Austrians held a huge numerical advantage and pushed cavalry and infantry south down the road out of Abbach.  I moved one of the cavalry regiments in the centre to the south of Peiping with a view to launching a spoiling attack against the rapidly advancing Austrian columns.  I also moved one of the elite battalions out of the village to hold off the Austrians moving south towards the central sector of the battlefield.  Although they slowed the advance doing so allowed the Austrians to slip a battalion into the southern half of the village.  The French also gained much needed re-enforcements in the shape of two light cavalry regiments entering in the South West corner.

6.  The French centre is now wide open

However, that left the centre looking distinctly under garrisoned!  One battalion of infantry is having to hold off three Austrian ones and having sent one cavalry regiment to support my left wing I had precisely two remaining cavalry regiments in support.  Following a round of combat with the Austrian Dragoons opposite me that quickly dwindled to one regiment, as shown in Photo 6.  My remaining cavalry are blown and staggered.  Staggered is the equivalent of disrupted or disorganised so far as I can make out, certainly a staggered unit is at a large disadvantage.

7. The Austrian infantry pressing forwards on my right

Over on the Right the Austrian Infantry continued to close on my defensive line (Photo 7). I'm unclear how many turns of musketry occurred or if they attempted to close to melee but overall things were looking pretty shaky on this wing.  In a desperate attempt to reverse the tide of events I decided to go for it and attacked all along the line.  Austrian volley fire failed to prevent my infantry getting into melee and a series of poor Austrian rolls and good French rolls saw Austrians fleeing to the rear in large numbers.

8. The Austrian push around and into Peising village

Things were even more desperate on the left side of the battlefield.  Although so far the Austrian's had not been able to make their numbers tell, but it was only a matter of time before they did.  My elite battalion which had left the village was not just holding it's own against the Austrian assaults but was actually beating them.  I was in serious doubt as to how long that could be maintained though as Austrians were poised to leave the village to their rear.  The light cavalry re-enforcements plus the regiment diverted from the centre launched death or glory charges to hold the Austrian's back and had some success but at a cost.  I was beginning to look for the next set of re-enforcements arriving to rescue things.  In an attempt to hang on until then  I abandoned the village and moved the second Battalion of infantry out to support their colleagues facing the enemy.

At this point we broke for lunch; I'd like to claim that this was taken in the saddle surveying the field of battle, but in fact it was taken sitting very comfortably in Paul's conservatory discussing the pros and cons of domestic solar panels! Very nice it was too. 

9. The aftermath of the French close assault on the right flank

The French counter attack around Poigen was far more successful than I had hoped (see photo 9).  In fact the Austrian's were even worse off than the photo suggests.  Shako 2 has a cascade morale failure rule.  When units reach set levels of troop loss their chance of passing morale tests declines dramatically and entire divisions can simply melt away.  So it was for the Austrians.  Over the course of two turns both Divisions on the French right failed tests and were removed from the table.

10.  Fighting is still continuing around Peising

Back at Peising the fighting was continuing the second Battalion had deployed from the village to shield the rear of Battalion which was already engaged but at the cost of abandoning the village which the Austrian's quickly fully occupied.  The Austrian attacks to the east of the village were starting to falter as they were unable to make headway against the better quality French.

11.  Two regiments of my light cavalry holding Austrian columns at bay

Ignore what looks like Austrian re-enforcements at the top of photo 11, those are some of those troops who are no longer 'combat effective'.  There are still eight battalions of Austrian infantry and a regiment of medium cavalry in play though most of which are in good shape.  Facing them are around half that number of French.  This would be a good time for additional French troops to arrive, which they do in the shape of six battalions of infantry, 2 skirmisher bases and a battery of artillery all entering south of Peising (Turn 7 of 12).  These are not the greatest of quality but hey, quantity has a quality all of it's own as someone once said.

The newly entering troops slogged forward through the woods, to enter the open ground effectively blocking any chance of the Austrian's exiting the table at this end of the board.  

12.  The situation around Poigen at the start of turn 8

Things had now turned around quite dramatically  Over on the right I was able to occupy Poigen and despite still being on defensive orders at least start moving units towards the centre of the battlefield.  Orders were sent from the C in C to change orders to attack  which would free them to move to support the left wing in the next turn or two.  The situation over on the left was now looking to be more stable anyway and had a decent counter attack developing all on it's own.  A quick tot up of victory points showed that the Austrians were a long way behind and had no chance of pulling things back.  On the plus side they controlled both sectors of Peising but against that their losses were substantially higher than the French and the exit points were both under French control.  Accordingly at the start of what I'm almost certain was turn 9 we called the game as a French win.

This was my first Napoleonic game against real live opposition in around thirty years and I have to say I enjoyed it and not just because I was on the winning side!  The rules played well, although as always I could see a couple of areas where a house rule might make things more interesting.  The game see sawed and for most of it I was convinced I was going to loose, and it was sufficient to have me trawling that electonical inter-web thingy to see if I could find a copy of Shako 2 and the scenario books for the Peninsula War.  Well I got given some figures for the peninsula a couple of years back so I may as well use them I suppose.  All in all a great day, with nice people, what more could you ask for.  Thanks to Paul Dawson for putting the game on, advice on the rules and providing lunch plus to his friend Paul for being good company and not laughing too much when my dice seemed to only have ones on them.

The next get together will be back to my place for an ECW encounter using my homebrew rules, which should be interesting.