The saloon is from Warbases’ Cactus Creek range. It doesn't come with any assembly instructions and in this case that is a drawback as the second story and the ground floor are very similar. So I set too and dry fitted everything together before reaching for the wood glue. Two things become obvious the first is that the key part of the build is the ground floor front wall. This can be identified as different from the second floor one as it has holes for the supports for the balcony on the second story. Importantly it is also slightly taller than the front wall of the second floor. Matching two sides and a rear wall to the height of those two front walls allows you to tell which floor they are for. It is also pretty obvious that the front of the ground floor needs to be painted before assembly, as getting a paint brush in once its all glued together would be tricky. The floor for the second storey sits inside the walls of that storey rather than having those walls slot into holes in the floor. To be honest it sounds more complicated than it actually is, but a dry run is a must.
 |
| Just need to paint to roof a nice grey-black as tar paper |
The only other potentially tricky part is placing the supports for the balcony. I found that gluing the wall end in place first was best as there is more flex in the vertical part which allows positioning it into the socket in the sidewalk part of the base easier than doing it the other way around.
One thing about the Warbases' buildings is that the roof sections come without any texture, you might recall that I had to scratch build shingles for the livery stables. For the Land Office I papered the roof in toilet tissue and PVA to create a tar paper effect (complete with the odd wrinkle) painted in a dark grey it looks fine. I'll be doing something similar for the saloon roof.
I also dry fitted the wagon together, this is a Sarissa Precision model and does come with some straight forward assembly instructions. It is pretty easy to put together and is a very nice little model. I need to break it back down for painting which will be a fairly simple one colour scheme. Which brings me to the subject of painting MDF to look like weathered wood. The look I want is the old weathered silver grey wood look and I'm struggling to find a way of creating the effect which I like. Suggestions will be gratefully received.
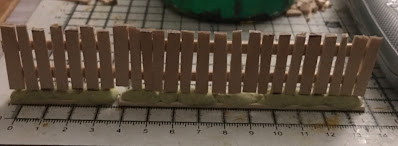
The fencing was made from coffee stirrers, match sticks and lolly sticks. The stirrers are used as planking and when split lengthways also make the stringers on the vertical planked fences. The match sticks are used for fence posts and lolly sticks for the bases. A good wood glue worked perfectly to glue the fence components together and some Milliput on the base served well as a foundation to stick the fence posts into. I think that they look the part and will do nicely as line of sight blockers.
I have made two styles of fence for the moment. The vertical planked ones for domestic use and the horizontal ones for corral or stockyard use. I started with just lolly sticks for the entire build but the planks felt over thick so for the mark 2 versions I went with coffee stirrers as planks. I also changed how the posts were attached so I used a single length of match stick rather than short sections, which frankly was a real pain.
 |
| Planks cut |
 | ||||
Framed (This is mk1 all made from lolly sticks)
|


Fencing versions 1 and 2 look equally good to me. Is the Saloon sign your own work or did it come with kit? Like it a lot! This town of yours is really filling out.
ReplyDeleteThe saloon sign was printed in MS Paint using a free to download western style font. The dog House is owned by G & B Dogge as in George and Barney. I thought it would be nice to have a bit of terrain that is a memorial to George. I will be making all future fences using the coffee stirrer versions. Mrs E has just bought me a box of 1,000 stirrers so I'm all set for a while.
Delete