Thursday, 22 June 2023

The gunfight near the OK Corral

Having completed the additional house rules for "The Old West Skirmish Rules" I needed to test them which I did with the game at the local modellers club.  The results were far too bloody so I decided to re run a historical fight where there is a lot of information to hand to give me a bench mark in case more adjustments were required.  That fight would be the Gunfight at the OK Corral, Tombstone, Arizona Territory, October 1881.  Except it wasn't at the OK Corral it was near the back gates to the  corral, along the street some 80 yards or so and into a vacant lot.  I suppose "The Gunfight near but not actually adjacent to the OK Corral" doesn't have quite the right ring to it.  

In fact a lot of what I thought I knew (mostly from movies to be fair) is wrong.  Luckily as the most iconic gunfight in western history it is pretty well documented and a lot of useful details are easily found online.  The best starting points, for me at least were the Sanborn Insurance map of Tombstone (dated 1886 so five years after the shootout) and a couple of web sites; The Wyatt Earp Explorer (John D Rose has put a huge amount of work into this site), and (believe it or not) an academic site with the trial transcripts of the attempt to convict the Earp's of murder for the killings.  The main Wikipedia article is also useful in establishing a basic narrative to hang more detailed information on.  This was enough for me to be able to create a scale recreation of the immediate area where the fight occurred.

The layout of the building plots in block 17
(image from John D Rose's excellent website)

The things we know for certain are that the fight took place to the southside of Fremont Street between Third and Fourth Streets in a vacant lot.  We can gauge the size of the building lots from an 1881 Map of Tombstone which shows the layout of building lots on the city blocks (see above).  I was interested in block 17 bounded by Fremont Street to the North, Allen Street to the South and Third and Fourth Street to west and East respectively.  The action was amongst the buildings in lots 1- 4 with lot 6 giving a rear access to the OK Corral.  The blocks were 300' square and had ten building lots along the north and south sides and two lots in the centre of each of the east and west sides.  All of these lots were 30' wide and the majority were 120' deep.  The exception are two "key lots" on each of the north and south sides (lots 11, 12, 23 and 24 above) which were 150' deep.  

The relevant part of the Sandborn insurance map

This is confirmed in part by the 1886 Sandborn map (above) which clearly shows the building in this block.  This in conjunction with period photos allows for a fairly accurate picture of the site of the gunfight to be put together.  The area of the gunfight is highlighted in green above showing the action spilled out onto Fremont.  The brown buildings are adobe construction, the yellow ones are timber framed.  The number in the corner shows how many floors and each building has a brief description of it's use.  For example Dwg for dwelling and Gro for grocery.  Buildings with a cross running from corner to corner are stables.  The Sandborn maps are accurate scale drawings which give these details of the construction, roof type, windows and use of buildings etc as this information was important for fire risk assessments and is pure gold for recreating the fight site.

All of the contemporary records place the fight in the open space between Fly's Photographic Studio and lodging house and the Harwood house with the action spilling out onto Fremont Street.  Wyatt Earp drew a sketch map in the decade before he died placing the action further east along Fremont but this is at odds with all the other evidence. and that was over forty years after the event.

After this things become a little more hazy, but this period photo helps a little.

Another excellent item from Wyatt Earp Explorers
This partially shows the buildings along Fremont Street

Note that in the above picture there are two houses between Fly's and Third Street on lots 1 and 2 (confusingly numbered 3 and 3a) rather than the single dwelling shown on the Sandborn map.  However, I'm sure that this image is fairly contemporary with the fight as the recorders office (marked 10) was replaced by a brick built City Hall, in 1882 I think, and definitely by 1886 when the Sandborn map was drafted.

The information above was sufficient to allow a start on building the terrain.  The really confusing part comes next determining who was stood where and what weapons were used on that fateful day.  So thats what I will cover in the next post.


Thursday, 1 June 2023

Murder on the Streets of De lancy

Murder on the Streets of De Lancy

Things have moved along in De Lancy following the events detailed in this post Small but Perfectly Formed: De Lancy's Reckoning - May 1869 (elenderilsblog.blogspot.com).  Jake died of complications from his wounds, but Roscoe Penny survived albeit with the loss of his left leg at the knee.  Henceforth he will be known as 'Peg leg' Penny!  Still in pain but no longer at Death's door 'Peg leg' has been transferred to the custody of the county sheriff and lodged in the town lock up to await trial.  Colonel De Lancy needs him to lie low for a while which is difficult while he is locked up in jail, so a plan has been devised to free him.  This involves Little Ned Tice and associates breaking Peg Leg out of jail.  

"From the De Lancy Star for June 1869.

Two slain in shoot out many wounded not all expected to live.

The streets of our fair town ran red with blood today as desperados attempted a rescue of one of their own from incarceration within the town lock up.  The infamous bandit Little Ned Tice is amongst those slain in a violent exchange of pistol, rifle and shotgun blasts on Main Street and it's surrounds.  The fight commenced just after sunrise with Tice's company of desperate brigands riding into town intent upon forcing the release of Roscoe 'Peg leg' Penny.  Witnesses state that the bandits dismounted outside of Read's Corral and attempted to approach the jail.  It was fortunate that an eagle eyed Deputy Henry Hall posted on the roof of the jail spotted the group of armed men approaching and was able to open fire.  His first shot hit Tice in the leg throwing him to the ground as well as alerting Sheriff Fred T Jeffries and members of the town Vigilance Committee who were within the lock up.

A veritable fusillade of shots then rang out forcing the few bystanders abroad at the time to seek cover and seriously wounding a second desperado.  Matters were not entirely one sided with the deputy who fired the first shot being wounded but continuing in the fight.  Sheriff  Jeffries and our brave citizens advanced down Main Street firing as they came.   It was at this point that the first fatality occurred when an outlaw, named locally as Ezra Bradshaw, fell to a well aimed pistol shot from one of the Vigilance committee.  Sherriff Jeffries was hit multiple times in the exchange which followed as was local man James Ewell who was unfortunate to jump over a fence directly into the sights of a Desperado skulking at the rear of the newly erected town bath house.

Matters now took a more serious turn with Tice's death.  He was felled by a shotgun blast to the chest but managed to wound his assailant with a final shot.  His partner 'Mexican Bob' was severely wounded at this juncture and is not expected to live.  This was more than sufficient for the surviving outlaw band who fled the town.  Our gallant defenders were unable to effect a pursuit as all were carrying significant wounds of their own."

My two willing participants

This was a short demonstration game using the Old West Skirmish Rules fought at the first weekend meeting of our modelling club.  I apologise for the lack of a detailed AAR explaining game play and looking things up meant I didn't get many pictures.

I umpired and two club members took five characters each.  Their respective parties started out at opposite ends of the table and moved towards each other.  Both sides sent men around the back of the buildings on Main Street, but the critical advantage was the guard on the roof of the jail.  He had a clear line of sight along the length of Main Street and a Sharp’s Carbine to make best use of that advantage.  I was using one inch to the yard as a ground scale and with hindsight that would have been better reduced to two yards to the inch.  I’d also reduce the skill levels as most shots hit their target even those from shotguns.  That said the important thing was the two players really enjoyed the game.  For almost 60 year old rules they stood up remarkably well and played reasonably quickly.  All in all well worth the effort of making the buildings.

Looking down Main Street

I just need to break up the mat with some small splodges of green and darker brown and a street grid.  Plus there is no where near enough street furniture or clutter either, so it's back to the crafting table for me.


Wednesday, 31 May 2023

Banking upon Success

From this to....(see end of post)

Yes you guessed it De Lancy now has a financial centre. A branch of The Freedman's Saving Bank to be exact. The bank actually existed for a few short years after the American Civil War but not perhaps in the South West where I am placing this one. The bank was set up to provide support to freed slaves, hence 'Freedman's' but by the early 1870s had gone bust. Given that banks were often named for their founders I thought I could use this as a bank founded by a Mr Freedman or as the actual Freedman's Saving Bank. That latter would make it an obvious target in the immediate aftermath of the war too.

The basic box frame with a start on the planking

And a start on the front façade with match stick framing

Just like the original wooden buildings I cut and applied planks to a frame.  However, in this case the frame wasn't timber scaffolding, it was a dog food box!  The build is mostly recycled cardboard also from dog food boxes.  I found that the recycling process used to make the card packaging creates a sturdy cardboard with a nice mid brown finish on the unprinted inner surfaces.  The packaging around tins of food is single ply while that around sachets is a thin corrugated card and both are great to work with.  They take paint and inks well and with a bit of stiffening from coffee stirrers hold their shape.  Best of all when given a layer of planking glued on with PVA wood adhesive they are fairly robust.

The planking effect is a bit rough and ready but I can live with that

The build wasn't particularly difficult.  I used the dog food sachet box as the frame as it had a 9.5 x 19cm footprint which fits well with other buildings.  I cut this down to the height I wanted (the original box would be great for a two storey building if you don't need access to both floors).   Planks were cut 5mm x 56mm from the single ply card .  I cut the doors and windows out and deconstructed the box for the frame so I could turn it 'inside out' as I wanted to hide the printed side under the planks and leave the brown as the inner walls.  I have settled on 20mm wide by 35mm high door spaces with a frame around the edge of the gap.  Matchsticks provided those door and window frames.  These I glued to the frame before planking.  A useful trick is to use multiples of the plank widths as the height from ground level to the window base to make planking easier.  Same at the top between the top of the frame and the roof line, not forgetting to allow for the size of the matchstick frame work around the cut outs.  once all the planks are glued in place edges can be tidied up using kitchen scissors and if you want a nice look glue an L profile edging strip around the corners to hide any ragged edges.  I didn't bother doing that for this build.  

Base added and side walk planked

To finish off I added a card board base under the building ensuring it extended 40mm beyond the building frontage to create a base for a side walk. I used some 5mm square section pine moulding rods from B&Q to lift the building and side walk off the playing surface.  I planked the sidewalk in the same way as I did the building sides.  Inside to help the card stay in shape a used more of the pine moulding as a rafter across the building to prevent the tops of the walls curving outwards and I added a counter, internal walls and a strong room.

Painting was acrylics on the frontage and staining to the other three walls using good old Agrax Earthshade on the side walk and a wash of highly diluted Vallejo Bone white  paint on the other outside walls followed by a light wash of Earthshade.

I can’t help but wonder how long it will be before someone either robs it or burns it down or both!


....to this a building with a decent Pedigree, chum

Friday, 12 May 2023

Street Map of De Lancy

Now that I have enough buildings to play a game I have had to turn my mind to how the town of De Lancy is laid out.  Previously I have stated that the town grew around an old stone block house built by the Mexican authorities back in the early 1830's so that has to be fairly central.  The Livery and Blacksmith's would be best on the outskirts of the town with corral space close by.  After that it was a case of slotting buildings in.  The initial street plan I eventually came up with looks like this.

De Lancy in1869

The solid grey blocks show buildings I already have the grey outlines are where I intend to add buildings.  The red lines are building plot boundary lines to aid me in deciding where to place stuff.  The game's ground scale is one centimetre to the yard which is slightly out compared to the figure scale.  As a result while the buildings are more in scale to the figures (I worked to roughly 1/56th scale) the ground scale for movement is about 2/3 of that.  This works for me as I prefer to have weapon ranges and movement lower than the building sizes rather than higher, I find it easier to reconcile slower movement and shorter shooting distances than I do faster and further, I clearly have more cautious shootists than average.

I'm hopeful of filling some of the spaces on Main Street and First Street before the end of the month. Longer term there will be some more MDF kit buildings and some scratch build adobe dwellings.   I have it in mind to add abank,  cafe, more stores and some residential housing in this first stage.

For my reference to town planning in the wild west I found a really useful web discussion that has really helped me plan the layout and especially with things like road widths and plot sizes.  It can be found here History 📆 - 19th century Western town layout: myth vs reality | Cyburbia | urban planning, placemaking, and more .  Its an interesting read for anyone who, like me, is on the far side of the Atlantic and too far away to visit the actual locations.

Thursday, 11 May 2023

The Painting Table - April 2023

Stand by for a shock, there is some space on the painting table! This is because s a few 28mm gunfight figures have been completed. I’m hoping that my grasshopper mind will not find a new project to fill it! In turn that means that the WW2 rebasing project will be on the back burner for a while, otherwise that space is definitely going to disappear.

As if by magic a space has appeared.  I'm betting it won't last!

Well this lot would quickly fill that space upstairs!

As well as those 28mm figures I also finished a couple more small buildings for De Lancy.  The town is starting to take shape now and so I have started to think about the town layout.

Three more border ruffians, two Dixon's and one possibly Minifigs

May is already looking like being a productive month.  I have bought a couple of metres of a mottled light brown felt fabric that will be a great start for use with De Lancy.  I think with some darker areas sponged on and the occasional grass green point it will make a nice arid high plain mat.  I’m also working on more buildings with the aim of being ready for a game late in the month.  I'm still running two work spaces as there is still a temporary building construction site downstairs on the kitchen table as De Lancy grows.  I'm holding off on major purchases of MDF building kits as our tow car recently bit the dust and we are saving to buy a replacement and as a result I don't feel I can drop a £50 or so for each of the Sarissa Precision kits I fancy. 

Basis for an arid terrain cloth.  The image appears darker than reality

 Other than that there isn't much to report.


Tuesday, 2 May 2023

Shacking up

What De Lancy doesn’t currently have are any homes. Not everyone lived over the store or out on the range so I need some homes. Period photographs show that in frontier towns these were often little more than shacks. So I thought about it a bit and came to the conclusion that I could make shacks especially run down ramshackle ones!

The basic shape of the floor and sides is all one piece

I decided on card clad with coffee stirrers.  Foam would be good for adobe buildings but I wasn’t fully happy with the material when I made the De Lancy store model as the walls felt too thick.  Strangely the card and cladding technique felt much more robust than the foam method.  The recycled card used in a lot of pet food packaging is great for this as it is thicker than cereal box cardboard.  Fortunately we have a dog so there is usually plenty around awaiting recycling.

Sides clad and assembled, roof under way (but wonky)

The card is easy to cut and fold the tricky bit is drawing up the building plan, and even that isn’t really too hard.  Cutting the stirrers would be easier with a mini band saw but a sharp Stanley knife and a cutting mat works OK.  Corner cladding was more card with everything glued together with PVA wood glue.  to finish I gave a liberal coat of brown ink (I wanted a darker look than the timber of the bath house to suggest tarred or creosoted wood.  The flat roof is the card with a coat of Vallejo German Grey to look like tar paper.   A thinned red wash for door and window frames with a white ink wash to give a distressed look and voila it's done.

The finished article (with lurking bad guy)

The build didn't take too long all complete in probably 4-6 hours, not certain as I did it in short bursts between other stuff.   The next one will be easier now I have established the technique, I might try a shotgun house next, or even a dog run house, (honest those are real styles) or I may just make more shacks.

Sunday, 30 April 2023

Let's clean up this town!

Cleanliness is next to Godliness or so they say, and as De Lancy has no church yet I thought that a bath house might be a half way decent alternative. I also had a couple of ideas on how to make some of the tented temporary buildings which often sprang up as a town was growing, so the bath house is located in just such a structure.

Basic framework done

The core of the building is made of cardboard with a balsa and coffee stirrer frontage.  The external timber footings are also coffee stirrers and the canvas is printer paper laid over the card and soaked in PVA wood glue.  A nice simple construction technique.  As always the key is to measure twice and cut once.  In this case that meant drawing the front elevation at full scale and then measuring the sides and sloped top on the drawing so I knew the dimensions to make the card tent top and sides.  I was still out by a small amount but the papier-mache covering hid that.  The trickiest part was gluing the front and back to the top and sides piece, but I got there in the end.  To create the illusion of a frame I cut some thin strips of card and glued them to the tent shape which worked rather well.  I put a groove down the centre of the coffee stirrers (length ways) to make each one look like two narrower planks and added some grooves for the ends where planks butted up against each other.

Frontage added along with 'canvas'

Painting was fairly basic; a wash of GW Agrax Earthshade over the wood work and to create the impression of shadows in folds in the 'canvas'.  I searched the web and found some useful signage that I reduced in size so it was roughly to scale. After gluing them to the frontage I added a wash of Windsor and Newton white acrylic ink to the top of the false front and some rolled up PVA soaked loo paper as rolled canvas over the doors.  and a half open curtain inside the doors.  I'm really quite pleased with the result.

First stage of painting completed

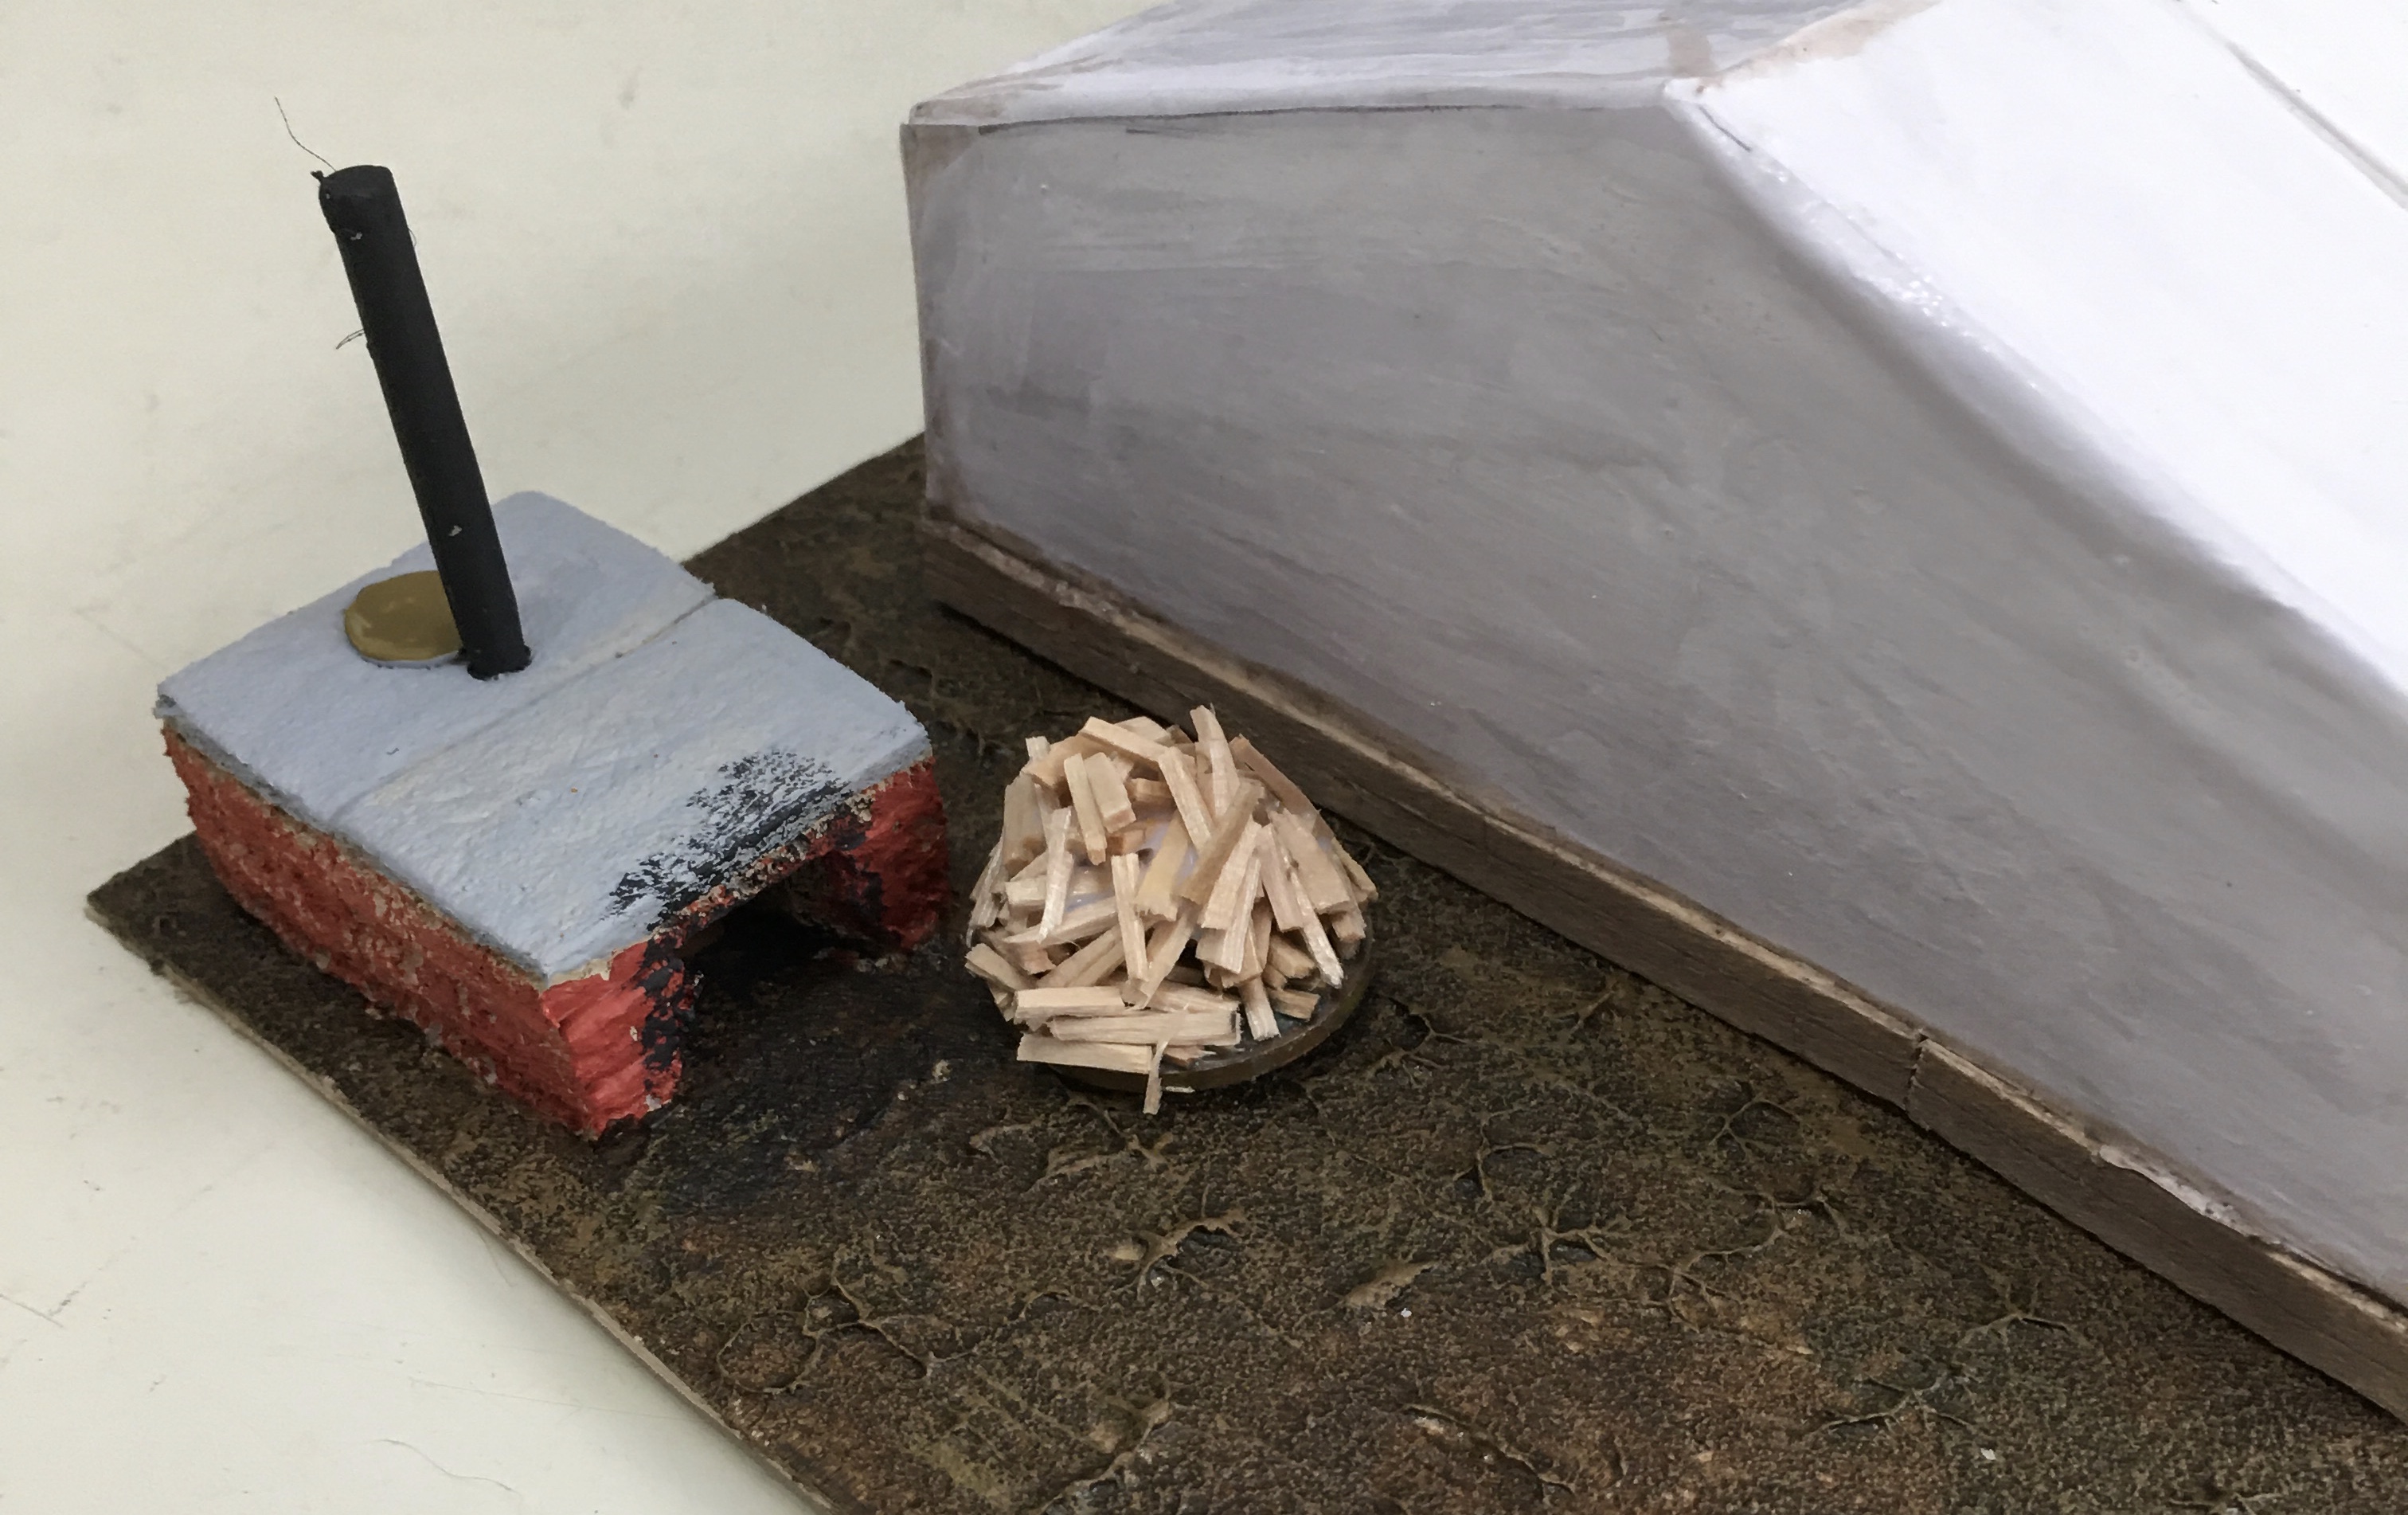
This being a bath house means that hot water would be available (for a small extra fee) so I needed to create the means of heating water.   Further Google searching gave me an example of wood fired water heating used in the 19th Century that looked easy to create.  This is a brick box with a door for fuel and an enclosed cauldron above it.   This was made from three layers of 5mm insulation foam, a skewer and the head of a roofing nail as the caldron lid. 

Around back is the water heating system and fuel

Closer view of the frontage

To flesh out the town I have also been making more fences.  There are going to be quite a few of these so to aid with that chore I created a framing tool to line everything up and mark sizes and fence post locations.  It isn't exactly high tech but it does the job.

The fence framing jig in all it's low tech glory
 
Of course you didn't expect me to stop at one new building did you?  No I didn't think so.  I have started work on a very basic shack or maybe it's going to be an outside store.  Either way it's an extra building.  As you can see in this case measure twice cut once didn't work!  Fortunately dog food card packaging is pretty forgiving and a new false floor hides a multitude of sins (and Tesco branding).  Cladding the exterior walls is a slow job and I need to go find a new Stanley knife blade as the current one is now very blunt so that's it for this post.   

Next up is a very basic shack