Wednesday, 9 October 2024

The Great War in the Air


 As previously mentioned I have been reading over some of my old blog posts.  A bit narcissistic I grant you, but I'm quite proud of some of the posts and after not rereading them for a few years they read rather better than I thought they would.  One of those I landed on was a WW1 air combat post, which of course meant I read all of the others on that topic.  Reading them two things came to mind, firstly I never did post the amendments I made to the original SPI rules and secondly where the hell did I put my notes and rules!  Worry not, I did find them, eventually.

Now that's a dogfight (except it isn't the picture is mock up created in 1933)

The starting point was the old SPI game "Flying Circus".  I played this to death back in the mid 1970's when it first came out.  So I suppose it was only natural that I would want to tinker with the concepts it through up. The original rules for that game can be found here FlyingCircusRules.pdf (spigames.net) and if you want to follow what I did you should take a look at them.  Like the majority of SPI games it used a hex gridded playing area but I didn't want to have to draw a large hex grid so I simply based the models on hexagonal bases and measured everything with a cardboard hex tool I made.  You can see that in photo one.  Aircraft don't stay in grid alignment with each other so when measuring line of sight and shooting ranges and arcs anything that crosses any part of the models base is 'on target'.

The measuring tool used for movement....


...and for gun range checks

The original rules are three dimensional in so far as aircraft can climb and dive  in the vertical plane but not much more, all other movement is in 2 dimensions within a height band of 1,000 feet, as you would expect from a map and counters game I suppose.  I wanted to add some out of plane manoeuvres like rolls and Immelmann turns that were the key tactics in aerial combat. Other things needed adding as well like energy gain and loss too.  The original game had one thing going for it though, which was that it could be learned in a couple of minutes!  Each aeroplane had a stall speed and top speed defined as movement points.  Making a turn used up movement points and different planes took different numbers of turns to climb to the next height level.  You could only shoot at a target which was within range and that had been in your firing arc for half of your, or their movement points.  Possible damage varied depending on the number of machine guns (single or twin) and the ammunition feed (belt or drum).  Lastly you had a limited number of turns firing and drum fed guns had to change the drum after two turns of firing.  That was pretty much it, a real beer and pretzels game.

Luckily smarter minds than mine had already looked at some of the things I felt needed improving so I borrowed and adapted.  First I changed the combat resolution table outcomes so they reflected pilot morale and experience by having most hits impact not the aircraft but the pilots confidence with any hit having a chance of causing a critical damage result which would have an effect on the aeroplane. As I said in the original posts those early aeroplanes were mostly a lot of nothing wrapped in canvas and wood, the vital systems were a small percentage of the target area.  Talking about the aeroplanes the original game only had statistics for around 20 of them, mostly allied types.  That needed expanding which given the lack of firm data on early combat aeroplanes was a big (read huge) task.  The amendments I ended up with are as follows.

Flying Circus Plus

These adaptions use a mix of advanced flying Circus (SPI), Richtofen’s War (AH) and home brew rules.

Turn Sequence (IGOYGO)

1.      Player 1 spotting

2.      Player 1 Movement

3.      Player 2 spotting

4.      Both player’s firing

Repeat the above for Player 2

Simultaneous Movement codes
Each turn note the aeroplanes movement on the play sheet using the following codes:

·         Number – that number of hexes straight ahead

·         Down Arrow – dive note how many metres

·         Up arrow climb - note how many metres (Max of 100 per hex)

·         R or L one hex side turn in indicated direction in the current hex one letter per hex side subject to a max of three.

·         Special manoeuvres – use code as shown below.

Diving
There are two standard categories of dive and a special manoeuvre available in FCP.  The two standard dives are:

Shallow dive – there is no reduction in MP for a shallow dive each 2MP spent moving a shallow dive loses 100 feet.  Turns may be made while shallow diving.

Steep- dive – an aircraft may only move straight ahead in a steep dive.  Each hex costs 2MP and loses 150 feet a steep dive.  Aircraft gain KE while steep diving.

Power Dive – see special manoeuvres.

Over Speeding (gaining energy)
Additional “speed” may be gained as a result of gaining energy by diving under power (over speed).  There is a maximum safe over speed before structural damage is risked.  This varies between aircraft as shown on the statistics sheet.  The original game rule of diving at a reduced speed is not used in the advanced rules.  Aircraft may dive at the maximum normal level flight speed or faster (due to energy gain) without any restrictions, but may suffer structural damage.

Gaining kinetic energy (KE)
Where an aircraft dives at its maximum speed or above it will gain kinetic energy (over speed) up to its maximum over speed allowance.  Aircraft gain one MP per KE point gained per turn spent diving at or over maximum speed.

Using KE
Once an aircraft has ended its dive it still holds the excess energy which must be bled off.  This happens in one of two ways.  In each turn of level flight KE movement points are lost in addition to any other speed reduction (through Drag).  Alternatively, the excess energy may be used to “zoom and boom”.  This entails converting excess energy (over speed movement points) into additional climb points.  One KE point provides an additional 200 feet of climb.

Damage from diving at over speed
Aircraft diving at more than safe dive speed risk structural damage.  Different aircraft have different safe dive speeds.  This is shown on the statistics chart.  The structural damage modifier will increase depending on how much they have exceeded the safe maximum dive speed.  Use the over speed damage table to check if damage occurs.

Damage from high stress manoeuvres
Where an aircraft performs a high stress manoeuvre roll on hit chart CRT3 to see if damage occurs.  First dice to see if hits are scored.  If so pilot resolution is not reduced as with MG fire instead move on to a critical damage test as per gun fire.  Ignore all results other than structural damage.  If there is structural damage check on the structural damage table for the type of damage incurred.  Fragile aircraft use range 1, normal range 2 and robust range 3 result columns.

Fragile Aircraft
Certain aircraft are considered fragile and have an increased chance of suffering structural failures when undertaking high stress manoeuvres.  Fragility is noted on the data chart for those aircraft.  They have lower resistance to structural critical damage than normal.

Loss of height and turns
Any turn in a single hex after the first hex side creates a loss of height of 50 feet

Front MG Arc of fire (simultaneous movement)
As firing solutions are harder to achieve with simultaneous movement the frontal arc of fire is widened.  It is now as shown below.

This simulates the ability to ‘kick in’ a little rudder to yaw the aeroplane.  Range remains the same.

Arc of Fire


Gunner operated ring and pin mounted guns

The gunner has to anticipate the pilot’s actions which can interfere with tracking targets.  He may also need to switch targets rapidly from left to right above or below.  To simulate this gunners fire at -1 on the CRT dice roll for all targets other than those below their aircraft where they fire at -2.

Spotting
Any aircraft firing is automatically spotted by the target aircraft.  Aircraft in blind spots cannot be spotted.  Line of sight is required to spot.  Clouds block line of sight.  Otherwise roll 2D6 at the start of the turn and adjust the result as follows (all factors are cumulative)

Aircraft firing weapons

+1

Aircraft within 8 hexes

+1

Aircraft below spotter

 -1

Aircraft ‘up sun’

 -2

Aircraft over 20 hexes from spotter

 -2


If the result is 7 or more the aircraft is spotted.  Any other aircraft in close formation are also spotted.  Close formation means in base to base contact and at the same height (+/- 200 feet).  If playing IGOYGO non-moving player’s aircraft check after the moving player has completed all movement

Ranges in 3D firing and spotting
To simulate firing in three dimensions the enemy aircraft must be within 1,000 feet above or below and not in a blind spot.  Only aeroplanes with the prop hang special move may fire directly upwards, and those with power dive fire directly below and only when those special manoeuvres have been used to gain the firing solution.  The chart below gives the actual range in hexes to use on the CRT

Height

Diff’ (feet)

Hexes to target >

0

1

2

3

4

5

6

7

8

0

-

1

2

3

4

5

6

7

8

200

1

1

2

3

4

5

6

7

8

400

2

2

3

4

4

5

6

7

8

600

3

3

4

4

5

6

7

8

-

800

4

4

4

5

6

6

7

8

-

1,000

5

5

5

6

6

7

8

-

-

NB 200 feet height difference equals one hex height difference in spotting

Combat damage and pilot resolution
In FC an aircraft has a damage limit equal to its speed.  Each point of damage reduces the aeroplanes speed by one point until it falls below stall speed when it is considered destroyed.  In these additional rules, particularly strong aircraft have a damage level higher than their speed as shown in the game statistics and fragile aircraft a lower value. 

Firing uses the tables below to ascertain if hits are scored.  These do no damage to the aircraft but reduce the pilot’s resolution (willingness to continue in combat).  Lots of bullets passing through your ‘plane will tend to do that.  The amount scored is subtracted from the resolution of the target pilot.  Once his resolution reaches zero his objective becomes survival and he will attempt to get off the board via any friendly table side.   Standard pilots have a resolution of 10.  Veterans and novices may have their resolution adjusted as players see fit.  In a campaign setting reduce resolution of all pilots by 1 for each friend shot down and killed.  Add 1 for each enemy aeroplane shot down to the shooter who got the kill shot.  Add 1 to all pilots who survive a game.  It is suggested that minimum resolution be set at 6 and maximum be capped at 18.

For damage checks roll a second D6, if the result is equal or lower than the result on the combat CRT add the totals rolled on both dice together and check the critical damage table. 

For example: a Fokker DVII (Twin belt fed MGs) fires at an SE5a at a range of 3 hexes.  A D6 is thrown scoring a 5 resulting in 2 hits.  The SE5a pilot’s resolution is reduced by 2.  As hits were scored a second D6 is thrown this results in a roll of 2 this is equal to the CRT score of 2 hits.  Critical damage may have occurred.  Adding the two dice rolls together gives a total of 7.  This is a control hit, checking on the control hit table requires a final roll of a single D6 this scores a 1 which reduces the SE5a’s turn code to the next lowest level.

Long Bursts
A player may opt to fire a ‘Long Burst’ before rolling the dice.  This adds 1 to the to hit di roll.  It uses up double ammunition and cannot be used if there is insufficient ammunition remaining or for drum fed guns there is only one ammunition point left before needing to reload.  After using a long burst roll 1D6 on a 1 the guns used have jammed and if this is the main gun, the pilot takes a reduction of 1 to his resolution for not being able to shoot.  This remains in place for the rest of the game.  Each following combat turn where the aircraft has flown straight and level for the entire turn roll 1D6 and unjam on a 6.

Special manoeuvres
These are all moves which require a climb or dive but which do not follow the FC rules so they are treated as special exceptions to the movement rules.  Some of these special manoeuvres are considered high stress manoeuvres and may lead to structural damage.  This will be detailed on each aeroplane’s data card.  To understand the moves the direction and facing of the aeroplane will use the descriptions in the image below. Front is always the initial direction of movement. 
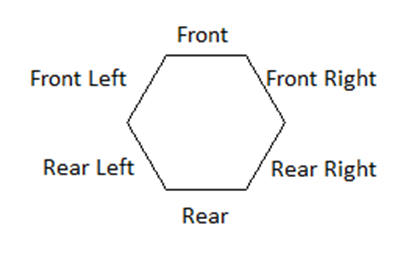


1.      Side Slip (Code -SS) -The aeroplane remains pointing in the same direction throughout the manoeuvre.  It moves into the Front Right or Front Left adjacent hex at a cost of 2MP and loses 50 feet of height.  The action may be repeated as long as there are MP available to use.  Alternating from right to left or left to right is permitted.

2.      Yo-Yos (Code HYY or LYY + number of hexes) -A Yo-yo allows an aeroplane to reduce distance over ground by alternatively climbing and diving.  A Yo-yo may start with a climb or a dive but must alternate climbs and dives in each successive hex during the manoeuvre.  The first step is always by entering the adjacent front hex.  It uses the energy gained in a dive to recover some of the height lost in the following climb.  Each hex moved through costs 2MP.  A hex in which the aeroplane dives reduces height by 100 feet.  A hex in which the aeroplane climbs gains 50 feet.  The manoeuvre may be carried out while flying in a straight line or combined with turns.

3.      Hammerhead turn (Code HT)HIGH STRESS.  The aeroplane moves forward one hex and enters a vertical climb.  it then revolves around the aircraft’s length (going from nose vertically up to vertically down) it then dives vertically in the same hex.  The aircraft may exit to any adjacent hex.  The manoeuvre costs 6MP.  For targeting purposes 3 MP may count towards acquiring a target for the aeroplane carrying out the action and all 6 for an aeroplane attempting to shoot at it. While carrying out this manoeuvre the aeroplane hangs almost stationary at the top of the climb and any aircraft firing at it does so with a +1 modifier to the to hit dice roll.

4.      Rolling reversal (Code RR)HIGH STRESS a half loop and roll out the modern Immelmann turn.

5.      Full loop (Code O) – The maximum size of the loop and so the number of hexes displaced to the rear is determined by the aeroplane’s rate of climb.  The aeroplane ends the manoeuvre facing in the same direction and the noted number of hexes to the rear of the starting hex.  The ‘plane will lose 50 metres of height in the loop.

Rate of climb

MP cost

End point

50

2

Start hex

100

4

1 hex to rear

150

6

2 hexes to rear

200

8

3 hexes to the rear

250

10

4 Hexes to the rear

300

12

5 hexes to the rear


6.      Displacement roll (Code DR) – In essence this is a combination of a side slip and a roll to slow forward movement while maintaining MP.  The aircraft moves forwards two hexes at a cost of 4MP

7.      Propeller hang (Code PH) HIGH STRESS– Aircraft moves forwards one hex and enters a vertical climb it then stays in the same hex but is assumed to be pointing vertically.  As with a Hammerhead The manoeuvre costs 6MP.  For targeting purposes 3 MP may count towards acquiring a target for the aeroplane carrying out the action and all 6 for an aeroplane attempting to shoot at it. While carrying out this manoeuvre the aeroplane hangs almost stationary at the top of the climb and any aircraft firing at it does so with a +1 modifier to the to hit dice roll.  After the propeller hang the aircraft may carry out a further propeller hang, a hammerhead or a rolling reversal

8.      Power Dive (Code PD) – HIGH STRESS The aircraft moves forwards one hex and then enters a vertical dive.  It gains KE in the dive at double the normal rate.  To end the power dive the aircraft enters a normal dive for half a turn and then level flight for half a turn.  Fragile aircraft check for structural damage on pulling out.

Charts

CRT 1 (twin MG belt fed)

Die/Range

1

2

3

4

5

6

7

8

1

1

0

0

0

0

0

0

0

2

2

1

1

0

0

0

0

0

3

4

2

1

1

1

0

0

0

4

4

3

2

1

1

1

0

0

5

5

4

2

2

1

1

1

0

6

6

5

3

2

2

2

2

1


CRT 2 (Double MG – drum fed)

Die/Range

1

2

3

4

5

6

7

8

1

1

0

0

0

0

0

0

0

2

2

1

0

0

0

0

0

0

3

3

2

1

1

0

0

0

0

4

4

2

1

1

1

0

0

0

5

4

3

2

1

1

1

1

0

6

5

4

3

2

2

2

1

1


CRT 3 (Single MG belt fed)

Die/Range

1

2

3

4

5

6

7

8

1

1

0

0

0

0

0

0

0

2

1

1

0

0

0

0

0

0

3

2

1

1

0

0

0

0

0

4

2

2

1

1

0

0

0

0

5

3

2

2

1

1

1

1

0

6

3

3

2

2

2

1

1

1


CRT 4 (Single MG drum fed)

Die/Range

1

2

3

4

5

6

7

8

1

0

0

0

0

0

0

0

0

2

1

0

0

0

0

0

0

0

3

1

1

0

0

0

0

0

0

4

1

1

1

0

0

0

0

0

5

2

1

1

1

1

1

0

0

6

3

2

2

1

1

1

1

1

NOTE:  Aircraft with both a single belt and single drum fed forward machine gun (e.g. SE5A) use CRT1 until the drum is empty they then use CRT3 until the drum is reloaded. 

Critical Hit Chart

Throw a second D6 if the score is lower than the result on the CDT above a critical hit has been scored.  Throw a second D6and add the scores together to get a score of 2 – 12 and check the table below.

Score

Effect

2

Crew Hit

3

Engine Hit

4

Structural Damage

5

Structural Damage

6

Control Hit

7

Control Hit

8

Control Hit

9

Structural Damage

10

Structural Damage

11

Engine Hit

12

Crew hit

Crew Hit
For multi crew aircraft dice to see which crew member is hit.  Roll 1D6 1 or 2 is KIA all other results are wounded.

Pilot hit if KIA aircraft is out of control and enters steep dive until it hits the ground.  If wounded reduce resolution by 2.  If Gunner hit KIA that gun position is out of action for the rest of the mission.  If wounded reduce pilot resolution by 2.  All fire by that gunner is at minus one to hit.  Further wounds to a previously wounded person reduce resolution by an additional 2 for each wound.

Engine Hit
Throw 1D6

Score

Result

1

Engine seizes.  Power reduced to zero.

2

Oil leak engine runs rough and seizes in next 6 turns 1D6 1 to seize then 1 & 2 etc.

3

Max power reduced by 1

4

Max power reduced by 2

5

Fire - 1 point of damage/resolution per turn until extinguished

6

Fire 2 points of damage/resolution per turn until extinguished

Extinguishing fire – dive the aircraft in a steep dive.  On a 6 on a D6 the fire is extinguished.  In a power dive it is extinguished on a 5 or 6

Structural Damage
No effect until the next high stress manoeuvre is attempted.  Then roll 1D6:

Score

Result

1

No Damage

2

No Damage

3

1D6 Damage

4

2D6 Damage

5

May no longer make high stress manoeuvres as a wing spar has cracked

6

Aircraft disintegrates

 High Stress Manoeuvres are:

·         Steep Dive

·         Any turn of more than one hex side or part hex side after the first.

·         A second turn in a consecutive hex after the first hex in the same turn

·         Special Manoeuvres as noted

Control Damage
Throw 1D6

Score

Result

1

Turn Rate reduces to next lower rate (e.g. A to B or C to D)

2

Unable to turn to Left

3

Unable to turn to Right

4

Climb cost increased by 1D6 steps

5

May only shallow dive

6

May only gentle climb

 No Special Manoeuvres may be used that require a move no longer available as a result of Control damage

Over speed effects
Throw 1D6 add any adjustment for how much over speed the aircraft is

Score

Result

1

No effect

2

No effect

3

1 Point Damage

4

2 Points Damage

5

3 Points Damage – possible structural damage test on next high stress manoeuvre

6

4 Points Damage - wing spars crack no steep dives or climbs

7 to 11

Severe damage wings detach plane breaks up


You don't have everything you need here (yet).  Next post I will put up the playing sheet on which the aircraft data is recorded and explain the abbreviations on that.  I will also post the data for the aeroplanes most commonly seen over the western front.  That will be another long post!

Saturday, 5 October 2024

Breaking the 150,000 page view barrier

It's not as momentous as breaking the sound barrier, or as noisy, but it is a milestone and I didn't even notice when it happened!  So thank you to everyone who has popped in and read my ramblings over the last 11 years.  Your continuing support is very much appreciated, unless you are a data trawling bot, you aren't a data trawling bot are you?  I thought not!  So here's hoping I don't need another 11 years to reach 300,000 views. 

Friday, 4 October 2024

17th Century Armies - Part 3 The Swedes (Part two)

A couple of things to add to the last post.  Firstly the Swedes had abandoned the arquebus before the start of the Thirty Year's War so all infantry units are musket armed.  Secondly in each brigade the squadron with the most pikemen is assumed to have formed the point of the arrowhead or diamond.  Personally I'm finding it difficult to accept that some brigades had no pikemen at all but in the absence of evidence I will go with that interpretation until a better one comes along. 

So, after looking at the Infantry I can turn to what seems (in theory at least) the easier part of the army! 

Cavalry

Native Swedish cavalry had two major disadvantages in the years prior to the Thirty Year's War.  Firstly their horses were neither large enough nor strong enough to carry a heavily armoured trooper as effectively as their enemies.  Secondly they struggled to manufacture sufficient wheellock pistols and armour to create troops capable of acting as armoured cuirassiers.  This is not to say that he did not have small numbers of Swedish cuirassiers available but these were mainly bodyguard units.  Gustavus' solution to this shortage was to use his other cavalry more aggressively, in a similar way to the French Huguenot Miller cavalry.  He took away the carbines from his Harquebusier style troops and left them with swords and pistols, and placed those troopers with armour in the front ranks.  To offset the lack of mounted close fire support for the charging cavalry he deployed bodies of musketeers between each squadron of horse in the front lines.  This would have been effective against an enemy who wanted to use Harquebusiers to soften up the Swedish cavalry prior to a Cuirassier charge but was risky against an enemy who closed to melee quickly unless the Swedish cavalry could hold them off!  Apparently at Breitenfeld Tilly was taken by surprise by the aggressive Swedish tactics as he had never considered Harquebusier style horse as 'Battle Cavalry'.  

Gustavus Adolfus at Breitenfeld 1632 with cavalry in background by Johann Jakob Walther

By the 1630's to support the more lightly armoured Swedish cavalry, heavier cuirassier and better equipped harquebusier style cavalry were provided by German mercenaries or allies.

I would treat the native Swedish/Finnish horse as shock or mixed shock with an option to class some as poorly equipped horse to reflect the lower proportion of troops with back and breast plates.  I would also treat the Finnish 'Hakkapeliitta' Horse as elite to reflect their reputation.  They are classed as trained and experienced or veteran from Sweden's entry into the Thirty Years War reducing to trained and experienced after Lutzen.

Native Swedish/Finnish horse probably deployed in three ranks to fight but probably manoeuvred in six ranks.  Cuirassiers should be deployed in deeper formations of at least six ranks if they are firepower or mixed firepower tactic troops or three ranks if mixed shock.  They are classed as armoured.  Swedish allied cavalry might be considered as unwilling if representing Saxons at Breitenfeld, and should be considered as trained but raw for that battle other wise treat as trained and experienced or veteran if long serving German mercenaries.

Formation sizes are harder to be precise about but seem to have been in the range of 200 - 400 men per battlefield Squadron.  The table below gives some formation data drawn from  Daniel S's blog post: The Swedish Army in the Battle of Breitenfeld 1631 | Kriegsbuch.  The whole site is a mine of information as are his posts on The Miniatures Page (TMP).

Swedish cavalry at 1st Breitenfeld

The table above covers all Swedish, and mercenary cavalry but excludes the Saxon allied horse.  The column titled "Harq'bus'" covers all non 3/4 armoured cuirassier type cavalry, these are both the traditional Harquebusiers and the more lightly armed Swedes and Finns.  The data for Cuirassiers covers all formations that are known to have been or may have been 3/4 armoured.  Based upon this roughly 35% of the cavalry were Cuirassiers and these tended to be in larger formations than their less well equipped brethren.  There were also between 400-500 Dragoons present which are not included in the table.

As a comparison at Lutzen the cavalry (may) have been split as follows:

Swedish cavalry at Lutzen 1632

I'm saying 'may' as my available sources don't show a split between harquebusier and cuirassier style cavalry.  Because of that I have made the following assumptions.  Those squadrons thought to have been cuirassier equipped at Breitenfeld are still equipped that way at Lutzen the following year.  That none of the new units are cuirassiers, except Ohme who formed the central cavalry reserve.  It would seem sensible to have that reserve made up of the heaviest available cavalry so Cuirassiers seemed to fit the bill.  Please note that I have excluded the Saxon and Hessian horse from the above table, as I'm trying to concentrate on the Swedes and mercenaries in their service here.  For completeness be aware that the Saxon and Hessian allies provided three additional squadrons of cavalry at Lutzen.

We can draw some (pretty speculative) conclusions from these two battles.  Cuirassier squadrons formed between 50 - 35% of the total and were deployed as very slightly larger units on average.  There was a fairly large variation in size on paper although in reality the smallest units were statistical outliers (i.e. only one at that small size in each army) probably acting as lifeguards or escorts.  The number of cuirassier equipped squadrons declined as the Swedish involvement went on and the percentage of German mercenaries increasing.  Native Swedish horse probably became better armoured over time as they acquired back and breast plates and helmets from battlefield loot. 

Cavalry may have company sized bodies of 50 or 100 shot attached and after 1631 a single ultra light gun may be deployed with each body of commanded shot as detailed in the rules on sub-units.  These bodies deployed in the spaces between front line cavalry squadrons.

Dragoons

I have struggled to find much information on dragoons in the Swedish army.  The order of battle for 1st Breitenfeld shows 400-500 dragoons were present.  None of my available sources gives any information for them being present at other battles but I find it hard to believe that they vanished after Breitenfeld.  I suggest that unless an OOB clearly states no dragoons were present that you should have a single squadron of no more than 500 dragoons present.  At Breitenfeld they were used to provide fire support to the cavalry on the left of the Swedish army so it is possible that at least some of the shot detachments supporting the cavalry wings in later actions were dismounted dragoons.

Artillery

Like the Dutch the Swedes supported their infantry with artillery at the brigade level.  However, forget the myth of leather guns, which if they ever saw use at all were probably not used for very long and not in Germany.  Instead use 3pdr ultra-light guns as infantry support (if you want to think of them as made of leather that's fine by me).  Each Brigade would have at least one supporting gun per squadron of foot and ideally would have two or even three.  These guns were not automatically deployed with their parent brigade, as at First Breitenfeld  some seem to have been deployed from the second line brigades to boost the support for those brigades in the front line.  At second Breitenfeld (1642) the 3pdrs were allocated in a large part to the cavalry wings at a ratio of one gun per division of commanded shot leaving only 11 to support the infantry centre of 8 brigades.   


Swedish 3pdr; the paint scheme may be a later addition


The heavier field artillery seem to have been mainly 24pdrs and 18pdrs.  The Swedish had a liking for massing the heavy artillery in batteries to the front of the Infantry centre,  these batteries could be extremely large.  For example at the crossing of the River Lech in 1632 the 72 available guns were all massed into three batteries of 24 guns each (including the 3pdrs)!  In the battles where I could easily find data the heavier guns never exceeded 34% of the total guns deployed.  The table below gives numbers of guns and their percentage of the total artillery deployed and the average number of 3pdrs for each brigade present.  As noted that doesn't mean these deployed with their parent brigade/regiment.

Some examples of the split in artillery allocations by shot weight

The data for Lutzen shown above is an estimate as the Swedish records simply state 70 guns were present of which 20 were heavy guns but doesn't detail their size.  A minimum of three 24pdrs were present as a salvo from three of these opened the Swedish assault.

In every TYW battle I can find details of the Swedes deployed more artillery than their opponents, be those Imperials, Catholic League or Spanish. Well over half the total number of guns available in the army were infantry support ultra light pieces as shown above. 

Army Deployment

Infantry commonly deployed in two lines of brigades to provide support and (as at Breitenfeld) create a reserve that could be deployed to cover a turned flank or replace a frontline brigade. I would use the three squadron Brigade between 1627 and 1631 and the four squadron brigade between 1631 and 1632 (Lutzen seems to have been the last use of four squadron brigades) then revert to three squadron brigades until some point prior to Nordlingen.  From Nordlingen and later the size of the individual infantry squadrons and their deployment pattern shifted to a simpler model as described in the previous post on the Swedes.

A cavalry reserve would be deployed to support the infantry centre although the bulk of the horse were deployed to the two wings of the army.  This could be as small as one squadron, as at Lutzen or two or three squadrons supporting each line of infantry brigades as at Breitenfeld. 

InfantryCavalryArtilleryDragoons
1st Breitenfeld163114,7427,45054400
Lutzen163213,0326,24060?
Nordlingen163416,0009,70068?
2nd Breitenfeld164210,00010,00070?

Split of troop types at major actions across the period

The chart shows the estimated numbers of the main troop types deployed at four major battles, it doesn't give a perfect analysis but gives some indication of the relationships between the various arms.  With the exception of 2nd Breitenfeld cavalry comprised between 33% - 38% of the total headcount.  This was split fairly evenly between the two wings with no more than 15-20% deployed as reserves for the infantry centre.  Because of the way infantry were deployed as brigades the number of manoeuvre units gave more flexibility to the cavalry who deployed and fought as individual squadrons until after Lutzen.  Typically the infantry were deployed in 7-8 brigades but cavalry could number between 25  to 30 squadrons.

A Swedish army is actually a joint Swedish and German force during the Thirty Year's War, although their mercenary troops were intended to fight in the Swedish manner and not in the formations used by the German or Imperial armies. They need some care in use as the Swedish cavalry can be brittle due to the shortage of armour. As a result they need to balance aggression with the need to allow the detachments of shot to have an impact before they charge. Infantry need to cover the cavalry flanks (and vice versa) when advancing. Although they had a reputation for aggression it was tempered with a need to ensure all elements of the army supported each other so that close combat was against an opponent who has been weakened before melee.

Sorry about the length of this post.  It just kept growing!  Everything above is a fast overview and this is an army that really deserves a deep dive into it's history and tactical use.   

Thursday, 3 October 2024

2024 a bit of an update

While I know it's not the end of the year (yet) I have been having a bit of an annual review.  It stemmed from my going back over my blog posts from the last couple of years.  Some of them were quite good though I say so myself.  One thing I noticed is that 2024 has been a bit quiet by my standards and has lacked variety of content.  The majority of posts were about 2mm pike and shot or the actual armies which were engaged in early 17th century combat in Western and Central Europe.  What was missing was game reports, mainly because I haven't played a lot of games, figure updates, mainly because I haven't done much painting and wargame show attendance reports, mainly because...well, you can see a picture forming here?  It's discouraging really!

All that said though, I have invested in a new set of rules "Strength and Honour" written by Mark Backhouse.  This was because they are intended for 2mm gaming and had good reviews.  There are some really clever mechanisms and I'm hoping to get a game in soon.  I'm also aiming to attend 'The Other Partizan' at Newark later this month, partly to see Strength and Honour in action but also to see the 28mm replay of Lutzen 1632 being staged by re-enacting friends of mine.  Of course some cash will be exchanged for additional toys!  My plan is to buy some of the Antonine Miniatures 2mm ancients blocks and bases from Warbases.  I could also be tempted by some western shoot out figures from Empress Miniatures as they have some rather nice figures based on the movie 'Tombstone' for both the Cowboys and the Earps.  Of course with any luck there will be some catching up with old friends too.

I have also been looking at the lead mountain (ugh!).  It has decreased in size fairly considerably over the last couple of years but there are still some considerable peaks to conquer in the 6mm pile.  Additions to my Dark Ages forces will probably result if I do get back to the painting table.  I'm also trying to resist a small foray into Wars of the Roses in 6mm.  It's been on my want to do list for a very long time and I'm not sure how much longer I can resist temptation for!  The counter argument is that I'm getting older and might never finish painting the figures I already have, let alone get a game in with them, but, you know, "Oooh shiny" and all that.

Right off to have a kip.  It's my 49th wedding anniversary tomorrow and I really need to be on my A game for the benefit* of the current Mrs E on the morrow!

* Not that kind of benefit, you lot have dirty minds!  I have decking to scrub and paint before the winter sets in and I do not want the memsahib having to do it now I'm feeling better.

Thursday, 19 September 2024

Seventeenth Century Armies - counting the troops

I'm busy with the second part of the Swedish Army post at the moment.  I had to take a few days out for recovery from having a kidney stone lasered but I'm back at the keyboard again now.  The enforced rest gave me time to think about one of the things I'm finding quite difficult.  Which is getting hard information on Swedish unit sizes, well unit sizes for any nationality really.  That left me thinking about how units were assembled for use in combat and their actual sizes.

I have already stated that the Regiment (or it's local equivalent) was an administrative body, pure and simple.  The combat formations were a different beast as they were formed from the regimental manpower pool but would have been merged or split as required to make up battlefield manoeuvre formations.  Companies or troops would have been kept together as these were bodies used to fighting as a group so I expect there to be some variation in unit sizes but not to a huge extent.  This is where the difficulties arise.  

The vast majority of the manpower figures I have seen are from pay returns or casualty returns.  These were drawn up by the administrative formation; the regiment not the combat formation so are not automatically an accurate reflection of the numbers in the combat units.  On top of which as mentioned before the practice of drawing pay for dead deserted or entirely fictional soldiers means the returns are not as accurate as we might hope.  (Yes I know you're dead Smith, now just stand there and be counted by the nice pay master there's a good lad).  I do wonder if that was worse or better in European armies which employed a large number of mercenaries as the contractor wants to increase his profit, but the engager wants to know they are getting value for money.

Either way we do know the theoretical size favoured under the various, and different, tactical doctrines from looking at the writing of the military authors of the day.  We can test that by the simple means of dividing total head counts by the number of tactical formations to see how close these come to the theoretical head counts.  And that dear reader is as good as it gets, unless you have a TARDIS about your person!

Saturday, 31 August 2024

Where have I been and what have I been doing?

Always assuming you are at all interested of course!  Well since the weather improved Mrs E and i have been , gulp, gardening.  We have a reasonably big garden by modern house standards and it has a lot of shrubs all around the edges.  Since last years heart attack I had not really felt like doing much garden maintenance until this last month or so.  That was when I realised that if it was left much longer catching back up before the weather turns again was going to be a huge task.  So the last six weeks has seen us cutting back shrubs, grubbing out brambles and nettles and generally tidying up.  we have done about 30% of what really needs doing and to be honest I don't really enjoy it and I am reaching the stage of contemplating looking at the price of garden maintenance services.

It's been a funny old month as for the first time in the 35 years I have been a member of the Sealed Knot I didn't attend the August Bank Holiday event.  There were two other years where there were no ABH event to attend, during the Covid and Foot and Mouth restrictions but I don't count those.  I'm slowly coming to terms with the fact that I probably won't be a battlefield participant again as age creeps up on me (creeps, who am I kidding, some days it feels like its galloping towards me whooping and hollering!).  Instead I think I shall give SK event photography a go, and so I have dug out my digital camera and started to get to grips with all it's extra bells and whistles which my previous film SLR didn't have.  It's interesting to see how the world of film photography now seems rather restrictive, but it's restrictions have actually given me a good grasp on composition and the balance between exposure time, aperture and shutter speed.  Well when you only had 36 shots on a roll of film you couldn't waste them so you thought about that stuff before clicking the shutter release!  What is all new to me is the additional abilities digital cameras bring to the party and mine is a fairly basic bridge camera, Lord only knows what the expensive professional level kit can do!

In other news I have regained some of my missing painting mojo which went AWOL last October while I was recovering from my unscheduled cardiac event (TM pending).  Over the last couple of evenings I have completed 96 of Irregular Miniatures' 6mm Pictish Spearmen who had been gathering dust on the painting table since this time last year.  I don't know of anyone else who has these in 6mm so even though the spears are much to short, and I'm not going to cut out the spears and replace them anytime soon, they have now been based and stand ready to repel any passing Romans, Dal Raitian Scots, Saxons, Vikings, Strathclyde Welsh and even other Picts!

96 Picts, possibly in search of a cave and some small furry animals to groove with *.

* Its a Pink Floyd reference