So to battle. As previously posted I have the men of Wessex with the Mercians being run by the solo play rules. I have decided that each command will have its own pip dice to reflect the poor command and control of the period so co-ordination between commands will be more difficult. I’m also going to move the centre commands first for each side as they are the ones commanded by the two respective kings.
 |
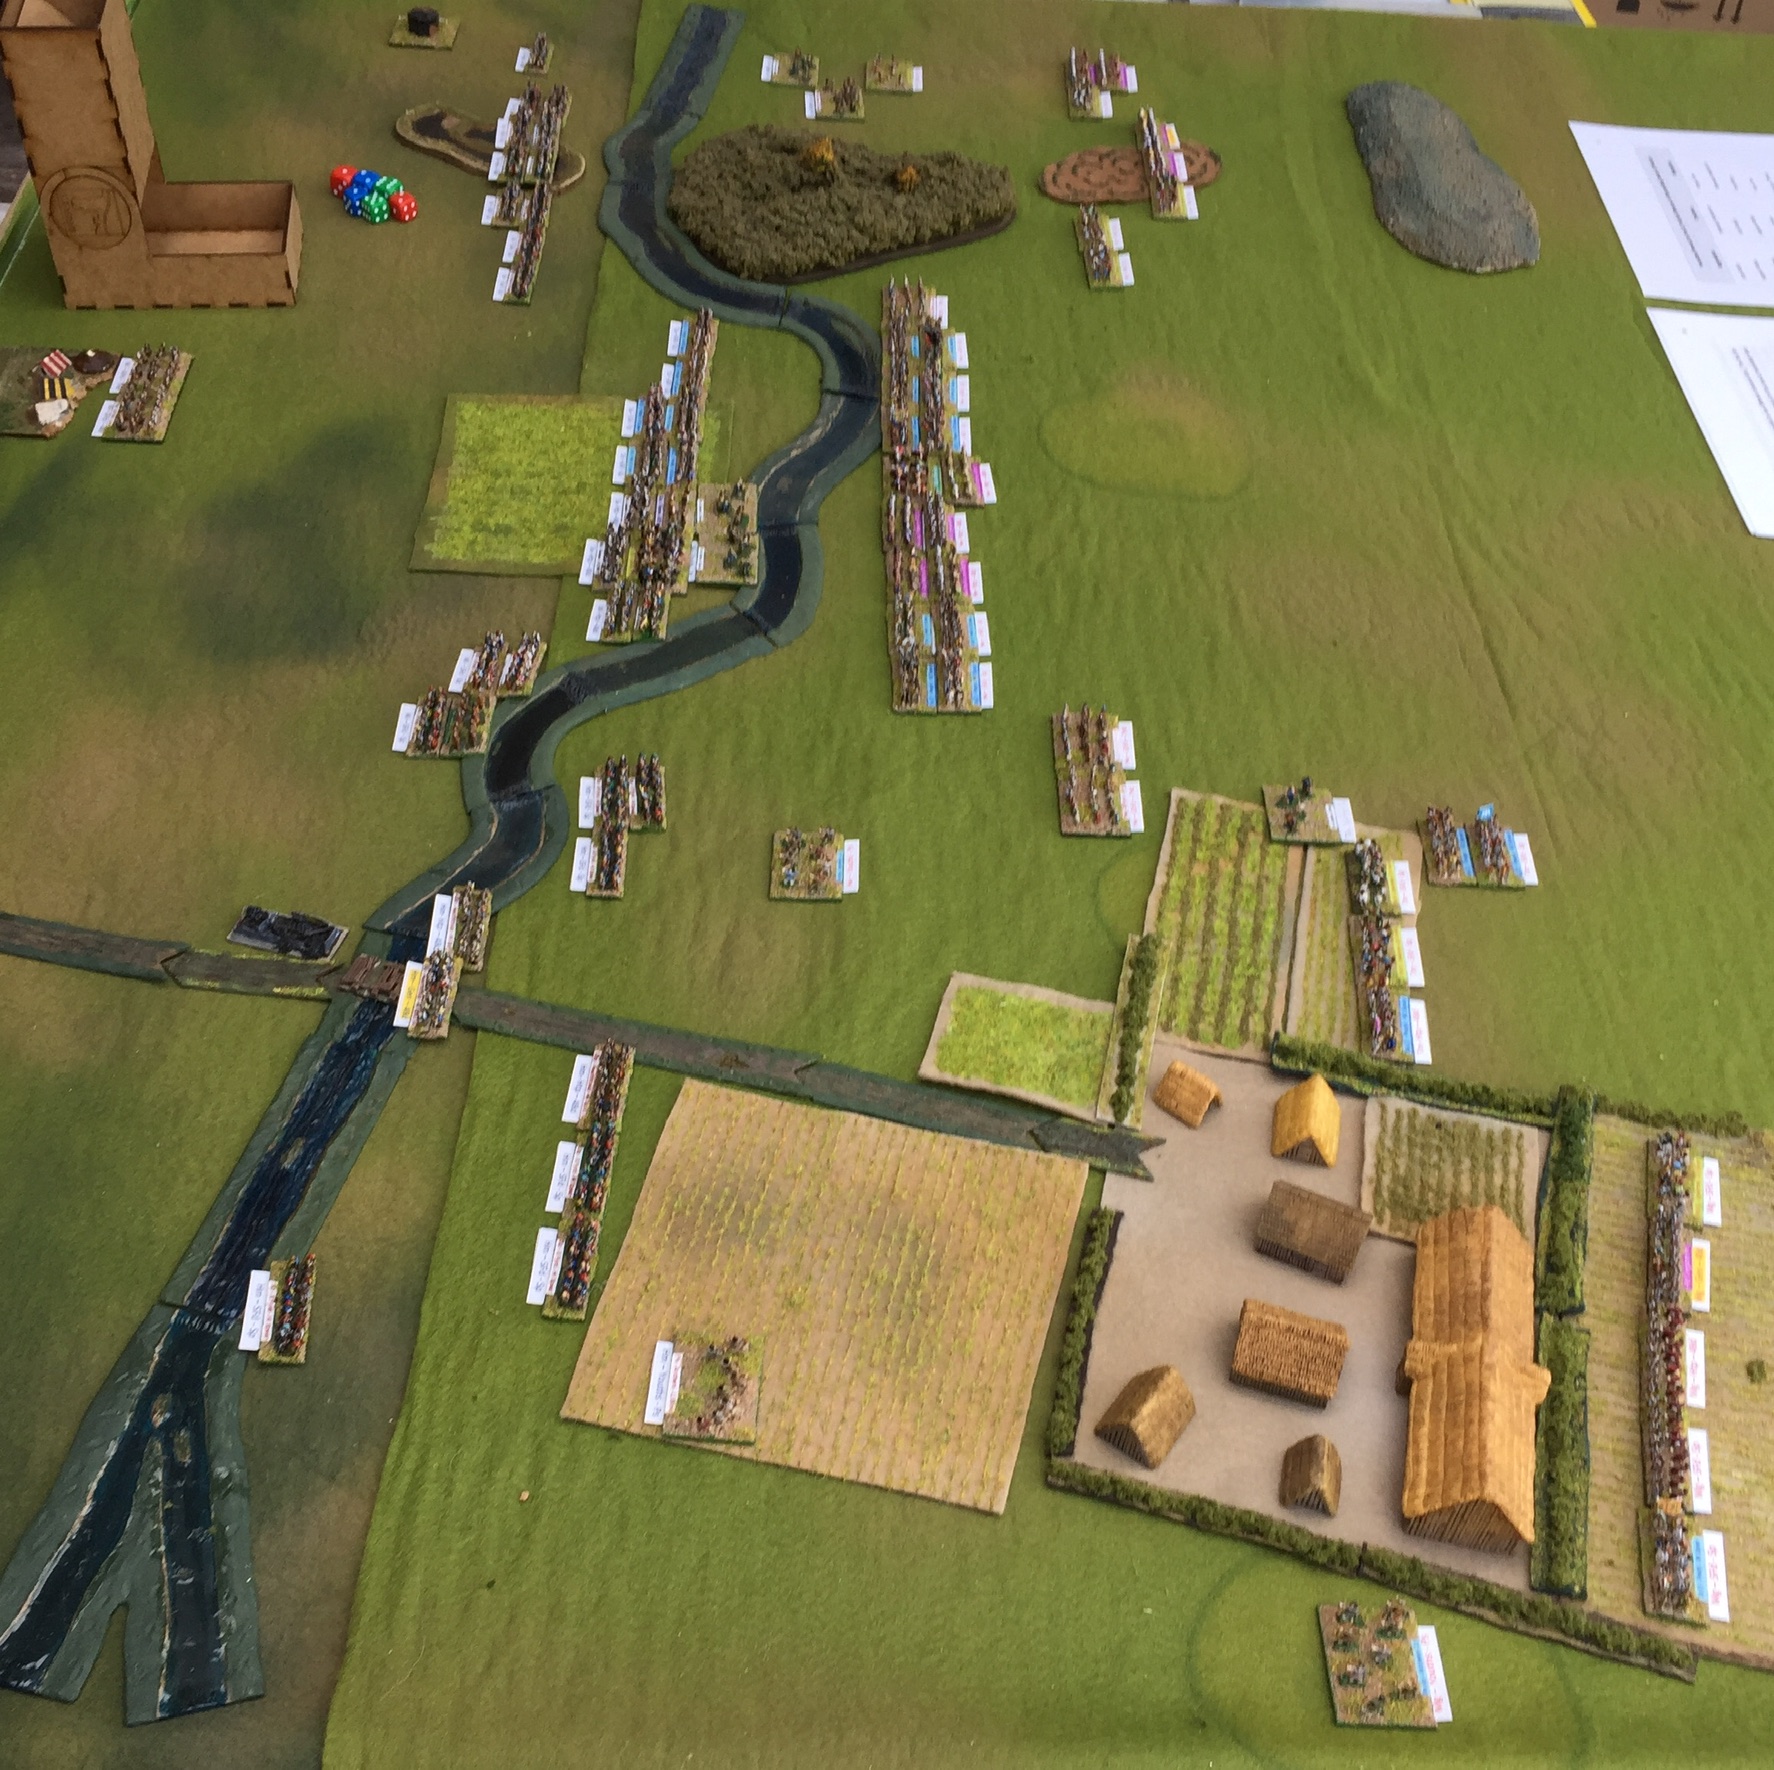
| 1. The initial deployments, Mercians furthest away |
The first couple of turns see both sides pushing forwards. The west Saxons are the first to have their formation come apart as the rush to get across the river before it turns into a contested crossing. The river turns out to difficult to cross. This means that only single elements or columns of elements can cross for each pip expended, movement is slowed and defenders gain an advantage against troops crossing.
 |
| 2. West Saxon start crossing the Coln |
The first to start crossing are the troops on the right of Wessex's line. The light infantry are not slowed but the shield wall's tight formation breaks up and the close order infantry are slowed. In the centre the line is moving up towards the river in a race to get there before the Mercian's can line the far bank and contest the crossing. Middle Anglo-Saxon's may not be the most tactically clever armies but even they know a disputed river crossing is not a good thing!
 |
| 3. The crossing continues on the West Saxon right. |
The crossing on the West Saxon right is unopposed as the Mercian command facing them is in disarray! They rolled aggressive but couldn't easily follow the instruction and became tangled up in the approaches to the village. Their line fragmented into a number of small groups. In the centre the Mercians are also rushing forward towards the river having rolled an aggressive stance and decent pips. On the far side of the table West Saxon light troops are over the river and fronting up to their Mercian opposite numbers. On that flank the Mercian command is slowed while they are traversing woodland.
 |
| 4. The view from the Mercian right wing. |
By the next turn the Mercians have reached the river with their central command but are unsure about what to do (a low pip score limited their options). Light Infantry are exchanging arrows and insults on the right and the Mercian left is in a real mess. The nice neat line has broken up around the village and with instructions to take aggressive action they are throwing small groups of men forward to attempt to come to spear thrust and sword stroke with the enemy before they can reorganise their shield wall after the river crossing. As a result they close as fast as possible but as the line attempts to move around the left of the village the formation ends in total confusion. This is one of the points with the solo rules, orders from the AI can result in odd decisions and if the dice swing back and forth between aggression and defence it can result in this kind of chaos. Players have the right to ignore results three times under the rules but I'm not using these yet in case I need them later. Probably a mistake to be honest, after all how much worse could a situation get than this?
 |
| 5. A closer view of the Mercian left wing, it's chaos over there |
Its one of the interesting things about solo games the AI mechanics create situations and as a player I like to create a narrative to make sense of it, it also gives me a story for the AAR here on the blog.
In the next turn the Mercian centre is following a second aggressive stance but on limited pips the entire command simply surges forwards and starts to cross the river, only for them to get a defensive stance and limited pips the next turn. So they retreat to form a defensive line on the river bank. I rationalise this as a rush of blood and a desire to come to grips with the invaders followed by the nasty shock when the water is cold and realising that there's a solid looking shield wall over on the other bank, so maybe we should stay this side and defend the river bank instead! Something similar happens on the Mercian left a defensive stance roll and maximum pips allows form defensive line to be an option and the fragmented line starts to reform. Possibly older more experienced heads have prevailed over there.
There has also been the first few clashes light infantry facing off over on the Mercian right saw a psiloi doubled by their West Saxon opponents and killed with the same thing happening on the other wing but with a West Saxon psiloi destroyed to even the score at one element lost each. Else where West Saxon Light Infantry are recoiling and fleeing from the Mercian shield walls.
The two armies have been facing each other for over an hour in game time now with no significant fighting yet. As you can see below the Mercian left wing is regaining some kind of cohesion and their West Saxon opponents are over the river but disorganised.
 |
| 6. The Mercian left starts to reorganise while their opponents are still struggling to reform their line |
This would be a good turn to get good aggression scores and high pips. Which is probably a good point to show how I'm handling the AI dice. I roll red for the left (port in nautical terms), green for the right (so that would be starboard) and blue is the central command. The relevance of the nautical terms is that boats and planes show red lights to port and green to starboard so the colour s help me remember which dice goes to which command. The larger dice give me the aggression (before adjustments) and the small ones the pips. These need to be thrown together as the pip score adjusts the aggression score low pip reduces aggression high pips increase it.
 |
| 8. The Mercian dice, red for port, green for starboard, blue you can guess. |
So having said this would be a good time to roll lots of sixes what we get is the above! Its about typical for the Mercian dice so far. The left and centre are feeling like attacking but don't have many options other than go straight in while the right has decent pips but is feeling a touch nervous. Hey ho (or what ever the Mercian equivalent is) you do what you can with what the dice provide. Its enough to start a moving into the village on the left and consolidating in the centre.
 |
| 9. The Mercian left more organised but still tangled up in the village |
Now the West Saxons take the bull by the horns and with a decent pip score their central command storms over the river and slams into the Mercian shield wall. The Mercians are pushed back with recoils but only one casualty. The flank commands continue to slowly advance and the first troops from the left hand command cross over the Coln to the Mercian held bank. This is getting to look like a fight now.
 |
| 10. Wudiandum still in Mercian hands |
The Mercians still hold the village, mainly because the West Saxons have been slow to move against it, but there is a fight coming. The fighting in the centre is hanging in the balance both Kings have been fighting alongside their household warriors. So far with no risk to either of them. The shield walls a pushing and shoving but there have been few casualties as yet.
 |
| 11. The aftermath of the attack in the centre both Kings in the thick of it. |
Which is where I am leaving it for this post. I will finish the game and post the last part of the AAR in a day or two.
Great looking game!
ReplyDeleteI like your 'AI' dice system for solo play, the contrary effects seem right for the period and the makeup of the armies. What if you were to use it for both sides? Mayhem ensues?
ReplyDeleteI can't claim credit for the solo system it is a Fanaticus product called De Bellis Solitarius , I spotted a link to it on a blog and thought that it would be useful. It does work rather well as long as you apply the options in the matrix for whichever tactical option comes up for the AI. I suspect that if both sides used the system half the time no-one would engage in combat.
ReplyDelete