No not the game of the same name, which I have never played, but my musings on how to represent that fine body of men (and sometimes women) in my draft set of WW2 rules. In keeping with Charles Grant's set 'Battle' which were my inspiration I wanted a one to one figure scale but with infantry based as the small manoeuvre groups that went together to form platoons. So for the British that would be the two component parts of an infantry section the rifle group and the gun group as separate bases. I'm not sure how I will base them yet, squares or oblongs seem to be the obvious choices.
I have the basic infantry combat mechanism sorted out. These are based on weight of fire creating pinned or suppressed results with suppression also having the potential to destroy a target group. Units can choose to use rapid fire which creates a higher weight of fire but that is balanced by a higher risk of ammunition depletion which dramatically reduces firepower until resupply occurs. A pinned result represents that target unit being unable to safely move while suppressed means unable to move or fire. I have some basic concepts for lifting pinned or suppressed status and also for the effect of a lower weight of fire on continuing to keep a unit pinned or suppressed. Weight of fire is calculated by adding together the value of all weapons firing at the target and it is randomised by a pair of opposed D6 dice rolls which gives a range between plus and minus five but trends towards zero. I'm not such a masochist as to want to count all the rifles and machine guns so each base will have a pre - calculated factor for rapid fire and sustained fire
Close assault will also use the same weight of fire data although automatic weapons and grenades will have a bonus to represent a mad minute. The results will be decisive with units more likely to be destroyed in close assault. Again I have a basic set of concepts but need to test them.
Fog of war comes from the use of blinds and a spotting system. I want to keep spotting rules as simple as possible so once units are spotted they stay spotted by all enemy units unless line of sight is totally lost. Firing units will have to have LoS to the target though, apart from tripod mounted HMGs where pre set defences will be able to use a limited type of indirect fire on pre plotted choke points if a spotter has a communication link to the HMG section.
Some of this stuff will work some won't survive solo playtesting. Time will show which concepts will need to be dropped or improved. I'm in a rush to get these done as I have a pile of 1940 British and German kit looking to get onto the table! I'm not trying for commercial levels of consistency just something to let me get the toys on the table and roll some dice!
Saturday, 25 January 2020

Thursday, 23 January 2020
Hooked to the silver screen?
Last weekend was a busy one in real life. On Friday I finished work and then Mrs E and I hot footed it down to Nottingham to see Kaiser Chiefs and Razorlight at the Motorpoint arena. It was a good night and Razorlight were particularly good. What confused me were the number of people who couldn't simply watch the gig. A huge number of people seemed to be treating the event as if it were on TV rather than live. Sitting there with smart phone in hand having facebook conversations taking selfies and in one particularly weird case buying tickets to see The 1975 while the Kaiser Chiefs were on stage!
Now before you think I was spending my evening staring over other people's shoulders to read their screens, I wasn't, it was so obvious I couldn't ignore it. One group of three 20 somethings rolled in after KC were on stage and left before they finished and can't have spent more than 10 minutes of the set not glued to their phones. It felt like 'I'm here, I have told the world I'm here, Kaiser Chiefs seen, check, OK lets go'. Given that the tickets were over £60 a pop this seems really rather odd. I suppose I must be getting old!
Saturday morning was taken up by various appointments and Saturday evening we went into Hull for another gig. This was Holy Holy a rather unusual tribute act, but unusual in a good way. You see Holy Holy are a David Bowie tribute act made up of well known faces from the music industry including Tony Visconti (Bowie's producer in the early 70's and a member opf his backing band on the pre spiders from mars albums), Woody Woodmansey (one of the original spiders from Mars), Glen Gregory (front man of Heaven 17) and James Stevenson (of The Alarm). So not really your average band.
Probably because the average age was higher there seemed to be less selfies and face booking going on. It's probably a nostalgia thing but I enjoyed the Saturday night far more than the Friday night. Although the fact that I wasn't driving and could have a beer probably helped.
Now before you think I was spending my evening staring over other people's shoulders to read their screens, I wasn't, it was so obvious I couldn't ignore it. One group of three 20 somethings rolled in after KC were on stage and left before they finished and can't have spent more than 10 minutes of the set not glued to their phones. It felt like 'I'm here, I have told the world I'm here, Kaiser Chiefs seen, check, OK lets go'. Given that the tickets were over £60 a pop this seems really rather odd. I suppose I must be getting old!
Saturday morning was taken up by various appointments and Saturday evening we went into Hull for another gig. This was Holy Holy a rather unusual tribute act, but unusual in a good way. You see Holy Holy are a David Bowie tribute act made up of well known faces from the music industry including Tony Visconti (Bowie's producer in the early 70's and a member opf his backing band on the pre spiders from mars albums), Woody Woodmansey (one of the original spiders from Mars), Glen Gregory (front man of Heaven 17) and James Stevenson (of The Alarm). So not really your average band.
Probably because the average age was higher there seemed to be less selfies and face booking going on. It's probably a nostalgia thing but I enjoyed the Saturday night far more than the Friday night. Although the fact that I wasn't driving and could have a beer probably helped.
Saturday, 11 January 2020
Battle - where it all started
Way, way back in the middle years of the last century a young Elenderil's Father used to read the Meccano Magazine. In that august tome were a series of articles by one Charles Grant. They were on a new and potentially interesting topic that would allow him to play with his Airfix soldiers and tanks in a more structured way than rolling marbles at them to see who fell over. Those articles were later gathered together and formed the book 'Battle! Practical Wargaming' a set of wargames rules for World War two games first published in 1970. It was practical because it didn't just give a rule and say do it like that, instead it explained how each rule was formulated and the connections between the rules that went to make a coherent whole. Back in 1968 that was a revelation.
Those rules were not perfect by any means, for a start they only provided statistics for a handful of vehicles and only for 1944-45. The defence values for AFV's were basic and while they worked it was difficult to see how the quoted values were calculated. Equally well the attack value for anti-tank weapons was equally difficult to unravel, but (and it's a big but) they worked because the relationships between the vehicle armour and the AT guns killing power were about right. There are obvious omissions but by and large Grant acknowledged those omissions and left it to the individual to add as much or as little extra as they wanted. Probably the key one is the lack of any spotting rules. A second issue is that fire fights don't pin or suppress targets, Infantrymen are OK or they are not, I suppose the idea was that players themselves would become dubious of advancing into a hail of fire and would create a kind of player driven pinning.
After Battle, I found John Tunstall's Discovering Wargaming which allowed me to put the rest of my Airfix collection to use. That was another primer that explained how the rules worked and it led on to bigger games with larger forces set in earlier periods of history. The rules were a single set that covered everything up to the ACW......one set to rule them all! Despite a growing interest in pre-gunpowder gaming I would still return to Grant's rules from time to time. Over the years I don't think I ever found a set of World War 2 rules that provided as much fun, or were as easy to understand, although to be fair as a 14 year old my standards were probably easily met.
A couple or three years ago I had an urge to scratch the old World War Two itch again but couldn't find a set of rules I liked. I tried the Battlegroup Kursk system which has some interesting ideas but just didn't do it for me. I looked at some free to play stuff, but nothing had the ease of use I was after and eventually I went back to Battle. There is a framework there for a fast play easy to follow game it just lacked breadth of application as it focussed on Europe in the last year of the war . So I decided to update them. Great idea....didn't work! The problem was that the factors given for tanks and AT guns were too limiting to easily allow for expanding the range of vehicles, especially back into the early war years. However I did quite like the roll to hit and roll to see if you kill it system all it needed was a bit more chrome.
After a bit of research I came across two things that really helped, the data charts from 'Firefly Outgunned' and armour data and armour penetration data for most of the AFVs and AT weapons used between 1939 and 1945. With a bit of work I was able to come up with a set of armour penetration charts for a set of ranges from 0-250 meters out to over 2,000 meters. These are based upon the 50% chance of penetration data used in US and UK weapon testing during the war and just afterwards. Adding a pair of opposed D6 rolls gives the potential for plus or minus 0 - 5 so that can add up to 50% greater and 50% lower penetration depth. I added some simple to spot and to hit tables based upon the data on relative target sizes from the Firefly data and with that the tank rules were about done. I tried a very brief play test and I'm happy with the penetration rules but the spotting and to hit factors need to be smoother as currently they slow things down too much.
Infantry rules updates will come next which will be by squads/sections rather than individual figures. I have the basics in my head but need to play test them and write them up. It is going to use factors for each type of weapon to create a fire density for a given range so that a German squad with Mg34s will lay down more fire than say a British squad with only a bren as support. Weight of fire will generate a chance to pin (can't move and fires with a restricted weight of fire), suppressed (can't move or fire) and neutralised (which is a polite way of saying KIA and WIA). The rest will probably be lifted from Grant although Olicanalad over on Olicanalad on artillery has some interesting thoughts on the actual application of indirect artillery fire I may need tosteal I mean borrow.
Watch this space for updates and playtests.
| You wouldn't get away with a cover like that nowadays - far too violent! |
/pic225384.jpg) |
| Oh the simplicity of the early rule sets These covered Ancients to ACW! |
After Battle, I found John Tunstall's Discovering Wargaming which allowed me to put the rest of my Airfix collection to use. That was another primer that explained how the rules worked and it led on to bigger games with larger forces set in earlier periods of history. The rules were a single set that covered everything up to the ACW......one set to rule them all! Despite a growing interest in pre-gunpowder gaming I would still return to Grant's rules from time to time. Over the years I don't think I ever found a set of World War 2 rules that provided as much fun, or were as easy to understand, although to be fair as a 14 year old my standards were probably easily met.
A couple or three years ago I had an urge to scratch the old World War Two itch again but couldn't find a set of rules I liked. I tried the Battlegroup Kursk system which has some interesting ideas but just didn't do it for me. I looked at some free to play stuff, but nothing had the ease of use I was after and eventually I went back to Battle. There is a framework there for a fast play easy to follow game it just lacked breadth of application as it focussed on Europe in the last year of the war . So I decided to update them. Great idea....didn't work! The problem was that the factors given for tanks and AT guns were too limiting to easily allow for expanding the range of vehicles, especially back into the early war years. However I did quite like the roll to hit and roll to see if you kill it system all it needed was a bit more chrome.
After a bit of research I came across two things that really helped, the data charts from 'Firefly Outgunned' and armour data and armour penetration data for most of the AFVs and AT weapons used between 1939 and 1945. With a bit of work I was able to come up with a set of armour penetration charts for a set of ranges from 0-250 meters out to over 2,000 meters. These are based upon the 50% chance of penetration data used in US and UK weapon testing during the war and just afterwards. Adding a pair of opposed D6 rolls gives the potential for plus or minus 0 - 5 so that can add up to 50% greater and 50% lower penetration depth. I added some simple to spot and to hit tables based upon the data on relative target sizes from the Firefly data and with that the tank rules were about done. I tried a very brief play test and I'm happy with the penetration rules but the spotting and to hit factors need to be smoother as currently they slow things down too much.
Infantry rules updates will come next which will be by squads/sections rather than individual figures. I have the basics in my head but need to play test them and write them up. It is going to use factors for each type of weapon to create a fire density for a given range so that a German squad with Mg34s will lay down more fire than say a British squad with only a bren as support. Weight of fire will generate a chance to pin (can't move and fires with a restricted weight of fire), suppressed (can't move or fire) and neutralised (which is a polite way of saying KIA and WIA). The rest will probably be lifted from Grant although Olicanalad over on Olicanalad on artillery has some interesting thoughts on the actual application of indirect artillery fire I may need to
Watch this space for updates and playtests.
Thursday, 9 January 2020
The Pledge
Over on TMP folks are discussing if they have met their pledge in 2019 , or not. Personally I never really understood the concept behind The Pledge or exactly what was being pledged for that matter. Some people take it to mean not buying any more figures until the ones they have are all painted others that you simply have to paint more than you buy so by the year's end the lead/plastic mountain is slightly smaller.
Neither of those really describe my approach, if I had applied the first definition I wouldn't have bought any figures since about 1980! If it’s the second then although I actually have more painted and based figures than I started 2019 with and slightly less unpainted figures I haven't necessarily cleared out the oldest unpainted castings.
The oldest unpainted figures are probably the ones shown below. These are from the old Citadel Range C100 'Spacefarers' I used them for the Traveller RPG. Although most of them are painted there are a handful who never made it to the painting table. These are from one of the Perry twins and are lovely figures for the time and cost the princely sum of 40p each according to a catalogue I found online. I also still have some of their gangsters range from the same period which are still bare metal!
Looking back over the old Citadel Catalogues online I was surprised to find that I still have a fair few of their figures in the collection. The Elenderil figure I posted about last year is one of their early fantasy figures and I have samples of a number of their dark age figures I must have bought either for for use in RPGs or to try out alongside my Hinchcliffe 25mm Late Imperial Romans. For some reason I never actually bought a full army of them though, probably due to a new and expensive hobby that entered my life around that time called parenthood!
Some projects just stalled and I lost enthusiasm for them and never picked it up again or other enthusiasms took over and pushed that project down the priorities list, though the reality is that I'm not so well organised to actually have a list! Others are things I will probably never return to partly because I don't have local players interested enough to want to play the period, the rules or the scale and some I just couldn't get to grips with. Western Gunfight games are one of the ones that I really used to enjoy playing but a lack of anyone else wanting to play the genre pretty much killed the project. Same goes for spaceship to spaceship combat games, although that at least is easier to play solo should the urge take me.
Last year my plan was:
"paint the rest of the Sassanid Persians, finish the Dark Age Britain project and the WW1 dogfight project (rules and models). Then get the Great Civil War in Lancashire campaign into gear. Plus whatever else takes my attention (WoTR in 6mm anyone?)."
I managed to resist the temptation to dive into 6mm WOTR but then again I managed to resist the temptation to actually fully complete any of my ambitions for 2019. I actually did paint up most of the Dark Ages in Britain figures I had to hand apart from a few Welsh and some cavalry who I haven't yet decided on nationalities for, so I'm counting that as a win. The WW1 dogfight rules are about there too and just need me to be disciplined enough to actually sit down and write them up. The rest, well yeah not quite so positive. I abandoned the civil war in Lancashire project for lack of a mechanism for map movement that could reflect the differences in times for moving between locations (AKA too lazy to think about it).
For the coming year I still have some (for some read quite a few) 6mm figures to finish. The painting queue has Early Sassanids as the main item needing finishing followed by early World War 2 British and Germans (who have been sat awaiting attention for about 4 or 5 years now). Also on my to do list for new projects I have an ambition to try Blucher with 3mm figures and need the 6mm figures to complete my Dacians, Picts and Scots Irish. I also want to replace my Irregular Miniatures Late Imperial Roman and Maurikian Byzantines with Baccus figures. The latter will need proxies from other ranges though, Baccus doesn’t do a Byzantine range of any period but I think there are some strong contenders in the Sassanid and late Roman ranges. Ideally I would like to get my 2mm ECW rules finalised and make a start on some fast play WW2 rules for company level. I have never really found any rules that I like for WW2 or at least any that I have enjoyed as much as the old Charles grant set 'Battle'.
I suppose that at some time I shall have to accept that I will struggle to paint all the stuff I have before I get past it and stop buying new figures! But this is not that day.
So that’s my colours nailed to the mast for 2020. Overall it looks like my Pledge for this year involves a buying spree at Vapnartak next month.
Neither of those really describe my approach, if I had applied the first definition I wouldn't have bought any figures since about 1980! If it’s the second then although I actually have more painted and based figures than I started 2019 with and slightly less unpainted figures I haven't necessarily cleared out the oldest unpainted castings.
The oldest unpainted figures are probably the ones shown below. These are from the old Citadel Range C100 'Spacefarers' I used them for the Traveller RPG. Although most of them are painted there are a handful who never made it to the painting table. These are from one of the Perry twins and are lovely figures for the time and cost the princely sum of 40p each according to a catalogue I found online. I also still have some of their gangsters range from the same period which are still bare metal!
 |
| 1980's Citadel spacefarers - I will paint them, eventually! |
Some projects just stalled and I lost enthusiasm for them and never picked it up again or other enthusiasms took over and pushed that project down the priorities list, though the reality is that I'm not so well organised to actually have a list! Others are things I will probably never return to partly because I don't have local players interested enough to want to play the period, the rules or the scale and some I just couldn't get to grips with. Western Gunfight games are one of the ones that I really used to enjoy playing but a lack of anyone else wanting to play the genre pretty much killed the project. Same goes for spaceship to spaceship combat games, although that at least is easier to play solo should the urge take me.
Last year my plan was:
"paint the rest of the Sassanid Persians, finish the Dark Age Britain project and the WW1 dogfight project (rules and models). Then get the Great Civil War in Lancashire campaign into gear. Plus whatever else takes my attention (WoTR in 6mm anyone?)."
I managed to resist the temptation to dive into 6mm WOTR but then again I managed to resist the temptation to actually fully complete any of my ambitions for 2019. I actually did paint up most of the Dark Ages in Britain figures I had to hand apart from a few Welsh and some cavalry who I haven't yet decided on nationalities for, so I'm counting that as a win. The WW1 dogfight rules are about there too and just need me to be disciplined enough to actually sit down and write them up. The rest, well yeah not quite so positive. I abandoned the civil war in Lancashire project for lack of a mechanism for map movement that could reflect the differences in times for moving between locations (AKA too lazy to think about it).
For the coming year I still have some (for some read quite a few) 6mm figures to finish. The painting queue has Early Sassanids as the main item needing finishing followed by early World War 2 British and Germans (who have been sat awaiting attention for about 4 or 5 years now). Also on my to do list for new projects I have an ambition to try Blucher with 3mm figures and need the 6mm figures to complete my Dacians, Picts and Scots Irish. I also want to replace my Irregular Miniatures Late Imperial Roman and Maurikian Byzantines with Baccus figures. The latter will need proxies from other ranges though, Baccus doesn’t do a Byzantine range of any period but I think there are some strong contenders in the Sassanid and late Roman ranges. Ideally I would like to get my 2mm ECW rules finalised and make a start on some fast play WW2 rules for company level. I have never really found any rules that I like for WW2 or at least any that I have enjoyed as much as the old Charles grant set 'Battle'.
I suppose that at some time I shall have to accept that I will struggle to paint all the stuff I have before I get past it and stop buying new figures! But this is not that day.
So that’s my colours nailed to the mast for 2020. Overall it looks like my Pledge for this year involves a buying spree at Vapnartak next month.
Tuesday, 31 December 2019
Happy New Year
It’s the end of 2019 (although not the end of the decade until next year) so have a happy and prosperous New Year. Here’s hoping that next year will be a great one.
Next year I hope to get more games under my belt, find a set of World War 2 rules I like and finally finish my ECW rules. Painting wise I want to complete my Pictish and Scots Irish Armies and replace my Irregular Miniatures Late Imperial Romans and Maurician Byzantines with Baccus figures. There is also the new Anglo-Saxon range from 2D6 to look forward too and at some point I have a lot of 2mm ECW cavalry and dragoon’s needing paint and some World War 1 1/300th aircraft to finish as well.
Of course being me something else will come along and distract me.
So that’s it for 2019 from me. Time to break out the champagne.
Next year I hope to get more games under my belt, find a set of World War 2 rules I like and finally finish my ECW rules. Painting wise I want to complete my Pictish and Scots Irish Armies and replace my Irregular Miniatures Late Imperial Romans and Maurician Byzantines with Baccus figures. There is also the new Anglo-Saxon range from 2D6 to look forward too and at some point I have a lot of 2mm ECW cavalry and dragoon’s needing paint and some World War 1 1/300th aircraft to finish as well.
Of course being me something else will come along and distract me.
So that’s it for 2019 from me. Time to break out the champagne.
Sunday, 22 December 2019
Somewhere in Cumbria 810AD - A DBA battle report
Middle Anglo-Saxons (III/24b) v Strathclyde Welsh (II/81d)
Tensions in the disputed lands west of the North Pennines regarding who controls the disputed lands around Caer Luel have led to open warfare. As the Northumbrians march over Stainmoor to assert their claim another force marching south from Strath Clut intercepts them north of the settlement of Pen Rid.
The Armies
Northumbria:
1 x General (4Bd)
2 x Hird (4Bd)
6 x Select Fyrd (Sp)
2 x Great fyrd (7 Hd)
1 x Scouts Ps
Strathclyde Welsh:
1 x General (Cv)
3 x Comitatensis (Cv)
7 x Pedyt (Sp)
1x Archers (Ps)
The Battlefield
The Northumbrians despite being more aggressive rolled low and ended up as the defenders. This suited them as they were able to select terrain to help limit the enemy cavalry's mobility. Choosing from the arable terrain set they selected a hamlet and ploughland from the compulsory list and a river, a steep hill and a wood from the optional list. Dicing for placement allowed the Strathclyde Welsh to position the hamlet but everything else was placed by the Northumbrians.
The Northumbrian master plan was to restrict the table as much as possible to slow the Strathclyde cavalry's freedom of movement. The Great Fyrd elements were placed on the most exposed flank as losing these wouldn't count towards the army break point. Things started to unravel from the start as the plough land was found to be good going (there was only a one in six chance of it not being but you can hope) and the river turned out to be Paltry so also counted as good going. Clearly it had been a dry spring and summer.
The Northumbrian deployment (furthest from the camera) placed the Psiloi alongside the woods, with the intention of occupying them to make it more difficult for the enemy to work around them. The next three elements were the Northumbrian Hird and General all solid Blades. That gave a small advantage over the opposing Spears. Next came the Northumbrian spears and lastly slightly refused the Great Fyrd. At this point the river hadn't been tested so in case it was difficult terrain nothing was deployed into it by either side.
Nearer the camera the Strathclyde Welsh had split their cavalry as 2 elements at each end of the line. The general is the inner of the two elements on the left flank. This was to give some control issues later in the game.
The Northumbrians were being cautious and simply brought the Great Fyrd into line and pushed forwards as a shield wall. On the other side because the ground wasn't as restricted on the right of the Welsh line they pushed forward with their cavalry on that wing. The other wing was slowed crossing the steep hill and is working it's way to the right with the intention of passing down the side of the woods.
The initial clash was between the Welsh cavalry on their left and the Great Fyrd. This was expected to be a bit of a push over, expected but not what actually happened. The general's element recoiled and the other unit only pushed it's opponent back. Not exactly the Ride of the Rohirrim then. Still better luck next time. On the other flank the Northumbrians settled their archers into the woods and there they intended to stay, creating a threat zone to block easy passage of that flank.
In the centre the Welsh Pedytes continued to advance hoping the Nobs on their horses might have the job done before they have to exchange spear thrusts with the Northumbrians. They should be so lucky!
What you can't see in the above shot is the Welsh right flank cavalry clearing the bad going on the steep hill. The dilemma for them is do they try for the gap between the table edge and the woods or turn in towards the end of the Northumbrian shield wall. With the enemy creating a threat zone they cannot avoid to the right of the woods they elect to shift towards the centre. On the other flank the second unit of Great Fyrd is destroyed and the cavalry have cleared the flank of the enemy shield wall.
The Infantry lines finally come to blows but neither side can gain a decisive advantage. Initially the Welsh foot seem to have the upper hand but slowly the Northumbrians start to push them back. The weak spot in the Welsh line is the need to include Psiloi to prevent an overlap while the Northumbrians have to tie up the Welsh cavalry hovering around their open right wing. In the ensuing combat the Psiloi flee while a unit of Northumbrian Spears do manage to stop the Welsh rolling up the flank, at least for this turn.
As the shield wall starts to fragment the ability to provide side support slowly evaporates, and the chance of a decisive combat results becomes slightly more likely. Despite that, neither side is collapsing. The losses are starting to mount but these are all from attacks on the flanks where a element has been flanked and cannot recoil. The Northumbrian Psiloi in the woods have changed their position to place their threat zone alongside the open flank of their shield wall. At this point it's a nail biting 3:2 in favour of Strathclyde (remember the 7 Horde losses don't count towards the Northumbrian break point).
By turn eight the Northumbrian attempt to hold off the Welsh cavalry attack has failed and their right flank is wide open. Things are looking just as shakey on the other flank where its the Welsh hanging on by the skin of their teeth. The Welsh Psiloi have been destroyed and a Hird unit is setting up to hit the flank of the now badly fragmented Strathclyde Welsh shield wall after flanking their Psiloi last turn. It's now 3:3 although I doubt extra time is beckoning! But disaster strikes they roll 1 for Pips and can't close up enough to get the position they need.
Play moved to Strathclyde who having ridden like hell to get to the Northumbrian camp capture it before another dice is rolled. Strathclyde win 5:3.
The Horde elements had held off the collapse of the Northumbrian right wing without contributing to the break point and actually made a better showing than expected. The clash of the shield walls became a shoving match with neither side able to gain a significant advantage until flanks were turned. The basic combat factors are not sufficiently different to create the chance of an easy doubling result in combat even where blades face spear which feels about right. Once the line fragments it becomes a tiny bit easier but still requires the statistically unlikely chance of getting a 1:6 split on the dice to create the result needed. Ultimately it was the mobility of the Welsh horse and their ability to create flank positions which turned recoils into destroyed results that made the difference. If the ploughland had turned out to be difficult going and the river had aided defence things might have turned out differently but then again it may not have done.
All in all a couple of hours well spent on a solo game and a chance to get my recent paint work onto the table. Man of the match award goes to the Northumbrian Psiloi for never having to fight anything while still denying the flank to the Strathclyde Welsh cavalry.
Tensions in the disputed lands west of the North Pennines regarding who controls the disputed lands around Caer Luel have led to open warfare. As the Northumbrians march over Stainmoor to assert their claim another force marching south from Strath Clut intercepts them north of the settlement of Pen Rid.
The Armies
Northumbria:
1 x General (4Bd)
2 x Hird (4Bd)
6 x Select Fyrd (Sp)
2 x Great fyrd (7 Hd)
1 x Scouts Ps
Strathclyde Welsh:
1 x General (Cv)
3 x Comitatensis (Cv)
7 x Pedyt (Sp)
1x Archers (Ps)
The Battlefield
The Northumbrians despite being more aggressive rolled low and ended up as the defenders. This suited them as they were able to select terrain to help limit the enemy cavalry's mobility. Choosing from the arable terrain set they selected a hamlet and ploughland from the compulsory list and a river, a steep hill and a wood from the optional list. Dicing for placement allowed the Strathclyde Welsh to position the hamlet but everything else was placed by the Northumbrians.
 |
| The battlefield (less the gap between the table edge and the woods) |
 |
| After deployment the restricted space seemed to be vouring Northumbria. |
Nearer the camera the Strathclyde Welsh had split their cavalry as 2 elements at each end of the line. The general is the inner of the two elements on the left flank. This was to give some control issues later in the game.
 |
| Both sides slog forwards with the Welsh cavalry starting wide flanking moves. |
 |
| First contact - no not aliens! Welsh horse crashing into the Great Fyrd |
In the centre the Welsh Pedytes continued to advance hoping the Nobs on their horses might have the job done before they have to exchange spear thrusts with the Northumbrians. They should be so lucky!
 |
| One Great Fyrd unit destroyed and the other pushed back. |
 |
| The Northumbrians stand their ground while the Welsh foot slowly close in |
 |
| After the first turn of shield wall on shield wall action. |
 |
| It looks more organised than it is from this flank. Trust me though that isn't an attack 'en echelon' |
 |
| Can the Northumbrians pull something out of the bag? Well No they can't actually |
 |
| Strathclyde poised for victory |
 |
| The survivors at battles end. |
Thursday, 19 December 2019
Second sight - 2D6 Anglo-Saxon Buildings
Second sight posts will be where I give my thoughts on new products after I have painted, based or for rules after I have played a game with them. In this case its a chance to provide some pictures of the painted Anglo-Saxon buildings from 2D6 which I gave an initial review of a few days ago.
The evidence for the appearance of Anglo-Saxon housing isn't great as most buildings were of timber construction so little remains of their architecture other than archaeological evidence. That gives us a good idea of the footprint of the buildings and evidence of the type of construction and the materials used but little or no idea of the look of the finished buildings. For makers of model buildings that means that they have to look at the best reconstructions of these buildings. In this case 2D6 based their models on the structures at West Stow Anglo-Saxon village near Bury St Edmunds. From what I can see on the village's website they are a pretty good reproduction too. Wattle and Daub is known to have been used and there is good evidence for timber planked structures and that latter style is what 2D6 have modelled. There is less evidence (that is to say none that I am aware of) as to how they treated the exposed woodwork to preserve it from the elements. It might have been lime washed or even painted if the building was the hall of a Thegn or an Alderman but for the less wealthy it was probably just as simple to replace planks as they rotted. I have read that the Anglo-Saxons preferred to use logs split in half as planks rather than flat split logs and the models reflect that.
Painting is easy as there is good definition to work with. The thatch is particularly well modeled which means a simple straw yellow block paint with a wash of Agrax earthshade is sufficient. The newer the thatch the more yellow the block painting needs to be and the lighter the coat of Earthshade. The downside to the design is that timber and thatch doesn't create a lot of colour contract for the finished paint schemes, which probably reflects the nature of the original structures really well. Looking at examples of older thatched buildings in real life shows that the thatch quickly weathers to a dark grey-brown colour. As cut timber weathers to a grey almost silver shade I tried a couple of techniques to break things up a bit. For the timber I started with a Vallejo Green Brown (70.879) washed with Earthshade and then dry brushed a really heavily thinned Vallejo Sky Grey (70,989) which creates a bit of contract. I also tried block painting in the Sky Grey and then washing with Earthshade which was OK and had the benefit of being fast but wasn't as nice a finish as the grey dry brush.
The photos are a bit lighter than reality as the lighting was a bit harsh. I should really make a light box!
I'm reasonably happy with the results and will be buying more of the 2D6 buildings as they are released. There are palisade sections due for release next which will allow me to create fenced enclosures around a Hall complex. These were usually ovals so some curved sections would be nice. I should really like to see some wattle and daub versions of the existing cottages and Great Hall too to give a bit of variety.
Lastly if you want to order some for yourself the webshop for 2D6 can be found at https://www.2d6wargaming.com/
The evidence for the appearance of Anglo-Saxon housing isn't great as most buildings were of timber construction so little remains of their architecture other than archaeological evidence. That gives us a good idea of the footprint of the buildings and evidence of the type of construction and the materials used but little or no idea of the look of the finished buildings. For makers of model buildings that means that they have to look at the best reconstructions of these buildings. In this case 2D6 based their models on the structures at West Stow Anglo-Saxon village near Bury St Edmunds. From what I can see on the village's website they are a pretty good reproduction too. Wattle and Daub is known to have been used and there is good evidence for timber planked structures and that latter style is what 2D6 have modelled. There is less evidence (that is to say none that I am aware of) as to how they treated the exposed woodwork to preserve it from the elements. It might have been lime washed or even painted if the building was the hall of a Thegn or an Alderman but for the less wealthy it was probably just as simple to replace planks as they rotted. I have read that the Anglo-Saxons preferred to use logs split in half as planks rather than flat split logs and the models reflect that.
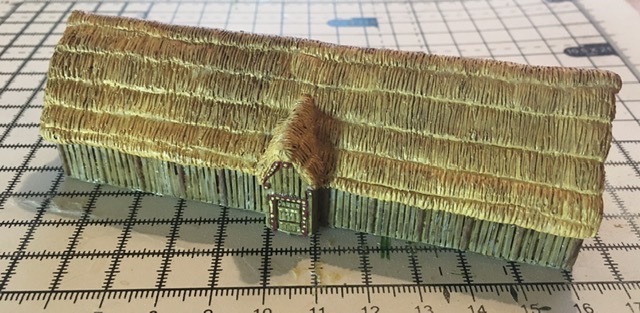 |
| The Great Hall - Timber walls and a thatch roof |
Painting is easy as there is good definition to work with. The thatch is particularly well modeled which means a simple straw yellow block paint with a wash of Agrax earthshade is sufficient. The newer the thatch the more yellow the block painting needs to be and the lighter the coat of Earthshade. The downside to the design is that timber and thatch doesn't create a lot of colour contract for the finished paint schemes, which probably reflects the nature of the original structures really well. Looking at examples of older thatched buildings in real life shows that the thatch quickly weathers to a dark grey-brown colour. As cut timber weathers to a grey almost silver shade I tried a couple of techniques to break things up a bit. For the timber I started with a Vallejo Green Brown (70.879) washed with Earthshade and then dry brushed a really heavily thinned Vallejo Sky Grey (70,989) which creates a bit of contract. I also tried block painting in the Sky Grey and then washing with Earthshade which was OK and had the benefit of being fast but wasn't as nice a finish as the grey dry brush.
 |
| The pit dwelling in the centre plus two huts the light thatch gives the best contrast |
 |
| Cottage with wood shingle roof - the timber walls look lighter here than in reality |
I'm reasonably happy with the results and will be buying more of the 2D6 buildings as they are released. There are palisade sections due for release next which will allow me to create fenced enclosures around a Hall complex. These were usually ovals so some curved sections would be nice. I should really like to see some wattle and daub versions of the existing cottages and Great Hall too to give a bit of variety.
Lastly if you want to order some for yourself the webshop for 2D6 can be found at https://www.2d6wargaming.com/
Subscribe to:
Posts (Atom)